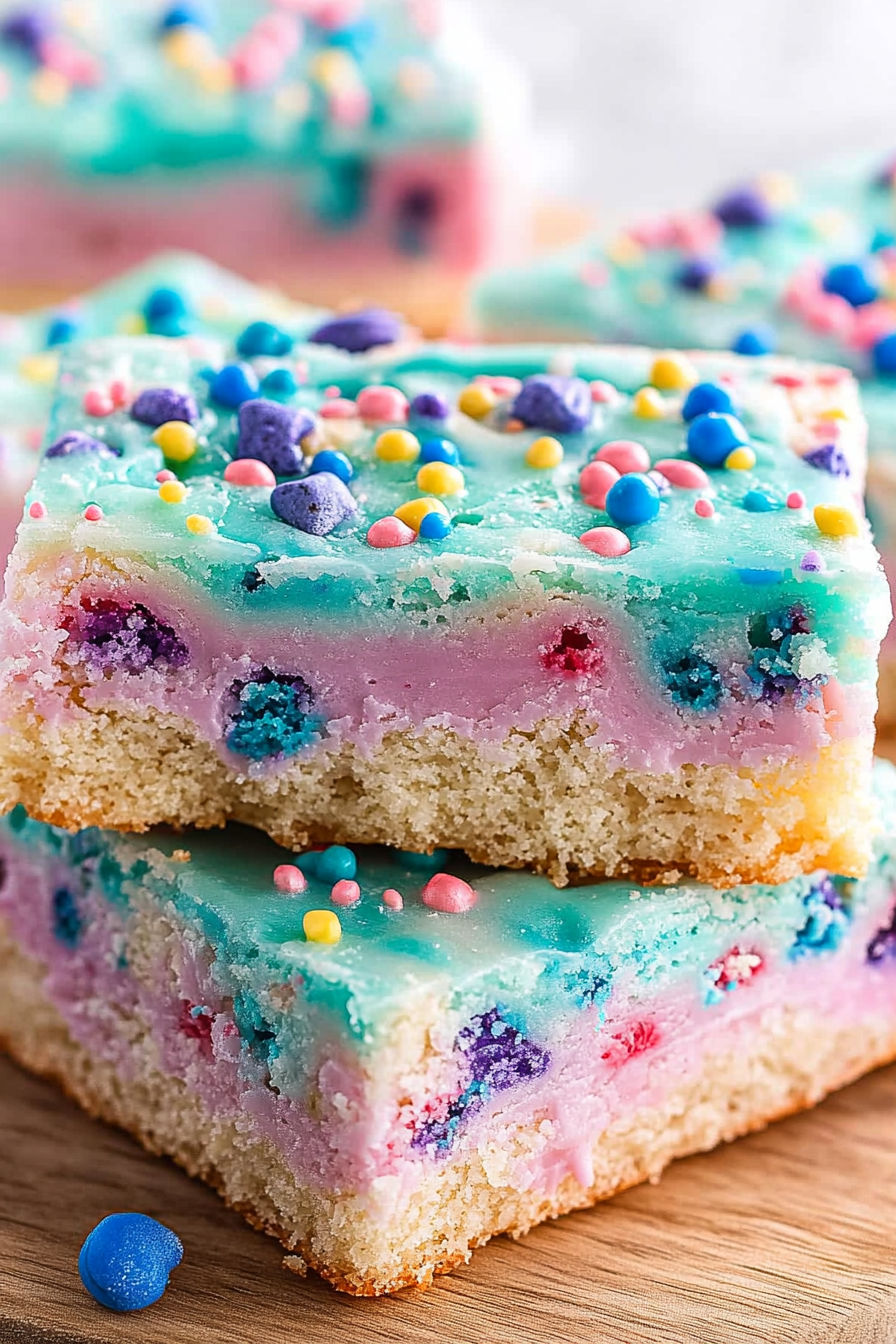
Magical Unicorn Bars How to Make Them
Honestly, I wasn’t planning to write about these little magic bites, but the moment I made my first batch, I knew I had to share them. They’re like a unicorn spliced with your favorite childhood treat — vibrant, fun, and downright addictive. My kids call them “rainbow magic in a bar,” and I swear, every time I bake these, the entire house fills with this irresistible smell — sweet, buttery, with just a hint of vanilla and fruity goodness. This recipe’s one of those “everyday magic” moments that gets whipped up on busy school nights when I need something quick but still feels special. I love how they look, too — like a little rainbow explosion that honestly makes you smile just looking at it. Plus, trust me on this one, they taste even better than they look. And, no joke, they disappeared in minutes at my house. If you love bright, colorful, and utterly fun treats that don’t require a fancy bakery, these Unicorn Bars are going to be your new best friend.
What is a unicorn bar?
Think of Unicorn Bars as a playful twist on classic blondies or gorp-inspired cookie bars, but with a splash of every color and flavor you can dream up. They’re essentially a buttery, chewy base loaded with sprinkles, chopped candies, or even dried fruit, then topped with a sweet glaze that gives them that fairy-tale touch. The name “Unicorn Bars” comes from their bright, rainbowy look and the fact that they feel like a magical treat straight out of a storybook. It’s almost like biting into a rainbow — only it’s portable, family-friendly, and way easier to make than you’d think. They’re perfect for birthdays, sleepovers, or just because you want that burst of happiness on a dull afternoon. Think of them as a fun project to do with kids, or a nostalgic shortcut for those times you crave something sweet but don’t want to mess around with complicated recipes. It’s all about that whimsical, carefree vibe, you know?
Why you’ll love this recipe?
What I love most about these Unicorn Bars is how versatile and forgiving they are—plus, the flavor combo is totally customizable. The base itself is a simple, buttery batter that I always do this when I want something quick and satisfying. It’s like cookie dough you can bake and cut into squares, but better because of all the colorful toppings and the fun glaze. They’re budget-friendly—most of the ingredients are staples I keep in my pantry—and totally adaptable. Swap the sprinkles for crushed candies, or add some chopped nuts for crunch. These bars are such a crowd-pleaser, whether I’m baking for my kids’ school party or just craving a sweet treat with my afternoon coffee. What I really love most is how cheerful they look. Every time I put a plate of these out, someone asks if I hired a bakery — and I just smile because they’re so simple to make. Plus, the flavor combo of buttery, vanilla, and sweet toppings is all kinds of nostalgic. Honestly, I’ve made these countless times, and they rarely last more than an hour in my house. They’re that good!
How do I make unicorn bars?
Quick Overview
This recipe is all about simplicity and fun. It starts with mixing a buttery, sweet batter, tossing in colorful sprinkles or candies, then baking until golden and just set. The real magic happens when you swirl a bright, sugary glaze on top — giving off that whimsical vibe that keeps everyone grabbing for seconds. No fancy equipment needed — just a basic baking pan and a mixing spoon. I love how quick these come together and how impressive they look, even when I’m no professional baker. Perfect for a rainy day project or last-minute party dessert. Trust me, once you try this, it’ll become your go-to for any celebration that calls for a little magic.
Ingredients
For the Main Batter:
– 1 cup (226g) unsalted butter, softened (trust me, real butter makes it SO much better)
– 1 ½ cups (300g) granulated sugar
– 2 large eggs
– 2 teaspoons vanilla extract
– 2 ½ cups (310g) all-purpose flour (I tested this with gluten-free blend — and it still works great!)
– ½ teaspoon baking powder
– ¼ teaspoon salt
– 1 cup rainbow sprinkles or mini candies (this is your magic ingredient!)
For the Filling (Optional but fun):
– ½ cup cream cheese, softened
– ¼ cup powdered sugar
– 1 teaspoon vanilla
(You can skip or swap this for just extra sprinkles!)
For the Glaze:
– 1 cup powdered sugar
– 2-3 tablespoons milk or cream
– Food coloring of your choice (think pastel pinks, purples, or even blue!)
– Extra sprinkles for decoration
Step-by-Step Instructions
Step 1: Preheat & Prep Pan
Preheat your oven to 350°F (175°C). Line a 9×13 inch baking pan with parchment paper or butter it generously. I always do this when I want the bars to come out clean and easy to cut. Trust me, no one wants to wrestle with a sticky, crumbly mess!
Step 2: Mix Dry Ingredients
In a small bowl, whisk together the flour, baking powder, and salt. I do this first so I don’t accidentally overmix the batter later. This step ensures everything is evenly distributed, and it’s my little secret to light, fluffy bars.
Step 3: Mix Wet Ingredients
In a large mixing bowl, beat the softened butter and sugar until creamy — it should look pale and fluffy, like a thick frosting. Add the eggs one at a time, beating after each addition. Then stir in vanilla. Your kitchen will smell incredible at this point — sweet, buttery, and warm.
Step 4: Combine
Gradually add the dry ingredients to the wet, mixing just until combined. Be careful not to overmix — that can make the bars dense instead of tender. Fold in your sprinkles or candies gently, so they don’t break apart.
Step 5: Prepare Filling (If Using)
If you want to add a little creamy core, blend the softened cream cheese, powdered sugar, and vanilla until smooth. Spread it evenly over the batter, or dollop small spoonfuls for a fun swirl effect.
Step 6: Layer & Swirl
Pour half the batter into your prepared pan. Spoon or spread the cream cheese filling over, then top with remaining batter. Use a toothpick or skewer to swirl gently for a marbled, rainbow effect. It’s all about that pretty, playful look.
Step 7: Bake
Bake for about 25-30 minutes, or until the edges turn golden and a toothpick inserted in the center comes out clean. Keep an eye on the oven — every oven is a little different, and you don’t want them to overbake and get too dry.
Step 8: Cool & Glaze
Let the bars cool in the pan for about 15 minutes, then transfer to a wire rack. Mix your glaze ingredients, add a few drops of food coloring, and drizzle it all over the top while the bars are still warm. Sprinkle a few extra sprinkles for that extra magical touch!
Step 9: Slice & Serve
Once completely cooled, slice into squares. They’re best enjoyed at room temperature, and believe me, the glaze and sprinkles will set perfectly. Serve on pretty plates, and watch those smiles spread—these bars truly are a rainbow in every bite.
What to Serve It With
This is one of those recipes that works for anything — breakfast, brunch, or a sweet ending to dinner. For breakfast, I love serving these with a hot cup of coffee or a glass of cold milk. They’re kind of like a fun coffee cake, especially if you sprinkle some cinnamon sugar on top before baking. At brunch, pair them with fresh fruit and a bubble of sparkling juice or mimosas — so festive! For dessert, I usually garnish with extra glaze or serve with a side of whipped cream and strawberries. When I want a casual snack, I toss a few in a container and pack them for school or picnics. Honestly, they even reheat well — just pop a square in the microwave for about 10 seconds and they’re as ooey-gooey as when fresh! My kids ask for these all the time, and I think they’d be perfect for any rainbow-themed party or just a happy weeknight treat. They’re simple enough for kids to help, too — which makes baking with family that much more special.
Top Tips for Perfecting Your Unicorn Bars
Over the years, I’ve learned a few tricks that make these bars turn out even better every time. First, when preparing your sprinkles or candies, try to use mini versions — big chunks tend to sink or over-balance the batter. If you’re adding a filling, make sure it’s soft but not runny; I’ve tested this with cream cheese but you can also try Nutella or fruit preserves for a different twist. When swirling your batter and filling, use a simple toothpick or skewer to create fun patterns — swirl in circles or zigzags for more colorful fun. I also discovered that if I sprinkle extra sprinkles on top right out of the oven, they stick beautifully and add that extra pop of color. Want to tweak the sweetness? Reduce the sugar slightly or opt for natural sweeteners like honey or maple syrup in the glaze—just keep track of the liquid content so it doesn’t get too runny. When baking, I always position my pan in the middle oven rack to keep the heat even. And for that glossy glaze, adding a splash of lemon juice or vanilla always gives it a little extra zing. Trust me, these tips come from many batches — some full of accidental mishaps but mostly, delicious success. Taste, look, and feel — every time you make these, you get closer to perfect. Honestly, the secret is patience and a little playful spirit!
Storing and Reheating Tips
These Unicorn Bars are a baking win — but what’s even better is knowing how to keep them fresh. Once cooled, store them in an airtight container at room temperature for about 2 days. I like to cover them tightly with plastic wrap or pop them into a cake carrier to keep the glaze from drying out. If I want to stash them longer, I pop them in the fridge — they stay good for up to a week. Just note that the glaze might soften a little, but you can always re-mix the glaze ingredients with a splash of milk and do a quick drizzle before serving again. For longer storage, you can freeze the bars wrapped tightly in plastic wrap and foil for up to 3 months. Thaw at room temp for a couple of hours and then add a fresh drizzle of glaze if needed. When reheating a slice, microwave for 10-15 seconds until warm but not hot — I learned the hard way that overheating melts the glaze unevenly. If you want them extra fresh, you can even re-bake them for a few minutes to revive the chewy texture. Remember, these are all about that bright, joyful flavor — and with a little care, they’re just as delightful on day three as they are fresh out of the oven.
Frequently Asked Questions
Final Thoughts
If you’re craving something playful, pretty, and irresistibly tasty, these Unicorn Bars fit the bill perfectly. They’re simple enough to whip up on a weeknight but special enough to impress everyone at your next party. The best part? They remind me of childhood—bright, cheerful, and a little bit magic kicked into every bite. Once you get the hang of it, you’ll be experimenting with different add-ins, glazes, or even layered flavors, and your kitchen will turn into a little fairy-tale workshop. I’ll admit, these bars are a bit of a guilty pleasure, but honestly, that burst of happiness from each colorful square? Totally worth it. I’d love to hear how yours turn out—so don’t forget to leave a comment or share your own fun variations. Happy baking, and may your kitchen always be filled with sweet, colorful magic!
Unicorn Bars
Ingredients
Method
- Preheat the oven to 350°F and lightly grease or line a 9x13 inch baking pan with parchment paper.
- In a large mixing bowl, combine the cake mix, egg, melted butter, and heavy cream until smooth.
- Spread the batter evenly into the prepared baking pan and bake for 20-25 minutes, or until a toothpick inserted comes out clean.
- Allow the baked layer to cool completely before frosting.
- To prepare the frosting, beat together the cream cheese and butter until smooth, then slowly add the powdered sugar, heavy cream, and vanilla until fluffy.
- Divide the frosting into two bowls. Mix purple coloring into one and blue into the other.
- Spread the colored frostings alternately over the cooled layer and swirl with a spatula.
- Decorate with sprinkles, cut into bars, and serve.