Magical Witch’s Cupcakes How to Make Them
Oh, you guys! I’ve been just bursting to share this recipe with you. It’s one of those that just feels like a warm hug, you know? My grandma used to make something similar when I was a kid, and the smell would fill our entire house. It was pure magic. These cauldron cupcakes, though, they’re my grown-up, slightly tweaked version, and honestly, they’re my go-to when I need a little sweet comfort without a whole lot of fuss. Forget those dry, crumbly muffins that seem to be everywhere; these are like little bites of heaven, incredibly moist and bursting with flavor. They remind me a bit of a really good, spiced zucchini bread, but in a perfectly portioned, crowd-pleasing cupcake form. If you’ve ever struggled with muffins that turn out flat or tough, stick with me, because these cauldron cupcakes are about to become your new best friend.
What are Cauldron Cupcakes?
So, what exactly *are* cauldron cupcakes? Well, the name is just a bit of fun, really! It’s a playful nod to how they bubble and rise in the oven, and maybe a little to the rich, deep flavors that make them so comforting. Think of them as incredibly moist, flavorful muffins that are designed to be a little bit special. They’re not just your average chocolate chip muffin; these have a depth of flavor from warm spices and, here’s the secret ingredient that keeps them unbelievably tender, a bit of finely grated zucchini. Don’t worry, you won’t taste the zucchini! It just works wonders for moisture and texture, making sure every bite is soft and delightful. They’re essentially the perfect little packages of cozy goodness, designed to bring a smile to your face.
Why you’ll love this recipe?
Honestly, there are so many reasons I adore these cauldron cupcakes, and I just know you will too! First off, let’s talk about the flavor. It’s this beautiful balance of sweet and warm spices – cinnamon, nutmeg, maybe a hint of clove – that just feels so comforting, especially as the weather gets a bit cooler. But the real showstopper? The texture. These are UNBELIEVABLY moist. I’m talking melt-in-your-mouth tender, and that’s all thanks to the not-so-secret ingredient: zucchini. It adds moisture without adding any obvious vegetable flavor, which is a win-win in my book. My kids, who are notoriously picky, gobble these up without even asking what’s in them, which is a miracle in itself!
And the simplicity! Seriously, this recipe is a lifesaver on busy afternoons or when unexpected guests pop over. You can whip up a batch in no time, and the ingredients are all pretty standard pantry staples. Plus, they’re incredibly budget-friendly, which is always a bonus. What I love most about these cauldron cupcakes is their versatility. They’re fantastic on their own, of course, but they’re also a wonderful base for a simple cream cheese frosting or even a light drizzle of chocolate ganache if you’re feeling fancy. They’re perfect for a quick breakfast on the go, a delightful addition to a brunch spread, or even a satisfying dessert when you’re craving something sweet but don’t want to bake a whole cake. They’re just… reliable. They turn out perfectly every single time, and that’s something you can truly count on.
How do you make a Cauldron Cupcake?
Quick Overview
Making these delightful cauldron cupcakes is surprisingly straightforward. The process involves mixing your dry and wet ingredients separately before gently combining them, adding in your zucchini, and then folding in any optional mix-ins. The magic really happens in the oven, where they puff up into perfect little domes. It’s a simple, no-fuss method that guarantees moist and flavorful results every time. You’ll be amazed at how easy it is to achieve such incredible texture and taste with minimal effort.
Ingredients
For the Main Batter:
2 cups all-purpose flour: Make sure it’s your standard, everyday flour. I’ve tested this with a good quality all-purpose flour, and it works beautifully. If you’re going the gluten-free route, I’ll share some tips later!
1 ½ teaspoons baking soda: This is crucial for that nice lift and fluffy texture. Don’t skimp on it!
½ teaspoon salt: Balances out the sweetness and enhances all those yummy flavors.
1 teaspoon ground cinnamon: My absolute favorite spice for these. It brings such warmth.
½ teaspoon ground nutmeg: Just a pinch adds that extra layer of cozy fragrance and taste.
¼ teaspoon ground cloves (optional, but recommended!): This really deepens the spice profile and makes them taste extra special.
1 ½ cups granulated sugar: This sweetens them up perfectly. If you prefer a less sweet treat, you can try reducing it slightly, but I find this amount is just right.
½ cup unsalted butter, melted: Melted butter is key for that tender crumb. Make sure it’s cooled slightly so it doesn’t cook the eggs.
2 large eggs: At room temperature is best. It helps them incorporate more smoothly.
1 teaspoon vanilla extract: A good quality vanilla makes a difference!
½ cup buttermilk (or ½ cup milk + ½ tablespoon lemon juice or vinegar, let sit for 5 mins): The buttermilk adds an extra layer of moisture and tang that’s just divine. If you don’t have any, the milk-and-acid substitute works like a charm. I’ve even tested this with almond milk and it actually made it even creamier!
1 cup finely grated zucchini, squeezed dry: This is our secret weapon! Make sure to grate it finely, and really, really squeeze out all that excess moisture. It’s essential for texture.
For the Filling (Optional, but SO worth it!):
½ cup brown sugar (packed): Adds a lovely caramel note.
2 tablespoons unsweetened cocoa powder: For that rich, chocolatey goodness.
1 teaspoon ground cinnamon: Echoes the spices in the batter.
Pinch of salt: Just to make those flavors pop.
For the Glaze (Optional):
1 cup powdered sugar: Sifted, so you don’t get lumps!
2-3 tablespoons milk (or buttermilk, for extra tang): Add just enough to reach your desired drizzling consistency.
½ teaspoon vanilla extract: For a touch of sweetness.
Step-by-Step Instructions
Step 1: Preheat & Prep Pan
First things first, get your oven preheated to 375°F (190°C). I like to place my oven rack in the center. Then, grab your muffin tin – you’ll need about 12 standard-sized muffin cups. Line them with paper liners, or if you’re like me and sometimes forget liners (it happens!), generously grease and flour each cup. This step is super important to prevent sticking, especially with how moist these are.
Step 2: Mix Dry Ingredients
In a large bowl, whisk together the all-purpose flour, baking soda, salt, cinnamon, nutmeg, and optional cloves. Give it a good whisk to make sure everything is evenly distributed. You want to make sure the leavening agents are all mixed in, so you get an even rise. Don’t skip this!
Step 3: Mix Wet Ingredients
In a separate medium bowl, whisk together the granulated sugar, melted butter (make sure it’s cooled a bit so it doesn’t scramble the eggs!), eggs, and vanilla extract until well combined. Then, slowly pour in the buttermilk (or your milk mixture) and whisk again until everything is smooth and creamy.
Step 4: Combine
Now, pour the wet ingredients into the bowl with the dry ingredients. Using a spatula or a wooden spoon, gently fold everything together until *just* combined. It’s really important not to overmix here! A few streaks of flour are totally fine. Overmixing develops the gluten too much and can lead to tough muffins, and we definitely don’t want that. This is where I learned my lesson years ago – a gentle hand is key!
Step 5: Prepare Filling
If you’re adding the optional filling, now’s the time to mix it up. In a small bowl, combine the brown sugar, cocoa powder, cinnamon, and a pinch of salt. Give it a stir until it’s all blended. This little mixture adds a wonderful spiced chocolate swirl that makes these cupcakes extra special.
Step 6: Layer & Swirl
This is the fun part! Spoon about two-thirds of the batter into your prepared muffin cups, filling each about halfway. Then, spoon a teaspoon or so of the filling mixture over the batter in each cup. Top with the remaining batter, filling each cup about three-quarters full. If you’re feeling fancy, you can use a toothpick or the tip of a knife to gently swirl the filling into the batter. Don’t overdo it, you just want a pretty marbled effect!
Step 7: Bake
Pop those beauties into your preheated oven. Bake for 18-22 minutes, or until a wooden skewer or toothpick inserted into the center of a cupcake comes out clean. The tops should be a lovely golden brown and they should spring back slightly when gently touched. Oven temperatures can vary, so keep an eye on them towards the end of baking.
Step 8: Cool & Glaze
Once they’re done, carefully remove the muffin tin from the oven and let the cupcakes cool in the tin for about 5-10 minutes. This helps them set properly. Then, gently transfer them to a wire rack to cool completely. If you’re adding the glaze, whisk together the powdered sugar, milk, and vanilla extract until smooth and pourable. Drizzle it over the cooled cupcakes. I love doing this when they’re *fully* cooled so the glaze doesn’t melt off.
Step 9: Slice & Serve
And there you have it! Perfectly baked cauldron cupcakes, ready to be devoured. They’re fantastic served warm or at room temperature. Enjoy them as they are, or with a lovely cup of coffee or tea. They’re best enjoyed fresh, but I’ll give you tips on storing them too!
What to Serve It With
These cauldron cupcakes are so versatile, you can really serve them for almost any occasion! For a quick and easy breakfast, I love grabbing one on my way out the door with a travel mug of strong coffee. The warm spices are the perfect way to start the day, and they keep me full until lunch. They also make a wonderful addition to a weekend brunch spread. I like to arrange them on a pretty tiered stand with some fresh fruit and maybe a yogurt parfait. They’re always a huge hit!
As a dessert, they’re a dream. A simple dusting of powdered sugar is lovely, but if you’re feeling a bit more indulgent, a light cream cheese frosting or even a drizzle of chocolate ganache takes them to the next level. They’re perfect for satisfying a late-night sweet craving when you don’t want to bake a whole cake. And for cozy nights in? Forget about it! These are the ultimate comfort food. Serve them warm with a scoop of vanilla ice cream, and you’ve got yourself pure bliss. My family loves them after dinner, especially when there’s a chill in the air. They just feel so comforting and homemade.
Top Tips for Perfecting Your Cauldron Cupcakes
I’ve made these cauldron cupcakes more times than I can count, and over the years, I’ve picked up a few tricks that really make a difference. So, let’s dive into some of my best tips to ensure yours turn out absolutely perfect every single time!
Zucchini Prep: This is arguably the most crucial step. You absolutely *must* grate your zucchini finely. If you grate it too coarsely, you’ll get pockets of moisture, and that’s not what we want. After grating, I mean *really* squeeze out the excess water. I usually put it in a clean tea towel or cheesecloth and wring it out like I’m trying to get every last drop of juice out. This ensures the moisture integrates beautifully into the batter without making it soggy.
Mixing Advice: Remember what I said about not overmixing? It’s worth repeating. Once you combine the wet and dry ingredients, mix only until you no longer see dry flour. A few small lumps are totally fine and actually preferable. Overmixing creates tough, chewy cupcakes, and that’s the opposite of what we’re aiming for. Think gentle folding, not vigorous beating.
Swirl Customization: If you’re adding the filling, don’t go crazy with the swirling. A few gentle passes with a toothpick or skewer is all you need to create a beautiful marbled effect. You want distinct swirls, not a uniform muddy color. Also, consider adding a sprinkle of chocolate chips or chopped nuts to the batter itself for extra texture!
Ingredient Swaps: I’ve tested this recipe with various dairy-free milks, and almond milk or oat milk work wonderfully, especially if you use the milk-plus-acid trick. For the butter, a good quality vegan butter substitute can also work, though the texture might be slightly different. If you don’t have buttermilk, the milk and lemon juice/vinegar trick is a lifesaver. Just let it sit for about five minutes to thicken slightly before adding it to the wet ingredients. I’ve also found that if I run out of eggs, a flax egg (1 tbsp flax meal + 3 tbsp water, let sit for 5 mins) can work in a pinch, though the richness might be slightly reduced.
Baking Tips: Make sure your oven is truly preheated. An oven thermometer is a great investment if you’re unsure about your oven’s accuracy. Baking on the center rack usually gives the most even results. If your cupcakes tend to brown too quickly on top, you can loosely tent a piece of foil over them for the last 5-10 minutes of baking.
Glaze Variations: If you’re not a fan of the sweet glaze, you can skip it entirely! A light dusting of powdered sugar is elegant and simple. Alternatively, you could try a cream cheese frosting for a richer treat, or even a simple lemon glaze for a bit of brightness. For a thinner glaze, add more milk a teaspoon at a time until it’s how you like it. For a thicker glaze, add more powdered sugar.
Storing and Reheating Tips
One of the best things about these cauldron cupcakes is how well they store! They stay wonderfully moist for days, which is a lifesaver for busy households like mine. At room temperature, I find they are best enjoyed within 2-3 days. Make sure to store them in an airtight container or wrap them tightly in plastic wrap. This prevents them from drying out. If you’ve glazed them, I sometimes find they are best stored at room temperature for up to a day before the glaze starts to get a bit sticky, but honestly, they rarely last that long in my house!
For longer storage, the refrigerator is your friend. In the fridge, these cupcakes will stay fresh and delicious for up to a week. Again, an airtight container is essential. When you’re ready to enjoy one from the fridge, you can eat it cold, or for the best texture, let it sit at room temperature for about 15-20 minutes to take the chill off. If you’ve frosted them, refrigeration is definitely the way to go to keep the frosting firm.
And yes, you can freeze these! They freeze beautifully, which is perfect for making a big batch and having them on hand whenever a craving strikes. Once they’re completely cooled, you can freeze them either unfrosted or frosted. For best results, wrap each cupcake individually in plastic wrap, then place them in a freezer-safe bag or container. They’ll keep well in the freezer for up to 2-3 months. To thaw, simply remove them from the freezer and let them come to room temperature on the counter for a few hours. If they’re frosted, give them a bit more time to thaw properly so the frosting doesn’t get all melty. For reheating unfrosted cupcakes, you can pop them in a 300°F (150°C) oven for about 5-7 minutes to warm them through and revive their tenderness.
Glaze Timing Advice: If you plan to freeze your cupcakes, it’s usually best to wait to add the glaze *after* they have thawed. Freezing and thawing can sometimes affect the texture of the glaze, making it a bit sticky or uneven. So, freeze them plain, thaw, and then glaze!
Frequently Asked Questions
Final Thoughts
There you have it – my cherished recipe for these incredibly moist and flavorful cauldron cupcakes. I truly hope you give them a try. They’re more than just a baked good; they’re a little bit of comfort, a whole lot of deliciousness, and a guaranteed way to bring smiles to your table. Whether you’re looking for a simple breakfast treat, a delightful brunch addition, or a satisfying dessert, these cupcakes deliver every single time. They’ve become a staple in my kitchen, and I’m so excited to share them with you.
If you love these, you might also enjoy my recipes for Spiced Apple Bread or my Double Chocolate Chip Cookies, as they share that same cozy, comforting vibe. Don’t be a stranger – I’d absolutely love to hear how your cauldron cupcakes turn out! If you try them, please leave a comment below and let me know your favorite part, or if you discovered any fun variations. Happy baking, friends!
Easy Cauldron Cupcakes
Ingredients
Method
- Preheat oven to 350°F and place liners in 24 cupcake tins.
- Combine cake mix, water, oil, and eggs in a medium mixing bowl and stir until well blended.
- Bake according to cake mix directions. Allow cupcakes to cool completely, then remove the liners.
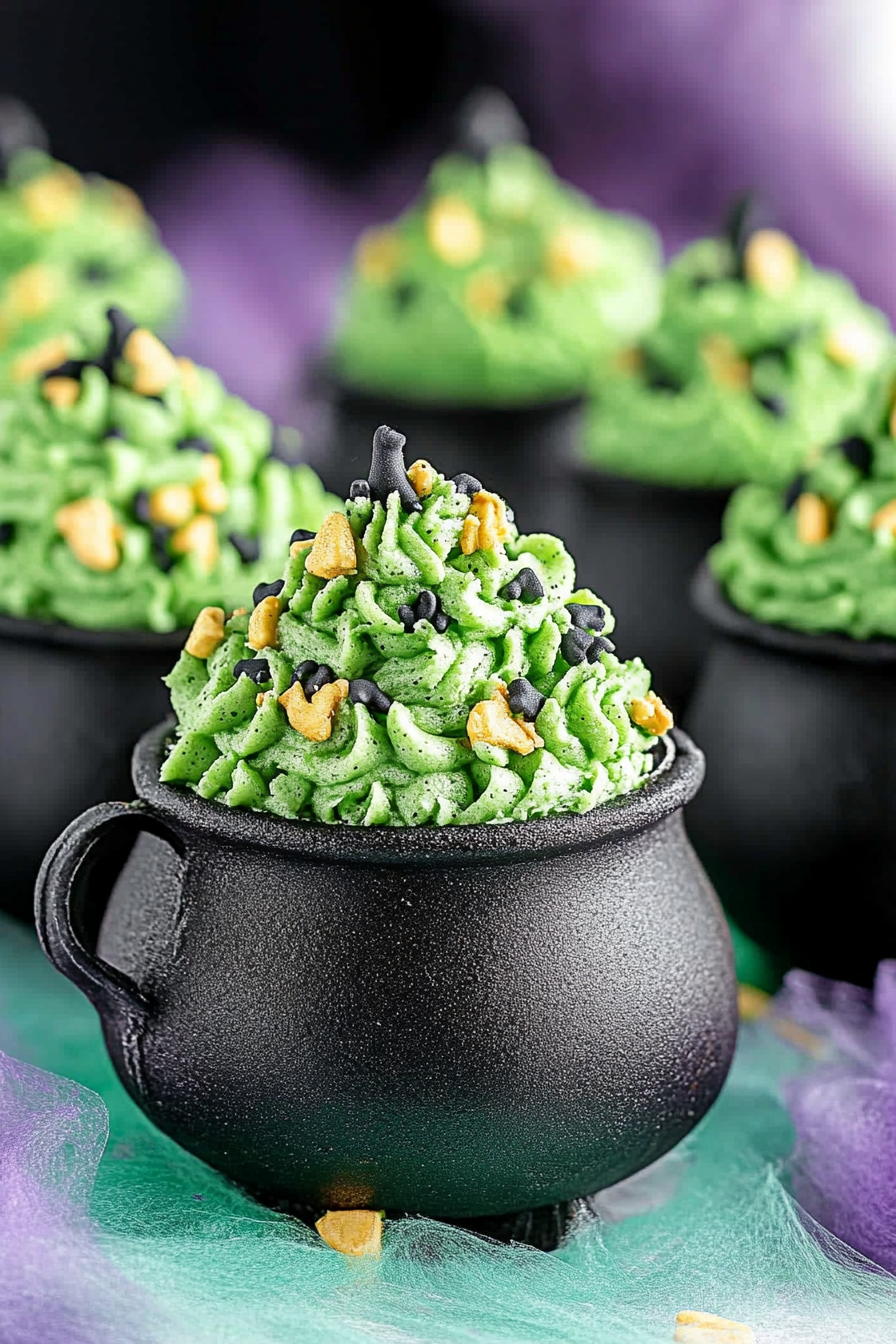
- Gently push a cupcake into each cauldron, pushing down enough so that there is room for the pudding on top of the cupcake.
- Whisk the pudding mix and milk together in a medium bowl until fully incorporated, then add a few drops of neon green food coloring, adding a drop or two at a time to achieve desired color, and whisk until color is uniform throughout pudding.
- Add the green pudding on top of the cupcake in each cauldron; do not overfill.
- Chill in the refrigerator for at least 2 hours.
- Melt the butter in a large pot over medium heat, then add marshmallows and stir continuously until marshmallows are completely melted.
- Stir a few drops of green food coloring into the melted marshmallows and mix well. The color will get a little lighter when the Rice Krispies are added, so make sure the green is fairly dark.
- Add the Rice Krispies to the marshmallows and stir until all the cereal is evenly coated.
- Immediately put a spoonful of Rice Krispy mixture on top of the pudding in each cauldron. Do this before the marshmallows start to cool or it will be difficult to place them on the pudding.
- While Rice Krispies are still warm, top with Halloween sprinkles.