Molten Red Velvet Surprise Cupcakes
Oh, you guys! I’ve been holding onto this recipe for what feels like forever, and I’m finally ready to spill the beans. If there’s one thing that always gets a gasp of delight at any gathering, or makes those quiet evenings at home feel a little more special, it’s a truly spectacular red velvet dessert. But forget about a whole cake that takes ages to bake and cool – we’re talking about individual little bursts of joy: red velvet lava cupcakes! Imagine biting into that impossibly tender red velvet cake, only to discover a molten, gooey chocolate center that just oozes out. It’s pure magic, and honestly, it’s surprisingly achievable. This recipe is my secret weapon when I need something impressive without a ton of fuss, and trust me, it rivals any fancy bakery treat you’ve ever had. It’s the kind of recipe that makes you feel like a baking wizard, even if you’re just whipping it up on a Tuesday night!
What is Red Velvet Lava Cupcake?
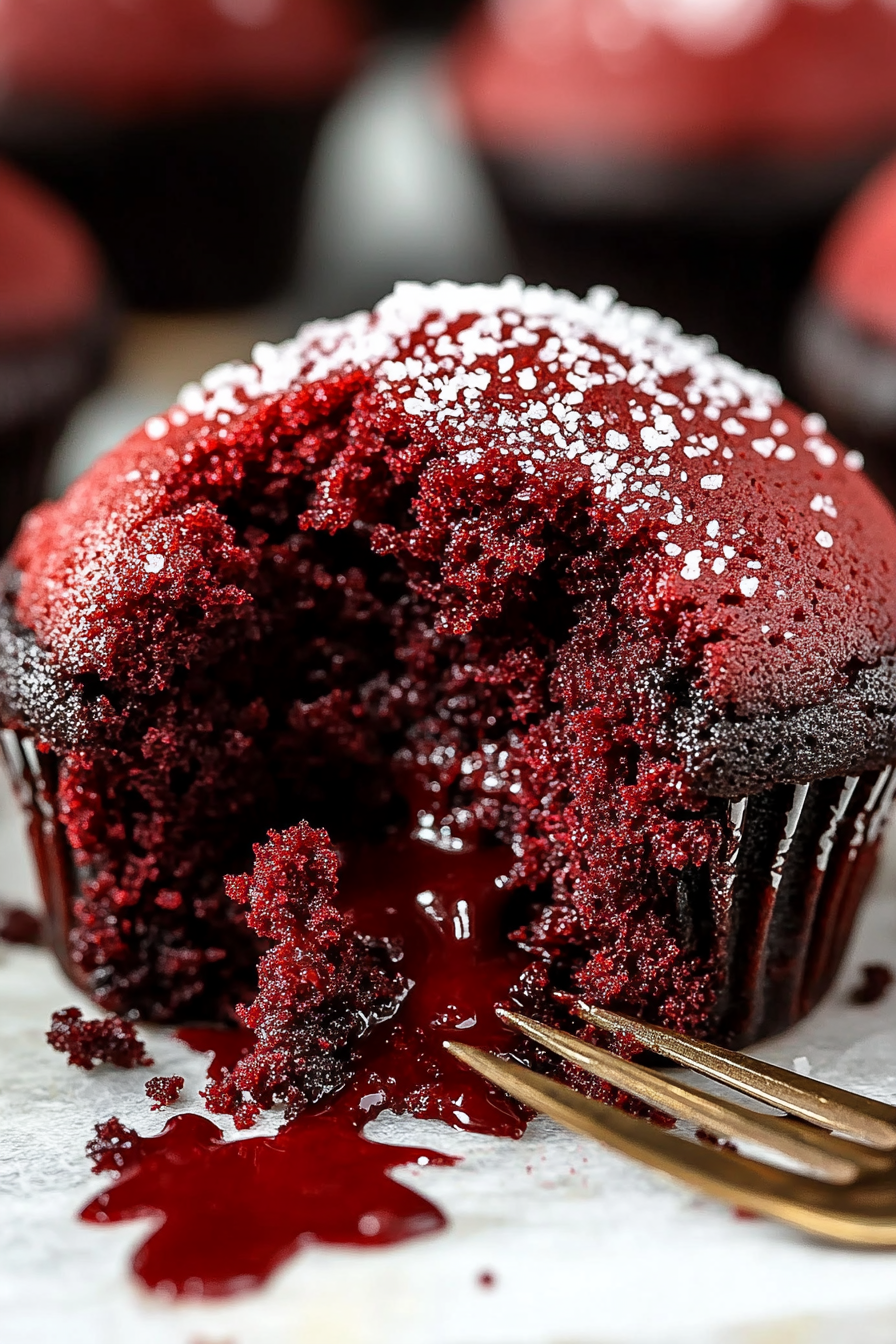
So, what exactly are these little wonders? Think of your favorite red velvet cake – that moist, slightly tangy, cocoa-infused goodness with that signature vibrant color. Now, imagine that cake is baked into individual cupcake form, but with a secret hidden inside. That secret? A rich, intensely chocolatey, molten “lava” center. When you break into one, the warm chocolate sauce just flows out, mingling with the cake. It’s essentially a miniature chocolate lava cake disguised as a red velvet cupcake, and the combination is utterly divine. The “lava” part comes from a simple, decadent chocolate ganache that we’ll pour into the center before baking. It’s this surprise element that makes them so fun and exciting to eat. It’s not just a cupcake; it’s an experience!
Why you’ll love this recipe?
Where do I even begin with why this recipe is a keeper? First off, the flavor is just out of this world. The red velvet cake itself has that perfect balance of sweet and a tiny bit tart, with a deep cocoa note that’s just heavenly. But then, that molten chocolate center… oh, that chocolate center! It’s so rich and decadent, it makes every bite feel like a luxurious treat. And the texture contrast is fantastic – the soft, tender cake against that gooey, flowing chocolate is just *chef’s kiss*. Beyond the incredible taste, this recipe is surprisingly simple to pull off. I know “lava” sounds intimidating, but I promise it’s not. You can whip up the batter in one bowl, and the ganache is just a matter of melting chocolate and cream. It’s a lifesaver for when you want to impress guests or just need a serious chocolate fix without dedicating an entire afternoon. Plus, cupcakes are inherently fun and portion-controlled, making them perfect for parties or just satisfying a craving without overdoing it. They’re also incredibly cost-effective compared to buying gourmet desserts. I’ve made these for bake sales, birthdays, and even just because, and they always disappear in minutes. What I love most, though, is the sheer delight on people’s faces when they discover that hidden treasure inside. It’s a guaranteed crowd-pleaser!
How do I make Red Velvet Lava Cupcakes?
Quick Overview
This recipe is all about creating two simple components – a luscious red velvet cake batter and a rich chocolate ganache filling – and bringing them together for an unforgettable treat. You’ll mix your dry and wet ingredients separately, combine them, then carefully layer the batter and ganache in your muffin tins before baking. The result is a perfectly baked cupcake with a delightful molten chocolate surprise waiting inside. It’s straightforward, requires basic baking ingredients, and the payoff is immense. You’ll have gorgeous, decadent cupcakes ready to wow in no time!
Ingredients
For the Main Batter:
- 2 ½ cups all-purpose flour: Make sure it’s spooned and leveled, not scooped, for accurate measurements. This is key for that perfect tender crumb.
- 1 ½ cups granulated sugar: For sweetness and structure.
- 1 teaspoon baking soda: Our leavening agent, working with the buttermilk for a beautiful rise.
- ½ teaspoon salt: To balance the sweetness and enhance flavors.
- 1 teaspoon unsweetened cocoa powder: Just a touch to deepen the flavor and color. Don’t skip this!
- 1 cup buttermilk: This is essential for that signature tender crumb and slight tang. If you don’t have any, you can make a quick substitute by adding 1 tablespoon of white vinegar or lemon juice to 1 cup of milk and letting it sit for 5-10 minutes.
- ½ cup unsalted butter, softened: Room temperature butter creams better, creating a lighter cake.
- 2 large eggs: Room temperature eggs incorporate more easily.
- 1 teaspoon vanilla extract: For that classic warm flavor.
- 2 tablespoons red food coloring (gel is best for vibrant color without adding too much liquid): I always opt for gel food coloring because it gives you that intense, beautiful red without making your batter watery.
- 1 teaspoon white vinegar: This reacts with the baking soda to help the cake rise and achieve a tender texture.
For the Filling:
- 4 ounces semi-sweet chocolate, finely chopped: Good quality chocolate makes a difference here. You want it to melt smoothly into a luscious sauce.
- ½ cup heavy cream: This will create our rich ganache.
For the Glaze:
- 1 cup powdered sugar: Sifted to avoid lumps.
- 2-3 tablespoons milk or cream: To reach your desired drizzling consistency.
- ½ teaspoon vanilla extract (optional): For a little extra flavor.
Step-by-Step Instructions
Step 1: Preheat & Prep Pan
First things first, let’s get your oven ready and your muffin tins prepared. Preheat your oven to 350°F (175°C). Line a standard 12-cup muffin tin with colorful cupcake liners – because presentation matters, right? Make sure you have all your ingredients measured out and ready to go. This makes the whole process so much smoother and less stressful. I always find that having everything prepped makes me feel more confident as I bake!
Step 2: Mix Dry Ingredients
In a large bowl, whisk together the all-purpose flour, granulated sugar, baking soda, salt, and cocoa powder. Give it a good whisk until everything is well combined and there are no pockets of cocoa or baking soda. This step ensures that your leavening agents and flavorings are evenly distributed throughout the batter, which is crucial for a consistent texture and rise. It’s the foundation for that perfect red velvet cake!
Step 3: Mix Wet Ingredients
In a separate medium bowl, whisk together the buttermilk, softened butter, eggs, vanilla extract, red food coloring, and white vinegar. You want to whisk until everything is thoroughly combined and the mixture is a vibrant, consistent red color. Make sure the butter is softened, not melted, so it can emulsify properly with the other ingredients. This also helps create a lighter, airier cake.
Step 4: Combine
Now, it’s time to bring those two bowls together. Pour the wet ingredients into the bowl with the dry ingredients. Using a spatula or a whisk, mix until *just* combined. Be careful not to overmix! A few small lumps are perfectly fine – in fact, they’re better than an overmixed batter. Overmixing can develop the gluten too much, resulting in tough cupcakes. We want tender, delicate red velvet goodness, so just mix until you no longer see streaks of dry flour.
Step 5: Prepare Filling
While your batter is resting, let’s make that luscious lava filling. Place the finely chopped semi-sweet chocolate in a heatproof bowl. Heat the heavy cream in a small saucepan over medium heat until it just begins to simmer around the edges. Don’t let it boil! Pour the hot cream over the chopped chocolate and let it sit for about 5 minutes without stirring. This allows the heat from the cream to gently melt the chocolate. After 5 minutes, whisk gently until the ganache is smooth, glossy, and completely combined. If any chocolate bits remain, you can microwave the mixture in 10-second intervals, stirring in between, until smooth. Set aside to cool slightly.
Step 6: Layer & Swirl
This is where the magic happens! Spoon about 1 tablespoon of red velvet batter into the bottom of each prepared cupcake liner. Then, carefully spoon about 1-2 teaspoons of the slightly cooled chocolate ganache into the center of the batter. Don’t let it touch the sides of the liner. Top the ganache with another tablespoon of red velvet batter, making sure to completely cover the chocolate. You can gently swirl a toothpick through the batter to create a beautiful marbled effect, but don’t go too deep, or you’ll mix the ganache in too much. The goal is a distinct center.
Step 7: Bake
Place the muffin tin in your preheated oven. Bake for 20-25 minutes, or until a toothpick inserted into the cake part of the cupcake (avoiding the center where the ganache is) comes out clean. The edges should be set, and the tops should spring back lightly when touched. Baking time can vary depending on your oven, so keep an eye on them towards the end. You want them baked through, but still incredibly moist.
Step 8: Cool & Glaze
Once baked, let the cupcakes cool in the muffin tin for about 5-10 minutes. This helps them set up properly. Then, carefully transfer them to a wire rack to cool completely. While they’re cooling, whisk together the sifted powdered sugar, 2 tablespoons of milk or cream, and vanilla extract (if using) in a small bowl. Add more milk or cream, a teaspoon at a time, until you reach a smooth, drizzly consistency. Once the cupcakes are completely cool, drizzle the glaze generously over the tops. Letting them cool fully before glazing prevents the glaze from melting off.
Step 9: Slice & Serve
And now for the moment of truth! Serve these beauties slightly warm for the ultimate lava flow, or at room temperature. If serving slightly warm, you can pop them in a very low oven (around 200°F/95°C) for a few minutes. When you bite into one, you’ll get that perfect contrast of moist red velvet and warm, gooey chocolate. They’re stunning on their own, but a dollop of whipped cream or a scoop of vanilla ice cream never hurts!
What to Serve It With
These red velvet lava cupcakes are so versatile, they can be dressed up or down depending on the occasion. For a delightful breakfast treat that feels incredibly indulgent, pair them with a strong cup of coffee or a creamy latte. The richness of the cupcake is perfectly balanced by a bold brew. For a more elegant brunch spread, serve them as individual desserts on pretty plates with a side of fresh berries – the tartness of raspberries or strawberries cuts through the sweetness beautifully. A mimosa or a sparkling rosé would be the perfect beverage pairing. As an after-dinner dessert, they truly shine. Imagine them served warm, perhaps with a scoop of high-quality vanilla bean ice cream melting alongside, or a drizzle of extra chocolate sauce. They’re a fantastic alternative to a slice of cake and feel much more personal. And for those cozy, I-just-need-a-treat-right-now moments, they are the absolute best. Grab one (or two!) with a glass of cold milk and a good book – pure comfort! My family loves having these on a Friday night after a long week. It feels like a special occasion without any of the stress.
Top Tips for Perfecting Your Red Velvet Lava Cupcakes
I’ve made this recipe countless times, and I’ve picked up a few tricks along the way that I think will really help you achieve red velvet lava cupcake perfection. For the batter, the key is not to overmix once you add the wet ingredients to the dry. Seriously, just mix until it’s combined. A few lumps are your friend here! It means you’re preserving that tender crumb. When you’re making the chocolate ganache filling, using good quality chocolate really makes a difference in flavor and texture. And make sure it cools just enough so it’s scoopable but not so much that it hardens. If it’s too hot, it’ll melt into the batter too much, and if it’s too cold, it’ll be hard to get into the center. For the lava effect, don’t fill the liners too full with batter before adding the ganache, or it might overflow. And when you add the top layer of batter, make sure it completely encloses the ganache. I’ve had a few instances where some ganache oozed out because it wasn’t fully covered, and while still delicious, it wasn’t quite the “lava” experience. I’ve experimented with different cocoa powders, and a good Dutch-processed one gives a deeper, richer flavor. For ingredient swaps, I’ve found that you can substitute the all-purpose flour with a good gluten-free blend, but you might need to add a tiny bit more liquid. I’ve also successfully used almond milk with a splash of vinegar in place of buttermilk, and it turned out just as creamy! When it comes to baking, every oven is different. I always recommend doing the toothpick test, and if your cupcakes are browning too quickly on top before the inside is cooked, you can loosely tent them with foil. For the glaze, if it’s too thick, add milk a teaspoon at a time until it drizzles nicely. If it’s too thin, whisk in a little more powdered sugar. The consistency is really about preference and how you want it to look – a thinner glaze soaks in a bit, while a thicker one provides a more distinct topping. Practice makes perfect, and even if they aren’t “perfect,” they will undoubtedly be delicious!
Storing and Reheating Tips
These red velvet lava cupcakes are best enjoyed fresh, especially if you want that signature molten center. However, they do store reasonably well if you need to make them ahead. At room temperature, they’ll be good for about 1-2 days, as long as they are stored in an airtight container. The glaze might soften a bit, and the lava center might start to set as it cools. If you’re storing them for longer or live in a warm climate, the refrigerator is your best bet. Pop them into an airtight container and they should stay fresh for up to 3-4 days. Be aware that refrigeration can firm up the ganache center, so you’ll definitely want to reheat them. To reheat, place a cupcake on a microwave-safe plate and heat for about 10-20 seconds, or until the center is warm and gooey again. Start with just 10 seconds and check, as they heat up quickly! For longer storage, you can freeze the unfrosted cupcakes. Wrap them tightly in plastic wrap, then place them in a freezer-safe bag or container for up to 2-3 months. To thaw, let them come to room temperature, then reheat as described above to bring back that glorious lava flow. I usually frost them *after* reheating if I’m serving them from frozen, just so the glaze stays fresh and pretty. If you plan on storing them unfrosted, you can add the glaze right before serving after reheating.
Frequently Asked Questions
Final Thoughts
I truly hope you give these red velvet lava cupcakes a try. They are, without a doubt, one of my all-time favorite treats to bake and share. The sheer delight they bring to people when they discover that gooey chocolate center is just priceless. They’re a perfect example of how a few simple ingredients and a little bit of love can create something truly spectacular. They’re beautiful enough for a special occasion but easy enough for a weeknight indulgence. If you’re a fan of red velvet, or just adore anything with a molten chocolate center, these are going to become a staple in your baking repertoire, just like they have in mine. If you love this recipe, you might also enjoy my chewy chocolate chip cookies or my fudgy brownie recipe for more chocolatey goodness. I can’t wait to hear how yours turn out, so please leave a comment below and let me know your thoughts, or share your own creative twists! Happy baking, everyone!
Red Velvet Lava Cupcakes
Ingredients
Method
- Chop or break up baking chocolate and place in a medium sized bowl. Heat the cream over low heat until it just simmers (or in the microwave for about 45 seconds). Pour over the chocolate. Stir until melted and smooth. (If it’s having a hard time melting, place it in the microwave for about 15 seconds.) Chill chocolate mixture until hardened, at least 2 hours.
- Preheat oven to 350 °F. Line muffin tins with cupcake liners.
- Mix up cake batter according to the box directions. Fill each liner about 0.5 full of batter. (You don’t want to fill them as full as 2/3, or they will spill over. A little less than is called for on the box is good.)
- Remove chocolate ganache from the refrigerator. Scoop 1 tablespoon balls (I used a cookie scoop) and place one ball in the center of each cupcake batter.
- Bake 20-23 minutes, until a toothpick inserted in the side of the cupcake (not the center!) comes out clean. Cool for just a few minutes in the pans.
- When ready to serve, remove the cupcakes from the pan and remove the liners. Turn upside down on a plate and sprinkle with powdered sugar.