Peanut Butter Cup Pie How to Make It
One of my absolute favorite desserts to make on a lazy Sunday or when I need a quick sweet fix is this peanut butter cup pie. I swear, it’s like biting into a dreamy, creamy chocolate peanut butter paradise — and it’s surprisingly easy to whip up. I remember the first time I made this for friends, and their eyes lit up when they tasted it. It’s one of those recipes that feels fancy but really is just a few pantry staples thrown together with love. The smell alone—rich, chocolatey, with just a hint of peanut butter—always brings everyone running into the kitchen. And honestly? My kids ask for this all the time. It disappeared in minutes at my house the last time I made it. Trust me on this one—once you try it, it’ll become a go-to for holiday gatherings, weekday treat runs, or just whenever you need a little comfort in dessert form.
What is a peanut butter cup pie?
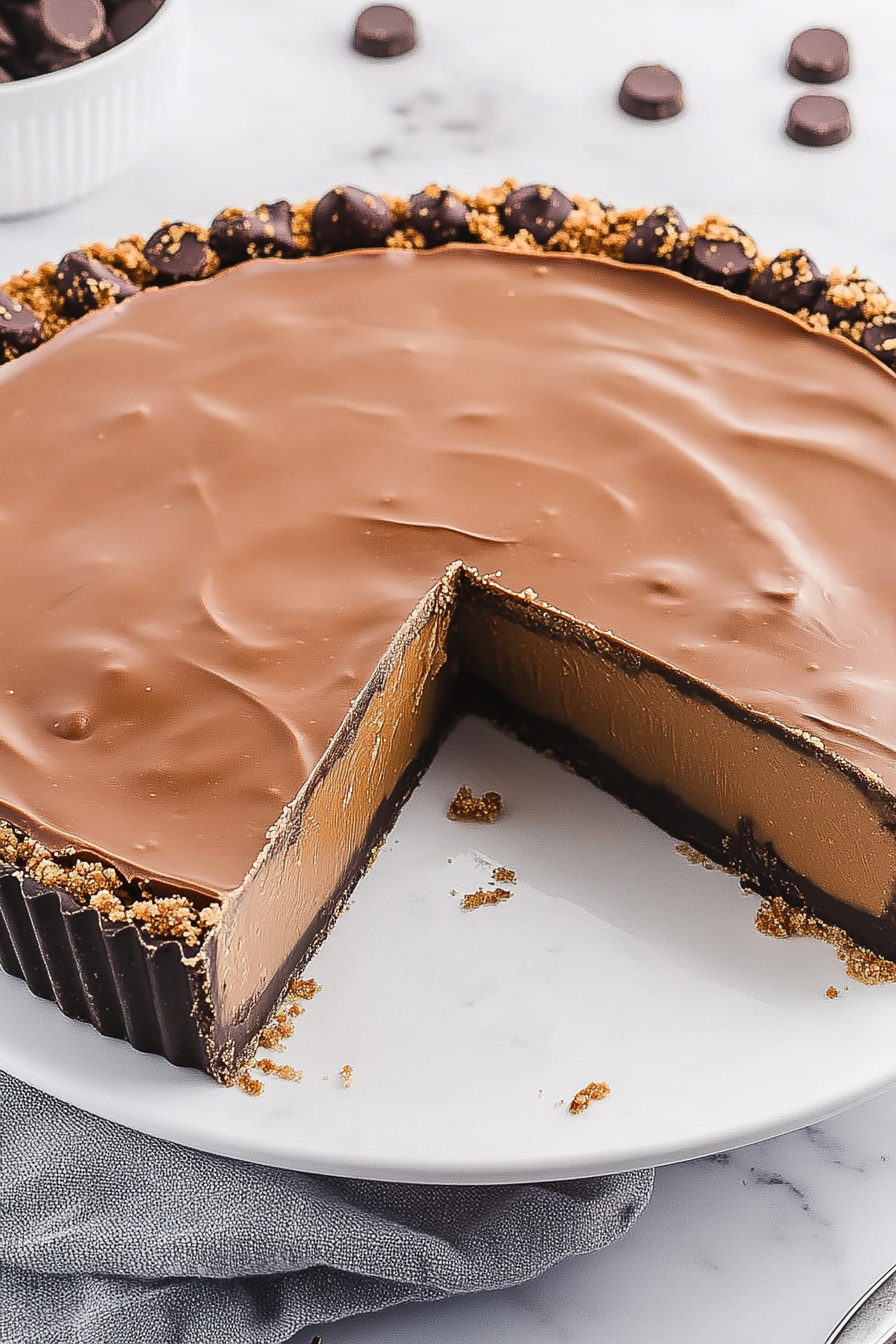
Think of peanut butter cup pie as the lovechild of your favorite candy and a classic pie—think Reese’s meets rich, velvety dessert. It’s essentially a creamy, chocolatey, peanut-buttery pie made with a graham cracker crust, a smooth peanut butter filling, and topped with a glossy chocolate glaze that mimics the candy’s signature look. The name hints at all the best parts of those iconic peanut butter cups, but in pie form—perfect for slicing and sharing (or not sharing, if you’re like me). The beauty of this dessert is that it combines the richness of chocolate and peanut butter with a light, almost mousse-like texture that’s incredibly satisfying without feeling heavy. It’s the kind of dessert you can serve at family dinners or impress guests with, and they’ll never guess how easy it was to throw together.
Why you’ll love this recipe?
What I love most about this peanut butter cup pie is how it hits all the right sweet and salty notes, and yet it’s so effortless to make. The flavor is just unbeatable—deep, gooey chocolate mingling with the nutty richness of peanut butter, all wrapped in a smooth, luscious filling that melts in your mouth. Plus, the ingredients are budget-friendly and accessible—you probably already have most of what you need in your pantry. The crust is simple graham crackers, no fancy pie dough required, which makes this feel approachable even for beginners. My favorite part? The versatility. Once you get the hang of it, you can customize the toppings—maybe sprinkle some chopped peanuts on top, or drizzle caramel for extra decadence. It’s a real crowd-pleaser, and honestly, I keep a batch in the fridge just to nibble on when that late-night chocolate craving hits. This one’s a lifesaver on busy nights or when I want a quick dessert that feels special. And because it’s made with creamy peanut butter and rich chocolate, it’s a little nostalgic, like those childhood peanut butter cup candies, but way more grown-up.
How do I make a peanut butter cup pie?
Quick Overview
This pie starts with a simple graham cracker crust, baked just enough to set it up with a buttery crunch. While it cools, you’ll blend peanut butter, cream cheese, and a touch of whipped cream to create a smooth, velvety filling. Pour it into your crust and swirl in melted chocolate or chopped peanut butter cups for extra flavor and texture. Finish with a shiny chocolate glaze and chill until set. Believe it or not, from start to finish, you’re looking at about 4 hours, mostly waiting for it to chill, making it perfect for planning ahead. The best part? It’s so straightforward—you’ll feel like a pro in no time.
Ingredients
For the Crust:
– 1 12 cups graham cracker crumbs (about 10-12 sheets, crushed finely) (about 1-2 cups)
– ¼ cup granulated sugar
– ½ cup unsalted butter, melted
– A pinch of salt
For the Filling:
– 1 cup creamy peanut butter (smooth or chunky, your call!)
– 8 oz cream cheese, softened
– 1 cup heavy cream
– ½ cup powdered sugar
– 1 teaspoon vanilla extract
– ½ cup chopped peanut butter cups (for mix-ins)
For the Glaze:
– 1 cup semi-sweet chocolate chips
– ½ cup heavy cream
– Optional: a sprinkle of sea salt or crushed peanuts on top
Step-by-Step Instructions
Step 1: Preheat & Prep Pan
Set your oven to 350°F (175°C). Prepare a 9-inch pie pan by lightly greasing it or lining it with parchment. In a bowl, combine the graham cracker crumbs, sugar, and salt. Stir in melted butter until all the crumbs are coated and resemble wet sand. Press this mixture evenly into the bottom and up the sides of the pie pan. Bake for about 8 minutes—just enough to firm it up and bring out that lovely buttery aroma. Let it cool completely before filling.
Step 2: Mix Dry Ingredients
For this recipe, most of your dry ingredients are already measured out. The key is to ensure your graham cracker crust is well-pressed and baked, so it doesn’t crumble later. When it’s cooled, you’re ready for the filling. No fuss here—just keep your ingredients organized and ready to go.
Step 3: Mix Wet Ingredients
In a large bowl, beat the softened cream cheese and peanut butter together until smooth. I prefer using a hand mixer or stand mixer for this—it makes it fluffier. Then, in a separate bowl, whip the heavy cream with powdered sugar and vanilla until stiff peaks form. Gently fold the whipped cream into the peanut butter mixture in batches. This creates that airy, mousse-like texture I love. Be gentle—overmixing can deflate the whipped cream and make it less light.
Step 4: Combine
Mix the peanut butter and cream cheese base with the whipped cream until everything is nicely incorporated. If you like extra chocolate swirls, fold in chopped peanut butter cups now. Or, for a more marbled effect, save some melted chocolate to swirl on top after layering.
Step 5: Prepare Filling
Pour the filling into your cooled crust, smoothing it into an even layer. If you’re adding chopped peanut butter cups, sprinkle them evenly over the top for an inviting, chunky look. You can also swirl some melted chocolate on top for added visual appeal.
Step 6: Layer & Swirl
If you want that pretty marbled look, gently drizzle melted chocolate over the filling and use a toothpick to swirl. Keep it loose—this part is where your artistic touch comes in! The swirl creates a beautiful pattern that’s just as tasty as it looks.
Step 7: Bake
This pie doesn’t require baking after assembly, but I do find that chilling it in the fridge for at least 4 hours—or overnight—sets everything beautifully. Just cover it lightly with plastic wrap and let the magic happen. If you want a firmer texture, you can chill longer.
Step 8: Cool & Glaze
When you’re ready to serve, melt your chocolate chips and heavy cream together to make a glossy glaze. Pour it over the chilled pie, smoothing it with a spatula. For extra flair, sprinkle a touch of sea salt or crushed peanuts on top. Let sit at room temperature for about 15 minutes to set the glaze before slicing.
Step 9: Slice & Serve
Use a sharp knife dipped in warm water to get clean slices. Serve straight from the fridge for a firmer bite, or let it sit at room temperature for a few minutes if you want it softer and Creamy. I love setting a few dollops of whipped cream on the side and maybe a drizzle of extra chocolate or caramel. It’s just the perfect bite every time.
What to Serve It With
This pie is pretty rich and dense, so I like pairing it with things that cut through the sweetness. For breakfast, a cold glass of milk or a strong coffee balances out the creamy richness. During brunch, I love serving it with fresh berries and a sprinkle of powdered sugar—adds a pop of color and freshness. As a dessert, it’s amazing with a scoop of vanilla bean ice cream or a dollop of whipped cream—my kids ask for this almost every weekend! If I’m feeling casual, I just slice it up and serve it alongside a hot cup of tea or a cold glass of milk. The kids love to grab a piece and take it outside in the sunshine, dipping their fingers into the gooey layers. It’s comfort food in its most delightful form—perfect for sharing or sneaking a second slice late at night when no one’s looking.
Top Tips for Perfecting Your Peanut Butter Cup Pie
Everyone has their tricks, and over the years I’ve learned a few things that really make this pie shine. First, when preparing the crust, I always make sure to press it firmly into the pan—this prevents it from crumbling later. Trust me, no one wants a crumbly crust on a special occasion! When mixing the filling, don’t overbeat; you want that light, airy texture, so fold gently and patiently. If your peanut butter is chunky, it’ll add a lovely texture but keep in mind it may slightly change the creaminess of the filling. I’ve tested this with natural peanut butter, and the truth is, it’s just as delicious — just watch out for the oil separation, which I solve by giving it a quick stir first. Swirling is my favorite part—try using a skewer to draw beautiful patterns or random circles, depending on your mood. For the glaze, I like a thicker consistency so it doesn’t pool too much on the edges but flows nicely over the top. I’ve also played with adding a dash of cinnamon or a pinch of sea salt to the glaze or filling—it’s subtle but gives it a lovely flavor depth. One lesson I learned? Chill your pie long enough! Sometimes I think I’m impatient, but rushing to cut it too soon makes your slices all messy. Patience pays off, and your slices will be perfectly clean and glossy. Oh, and don’t forget to let it sit at room temperature for just a few minutes before slicing—this helps it soften slightly and brings out all those wonderful flavors!
Storing and Reheating Tips
If you have leftovers or want to prepare this ahead of time, here’s what I do: Keep the pie refrigerated in an airtight container or covered tightly with plastic wrap. It stays fresh for up to 3 days, but honestly, it rarely lasts that long around here! If you want to enjoy it later, just grab it from the fridge about 15-20 minutes before serving; it softens slightly and makes each bite even better. To freeze, wrap the whole pie or slices tightly in plastic wrap and then foil. It’ll last up to a month—perfect for making ahead. When you’re ready to enjoy again, thaw in the fridge overnight and bring to room temp before serving. Just keep in mind, the glaze may lose some of its shine after freezing, so if you want that glossy look, you can re-glaze slightly before serving. I’ve found that the secret to maintaining flavor and texture is to avoid removing it from the fridge too soon—cold keeps those luscious layers intact. No matter how you store it, this pie is one you’ll find yourself sneaking for, even days later—you can’t beat that chocolate-peanut butter combo!
Frequently Asked Questions
Final Thoughts
Honestly, this peanut butter cup pie has become one of my most-loved desserts because it’s like a hug in every bite—rich, creamy, and just a little indulgent. It’s a little nostalgic for me, reminding me of childhood candy cravings but turned into something sophisticated enough to serve at dinner parties. Every time I make it, I get praise, and I love sharing that moment of happiness with friends and family. Plus, it’s so easy to customize—swap the peanut butter for almond butter, sprinkle chopped nuts, or swirl in extra chocolate—and still end up with a showstopper. If you’re craving something sweet that’s both comforting and fun, I promise this will be your new favorite. So, gather your ingredients, set aside some time, and make this magic happen in your own kitchen. Can’t wait to hear how yours turns out—happy baking!
Peanut Butter Cup Pie
Ingredients
Method
- Line the bottom of a 9-inch tart pan with parchment paper and lightly spray with nonstick spray.
- Combine chocolate chips and vegetable oil in a microwave-safe bowl and heat for 45-55 seconds. Stir until smooth and melted.
- Spread half of the melted chocolate evenly over the bottom and sides of the tart pan. Chill while preparing the filling.
- Whisk together powdered sugar and graham cracker crumbs in a bowl.
- In a microwave-safe bowl, heat chunky peanut butter and butter for 45 seconds, then stir to combine.
- Pour the peanut butter mixture over the powdered sugar and graham cracker crumbs and mix well.
- Spread the peanut butter filling evenly over the chilled chocolate shell.
- Top with the remaining melted chocolate, smoothing it out to cover the filling completely.
- Refrigerate the pie for at least 4 hours or until set.
- Gently remove from tart pan, peel off parchment, and slice into wedges to serve.