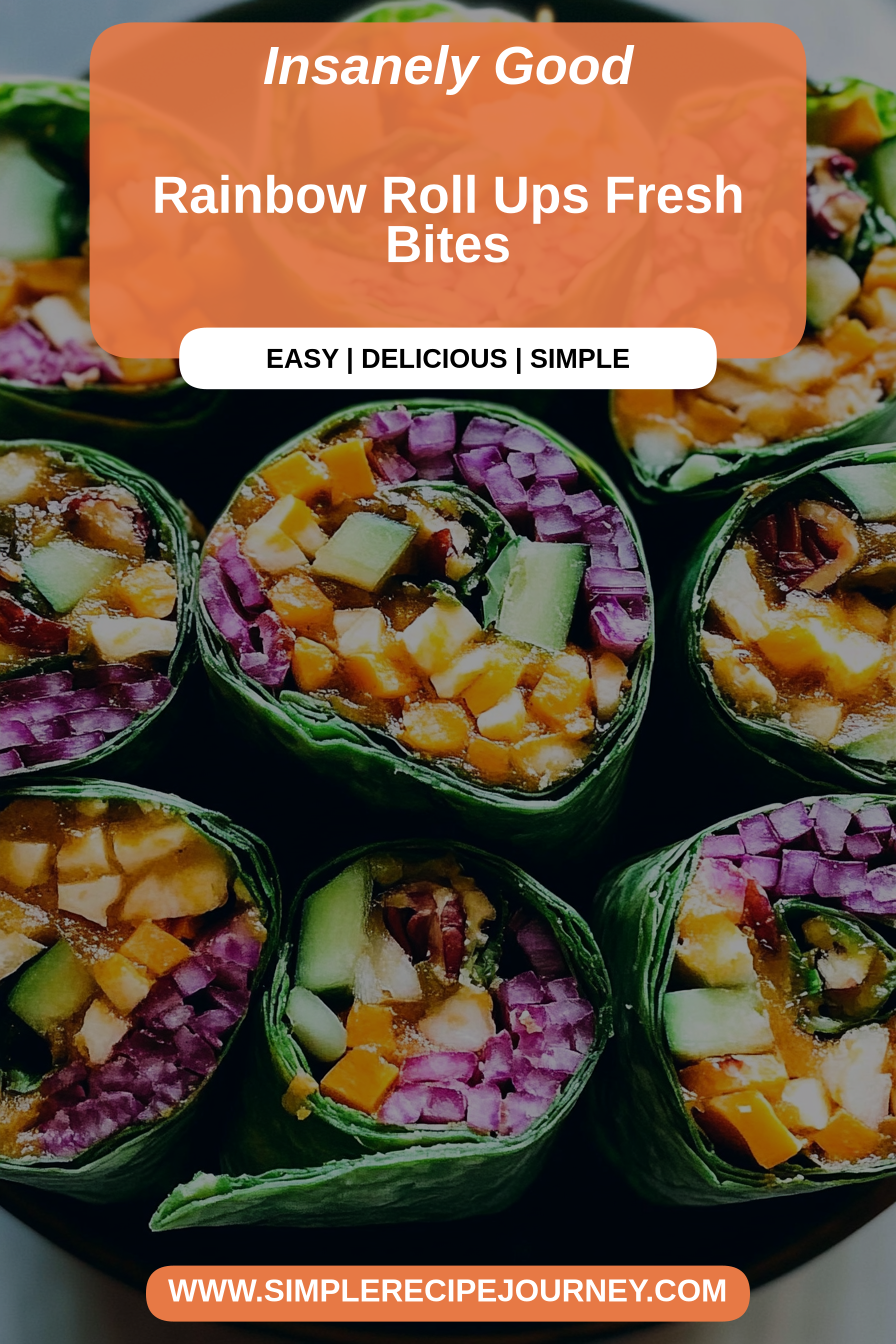
Rainbow Roll Ups Fresh Bites
You know, there are some recipes that just feel like a warm hug. They’re comforting, a little bit nostalgic, and always, *always* hit the spot. For me, one of those recipes is my rainbow roll ups. I swear, the moment I start swirling those colors together, I feel a little spark of joy. It’s like painting with edible colors! These aren’t just any sweet treat; they’re a vibrant celebration, a perfect pick-me-up, and honestly, a lifesaver on those days when I need something delicious but don’t have hours to spend in the kitchen. They remind me so much of those colorful swirled cookies you see at bakeries, but trust me, these are so much easier to whip up at home, and the flavor is just divine. If you’ve ever loved a good funfetti cake or a marbled brownie, you’re going to be absolutely smitten with these.
What is a rainbow roll up?
So, what exactly are these magical rainbow roll ups? Think of them as a delightful, tender, lightly sweet rolled cake, but with a whimsical twist. Instead of a single color, we’re dividing the batter into portions and coloring them with vibrant hues – reds, oranges, yellows, greens, blues, and purples, if you’re feeling ambitious! Then, we gently swirl these colors together before baking, creating a stunning marbled effect. Once baked and cooled, they’re usually brushed with a simple glaze that makes them perfectly shiny and even more irresistible. It’s essentially a beautiful, swirly masterpiece that tastes as good as it looks, and is surprisingly simple to achieve, even if you’re not a professional baker. The name itself just sounds cheerful, doesn’t it?
Why you’ll love this recipe?
Oh, where do I even begin with why this recipe is a winner? First off, the flavor is just sublime. It’s a delicate, buttery base that’s not overly sweet, allowing the visual magic to really take center stage. But don’t let the pretty colors fool you; there’s serious flavor here! The texture is incredibly tender and moist, almost cake-like, which makes it a joy to eat. And then there’s the sheer simplicity of it all. I know some people see the colors and think it’s complicated, but honestly, it’s just a matter of dividing batter and adding a few drops of food coloring. It’s more fun than fussy! Plus, it’s incredibly budget-friendly. Most of the ingredients are pantry staples, and you don’t need any fancy equipment. What I truly adore about these rainbow roll ups is their versatility. They’re fantastic for a birthday party, a weekend treat, or even just a little something to brighten a Tuesday afternoon. They’re a guaranteed crowd-pleaser, and I’ve had kids and adults alike oohing and aahing over them. It’s the kind of recipe that brings a little bit of cheer and a lot of deliciousness to your table, without breaking the bank or taking up your entire day. Honestly, what’s not to love?
How do you make a rainbow roll up?
Quick Overview
This recipe is all about creating beautiful layers of color and then baking them into a soft, delicious sheet cake. We’ll whip up a simple batter, divide it into small bowls to color, then gently swirl them onto a baking sheet. A quick bake, a simple glaze, and you’ve got yourself a showstopper! It’s remarkably straightforward, and the swirling technique is more intuitive than you might think. You’ll be amazed at the results you can get with just a few simple steps. It’s the perfect recipe to get the kids involved in too – they’ll have a blast helping with the coloring and swirling.
Ingredients
For the Main Batter:
Here’s what you’ll need to get started. I always try to use good quality butter for the best flavor, but honestly, whatever you have on hand will work beautifully. Make sure your eggs and butter are at room temperature; it really helps everything emulsify nicely for a smoother batter. I’ve found that using unsalted butter gives me more control over the saltiness, but salted is fine too, just maybe omit a tiny pinch of the added salt.
- 1 cup (2 sticks) unsalted butter, softened
- 1 ½ cups granulated sugar
- 3 large eggs, room temperature
- 1 teaspoon vanilla extract
- 2 ½ cups all-purpose flour
- 1 teaspoon baking powder
- ½ teaspoon salt
- 1 cup milk (any kind works, I’ve even used almond milk and it was great!)
- Food coloring (gel food coloring works best for vibrant colors without adding too much liquid)
For the Filling:
For this recipe, we’re keeping it simple and classic with a light dusting of powdered sugar, but you could totally get creative here. A thin layer of cream cheese frosting or even some fruit preserves would be lovely. I sometimes just dust mine with a little extra powdered sugar once it’s baked and cooled, but a simple glaze is my favorite.
- Powdered sugar, for dusting (optional)
For the Glaze:
This glaze is super simple and adds just the right amount of sweetness and shine. You want it to be pourable but not too thin. If it’s too thick, a tiny splash more milk or lemon juice will loosen it right up. If it’s too thin, just add a bit more powdered sugar.
- 1 ½ cups powdered sugar
- 2-3 tablespoons milk or lemon juice
- ½ teaspoon vanilla extract (optional)
Step-by-Step Instructions
Step 1: Preheat & Prep Pan
First things first, let’s get our oven going. Preheat it to 350°F (175°C). Now, grab a large baking sheet – a standard 18×13 inch one is perfect. You’ll want to line it really well with parchment paper. Don’t skimp on this! You can even grease the parchment paper lightly if you’re worried about sticking, though I usually find it’s not necessary if the parchment is good quality. Make sure it covers the entire surface right up to the edges.
Step 2: Mix Dry Ingredients
In a medium bowl, whisk together your flour, baking powder, and salt. This is a simple step, but it ensures that your leavening and salt are evenly distributed, which is key for a consistent texture in your baked goods. Give it a good whisk until everything looks nicely combined. Set this aside for now.
Step 3: Mix Wet Ingredients
In a large bowl, cream together your softened butter and granulated sugar. Beat them with an electric mixer (handheld or stand mixer) until they’re light and fluffy. This usually takes about 3-5 minutes. Then, beat in the eggs, one at a time, making sure each one is fully incorporated before adding the next. Stir in the vanilla extract. This is where you want a nice, smooth, emulsified mixture.
Step 4: Combine
Now, we’ll alternate adding the dry ingredients and the milk to the wet ingredients. Start by adding about a third of the dry ingredients to the butter mixture and mix on low speed until just combined. Then, add half of the milk and mix again. Repeat this process, ending with the dry ingredients. Be careful not to overmix! Overmixing can develop the gluten too much, leading to a tougher texture. Mix until you just no longer see streaks of flour. The batter should be thick but pourable.
Step 5: Prepare Filling
Honestly, for this recipe, the “filling” is really just the beautiful swirl we create within the batter itself! So, this step is all about preparing to make those colors happen. You don’t need to prepare a separate filling unless you decide to get fancy later on. For now, let’s focus on dividing our batter.
Step 6: Layer & Swirl
This is the fun part! Divide your batter among 5-6 small bowls. Add a different food coloring to each bowl – aim for a rainbow if you can! Stir each one gently until the color is evenly distributed. Now, take spoonfuls of each colored batter and dollop them randomly onto your prepared baking sheet. Don’t think too hard about placement; just drop spoonfuls of different colors next to each other. Once all the batter is on the sheet, take a knife or a skewer and gently swirl the colors together. Make figure-eights or simple sweeping motions. You want to create a marbled effect, not completely blend the colors into one muddy shade. Don’t over-swirl, or you’ll lose the distinct colors.
Step 7: Bake
Pop that beautifully swirled batter into your preheated oven. Bake for about 15-20 minutes. You’ll know it’s done when the edges are lightly golden and a toothpick inserted into the center comes out clean. Keep an eye on it, as ovens can vary!
Step 8: Cool & Glaze
Once baked, let the sheet cake cool in the pan on a wire rack for about 10 minutes. Then, carefully invert it onto the wire rack, peel off the parchment paper, and let it cool completely. While it’s cooling, whisk together your glaze ingredients until smooth and pourable. Once the cake is completely cool, drizzle the glaze over the top. You can make simple lines or cover the whole thing. Let the glaze set for about 15-20 minutes.
Step 9: Slice & Serve
Once the glaze has set, it’s time to cut! Use a sharp knife to slice the rolled cake into bars or squares. The magic of the swirl will be revealed with every cut. Serve them up and watch the smiles appear!
What to Serve It With
These rainbow roll ups are so wonderfully versatile, they fit right in at almost any occasion! For a delightful breakfast, I love serving them with a strong cup of coffee. The simple, sweet flavor is a perfect start to the day. You can arrange them artfully on a platter alongside some fresh berries for a pop of extra color. For a more festive brunch, they make a fantastic addition to a dessert table or even as a standalone treat. Imagine them next to a fruit salad or some yogurt parfaits – they add that instant wow factor without any extra fuss. As a dessert, they’re just heavenly. They’re lovely on their own, but you could also serve them with a dollop of whipped cream or a scoop of vanilla ice cream for a more decadent experience. And for those cozy snack times? They’re perfect! Just grab one (or two!) with a glass of milk, and you’ve got instant comfort. My family absolutely adores them as an after-school treat. It’s amazing how a simple swirl of color can turn an ordinary snack into something truly special.
Top Tips for Perfecting Your Rainbow Roll Ups
Over the years, I’ve picked up a few little tricks that make these rainbow roll ups even better. For the zucchini prep (if you’re adding it, which I sometimes do for extra moisture!), make sure you squeeze out as much liquid as possible. Grating it finely works best, and using fresh zucchini is a must for optimal flavor and moisture. When it comes to mixing, remember that overmixing is the enemy of tender baked goods. Stop as soon as you no longer see dry ingredients. For the swirl customization, don’t be afraid to experiment with the patterns! A few gentle swirls are all you need; too much mixing will muddy the colors. If you want really distinct colors, use gel food coloring sparingly, as it’s more concentrated. Ingredient swaps are definitely possible here! If you’re out of milk, a plant-based milk like almond or oat milk works wonderfully. You can also experiment with different extracts; a hint of almond or lemon can be lovely. For baking, make sure your oven is accurately preheated. Ovens can be tricky, so using an oven thermometer is a good idea if yours tends to run hot or cold. Baking time can vary, so the toothpick test is your best friend. And for the glaze variations, play around with the consistency. A thicker glaze will create more defined lines, while a thinner one will spread further. You can also add a touch of fruit juice (like raspberry or orange) for a subtle fruity flavor and color boost!
Storing and Reheating Tips
These rainbow roll ups are pretty forgiving when it comes to storing. If you’ve got any leftovers (which is rare in my house!), you can keep them at room temperature for about 2 days. Just make sure they’re in an airtight container or covered well with plastic wrap so they don’t dry out. If you live in a warmer climate or want them to last a bit longer, the refrigerator is your best bet. They’ll stay fresh in an airtight container in the fridge for up to 4-5 days. The glaze might get a little softer in the fridge, but it’s still delicious. I haven’t personally frozen them with the glaze on, but I imagine they would freeze well without it. If you want to try freezing, bake and cool the roll ups completely, then wrap them tightly in plastic wrap, followed by a layer of aluminum foil. They should be good in the freezer for about 2-3 months. To thaw, just unwrap them and let them come to room temperature on the counter, or gently warm them in a low oven (around 250°F or 120°C) for a few minutes if you like them warm. For the glaze, I always recommend waiting until the roll ups are completely cool before applying it. If you plan to store them for more than a day or two, or if you’re freezing them, you might want to store the glaze separately and apply it just before serving for the best texture.
Frequently Asked Questions
Final Thoughts
Honestly, making these rainbow roll ups always brings a smile to my face, and I truly hope it does the same for you. It’s such a simple way to create something beautiful and delicious, and it’s a fantastic recipe to share with loved ones. The joy on someone’s face when they see those vibrant swirls is just priceless. They’re not just a treat; they’re a little bit of edible happiness. If you love colorful bakes and delicious, tender cake, you absolutely have to give this a try. For those of you who enjoyed this, you might also love my Swirled Lemon Blueberry Loaf or my fun Tie-Dye Cupcakes – they have that same playful spirit! I can’t wait to hear how your rainbow roll ups turn out, and what color combinations you decide to create. Please leave a comment below and share your thoughts, or even your own favorite serving suggestions!
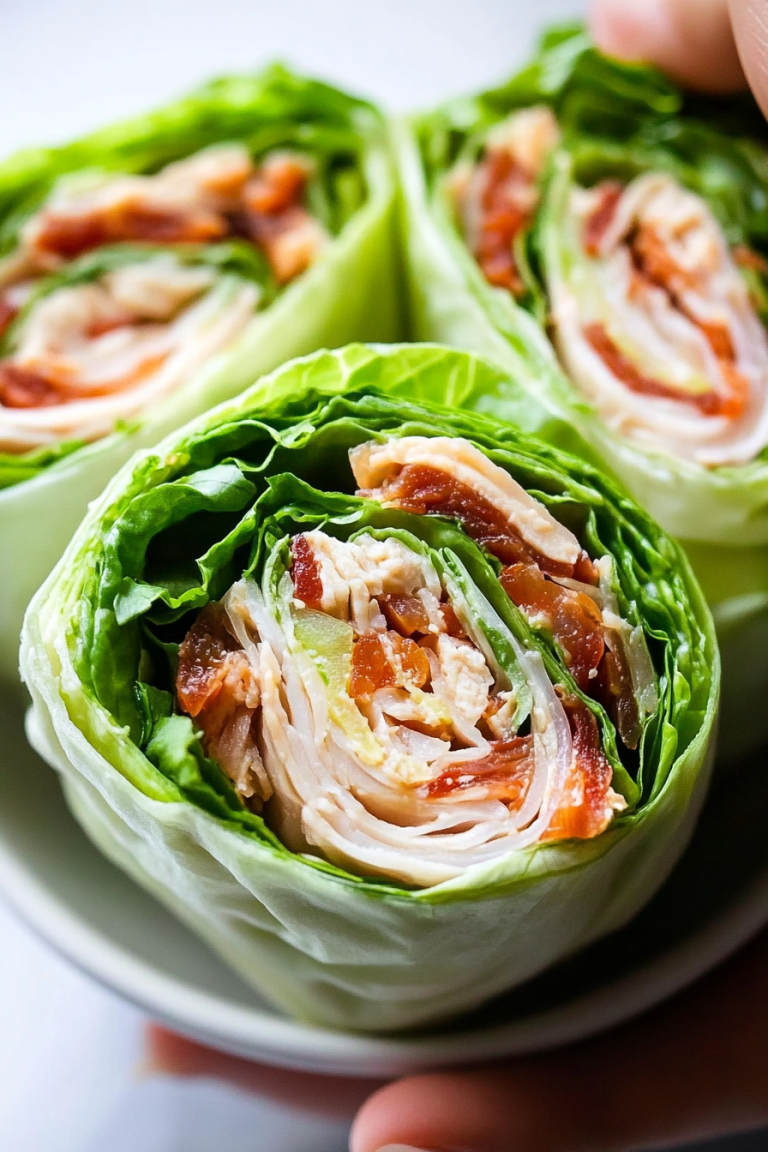
Rainbow Veggie Roll-Ups with Peanut Sauce
Ingredients
Method
- Carefully trim the thick stem from the collard green leaves. You want to make it thinner so the leaf is more pliable, but don't cut it all the way off.
- Lay a collard green leaf flat. Arrange your fillings (carrots, bell pepper, cucumber, cabbage, quinoa/rice if using, and cilantro) across the lower third of the leaf.
- Fold the sides of the collard leaf inward, then tightly roll from the bottom up to create a wrap.
- Repeat with the remaining collard leaves and fillings.
- In a blender or food processor, combine all the peanut sauce ingredients: peanut butter, soy sauce, rice vinegar, water, honey, and minced garlic.
- Blend until smooth and creamy. Add a little more water if needed to reach desired consistency.
- Serve the rainbow veggie roll-ups with the peanut dipping sauce on the side.