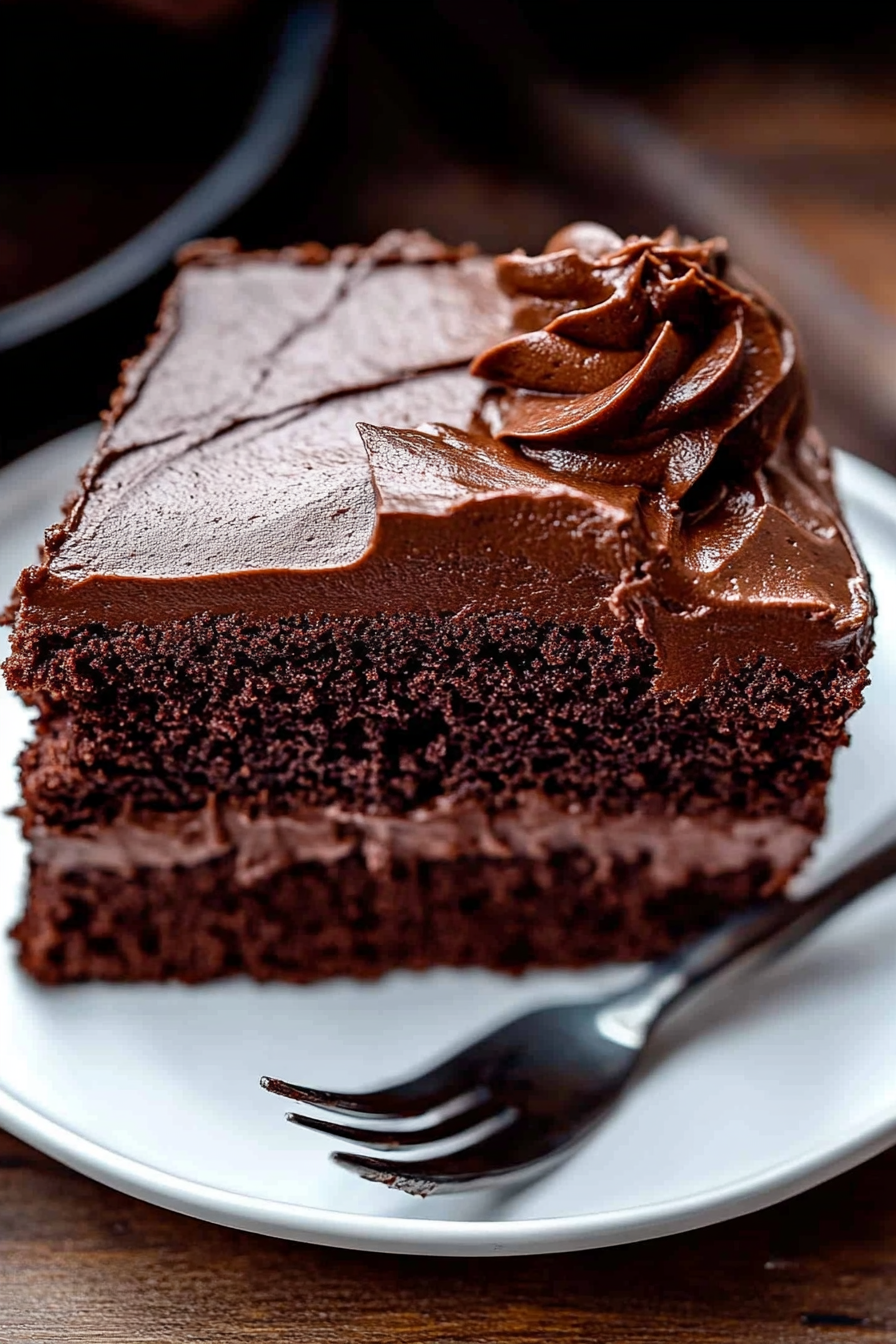
Rich Chocolate Cake With a Secret Ingredient
There’s something about the smell of baking chocolate cake that feels like a warm hug, isn’t there? I remember sneaking into the kitchen as a kid, just waiting for the oven to beep so I could cut that first slice — warm, gooey, and perfectly sweet. Honestly, I’ve made so many chocolate cakes over the years, but I keep coming back to this one because it’s silky, rich, and surprisingly simple to pull off even when I’m short on time. It’s that kind of recipe that feels fancy but is really just a happy mishmash of pantry staples. And trust me, this one’s a lifesaver on busy nights when everyone’s craving something comforting but you don’t want to spend hours fussing in the kitchen. Plus, my kids ask for this all the time — it disappeared in minutes at my house! I can’t wait to share my favorite chocolate cake recipe with you—it’s the kind of treat that makes special days even sweeter.
What is chocolate cake?
Think of a chocolate cake as the ultimate chocolate lover’s dream — a soft, tender sponge layered with velvety chocolate frosting or glaze. It’s essentially a sweet, moist cake that highlights rich cocoa flavor, often paired with creamy fillings or toppings. The name is pretty straightforward, but the magic lies in how you get that perfect balance — not too dry, not too dense, with just enough sweetness to keep everyone coming back for seconds. It’s kind of like a piece of happiness you can hold in your hands. Whether it’s for birthdays, casual weekend indulgence, or when you want a little pick-me-up after a long day, a good chocolate cake is always there to rescue you. Think of it like a warm blanket but in dessert form — comforting, familiar, and just a little decadent.
Why you’ll love this recipe?
What I love most about this chocolate cake is how effortless it is to make, and yet it tastes like it came from a bakery. The flavor? Oh boy, it’s deep, dark, and bursting with cocoa goodness — you’ll probably want a second slice, and maybe even a third (no judgment here!). The batter comes together quickly, no fancy equipment required, and I always keep these simple ingredients on hand — flour, cocoa powder, sugar, eggs, a little oil, and some chocolate chips for a surprise burst of richness. Plus, it’s incredibly versatile. You can serve it plain—just dusted with a bit of powdered sugar—or go all out with a luscious chocolate ganache or whipped cream. And because the batter keeps well, it’s perfect for making ahead, refrigerating, or even freezing portions for when that chocolate craving hits. Honestly, I’ve tested this with almond milk, and it just made it creamier — so feel free to swap ingredients to suit what you’ve got, making it your own special treat. What I love most is how this recipe feels like a warm hug — familiar, joyful, and guaranteed to bring a smile to everyone’s face.
How do I make chocolate cake?
Quick Overview
This chocolate cake is a one-bowl wonder that comes together in about 45 minutes — perfect for when you’re short on time but still want to impress. You start by whisking dry ingredients, then blending wet ingredients, and folding everything together until just combined. Pour it into a prepared cake pan, swirl in your favorite filling or chocolate chips if you like, and bake until a toothpick comes out clean. Once cooled, top with a shiny glaze or sprinkle with powdered sugar. It’s honestly so straightforward, and the smell alone will make your house feel like a chocolate haven.
Ingredients
For the Main Batter:
– 1 ¾ cups all-purpose flour (I prefer unbleached, but plain AP works great)
– ¾ cup unsweetened cocoa powder (preferably Dutch-processed for richer flavor)
– 1 ½ teaspoons baking powder
– 1 teaspoon baking soda
– ½ teaspoon salt
– 1 ½ cups granulated sugar
– ½ cup vegetable oil (or melted coconut oil for a tropical twist)
– 2 large eggs (at room temperature, trust me on this!)
– 1 teaspoon vanilla extract
– 1 cup boiling water or hot coffee (enhances the cocoa flavor)
For the Filling (Optional but dreamy):
– ½ cup chocolate chips or chunks
– ¼ cup creamy peanut butter or hazelnut spread (for a Nutella style)
For the Glaze:
– ½ cup heavy cream or coconut cream
– 1 cup semi-sweet chocolate chips or chopped chocolate
– A teaspoon of vanilla (optional but delightful)
Step-by-Step Instructions
Step 1: Preheat & Prep Pan
Set your oven to 350°F (175°C). Grease your cake pan generously — I love using butter and a dusting of cocoa powder instead of flour because it keeps the cake super moist and non-sticky. Line the bottom with parchment paper for extra assurance it’ll come out perfectly. This step is simple but makes a huge difference.
Step 2: Mix Dry Ingredients
In a big mixing bowl, whisk together the flour, cocoa powder, baking powder, baking soda, and salt. I always do this first to evenly distribute everything — it prevents clumps and ensures your cake rises nice and fluffy. The dry mixture should look uniform and a bit stinky of delicious cocoa — trust your nose!
Step 3: Mix Wet Ingredients
In a separate bowl, beat the eggs with sugar, oil, and vanilla until smooth and slightly frothy. Then stir in the hot water or coffee — that’s where the magic flavor deepens. The mixture might look a bit runny, but don’t worry — that’s what keeps it moist. I’ve tested this with almond milk and it made it even creamier, but use what you love best!
Step 4: Combine
Pour the wet ingredients into the dry and fold gently with a spatula. Avoid overmixing — just until combined is perfect. If you’re adding chocolate chips, fold them in now. The batter will be thin but that’s exactly how it should be.
Step 5: Prepare Filling
If you’re adding a filling, like chocolate chunks or nut butter, spread half of the batter into your pan first, then sprinkle or dollop in your filling, and top with the rest of the batter. For a pretty swirl, use a toothpick to drag the filling through the batter in gentle circles.
Step 6: Layer & Swirl
This step is where you can get creative! I love swirling in some extra chocolate or peanut butter for a marbled effect. Use a skewer or a toothpick to gently swirl through the batter — it’s like creating little chocolate storms in your cake.
Step 7: Bake
Pop the whole thing into the oven and bake for about 35-40 minutes. Check with a toothpick in the center; it should come out with a few moist crumbs but no wet batter. For me, every oven is a little different — I’ve learned to start checking around 33 minutes. If the top starts cracking and your house smells heavenly, you’re probably done.
Step 8: Cool & Glaze
Let the cake cool in the pan for about 15 minutes, then transfer it to a wire rack. Don’t rush the cooling — it makes slicing so much easier. Once cooled, pour your luscious glaze over the top — melt the chocolate with cream, pour, and let it set. The glaze is magical because it makes every bite shiny and rich-looking.
Step 9: Slice & Serve
Use a sharp serrated knife to cut clean slices — I find warming the knife slightly helps. Serve a piece with a dollop of whipped cream or a scoop of vanilla ice cream if you’re feeling extra indulgent. Trust me, a warm slice with melted chocolate on top is the real secret to happiness.
What to Serve It With
This chocolate cake goes with just about anything, but here are some ideas that I always turn to. For breakfast? Why not, paired with a strong cup of coffee or a glass of cold milk — it’s basically dessert for breakfast anyway! For brunch, serve with fresh berries or a drizzle of caramel for a touch of sophistication. When it’s time for dessert, a dusting of powdered sugar, a scoop of vanilla ice cream, or some whipped cream makes it special. And if you’re just craving a cozy snack, a warm slice with a mug of tea or hot cocoa hits the spot. One of my favorite traditions is slicing it up, wrapping individual pieces in plastic wrap, and freezing them for a quick treat later on — the kids love grabbing a piece straight from the freezer and letting it thaw a little before enjoying.
Top Tips for Perfecting Your Chocolate Cake
Over the years, I’ve picked up a few tricks for making sure this cake turns out perfect every time. First, always measure your ingredients accurately — baking is a science, after all. I use a kitchen scale when I can, especially for flour and cocoa powder; it makes all the difference. If your batter feels too thick, a splash more hot water or coffee can loosen it without sacrificing flavor. When it comes to swirling fillings, take your time to create pretty marbled patterns — it’s surprisingly easy once you get the hang of it. And do not overmix! Overworking the batter leads to dense, tough cakes. I’ve tested different temperature setups, and placing the cake in the lower third of the oven helps it bake evenly. For the glaze, I love a glossy, smooth finish, so I warm the cream just enough to melt the chips without boiling — patience equals beauty here. I’ve also experimented with substituting butter for oil, and honestly, it adds a lovely richness, so don’t be afraid to tweak. And finally, my most recent trick? Adding a pinch of espresso powder to the cocoa intensifies that deep, dark chocolate flavor. It’s tiny but totally worth it!
Storing and Reheating Tips
This cake keeps beautifully! Wrap it tightly in plastic wrap or store in an airtight container at room temperature for about 2 days — if it’s out longer, I pop it in the fridge. It’s still moist and delicious cold, although I prefer it slightly warmed, about 10 seconds in the microwave. If you want to keep it for longer, slice it up and freeze portions wrapped well with parchment and foil — it stays fresh for up to 3 months. Just let it thaw at room temperature or warm slightly before serving. If your glaze is set in the fridge, warm it gently over low heat or in the microwave to make pouring easy again. The trick is to keep it covered to prevent it from drying out or absorbing fridge odors — I learned that the hard way! Also, if you’re reheating slices, a quick zap in the microwave works wonders — just keep a close eye so it doesn’t overheat and turn rubbery.
Frequently Asked Questions
Final Thoughts
This homemade chocolate cake embodies everything I adore about baking — it’s simple, rich, and deeply comforting. Over the years, it’s become a family favorite, especially for birthdays or whenever I want to indulge a little. Honestly, there’s just something about that moist crumb paired with glossy chocolate glaze that transforms any ordinary day into a celebration. Plus, you can customize it easily — add nuts, swirl in caramel, or keep it classic. The best part? It’s so forgiving, and every time I make it, I feel like a little kitchen hero. If you try it, I’d love to hear how yours turns out or if you add your own twist. Happy baking, and don’t forget to share a slice with someone you love — this chocolate cake is bound to make today extra special!
Chocolate Mayonnaise Cake
Ingredients
Method
- Preheat oven to 350°F. Spray a 9x9-inch baking dish with nonstick cooking spray.
- In a medium mixing bowl, whisk together the flour, sugar, cocoa powder, and baking soda.
- Add the water, mayonnaise, and vanilla. Mix until evenly combined.
- Pour the batter into the prepared baking pan. Bake for 25-30 minutes, or until a toothpick comes out mostly clean.
- Let the cake cool in the pan for 10-15 minutes before transferring to a wire rack to cool completely.