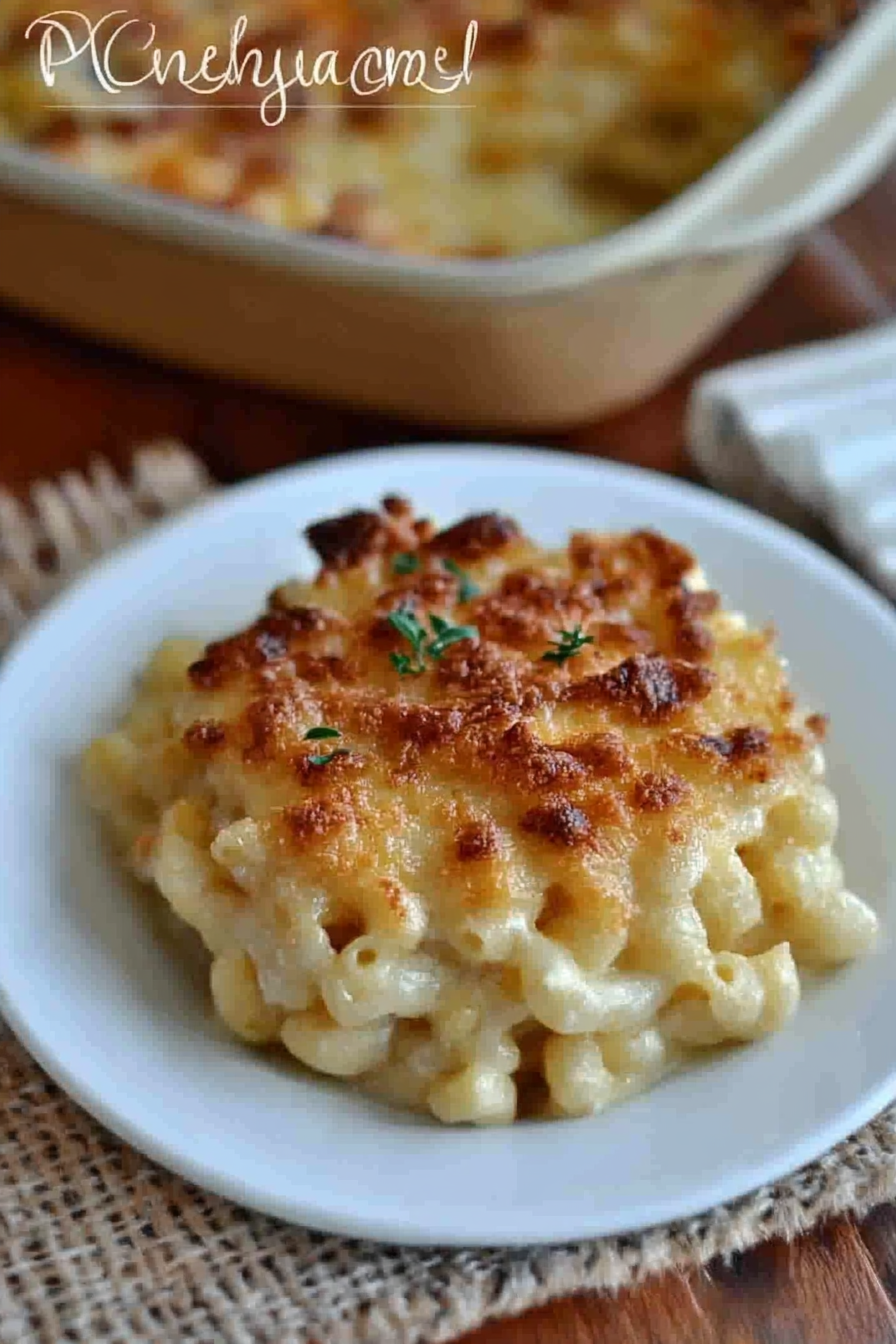
Savory Mac and Cheese with Gouda and Bacon
There’s something about a warm, creamy plate of mac and cheese that just hits different, you know? I remember my childhood summers spent sneaking tastes from my mom’s bubbling casserole, the rich smell of cheddar filling the house, and that gooey, cheesy stretch every time I scooped it up. It’s honestly one of those recipes that just feels like a hug in food form—so simple, so satisfying. Over the years, I think I’ve tried every version out there, from the fancy stovetop to baked with a crispy topping, but this one’s my tried-and-true favorite. It’s the kind of dish that disappears in minutes at my house, leaving everyone asking for seconds—and thirds. Plus, it’s surprisingly easy to throw together on a busy weeknight, yet elegant enough to serve for family dinners or casual gatherings. Trust me, once you get this down, you’ll be making it all the time. Yep, it’s that good.
What is Mac
Think of it as the classic American comfort food that’s been around forever—easy, cheesy, and totally addictive. It’s essentially cooked pasta coated in a rich, creamy cheese sauce, baked or served straight from the stove. The name “mac and cheese” is short for macaroni and cheese, but over the years, it’s come to encompass so many variations—from velvety stovetop mixes to baked casseroles with crispy tops. The charm is in its simplicity: tender pasta smothered in cheese that stretches with every bite, warming you from the inside out. This dish’s roots run deep in family kitchens and school cafeterias alike, making it a beloved staple in many homes. It’s versatile enough to swap out cheeses, add veggies, or throw in a little spice—whatever makes your taste buds happy. And honestly? It’s so much easier to make than you think—with just a handful of ingredients and a little love, you’ll have a dish that everyone asks for again and again.
Why you’ll love this recipe?
What I love most about this mac and cheese is how it checks all the boxes—delicious, cozy, and simple to whip up. The flavor? Oh, it’s next-level. I use a combination of sharp cheddar and creamy gouda to get that perfect balance of tang and meltiness, but you can swap in your favorite cheeses if you like—stuff like Gruyère or Monterey Jack work beautifully. The best part? It’s a one-pot wonder most of the time, making cleanup a breeze, which is a lifesaver on busy nights. Plus, every ingredient is budget-friendly—that’s right, no fancy cheeses or obscure ingredients needed. I’ve also tested this with almond milk, and honestly, it made the sauce even creamier—who knew? Personally, what I love most is how adaptable it is. Want to add a little heat? Toss in some red pepper flakes. Looking for a bit of crunch? Top it with breadcrumbs or crispy bacon. This dish is comfort food at its finest, but it’s also a blank canvas for your own twists. It’s perfect for cozy family dinners, potlucks, or even a quick, indulgent lunch. If you’re anything like me, you’ll find yourself making this at least once a week—it’s that good!
How do
Quick Overview
This recipe keeps things simple and straightforward. You start by boiling your pasta until just al dente, then set it aside while you whip up a luscious cheese sauce. It’s all about creating that silky, cheesy goodness that coats every piece of pasta perfectly. Pour the sauce over the pasta, give it a gentle stir, and bake until bubbling and golden on top. The secret? Using a mix of cheeses for depth and stirring the sauce slowly to prevent clumping. No fancy techniques, just good old-fashioned comfort food made with love. It’s perfect when you want something hearty but don’t want to fuss—just toss everything in, bake, and enjoy.
Ingredients
For the Main Pasta: For the main Pasta: For
– 1 pound (450g) of your favorite pasta (elbow macaroni is classic, but penne or shells work great too). Always cook until just al dente; nobody likes mushy cheese!
– Salt for the water, because it makes the pasta flavor pop.
– A splash of olive oil to prevent sticking if you like.
For the Cheese Sauce:
– 4 tablespoons unsalted butter
– 3 tablespoons all-purpose flour (this is your thickening magic)
– 2 cups whole milk (or almond milk if you want it dairy-free, but trust me, full-fat milk makes it creamier)
– 1 cup sharp cheddar, grated
– ½ cup gouda or Gruyère, grated (for that irresistible meltiness)
– ½ teaspoon black pepper
– ½ teaspoon paprika (adds a subtle smoky flavor)
– Salt to taste
Optional Extras for Topping:
– Breadcrumbs mixed with a bit of butter for that crispy topping
– Cooked bacon bits, chopped herbs, or a dash of hot sauce for a personal twist
Step-by-Step Instructions
Step 1: Preheat & Prep Pan
Preheat your oven to 375°F (190°C). Grease a baking dish with butter or non-stick spray. While the oven warms up, bring a large pot of salted water to a boil. Add your pasta and cook until just al dente—think a minute less than package instructions, so it doesn’t turn to mush in the oven. Drain and set aside.
Step 2: Mix Dry Ingredients
Nothing fancy here, but I always measure out my flour and spices first—makes the whole process smoother. The flour is what will turn your milk and butter into that velvety sauce, so don’t skip this step. Whisk the flour and paprika together—it’s my little flavor secret, plus it prevents lumps.
Step 3: Mix Wet Ingredients
In a separate saucepan, melt the butter over medium heat. Once melted, whisk in the flour mixture a little at a time, stirring constantly until it forms a smooth paste. Slowly pour in the milk, whisking all the while to keep it silky. Keep stirring until it thickens—about 5 minutes. The smell of warm milk thickening is just heavenly. Remove from heat and stir in your grated cheese until melted and smooth.
Step 4: Combine
Pour the cheese sauce over your cooked pasta. Gently fold everything together, making sure each piece is coated in that cheesy goodness. Don’t overmix—just enough to get a nice, even coating. Taste and add salt if needed.
Step 5: Prepare Filling (Optional)
If you want to add a surprise inside—like cooked bacon, sautéed mushrooms, or a dash of hot sauce—now’s the time. Mix them into the cheese pasta, or layer them if you’re doing a casserole.
Step 6: Layer & Swirl
Transfer the coated pasta into your prepared baking dish. If you like a swirl effect, spoon a little extra cheese or sauce on top and give it a gentle swirl with a fork. This makes stuff look pretty when it comes out of the oven!
Step 7: Bake
Sprinkle the top with your breadcrumb mixture or extra cheese, then bake uncovered for about 20–25 minutes, or until bubbly and golden on top. Keep an eye toward the end—because burnt cheese isn’t the goal here.
Step 8: Cool & Glaze
Let it cool slightly for about 5 minutes—to let the cheese sauce set just a little. While it cools, mix up a quick glaze if you’re adding one, or just sprinkle some fresh herbs for brightness. If you want that shiny, cheesy crust, brush the top lightly with butter or olive oil before serving.
Step 9: Slice & Serve
Grab a big spoon or a sharp knife—this dish slices beautifully once cooled just enough. Serve warm, maybe with a side salad or some roasted veggies. Honestly, just scooping it straight from the dish is my favorite—no fuss, full flavor. And yes, leftovers heat up like a dream—trust me on this one!
What to Serve It With
This mac and cheese is equally happy with a simple green salad or some roasted broccoli on the side. When I do a full family dinner, I love serving it alongside crispy roasted chicken or grilled sausages—it turns into a hearty, satisfying meal. For brunch, I like a side of fruit and maybe some scrambled eggs, the contrast in flavors is lovely. I’ve even served it as a comforting lunch with a drizzle of hot sauce or a sprinkle of chopped herbs. My kids, of course, ask for this all the time, especially when I turn it into “baked cheesy pasta casserole.” And it’s perfect for casual weeknight dinners or even potlucks because everyone always asks for the recipe. It’s genuinely one of those dishes that feels indulgent but is so simple to make, you’ll want to keep a batch in the fridge at all times.
Top Tips for Perfecting Your Mac and Cheese
Over the years, I’ve learned a few tricks that take this from good to downright addictive. First, always use freshly grated cheese; pre-shredded cheese has anti-caking agents that can prevent smooth melting. Trust me, that extra minute grating cheese makes all the difference. When cooking the pasta, salt your water generously—like sea water—so the pasta itself is flavorful. Under or overcooked pasta ruins the texture, so aim for just al dente. The cheese sauce? Keep your heat moderate; high heat can make the cheese clammy or cause it to break. I’ve also experimented with using different cheeses—gorgonzola or pepper jack for a spicy kick, or a splash of cream for extra richness. When it comes to toppings, I tested baking with panko breadcrumbs and seasoned herbs, and they both add delightful crunch and aroma. Sometimes I mix a bit of grated Parmesan into the breadcrumbs for a salty boost. A pro tip? If you want a crispy top, lightly spray or brush breadcrumbs with butter before baking—they toast beautifully in the oven. You can even dollop a spoonful of mustard into the cheese sauce for a subtle tang. Just keep tasting and adjusting—they’re little touches that elevate the dish from homemade to restaurant quality.
Storing and Reheating Tips
This mac and cheese keeps surprisingly well. If you’ve got leftovers, store them in an airtight container in the fridge for up to 3 days. I prefer to store it without the topping—I usually add the breadcrumbs just before reheating to keep that crunch intact. When reheating, I recommend doing it gently on the stove over low heat, stirring occasionally so it heats evenly without drying out. Microwave works too—but try to use medium power and stir halfway through to prevent hot spots. If you want to freeze it, pack it tightly in a freezer-safe container for up to 2 months. Thaw overnight in the fridge, then reheat over low heat or in the oven with a sprinkle of fresh cheese or breadcrumbs on top. For best results, don’t add the glaze (if using) until just before serving—freezing can sometimes affect its glossy finish. Remember, the key is to reheat slowly and avoid overcooking, which can turn cheese sauce grainy or rubbery. And trust me, nothing beats a warm, freshly baked plate—so try not to let leftovers sit too long!
Frequently Asked Questions
Final Thoughts
This mac and cheese isn’t just a dish; it’s my little token of warmth and home, ready to comfort you after a long day or bring smiles to your family’s faces. Over the years, I’ve tweaked and perfected it, and I swear, once you try it, you’ll find yourself making it more often than you’d admit. The blend of cheeses, the creamy sauce, the crispy topping—it’s all about those small magic moments in the kitchen that turn simple ingredients into a beloved classic. Whether you’re new to cooking or a seasoned pro, I promise this will become one of your go-to recipes. Remember, it’s all about personal touches—feel free to experiment with flavors, add your favorite mix-ins, or even make it your own signature dish. Happy baking, and I can’t wait to hear how yours turns out! Don’t forget to leave a comment below and share your twists—I love hearing from fellow cheese lovers!

Creamy Bacon Macaroni and Cheese
Ingredients
Method
- Cook the macaroni according to package instructions. Drain and set aside.
- In a large saucepan, melt butter over medium heat. Add milk and bring to a simmer. Whisk in flour and cook for 1-2 minutes until thickened. Gradually stir in cream, whisking constantly. Add salt, pepper, mustard, and Worcestershire sauce. Reduce heat to low and simmer for 5 minutes.
- Shred the gouda and cheddar cheeses. Add to the sauce and stir until melted and smooth.
- Combine the cooked macaroni with the cheese sauce. Transfer to a baking dish.
- In a food processor, pulse bread slices into fine crumbs. Mix with melted butter. Sprinkle over the macaroni and top with crumbled bacon.
- Bake at 375°F for 25-30 minutes until bubbly and golden.