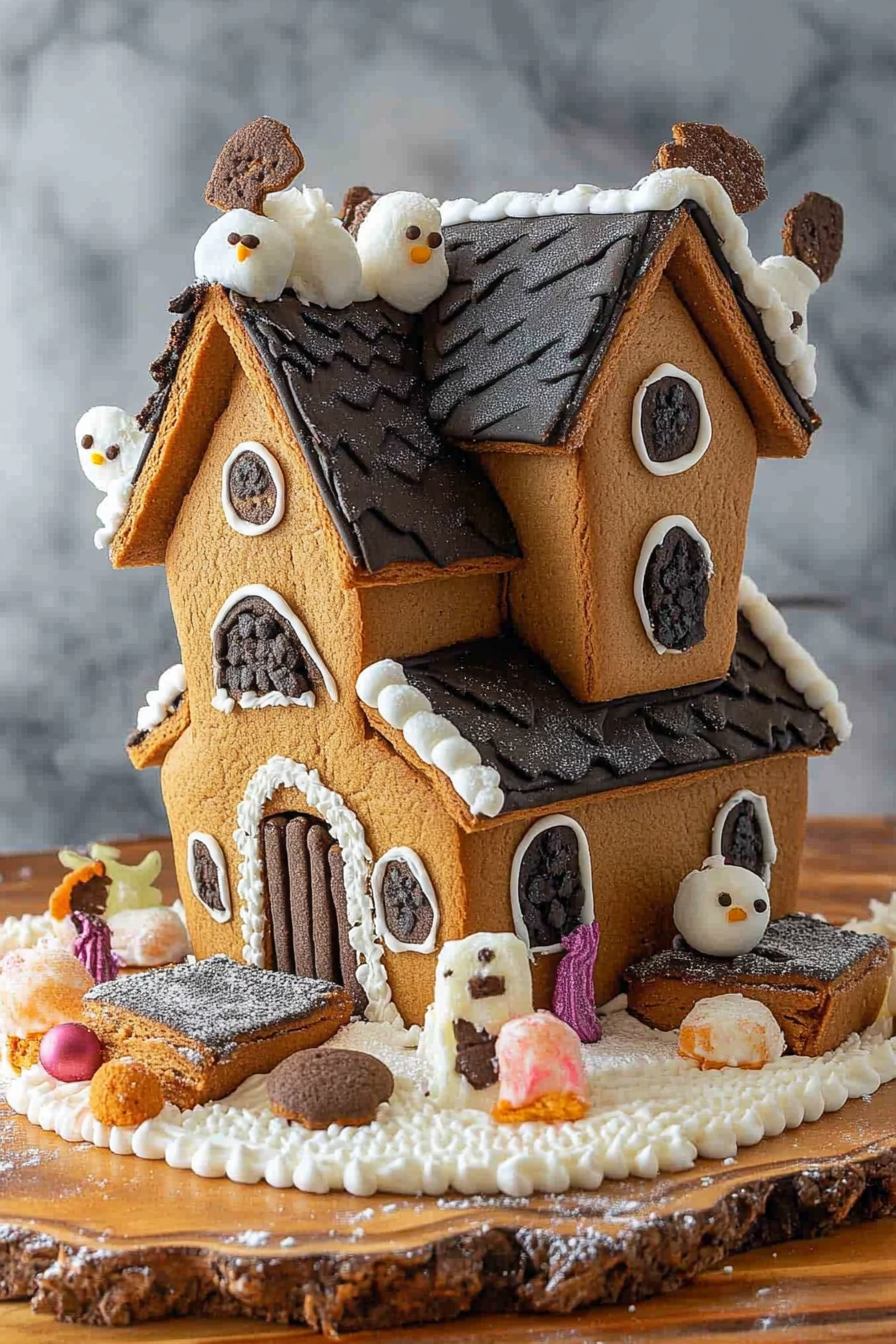
Spooky Gingerbread House Decorating Ideas
Oh, the magic of the holiday season! For me, it’s always been tied to the scent of gingerbread. Not just any gingerbread, but the kind that fills the whole house with a warm, spicy aroma that just screams “cozy.” And what’s more iconic than a gingerbread house? I remember as a kid, my grandma would always have one on the mantelpiece, looking like a tiny, edible palace. We were never allowed to touch it until Christmas Eve, and even then, it was a monumental decision about which perfectly placed gumdrop to take first. Now that I have my own little ones, recreating that wonder is one of my absolute favorite traditions. This isn’t just about building a pretty structure; it’s about creating memories, one candy cane at a time. This gingerbread house recipe is truly my go-to because it’s incredibly stable for building, but still tastes absolutely divine, unlike some of those super-hard, inedible versions. It’s the perfect balance, and honestly, my family devours the leftovers faster than I can clean up the icing bag!
What is a gingerbread house?
So, what exactly is this gingerbread house we’re talking about? At its heart, it’s a confectionary structure, built from pieces of baked gingerbread dough that are assembled using royal icing, which acts like super-strong edible glue. Think of it as a delicious, albeit temporary, architectural project for your kitchen. The “house” part is pretty literal – it’s typically designed to resemble a cozy cottage, a grand castle, or any whimsical dwelling you can dream up. The gingerbread itself is a spiced cookie, usually flavored with ginger, cinnamon, cloves, and molasses, giving it that distinct, warming taste. It’s not just for looking pretty, though! A good gingerbread house recipe, like the one I’m sharing, results in cookies that are sturdy enough to stand up to assembly and decorating, but are also tender and flavorful enough to be enjoyed by the bite. It’s a beloved holiday tradition that spans across many cultures, a sweet symbol of festive cheer!
Why you
I love gingerbread house recipes. I know you will too. Let’s talk about the ingredients.flavor. The aroma alone when this bakes is intoxicating – a rich blend of warm spices like ginger and cinnamon, balanced with the deep sweetness of molasses. It’s the quintessential holiday scent, and it’s so much more satisfying than any candle! Then there’s the simplicity. Now, I know building a gingerbread house can sound daunting, but the dough itself is surprisingly straightforward to make. The key is getting the consistency right, which I’ll walk you through. It’s less fussy than some delicate cookie recipes, and it comes together pretty quickly. And talk about Cost-efficiency: What is the best way! Most of the ingredients are pantry staples, so you don’t need to break the bank to create something truly spectacular. It’s an activity that’s fun for the whole family without costing a fortune. Finally, its versatility is incredible. While the primary goal is building a show-stopping gingerbread house, the leftover dough can be cut into fun shapes for individual cookies, or you can even scale it down for smaller gingerbread figures. It’s a recipe that truly delivers on all fronts. What I love most about this is that it’s robust enough for construction, meaning fewer frustrating collapses mid-build, but it also has that delightful chewiness and spicy kick that makes it a joy to eat. It’s a win-win for both decorators and cookie monsters!
How to Make A Gingerbread House
Quick Overview
Making this gingerbread house is a two-part joy: baking the sturdy, flavorful gingerbread pieces, and then bringing them all together with a strong royal icing. We’ll mix up a spiced dough, roll it out, cut out our house pieces, and bake them until firm. Then, we’ll whip up some foolproof royal icing to act as our edible cement. Once everything is cooled, it’s time for the fun part: assembling the walls, adding the roof, and decorating to your heart’s content! It’s a process that requires a little patience, especially during the drying phases, but the result is incredibly rewarding, and the steps themselves are quite simple.
Ingredients
For the Main Gingerbread Dough:
You’ll need: 3 cups all-purpose flour, plus more for dusting; 1 teaspoon baking soda; 1 teaspoon ground ginger; 1 teaspoon ground cinnamon; ½ teaspoon ground cloves; ¼ teaspoon salt; ¾ cup unsalted butter, softened; ¾ cup packed light brown sugar; ½ cup molasses; 1 large egg, at room temperature.
My secret for the best gingerbread? Using good quality spices makes a huge difference, really enhancing that warm, festive flavor. And make sure your butter is truly softened – it makes creaming it so much easier!
For the Royal Icing:
This is the glue that holds everything together! You’ll need: 3 large egg whites, at room temperature; 4 cups confectioners’ sugar, sifted; ½ teaspoon cream of tartar (optional, but it helps stabilize it).
Sifting your confectioners’ sugar is a small step that prevents lumpy icing. For a thicker, more robust icing, use just the egg whites and sugar. If you want a slightly more spreadable icing for decorating details, you can add a tiny bit of water, a teaspoon at a time, but be careful not to make it too thin!
Step-by-Step Instructions
Step 1: Preheat & Prep Pan
Get your oven preheated to 350°F (175°C). This ensures an even baking temperature right from the start. Line your baking sheets with parchment paper. This is crucial! It prevents sticking and makes removing the gingerbread pieces so much easier. You’ll be cutting out large pieces, so give them plenty of space on the baking sheets. I usually work in batches, so the cookies don’t crowd each other and bake evenly.
Step 2: Mix Dry Ingredients
In a medium bowl, whisk together the 3 cups of all-purpose flour, baking soda, ground ginger, cinnamon, cloves, and salt. Whisking them together ensures all the leavening and spices are evenly distributed throughout the flour. This step is super important for consistent texture and flavor in every bite of your gingerbread house.
Step 3: Mix Wet Ingredients
In a large bowl, using an electric mixer on medium speed, cream together the softened butter and packed light brown sugar until light and fluffy, about 2-3 minutes. Beat in the molasses until well combined. Then, add the egg and beat until just incorporated. Make sure your egg is at room temperature; it incorporates much better this way and helps create a smoother batter.
Step 4: Combine
Gradually add the dry ingredients to the wet ingredients, mixing on low speed until just combined. Don’t overmix! Overmixing can develop the gluten in the flour, leading to tough cookies, and we definitely don’t want that for our gingerbread house. The dough should be thick and cohesive. If it seems a bit sticky, you can add a tablespoon more flour at a time, but use it sparingly.
Step 5: Prepare Filling
For the royal icing, which is our “filling” and building material: In a clean, dry bowl of your electric mixer (or using a hand mixer), combine the egg whites and sifted confectioners’ sugar. Add the cream of tartar if you’re using it. Beat on low speed until the sugar is incorporated, then increase the speed to medium-high and beat for 5-7 minutes, until the icing is stiff, glossy, and forms peaks that hold their shape. This is key for building – you want it to be like thick toothpaste!
Step 6: Layer & Swirl
This step is about preparing your gingerbread pieces for assembly. Once your gingerbread dough is mixed, divide it in half, flatten each half into a disk, wrap tightly in plastic wrap, and chill in the refrigerator for at least 2 hours, or until firm. This makes it much easier to roll out and cut. Once chilled, roll out one disk of dough on a lightly floured surface to about ¼-inch thickness. Use sharp knives or templates to cut out your gingerbread house pieces: two sides, two gables (front/back), and two roof panels. Carefully transfer these pieces to your prepared baking sheets, leaving some space between them. You can also cut out little windows or doors before baking if you like! Bake for 10-15 minutes, or until the edges are firm and slightly browned. Let them cool on the baking sheets for a few minutes before transferring them to a wire rack to cool completely. Repeat with the second disk of dough.
Step 7: Bake
Bake your gingerbread pieces in the preheated oven at 350°F (175°C) for 10-15 minutes, depending on the size and thickness of your pieces. You’re looking for the edges to be set and lightly golden brown. They should feel firm to the touch when gently pressed. It’s better to underbake slightly than overbake, as they will continue to firm up as they cool. Keep an eye on them, as thicker pieces might need a few extra minutes. Rotate the baking sheets halfway through baking if your oven has hot spots.
Step 8: Cool & Glaze
Once baked, let the gingerbread pieces cool on the baking sheet for about 5 minutes before carefully transferring them to a wire rack to cool completely. This is crucial for structural integrity! Warm gingerbread is soft and can easily break or warp. Once your pieces are completely cool, you can start assembling with the royal icing. Load your piping bag fitted with a medium round tip (or a ziplock bag with a corner snipped off) with the royal icing. Pipe a generous line of icing along the bottom and side edges of one of your house side pieces. Attach it to your base (a sturdy cardboard or board works well). Then, pipe icing along the adjoining edges and attach the front or back gable piece. Repeat with the other side and gable pieces, holding them in place for a minute or two until the icing starts to set. Once the four walls are assembled and feeling secure, pipe icing along the top edges of the walls and carefully attach the roof panels. Let the entire structure dry and set for at least a few hours, or preferably overnight, before decorating.
Step 9: Slice & Serve
This step is less about slicing the house and more about enjoying the decorating! Once your house is fully assembled and the icing has hardened, it’s time for the creative fun. Use the leftover royal icing to “glue” on candies, pretzels, candies, or anything else your heart desires. Think gumdrops, candy canes, M&Ms, sprinkles – the possibilities are endless! You can even tint small portions of the icing with food coloring for decorative details. Once your masterpiece is complete and the decorations are set, your gingerbread house is ready to be admired and, eventually, enjoyed. If you’re serving it, you can carefully slice off pieces of the gingerbread walls and roof. It’s best served at room temperature, allowing the spices to really shine through.
What to Serve It With
While the gingerbread house is a star all on its own, especially during the holidays, here are some ideas for how to present and enjoy it, or even incorporate its flavors into your gatherings.
For Breakfast: Imagine a smaller, personal-sized gingerbread house or even gingerbread cookies cut into festive shapes served alongside a steaming mug of spiced coffee or a rich hot chocolate. It’s a sweet, warming start to a chilly morning. You could also crumble a piece of a less-decorated gingerbread house into yogurt for a festive parfait.
For Brunch: A beautifully decorated gingerbread house makes a stunning centerpiece for a holiday brunch table. Serve it alongside classic brunch items like pancakes, waffles, or even a savory quiche to balance the sweetness. A pitcher of mimosas or a festive cranberry punch would pair wonderfully.
As Dessert: This is perhaps its most traditional role! Serve slices of gingerbread house with a dollop of whipped cream, a drizzle of caramel sauce, or even a scoop of vanilla bean ice cream for an extra decadent treat. A warm apple cider or a mulled wine complements the spices beautifully.
For Cozy Snacks: On a cold afternoon, a simple slice of gingerbread, perhaps from a less-than-perfectly-assembled piece of the house, is pure comfort. Pair it with a glass of milk or a cup of herbal tea. It’s the perfect sweet indulgence to enjoy while reading a book or watching a holiday movie.
My family also loves to break off pieces of the actual house and have “gingerbread parties” where we just munch on the construction materials, usually with a glass of cold milk. It’s incredibly informal but always a huge hit!
Top Tips for Perfecting Your Gingerbread House
Over the years, I’ve learned a few tricks that make building and decorating a gingerbread house a much smoother (and more enjoyable!) experience. These are the little things that make a big difference.
Gingerbread Dough Prep: The most crucial step for sturdy construction is chilling the dough thoroughly. Don’t rush this! At least 2 hours, and even better if it’s longer, or even overnight. This makes the dough firm and easy to roll and cut without spreading too much during baking. If your dough gets too warm while you’re cutting shapes, pop it back in the fridge for 15-20 minutes. When rolling, aim for an even ¼-inch thickness for all your pieces; this ensures they bake evenly and fit together well.
Mixing Advice: As I mentioned, avoid overmixing the dough once the dry ingredients are added. Mix just until it comes together into a cohesive ball. For the royal icing, make sure your egg whites are free of any yolk. Whisk them with the sugar until it’s very stiff and glossy; this is the secret to strong “glue.” If your icing seems too thin, add more sifted confectioners’ sugar a tablespoon at a time. If it’s too thick to pipe, add a tiny bit of water or milk, just a half-teaspoon at a time, until you reach the desired consistency.
Structural Integrity: When assembling the house, don’t be shy with the icing. Use plenty to ensure strong seams. Hold the pieces together for a good minute or two after applying the icing until you feel it start to set. Using a temporary support system, like cans of food or small jars, can help hold walls in place while the icing dries. Let the assembled structure dry completely, ideally overnight, before you start decorating. This prevents any sad collapses!
Swirl Customization: For decorative icing, you can experiment with different piping tips for various effects – star tips for “snow” drifts, round tips for outlines, and petal tips for shingles. You can also tint your icing in advance. I like to keep some white icing aside for snow and icicles. For patterns on the walls or roof, consider using a toothpick to gently drag lines through the icing while it’s still wet, creating swirls or wood grain effects.
Ingredient Swaps: While this recipe is tested for its structural integrity, if you’re looking for variations, consider adding a teaspoon of vanilla extract to the dough for an extra flavor note. For a darker, richer flavor, you could use dark molasses. When it comes to decorating, the sky’s the limit! Be creative with candies, pretzels, cookies, and even cereal for unique textures and colors.
Baking Tips: Always preheat your oven properly. If your gingerbread pieces are cut very large, they might need a few extra minutes to bake through. Keep an eye on the edges; they should be firm and just starting to brown. If they are browning too quickly, you can tent the pieces with foil. Let them cool completely on a wire rack before attempting assembly.
Glaze Variations: While royal icing is best for construction, for decorating only, you could also use a simple confectioners’ sugar glaze (confectioners’ sugar mixed with a little milk or lemon juice until pipeable) for lighter details, though it won’t hold structural elements. For a glossy finish on decorations, a little corn syrup can be mixed into the icing.
Storing and Reheating Tips
Proper storage is key to keeping your gingerbread house looking and tasting its best, whether you’re saving it for a later date or just have some leftover cookies.
Room Temperature: Once fully decorated and the icing is completely dry, your gingerbread house can be stored at room temperature. Keep it in a cool, dry place, away from direct sunlight or heat, which can cause the icing to soften or melt. A large, airtight container or a dedicated cake stand with a lid works perfectly. It can typically last for up to 2 weeks when stored this way. The gingerbread itself will become slightly softer over time, which many people find even more enjoyable.
Refrigerator Storage: I generally don’t recommend refrigerating the whole gingerbread house, as the humidity can make the gingerbread soft and the icing might become sticky. However, if you have extra gingerbread cookies (not part of the house structure), they can be stored in an airtight container in the refrigerator for a few extra days, though they might lose some crispness.
Freezer Instructions: Unassembled gingerbread cookie pieces (before decorating or icing) can be frozen. Wrap them tightly in plastic wrap, then place them in a freezer-safe bag or container. They’ll last for up to 3 months. Thaw them completely at room temperature before proceeding with assembly or decorating. Once the house is assembled and decorated, freezing is not recommended due to potential moisture issues.
Glaze Timing Advice: For the gingerbread house itself, ensure all icing and decorations are completely dry before storing. If you plan to store it for a long time, it’s best to do minimal decorating on the structural parts and save the bulk of the candy and frosting for closer to when you plan to display or eat it, if you’re concerned about freshness of candies.
Frequently Asked Questions
Final Thoughts
There you have it – my tried-and-true recipe for a gingerbread house that’s as delightful to build as it is to eat! This project is so much more than just a recipe; it’s an invitation to create magic in your kitchen, to gather your loved ones, and to fill your home with those wonderful, spicy aromas that just make the holidays feel complete. The satisfaction of seeing your creation come together, piece by piece, is truly special. I hope this recipe brings as much joy and deliciousness to your home as it has to mine over the years. If you try it out, please let me know how it turns out in the comments below – I absolutely love hearing about your baking adventures! And if you’re looking for more festive treats, be sure to check out my recipes for [link to another relevant recipe, e.g., Christmas Sugar Cookies] or my [link to another relevant recipe, e.g., Peppermint Bark Brownies]. Happy baking, and may your gingerbread house stand tall and sparkle bright!

Spooky Gingerbread House for Halloween
Ingredients
Method
- Create or print a paper pattern for your gingerbread house pieces and have them ready.
- Preheat your oven to 360 degrees F (180 degrees C).
- Line a jelly roll pan with parchment paper and lightly grease it.
- In a large bowl, beat the butter and brown sugar until light and fluffy.0.5 cup butter
- Add the egg and molasses, and beat until combined.0.5 cup butter
- Stir in the flour, ginger, baking soda, cinnamon, nutmeg, allspice, and salt until a thick dough forms.0.5 cup butter
- Press the dough evenly into the prepared jelly roll pan.
- Bake for 20-25 minutes, or until the gingerbread is a deep golden brown.
- Let the gingerbread cool in the pan for 5 minutes.
- While still warm, place your paper pattern on the gingerbread slab and carefully cut out the desired house shapes using a small paring knife.
- Allow the gingerbread pieces to cool completely in the pan. Run your knife through the cuts again if needed.
- Assemble the cooled gingerbread pieces using royal icing on a sturdy base, such as a cardboard cake board.0.5 cup butter
- Decorate your gingerbread house with additional colored icing, Halloween candies, and marshmallow ghosts to create a spooky scene.0.5 cup butter