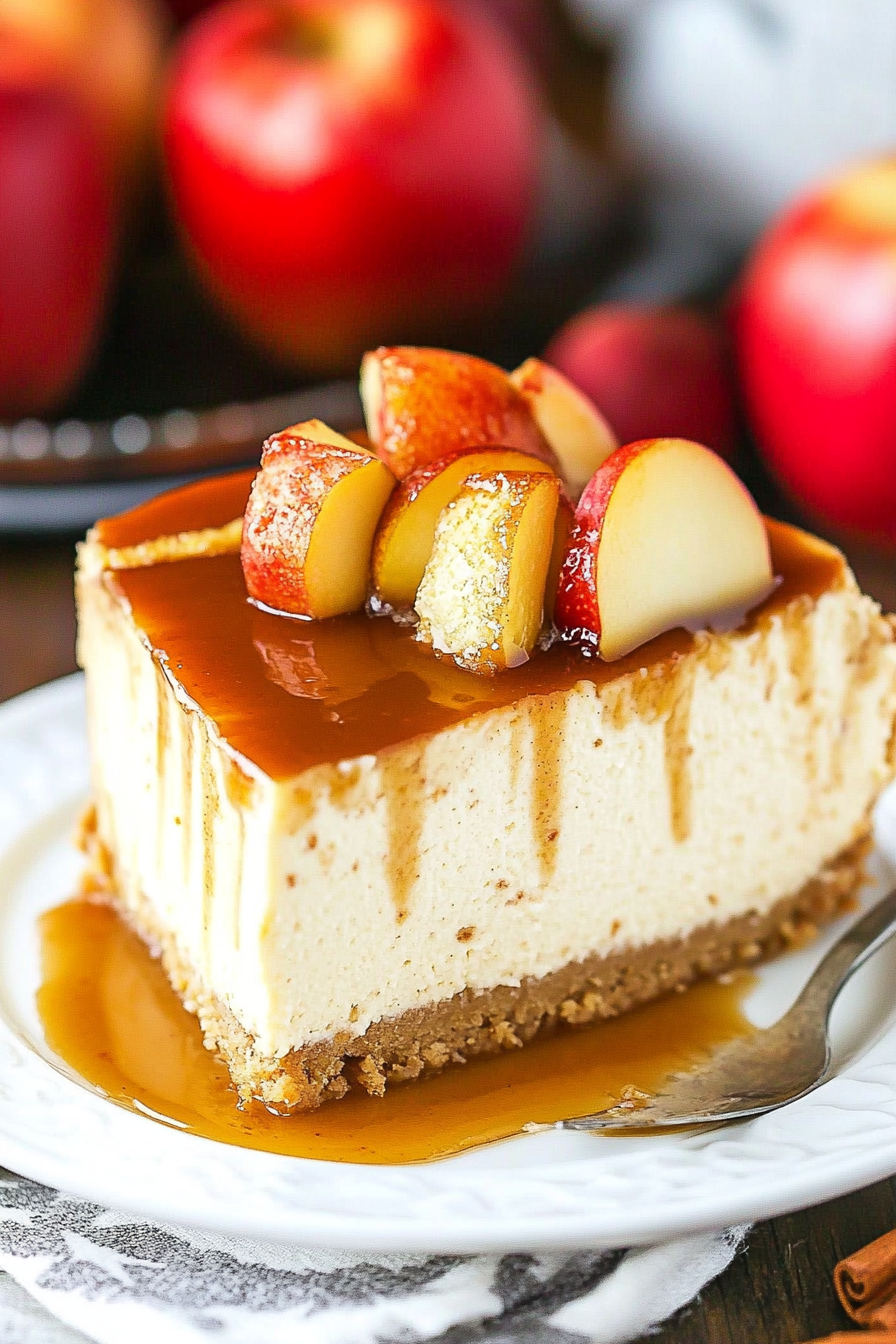
Sweet Apple Cheesecake: How to Make It Easy
There are some recipes that just stick with you, aren’t there? The ones you pull out for holidays, for comfort, or just because the craving hits. For me, that recipe is this incredible apple cheesecake. It’s not just a dessert; it’s a hug in cake form. I remember the first time I made this for my family, it was a blustery autumn evening and the house was filled with the most amazing scent of cinnamon and baked apples. My mom, who’s the harshest critic of anything sweet I make, took one bite and her eyes just lit up. She said, “Honey, this is just… perfection.” And that’s when I knew I’d struck gold. It’s like a classic apple pie met a dreamy, creamy cheesecake, and they decided to have the most delicious baby. Honestly, if you’re looking for an apple cheesecake that’s rich, spiced just right, and has that perfect balance of tart apples and sweet, creamy filling, you’ve found it. Forget those fussy layered cheesecakes; this one is surprisingly straightforward and delivers big on flavor. It’s the kind of dessert that makes people ask for the recipe immediately!
What is Apple Cheesecake?
So, what exactly is this magical creation we’re talking about? Think of it as the ultimate fusion of two beloved desserts. On one hand, you have the comforting, familiar goodness of baked apples – that tender, slightly tart fruit mingling with warm spices like cinnamon and nutmeg. On the other, you have the luxurious, decadent smoothness of a classic cheesecake. Instead of just being a plain cheesecake with apples sprinkled on top, this recipe actually folds chunks of tender, spiced apples right into the creamy filling itself. And to top it all off, there’s often a simple, glossy glaze that makes it look as good as it tastes. It’s not overly complicated like some fancy pâtisserie desserts; it’s more of a rustic, home-style treat that uses simple ingredients to create something truly spectacular. It’s essentially your favorite fall flavors wrapped up in a velvety smooth cheesecake package, and trust me, it’s a game-changer.
Why you’ll love this recipe?
There are so many reasons why this apple cheesecake has become a staple in my kitchen, and I’m betting it will in yours too! First and foremost, the flavor is just out of this world. You get that wonderful tang from the cream cheese, the subtle sweetness, and then BAM! You hit these pockets of perfectly cooked, spiced apples. It’s not too sweet, which is something I really appreciate. The cinnamon and nutmeg really sing, especially when they meld with the apples and the creamy base. It’s the perfect balance. And honestly, the simplicity of this recipe is a huge selling point for me. I’ve tried making cheesecakes that require water baths and endless cooling precautions, and while they’re nice, this one is way more forgiving. You can whip up the batter and have it in the oven without a whole lot of fuss. This means I can make a truly impressive dessert even on a busy weeknight when everyone’s asking “What’s for dessert?” I also love how cost-effective it is. The ingredients are pretty standard pantry staples, and apples are usually pretty affordable, especially when they’re in season. Plus, it’s so versatile! I’ve served this as a fancy dessert for holiday gatherings, and I’ve also just cut a slice for a late-night snack with a cup of tea. It’s that adaptable. What I love most, though, is the reaction it gets. People are always surprised by how incredible it tastes, and they’re even more surprised when I tell them how easy it was to make. It feels like a culinary win every single time!
How do I make Apple Cheesecake?
Quick Overview
Making this apple cheesecake is a joy because it combines simple steps with incredible results. You’ll start by preparing your crust (if you’re using one, though this version is crustless for maximum cheesecake goodness!), then move on to mixing a dreamy cream cheese filling that’s infused with warm spices. We’ll gently fold in tender chunks of apples for those delightful flavor bursts throughout. The magic really happens in the baking, where everything comes together into a beautifully set, creamy dessert. Finally, a simple glaze adds that perfect finishing touch. It’s a straightforward process that guarantees a show-stopping apple cheesecake without the typical cheesecake stress.
Ingredients
For the Filling:
You’ll need about 2 pounds (4 blocks) of full-fat cream cheese, softened to room temperature. Trust me on the full-fat; it makes all the difference in achieving that truly luscious, creamy texture we’re after. Make sure it’s really soft, or you’ll end up with lumps, and nobody wants lumpy cheesecake! I also grab about 1 1/4 cups of granulated sugar. You can adjust this slightly depending on how sweet you like things, but this is a good starting point for that perfect balance with the apples. For that classic cheesecake richness, we’ll use 4 large eggs, also at room temperature. Cold eggs can seize up the mixture and lead to a less smooth texture, so let them sit out with the cream cheese. And don’t forget a teaspoon of pure vanilla extract – it’s the backbone of so many sweet treats! A quarter cup of sour cream or heavy cream adds that extra bit of velvety smooth finish and a little tang. For the spices, you’ll need 1 teaspoon of ground cinnamon and a quarter teaspoon of ground nutmeg. These are essential for that cozy, autumnal apple flavor.
For the Apples:
I prefer using about 2 to 3 medium-sized firm, tart apples, like Granny Smith or Honeycrisp. They hold their shape well when baked and provide a lovely contrast to the sweet filling. You’ll want to peel, core, and chop them into roughly 1/2-inch pieces. In a separate bowl, I toss these apple chunks with 1 tablespoon of all-purpose flour (this helps them absorb excess moisture and prevents them from sinking too much), 2 tablespoons of granulated sugar, and 1 teaspoon of ground cinnamon. This little step is key to getting those perfectly spiced, tender apple pieces throughout your cheesecake.
For the Glaze:
This is optional, but I think it really elevates the finished cheesecake. It’s super simple: 1/4 cup of apple jelly or apple butter, warmed slightly until it’s pourable. If you don’t have apple jelly, apricot jam works beautifully too. A tablespoon of water or apple cider can help thin it out if needed.
Step-by-Step Instructions
Step 1: Preheat & Prep Pan
First things first, let’s get the oven ready. Preheat it to 325°F (160°C). This lower temperature is crucial for cheesecake because it allows it to cook gently and evenly, preventing cracks and ensuring that super creamy texture. Now, grab a 9-inch springform pan. These pans are a lifesaver for cheesecakes because they allow you to easily release the cake once it’s set. Lightly grease the bottom and sides of the pan with butter or non-stick cooking spray. This is just an extra layer of insurance to make sure your beautiful apple cheesecake doesn’t stick.
Step 2: Mix Dry Ingredients
In a medium bowl, whisk together your chopped apples, 2 tablespoons of granulated sugar, 1 teaspoon of ground cinnamon, and 1 tablespoon of all-purpose flour. Make sure those apple pieces are well coated. This coating helps to absorb some of the apple’s natural juices during baking, and the flour also helps to thicken the filling slightly, preventing a soggy bottom. Set this mixture aside. I always give the apples a little sniff at this point – the cinnamon just smells like fall!
Step 3: Mix Wet Ingredients
In a large mixing bowl, beat the softened cream cheese with an electric mixer on medium speed until it’s completely smooth and creamy. There should be absolutely no lumps! This might take a couple of minutes. Then, gradually add the 1 1/4 cups of granulated sugar and continue beating until well combined and fluffy. Scrape down the sides and bottom of the bowl often to make sure everything is incorporated. Next, beat in the sour cream (or heavy cream) and the vanilla extract until just combined. Don’t overmix here; we’re just bringing it all together.
Step 4: Combine
Now, it’s time to add the eggs. Add them one at a time, beating on low speed just until each egg is incorporated. Overbeating the eggs can introduce too much air, which can lead to cracking. So, be gentle! Once all the eggs are mixed in, you should have a smooth, thick, and luscious batter. It should look like velvet. If you see any streaks of egg or cream cheese, give it one last gentle scrape and fold.
Step 5: Prepare Filling
Okay, here’s where the “apple” in apple cheesecake really comes to life. Gently fold about two-thirds of the spiced apple mixture into your cream cheese batter. We want to distribute those lovely apple chunks throughout, but we don’t want to mash them. The remaining apple mixture will be used for topping. The goal is to have visible chunks of apple in every bite, not a uniformly apple-flavored batter.
Step 6: Layer & Swirl
Pour about half of the cream cheese batter into your prepared springform pan. Then, evenly scatter about half of the remaining plain apple mixture over the batter. Spoon the rest of the batter on top, and then artfully arrange the rest of the apples over the surface. If you’re feeling fancy, you can use a knife or a skewer to gently swirl some of the apples into the top layer of the batter, creating a beautiful marbled effect. But honestly, just scattering them works beautifully too!
Step 7: Bake
Place the springform pan on a baking sheet (this catches any potential drips and makes it easier to handle). Bake in your preheated oven for about 60 to 75 minutes. The edges should be set and slightly puffed, while the center will still be a little jiggly when you gently shake the pan. This slight jiggle is exactly what we want – it means the cheesecake will continue to cook and set as it cools, resulting in that perfect creamy texture. Don’t be tempted to overbake it!
Step 8: Cool & Glaze
This is perhaps the most critical part for cheesecake success: cooling! Turn off the oven, crack the oven door open slightly (you can prop it with a wooden spoon), and let the cheesecake cool in the oven for about 1 hour. This gradual cooling prevents drastic temperature changes that can cause cracking. After that, remove the cheesecake from the oven and let it cool completely on a wire rack. Once it’s at room temperature, cover it loosely with plastic wrap and refrigerate for at least 4 hours, or preferably overnight. Chilling is essential for the cheesecake to fully set and for the flavors to meld. Once it’s thoroughly chilled and set, you can gently warm your apple jelly or apple butter with a tablespoon of water or cider until it’s pourable. Brush this warm glaze over the top of the cheesecake. It adds a beautiful shine and an extra layer of apple flavor!
Step 9: Slice & Serve
To get those beautiful, clean slices, I like to run a thin, sharp knife under hot water, wipe it dry, and then slice. Repeat this for each cut. This ensures neat edges and a perfect presentation. Serve your apple cheesecake chilled. It’s delicious on its own, but a dollop of whipped cream or a scoop of vanilla ice cream never hurts!
What to Serve It With
This apple cheesecake is so wonderfully versatile, it can truly grace any table, any meal! For a cozy breakfast or a special weekend brunch, I love serving it slightly chilled, perhaps with a dusting of powdered sugar and a side of fresh berries. A good quality coffee or a delicate herbal tea pairs perfectly. For a more elegant brunch spread, think about small, neat slices served on pretty dessert plates. A glass of sparkling cider or even a mimosa complements the festive feel beautifully. When it’s served as an after-dinner dessert, that’s where it truly shines. Alongside a steaming mug of coffee or a rich espresso, it’s pure indulgence. A drizzle of caramel sauce or a sprinkle of chopped toasted pecans can add another layer of texture and flavor. And for those moments when you just need a little something sweet, a casual slice enjoyed while curled up on the couch with a good book is absolute heaven. I’ve even been known to serve it with a small glass of apple cider or a bit of a spiced rum cocktail for an adult twist. My kids, though, are happiest with just a big ol’ slice, no fancy additions needed – they say the apples and the creamy cheesecake are a match made in heaven all on their own!
Top Tips for Perfecting Your Apple Cheesecake
Over the years, I’ve learned a few tricks that I think really elevate this apple cheesecake from good to absolutely unforgettable. When it comes to the apples, the type you choose really does matter. I always reach for firm, tart apples like Granny Smith, Honeycrisp, or Braeburn. They keep their shape during baking and offer that wonderful balance against the sweetness of the cheesecake. Avoid softer apples like Red Delicious, as they can turn mushy. When you’re chopping them, aim for about a half-inch dice. Too small and they disappear; too large and they might feel out of place. And that step of tossing them with flour, sugar, and cinnamon? Don’t skip it! The flour helps absorb excess moisture, which is crucial for preventing a watery cheesecake. For the batter itself, the biggest tip I can give is to ensure your cream cheese and eggs are at room temperature. Seriously, this is non-negotiable for a smooth, lump-free cheesecake. Cold ingredients just won’t blend as well. When you’re mixing, be mindful of overbeating, especially after adding the eggs. You want just enough mixing to combine; too much air introduced at this stage can lead to cracks. I’ve learned this the hard way more than once! If you do get a crack, don’t despair! The glaze and the apples on top usually hide them beautifully. Speaking of the apples, while folding them into the batter is great, I also love adding a few extra on top for presentation and that burst of apple flavor. If you want to get fancy with the swirls, use a knife or a skewer and make gentle figure-eights through the top layer of batter and apples. It’s more about visual appeal than anything else. For baking, using a water bath is sometimes recommended for cheesecakes, but I’ve found with this recipe, with its lower temperature and careful cooling process, it’s usually not necessary and frankly, it’s a hassle I can live without! Just make sure your oven is accurately preheated. The cooling process is just as important as the baking. Let it cool gradually in the turned-off oven with the door ajar for about an hour. This slow transition helps prevent cracks. Then, refrigeration is key – at least 4 hours, but overnight is truly best for that firm, creamy texture. Finally, for the glaze, if you don’t have apple jelly, apricot preserves warmed up with a splash of water or apple cider work like a charm. They provide that beautiful shine and a complementary fruity note.
Storing and Reheating Tips
Keeping your gorgeous apple cheesecake tasting fresh is super important, and thankfully, it’s pretty straightforward. If you find yourself with leftovers (which, let’s be honest, doesn’t happen often in my house!), the best way to store it is in the refrigerator. Make sure the cheesecake is completely cooled before you cover it. I usually use plastic wrap, making sure it’s loosely tented over the top to prevent condensation from forming directly on the surface. You can also use an airtight container if it fits. Stored this way in the fridge, your apple cheesecake should stay delicious for about 4 to 5 days. The flavors actually tend to meld and improve over time, so the second or third day can be even better! If you want to freeze portions for later, I highly recommend slicing the cheesecake first. Then, wrap each slice individually and tightly in plastic wrap, followed by a layer of aluminum foil or a freezer-safe bag. This double-wrapping is essential to prevent freezer burn. Properly wrapped, your apple cheesecake can last in the freezer for up to 2 months. To thaw, it’s best to move the frozen slice from the freezer to the refrigerator and let it thaw overnight. Avoid thawing at room temperature, as this can affect the texture. For reheating, I generally don’t reheat cheesecake unless it’s been in the fridge for a day or two and I want to bring it back to room temperature for serving. If you do want it slightly warmer, a very short stint in a low oven (around 250°F for 10-15 minutes) might work, but I find chilled is usually best. If you plan to freeze it, it’s best to add the glaze *after* it has been thawed, rather than before, as the glaze can sometimes get a bit sticky when frozen and thawed.
Frequently Asked Questions
Final Thoughts
Honestly, making this apple cheesecake is one of my favorite ways to bring a little bit of cozy, homemade joy into my life, and I really hope it does the same for you. It’s that perfect blend of comforting apple pie vibes and the luxurious creaminess of cheesecake, all wrapped up in a package that’s surprisingly manageable for home bakers. The way the warm spices mingle with the tender apples and that rich, velvety cream cheese filling is just pure magic. It’s the kind of dessert that makes any meal feel a little more special, whether it’s a quiet weeknight or a bustling holiday gathering. If you love this recipe, you might also enjoy my Spiced Pear Crumble or my classic New York Style Cheesecake for more dessert inspiration. Give this apple cheesecake a try – I have a feeling it’s going to become a beloved recipe in your home too. I can’t wait to hear what you think, or if you discover any fun variations! Happy baking, and enjoy every single delicious bite!
Apple Cheesecake
Ingredients
Method
- Prepare the caramel sauce according to its recipe and let it cool to at least room temperature. The caramel sauce can be made several days ahead if desired.
- Preheat your oven to 325°F (163°C). Line a 9-inch (23cm) springform pan with parchment paper on the bottom and grease the sides.
- In a small bowl, combine the crust ingredients. Press the mixture evenly into the bottom and up the sides of the springform pan.
- Bake the crust for 8-10 minutes, then set aside to cool.
- Cover the outside of the springform pan with aluminum foil to prevent water from entering during the water bath. Set the prepared pan aside.
- Reduce the oven temperature to 300°F (148°C).
- Toss the apples for the apple filling layer with ground cinnamon and spread them evenly over the bottom of the crust.
- Add the flour to the caramel sauce, then pour the caramel sauce evenly over the apples. Set the pan aside.
- In a large bowl, beat the cream cheese, brown sugar, and flour on low speed until well combined and smooth. Use low speed to minimize air incorporation, which can cause cracks. Scrape down the sides of the bowl as needed.
- Add the sour cream, applesauce, vanilla extract, and ground cinnamon, and mix on low speed until well combined.
- Add the eggs one at a time, mixing slowly to combine after each addition. Scrape down the sides of the bowl as needed.
- Pour the cheesecake batter into the crust, over the apples.
- Arrange the thinly sliced apples for the topping on the cheesecake filling to create a decorative pattern (e.g., a rose pattern). Start from the outside edge, slightly overlapping each apple slice, and work your way inwards to form a complete circle. Continue creating circles until you reach the center of the cheesecake.
- Combine the sugar and cinnamon and sprinkle it evenly over the apples.
- Place the springform pan inside a larger baking pan. Carefully fill the outer pan with enough warm water to come about halfway up the sides of the springform pan. Ensure the water level does not exceed the top edge of the aluminum foil.
- Bake for 1 hour and 30 minutes. The edges of the cheesecake should be set, but the center couple of inches will still be jiggly.
- Turn off the oven and leave the door closed for 30 minutes to allow the cheesecake to continue cooking gently and begin cooling.
- Crack the oven door open slightly and leave the cheesecake inside for another 30 minutes to cool down gradually, which helps prevent cracking.
- Remove the cheesecake from the oven and water bath, unwrap the foil, and refrigerate until firm, for 5-6 hours or preferably overnight.
- Carefully remove the cheesecake from the springform pan and place it on a serving dish. You can brush the top apples with some reserved caramel sauce for shine. Cover the cheesecake and refrigerate until ready to serve.