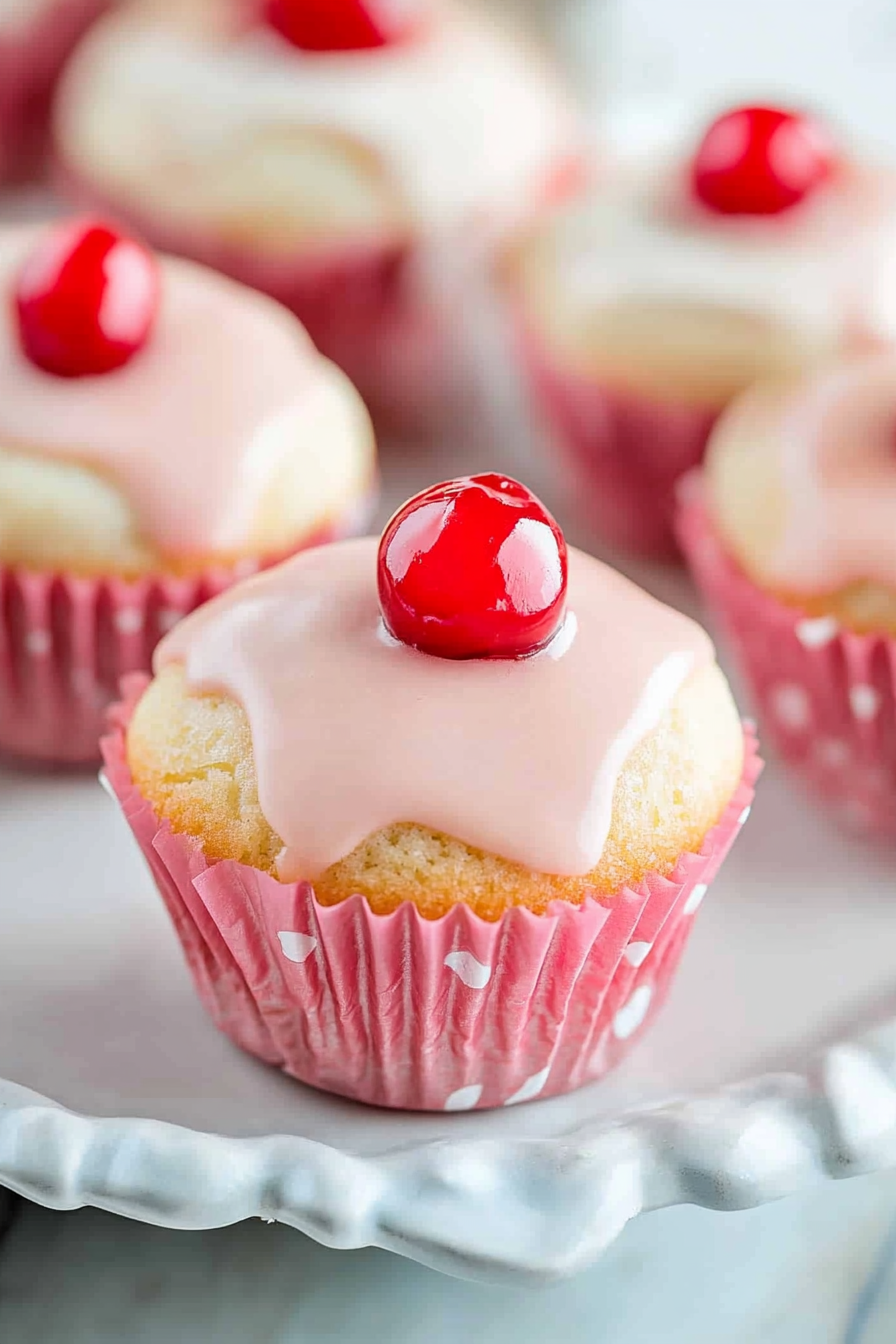
Sweet Cherry Cupcakes How to Bake Them
If there’s one thing I’ve learned over the years, it’s that baking has a magical way of bringing people together. And if I’m honest, there’s nothing quite like biting into a soft, moist cherry cupcake that’s bursting with juicy fruit and topped with a little drizzle of glaze. I still remember my grandma’s kitchen filled with the smell of baking cherries and vanilla — it’s a memory I cherish and try to recreate every time I whip up these cupcakes. Honestly, this recipe has become my go-to when I want something sweet, cheerful, and just a little bit special. It’s incredibly easy, quick to make, and totally family-approved. Trust me on this one — these cherry cupcakes disappear faster than you can say “more, please!” My kids ask for these all the time, and I love that I can whip them up on busy weeknights or for weekend picnics. And the best part? They taste like a little slice of summer, even in the dead of winter.
What is a cherry cupcake?
Think of cherry cupcakes as a delightful twist on your usual vanilla cupcake — they’re essentially fluffy little cakes infused with fresh cherry goodness. The name might sound straightforward, but these cupcakes are a joy to make and even more fun to eat. It’s a classic flavor combo, really: sweet, tart cherries nestled in moist, tender batter, topped with a light glaze that makes each bite shine. The cherries add a pop of color and freshness — it’s like a mini summer picnic in every cupcake. These are perfect for birthdays, summer parties, or just because you need a sweet pick-me-up. What I love most about these cherry cupcakes is their versatility — you can use fresh cherries when they’re in season, or icy, frozen ones if you’re craving them in winter. Either way, they always turn out charming and cozy.
Why you’ll love this recipe?
Is it possible to make a cupcake without using it?
- Flavor: The combination of sweet, tart cherries with the soft crumb of the cupcake is pure magic. I swear, the smell alone brings everyone running to the kitchen. The cherries caramelize slightly during baking, creating this warm, inviting aroma that makes you feel instantly at home.
- Simplicity: This recipe is a lifesaver on busy nights. You don’t need fancy ingredients or complicated techniques — just a few staples from your pantry, and you’re set. I’ve made these so many times, I can do it pretty much in my sleep!
- Cost-efficiency: What is the best way to measure cost-efficiency? Using fresh cherries when in season or frozen ones out of season keeps this budget-friendly. And the filling and glaze require pantry staples like sugar, flour, and vanilla — no special shopping trips needed.
- Versatility: These cupcakes are perfect as is, but you can also dress them up or down. I’ve added a touch of almond extract or swapped the glaze for a drizzle of icing. They’re flexible enough to suit your mood — and your guests’ tastes.
Plus, I love that they look gorgeous on any dessert table, with their bright red cherries peeking out. What I especially enjoy is how forgiving this recipe is — overmixing? Not a problem. Underbaking? Easy fix. It’s a recipe that genuinely makes me feel like a confident baker every time I make it.
How to Make Cherry Cupcakes
Quick Overview
This one’s a straightforward, foolproof process. You mix together a soft batter, fold in fresh or frozen cherries, pour into cupcake liners, and bake until golden. While they’re cooling, whip up a simple glaze that you can pour over warm cupcakes or sprinkle on after they’ve cooled. The result? Moist, fruity cupcakes with a shiny, sweet-tart topping that’s impossible to resist. What’s great about this method is that it’s fast enough to throw together on a weeknight but elegant enough to serve to guests. You’ll love how the cherries distribute evenly, and the aroma of baking fruit is enough to make everyone smile.
Ingredients
For the Main Batter:
– 1 ½ cups all-purpose flour
– 1 teaspoon baking powder
– ¼ teaspoon baking soda
– ¼ teaspoon salt
– ½ cup unsalted butter (softened)
– ¾ cup granulated sugar
– 2 large eggs
– 1 teaspoon vanilla extract
– ½ cup sour cream or Greek yogurt
– 1 cup fresh cherries, pitted and quartered (or frozen, thawed)
For the Filling:
– ½ cup chopped fresh cherries or frozen cherries
– 2 tablespoons sugar
– A squeeze of lemon juice (optional but recommended for brightness)
For the Glaze:
– ½ cup powdered sugar
– 1-2 tablespoons milk or lemon juice
– Optional: a few drops of vanilla or cherry extract for extra flavor
Step-by-Step Instructions
Step 1: Preheat & Prep Pan
Set your oven to 350°F (175°C) and line a muffin tin with paper liners. I always do this first so I don’t forget once the batter’s ready. Make sure your cherries are pitted and chopped — no one wants a surprise pit in their cupcake!
Step 2: Mix Dry Ingredients
In a bowl, whisk together the flour, baking powder, baking soda, and salt. This ensures everything is well combined and gives the cupcakes that fluffy texture later. Trust me, sift if you’re feeling fancy — it makes a difference!
Step 3: Mix Wet Ingredients
In another large bowl, beat the softened butter and sugar until it’s light and fluffy — about 2-3 minutes. Add the eggs one at a time, mixing well after each, then stir in vanilla and sour cream. I’ve tested this with almond yogurt too, and it actually made the cupcakes even creamier — so feel free to experiment!
Step 4: Combine
Gradually add your dry ingredients to the wet mixture, mixing just until combined. Be careful not to overmix — you want tender cupcakes, not dense ones. Gently fold in the cherries, making sure they distribute evenly without breaking down the batter.
Step 5: Prepare Filling
If you want an extra cherry burst in your cupcakes, stir together chopped cherries with a teaspoon of sugar and a squeeze of lemon juice. This gives an added fresh-tart flavor that balances the sweetness perfectly.
Step 6: Layer & Swirl
Fill each cupcake liner about ¾ full with batter. If you’re feeling fancy, add a spoonful of the cherry filling in the center — or swirl it through the batter with a toothpick for a pretty marbled effect.
Step 7: Bake
Pop them in the oven for about 18-22 minutes. The tops should be golden, and a toothpick inserted into the center should come out clean. Every oven is different, so start checking at 18. When they’re done, let them cool in the pan for 5 minutes, then transfer to a wire rack.
Step 8: Cool & Glaze
Allow the cupcakes to cool completely — this prevents the glaze from sliding off. Mix your powdered sugar with milk or lemon juice for that shiny finish. Pour it over the cupcakes while they’re still warm for a glaze that seeps into every crevice, or drizzle it on after they’ve cooled for a more delicate touch.
Step 9: Slice & Serve
Serve these cupcakes slightly warm or at room temperature. A little extra cherry on top makes a special presentation, but honestly, these look adorable just as they are. I love pairing them with a cold glass of milk or a hot cup of tea for the perfect cozy treat.
What to Serve It With
These cherry cupcakes are super versatile! For breakfast, I sometimes serve them with a dollop of Greek yogurt and a splash of honey, alongside your favorite morning brew. They’re equally pretty on a brunch table, paired with fresh fruit and crisp mimosas — I’ve even made mini versions for tea parties.
As an after-dinner dessert, adding a scoop of vanilla ice cream or a dusting of powdered sugar takes them to the next level. My family loves grabbing a cupcake with their afternoon coffee — it’s comfort in every mouthful. And for a quick, casual snack, they’re just perfect with a cup of tea or a glass of sparkling water. Little does everyone know, they’re so easy to make, you can whip up a batch anytime the craving hits.
Top Tips for Perfecting Your Cherry Cupcakes
Over the years, I’ve picked up a few tricks to make these cupcakes absolutely irresistible:
- Cherry prep: Use fresh cherries in season for the best flavor, but frozen ones work beautifully when fresh isn’t available. Just make sure to thaw and drain excess moisture to avoid soggy batter.
- Mixing advice: Overmixing is the enemy — it toughens the crumb. Mix just until ingredients are combined, then fold in cherries gently.
- Swirl icons: For a decorative swirl pattern, drop spoonfuls of batter and cherry filling alternately into the liners, then use a toothpick or skewer to swirl gently through.
- Ingredient swaps: Dairy-free? Use coconut yogurt or almond milk to keep things light and moist. Want extra tartness? Add a splash of lemon juice or a teaspoon of vinegar to your batter.
- Baking tips: Rotate your pan halfway through baking to promote even heat distribution. And always do the toothpick test — that’s the true sign of perfect cupcakes.
- Glaze variations: For a richer flavor, add a teaspoon of cherry extract or vanilla to your glaze. Or try a drizzle of melted white chocolate for an elegant finish.
Honestly, the more I make these, the more I learn about customizing them to my mood or the season. Which is your favorite tweak? Feel free to experiment, and don’t forget to share your own tips!
Storing and Reheating Tips
These cupcakes are quite resilient, but proper storage keeps them tasting fresh:
- Room temperature: Keep cupcakes in an airtight container for up to 2 days — perfect for last-minute get-togethers.
- Refrigerator: Store covered in a container for up to 4 days. The texture stays nice as long as they’re covered well to prevent drying out.
- Freezer: Wrap each cupcake tightly in plastic wrap, then place in a freezer bag for up to 3 months. Thaw at room temperature and re-glaze if needed — this helps them taste freshly baked!
When reheating, I usually warm them briefly in a low oven or microwave. A quick heat makes the cherries juicy again and refreshes the aroma. Just be careful not to dry them out — these cupcakes are too good to let go to waste!
FAQs
Final Thoughts
There’s just something about these cherry cupcakes that feels like a warm, loving hug — a little burst of sunshine wrapped in fluffy cake. Over the years, I’ve made them so many times that they’ve become a family fixture, and I love how flexible and forgiving they are. Whether it’s a quick dessert for friends, a fun weekend project with the kids, or a special treat to brighten a dull day, these cupcakes never fail to bring smiles. I hope you give this recipe a try and maybe even add your own personal twist — a splash of almond extract, a handful of dark chocolate chips, or a different fruit filling. Most importantly, have fun in your kitchen and remember: some of the best memories are baked right into these little cakes. Happy baking, and I can’t wait to hear how yours turn out!
Cherry Cupcakes
Ingredients
Method
- Prepare cake mix according to the package directions and substitute maraschino cherry juice for a portion of the water.
- Fold in chopped maraschino cherries.
- Pour into muffin tins and bake for 25 minutes at the temperature specified on the cake mix package.
- Allow to cool completely before coating with the white chocolate glaze.
- Combine white chocolate and cream in a deep bowl. Microwave on high for 1 minute. Stir.
- Add butter and microwave on high for 30 seconds. Stir.
- Microwave on high for an additional 10 to 15 seconds if needed to let butter and white chocolate melt.
- Add powdered sugar and vanilla and stir until smooth.
- Spread glaze over cupcakes and cool until the glaze hardens. Top each with one maraschino cherry.