Sweet Cookie Bars How Easy They Are
If I had to pick one dessert that instantly transports me back to childhood lazy Sunday afternoons, it’d be these sugar cookie bars. There’s just something about cutting into that golden, slightly cracked top, revealing that soft, buttery center, that makes my heart instantly happy. I remember my grandma making her famous sugar cookies, but honestly, these bars? They’re even easier, and I promise—they disappear in minutes at my house! They’re perfect for when you’re craving something sweet but don’t want to fuss with cookie cutters or rolling dough. Plus, they’re a total crowd-pleaser—my kids ask for these all the time, and friends always ask for the recipe. It’s that kind of dessert—you know, the one you can whip up during a busy week, yet feel fancy enough to serve at a brunch or special family gathering. Trust me on this one, once you try these, they’ll become a staple in your recipe box too.
What is sugar cookie bar?
Think of sugar cookie bars as the lovechild of classic sugar cookies and brownies—something that’s basically a thick, chewy sheet of melt-in-your-mouth sweetness. Unlike traditional cookies, which take a little patience and a lot of rolling, these are all about easy prep and big flavor. The name is pretty straightforward: they’re bars made from a sugar cookie dough baked in a pan, then topped with a simple glaze or frosting. It’s essentially the best of both worlds—familiar buttery flavor with the convenience of a sheet dessert. My take on these started years ago when I wanted a quick way to satisfy my sweet tooth without messing around with complicated cookie shapes. Whether it’s for a last-minute potluck, a school party, or just because I’m craving something sugary, sugar cookie bars never disappoint. They’re versatile, forgiving, and incredibly addictive.
Why you’ll love this recipe?
Honestly, what I love most about these sugar cookie bars is how they make everyone smile—no fancy ingredients needed, just pantry staples that I always have on hand. The flavor? Oh, it’s buttery, sweet, with just a hint of vanilla and a touch of vanilla glaze that makes them shine. The texture strikes the perfect balance between tender and chewy, with a slight crisp edges that’s totally addictive. And the best part? They’re ridiculously easy to make. You basically mix up one batter, pour it into a pan, bake, then add a quick glaze. No chilling, no rolling, no stress. My budget loves them too, since they use simple ingredients—nothing fancy—and they stretch a long way, making them perfect for feeding a crowd or family of four. Maybe what I love most is the endless customization. You can add sprinkles, lemon zest, or even a splash of almond extract to make them your own. It’s like baking a blank canvas—quite frankly, one of the most versatile recipes I keep coming back to.
How do I make sugar cookie bars?
Quick Overview
This recipe is practically foolproof. You’ll start by making a buttery, sugar cookie dough—think tender, slightly chewy, with just enough sweetness. Pour the dough into a prepared pan, spread evenly, and bake until golden. While it cools, whip up a simple glaze—sweet vanilla, maybe with a splash of milk—and then drizzle or spread it on top. The whole process takes about 30 minutes, tops, making it perfect for a spontaneous sweet treat. What’s special about this method is how effortless it is—no need to scoop individual cookies or worry about overbaking. It’s honestly a brainless baking project that yields spectacular results every single time.
Ingredients
For the Main Batter:
– 2 ½ cups all-purpose flour (I always use unbleached for a richer flavor)
– 1 teaspoon baking powder
– ½ teaspoon salt (trust me, it balances the sweetness)
– ¾ cup unsalted butter, softened (but not melted—trust me, softened is key)
– 1 cup granulated sugar (don’t skimp—this is the star of the show)
– 1 large egg (room temperature makes mixing easier)
– 1 teaspoon vanilla extract (the real stuff makes all the difference)
For the Filling (Optional but highly recommended):
– ¼ cup butter, softened
– ½ cup powdered sugar
– 1 teaspoon vanilla
– 1 tablespoon milk or cream (I actually love using whole milk for richness)
For the Glaze:
– 1 cup powdered sugar
– 2-3 teaspoons milk
– ½ teaspoon vanilla
– Sprinkles for fun (or mini chocolate chips if you’re feeling wild)
Step-by-Step Instructions
Step 1: Preheat & Prep Pan
Set your oven to 350°F (175°C). Line a 9×13-inch baking pan with parchment paper or lightly grease it with butter. This helps with easy removal and keeps the bars from sticking, which, honestly, I learned this the hard way after almost tearing my bars apart—don’t skip this step!
Step 2: Mix Dry Ingredients
In a small bowl, whisk together the flour, baking powder, and salt. I do this first so I don’t forget any, plus it helps distribute everything evenly in the dough. Trust me, it prevents clumps later on and gives your bars the perfect rise.
Step 3: Mix Wet Ingredients
In a large mixing bowl, beat the softened butter and sugar until creamy—about 2-3 minutes. You want it nice and fluffy. Add the egg and vanilla, beating until well combined. It’s fun to see the mixture turn paler and get that lovely vanilla aroma wafting through the kitchen.
Step 4: Combine
Gradually add the dry ingredients into the wet, mixing on low speed or folding gently with a spatula. Be careful not to overmix—this develops gluten and can make your bars dense. I usually stop when the flour is just incorporated. The dough will be thick but spreadable—perfect for pouring into the pan.
Step 5: Prepare Filling (Optional)
If you’re going for a cream cheese style swirls or a simple frosting in the middle, beat the softened butter and powdered sugar first, then add vanilla and milk until smooth. Spread it evenly over the dough before baking or swirl it in for a marbled look.
Step 6: Layer & Swirl
Pour the dough into your pan, smoothing it out with a spatula. If you’re adding filling, dollop and gently swirl it with a knife or toothpick. I love doing this because it adds a pretty pattern and enhances the flavor—trust me, it’s worth the tiny extra effort.
Step 7: Bake
Bake in the prepared oven for 20-25 minutes, or until the top is lightly golden and a toothpick inserted in the center comes out clean. Keep an eye toward the end—overbaking makes them dry, and nobody wants that.
Step 8: Cool & Glaze
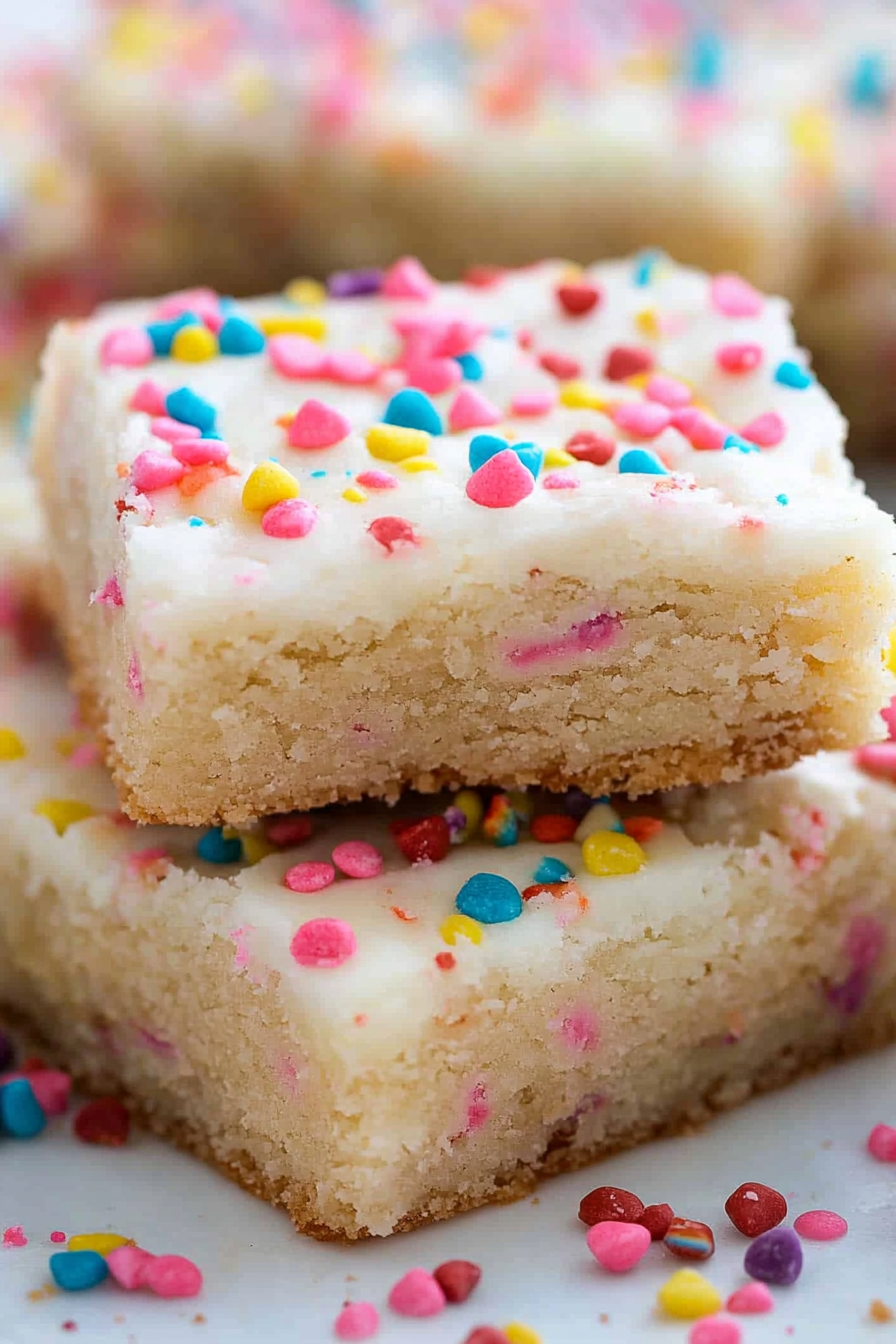
Allow the bars to cool in the pan for at least 15 minutes. Once cooled, mix together the glaze ingredients and drizzle generously over the top. This glaze really takes it to the next level—shine, sweetness, and that lovely vanilla aroma. If you’re feeling extra festive, sprinkle some colorful sprinkles now.
Step 9: Slice & Serve
Use a sharp serrated knife to cut clean, even squares—dipping in hot water and wiping dry between cuts keeps it neat. Serve at room temperature, or if you’re in a hurry, microwave a little for a soft, gooey experience. These bars look beautiful on a platter—great for sharing, or just sneaking a few for yourself. No judgment here.
What to Serve It With
These sugar cookie bars are pretty versatile, so you can dress them up or down depending on the occasion. For breakfast, serve with a mug of rich coffee and a side of fresh fruit—breakfast dessert, anyone? During brunch, pair with a mimosa or a hot latte, and maybe add some fresh berries for color and brightness. As a dessert, they’re lovely on their own, but I love dolloping a little whipped cream or a scoop of vanilla ice cream on top for a more decadent finish. They also make perfect cozy snacks—think of a lazy afternoon with tea and chat with friends. When I make these for school parties, I often decorate with sprinkles or colored sugar—kids (and adults) can’t get enough. Honestly, these bars are as comforting as childhood but just fancy enough to elevate any gathering.
Top Tips for Perfecting Your Sugar Cookie Bars
Over the years, I’ve picked up a few tricks to make these even better. First, when dealing with butter, I always make sure it’s softened—not melted—to get the right texture. I’ve tested this with plant-based margarine and even almond butter, and let me tell you, it still works beautifully—just adjust the flavor accordingly. When mixing the batter, don’t overdo it—overmixing can create tough cookies, and nobody wants that chewy dryness. For the swirl filling, I’ve experimented with cream cheese instead of butter, and it adds a lovely tang—great for staying in that classic cookie vibe but with a little extra kick. If you want to add a citrus twist, a splash of lemon or orange zest in the batter or glaze gives it a fresh, vibrant flair that’s perfect for spring or summer entertaining. Baking tip: if your oven runs hot, check the bars a few minutes early—every oven is different! And about the glaze: I’ve tested adding a splash of almond extract or even a dash of cinnamon for variety—delicious! It’s all about customizing and making this recipe your own. Practice makes perfect, so don’t be discouraged if the first batch isn’t picture-perfect. Every oven, ingredient, and kitchen is different, and I’ve learned that a little patience and tweak here and there make all the difference.
Storing and Reheating Tips
These sugar cookie bars keep surprisingly well, which is handy because I often find myself sneaking a piece the next day. If you’re saving leftovers, store them in an airtight container at room temperature for up to two days—cover loosely with foil to keep the glaze fresh. To keep them longer, pop them into the fridge for up to a week. Just make sure to bring them to room temp before slicing again, as they tend to firm up in the fridge. For freezer lovers, these bars freeze beautifully—wrap them tightly in plastic wrap and store for up to 3 months. When ready to enjoy, thaw at room temp for about an hour, and if needed, warm for a few seconds in the microwave for that just-baked warmth. I always make sure to add the glaze after thawing; if you freeze the bars with the glaze on, it might get weird—learned that one from my baking mistakes! When reheating, a quick warm-up softens everything and keeps that buttery, sweet experience intact. This process works whether you’re making a batch for yourself or sharing with friends—trust me, these will still taste amazing even after days.
Frequently Asked Questions
Final Thoughts
If you’re looking for an easy, classic treat that’s loved by kids and adults alike, these sugar cookie bars are your new best friend. The combination of buttery richness, sweet glaze, and just enough chewiness makes every bite feel like a warm hug. I’ve made these countless times, tweaking ingredients here and there, and I still get excited every time I see them come out of the oven. Whether you’re baking for a crowd or just craving a cozy snack, I promise, this recipe won’t let you down. It’s one of those comfort foods that makes your kitchen smell incredible and leaves everyone asking for seconds. So go ahead, gather your ingredients, and indulge in a little baking magic—you deserve it. And hey, I’d love to hear how yours turn out! Drop a comment, share your twists, or tag me with your beautiful squares—I love seeing happy bakers in action. Happy baking!

Homemade Sugar Cookies
Ingredients
Method
- Preheat oven to 350°F. Line a 9x13-inch baking pan with parchment paper and set aside.
- In a large mixing bowl, beat softened butter and sugar until creamy. Add egg and vanilla extract, and mix well. Stir in baking soda, cream of tartar, and salt. Gradually add flour, mixing just until combined.
- Press dough evenly into the prepared pan. Bake for 14-15 minutes until edges are golden. Let cool completely before frosting.
- For the frosting, beat softened butter until smooth. Gradually add powdered sugar, vanilla, and enough milk until desired consistency is achieved. Tint frosting with food coloring if desired.
- Spread frosting evenly over cooled cookie base. Decorate with sprinkles as desired. Cut into bars and serve.