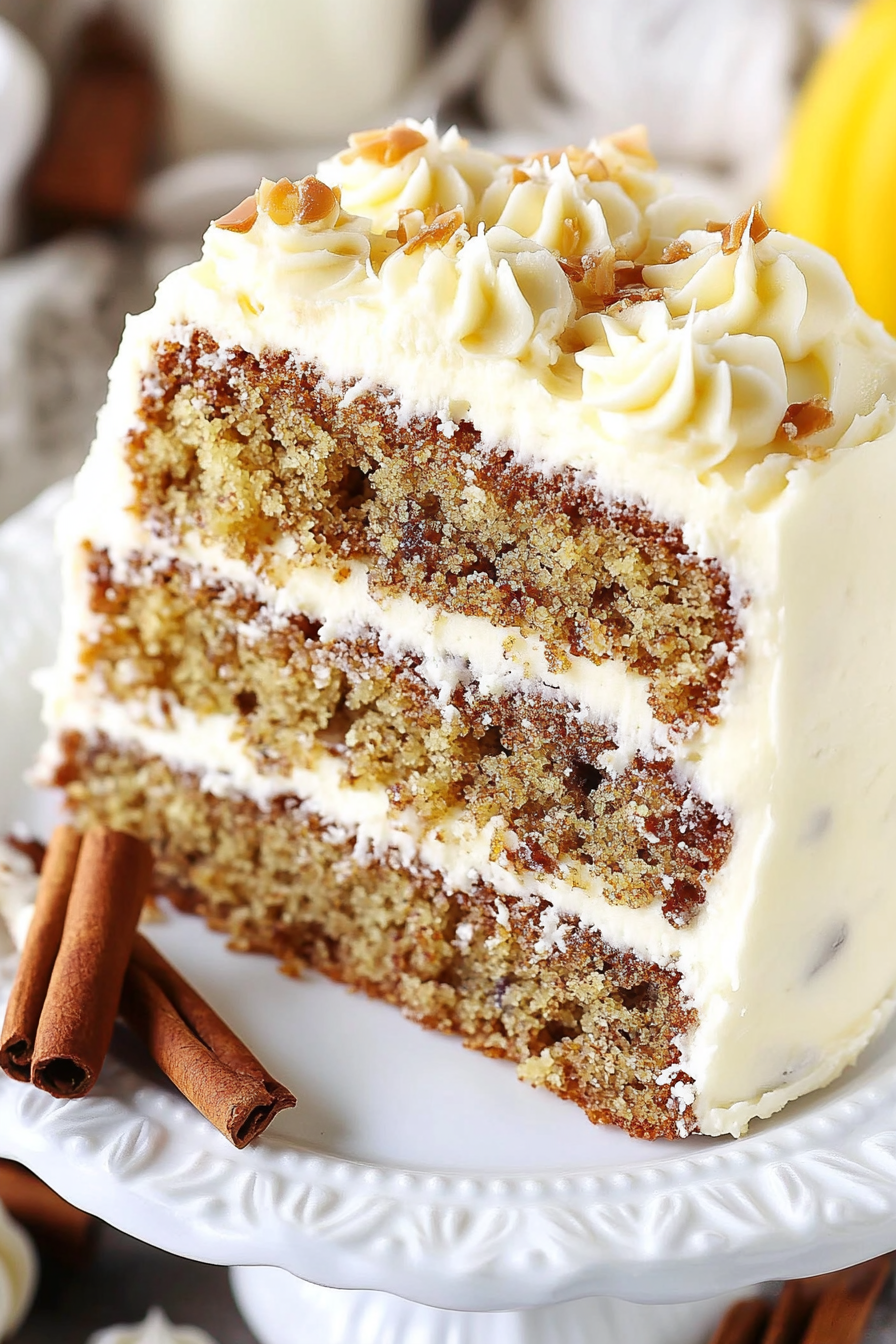
Tiny Cake Magic How to Make Hummingbird Cake
There’s something almost magical about slicing into a piece of hummingbird cake. I remember the first time I tried it — that moist, tender crumb with the perfect swirl of cream cheese filling, topped with a glossy glaze, just messy enough to look inviting. It instantly took me back to lazy Sunday afternoons at my grandma’s house, where she’d serve this alongside a steaming cup of coffee and stories that made my childhood feel like one long warm hug. Honestly, this recipe is one I’ve made countless times, and it never fails to bring smiles—trust me, my kids actually ask for seconds! If you’re looking for a dessert that’s as comforting as it’s impressive, this hummingbird cake is your new best friend. It’s incredible how something so simple — bananas, pineapples, walnuts — can turn into something so irresistibly good. Plus, it’s surprisingly easy to make, which is a lifesaver on busy nights or when you’re craving something sweet and homemade in a hurry. Ready to get baking and add a little joy to your day? Let’s do this!
What is a hummingbird cake?
Think of hummingbird cake as the southern belle of cakes — sweet, charming, and a little bit unexpected. It’s essentially a spice cake infused with mashed bananas and crushed pineapple, giving it that wonderful moist texture and fruity sweetness. The name, I’ve heard, comes from the hummingbird’s love for nectar, which is a sweet nod to the sugary, tropical flavors packed into each bite. It’s a layered masterpiece with a luscious cream cheese frosting swirling through the middle, crowned with a shiny glaze that makes the whole thing look like it belongs in a bakery window. What I love about hummingbird cake is how it’s both cozy and festive, perfect for family gatherings, potlucks, or just because you want to treat yourself on a Tuesday. It’s also surprisingly versatile — you can add walnuts, shredded coconut, or even a dash of cinnamon to really personalize it. If you enjoy rich, fruity, and slightly spicy desserts, this cake is sure to steal your heart — just like it did mine!
Why you’ll love this recipe?
First off, the flavor—oh, the flavor! The sweetness from ripe bananas and crushed pineapple dances perfectly with warm spices like cinnamon and nutmeg. Each bite is tender, moist, and packed with bits of walnuts that add a subtle crunch. What I love most about this hummingbird cake is how simple it is to pull together; I’ve tested this so many times, I can practically do it with my eyes closed—though I definitely don’t want to miss the fun of mixing all those pretty ingredients together. Plus, the ingredients are budget-friendly and easy to find at my local store — no fancy gadgets or hard-to-pronounce items needed. It’s one of those cakes that tastes just as incredible as it looks, especially when you’re craving something sweet but want it to feel special. I also appreciate its versatility; serve it for breakfast (yes, it’s that good!), have it at a brunch party, or enjoy it as a decadent dessert after dinner. This cake is a keeper in my book, and I bet it’ll become one in yours too.
How do I make a Hummingbird cake?
Quick Overview
This hummingbird cake comes together surprisingly quickly — no complicated layers or fancy techniques. You basically whisk your dry ingredients, mix your wet ingredients, and then fold everything gently together. The secret to that tender crumb is not overmixing, so I always do this when I’m feeling impatient or multitasking — it’s foolproof! Pour half the batter into your prepared pan, dollop the cream cheese filling, swirl it delicately, then top with the rest of the batter. Pop it in the oven, and before you know it, your kitchen smells like heaven. Once baked, let it cool completely before glazing and frosting — this helps everything set perfectly. The result? A stunning cake that’s moist, bursting with fruity goodness, and beautifully marbled with cream cheese richness. Honestly, I think this is the kind of cake that makes people say, “Wow,” even if you’re just serving it for family Sunday dinner. It’s that good and that simple.
Ingredients
For the Main Batter:
– 2 cups all-purpose flour (I like to use unbleached for a richer taste)
– 1 teaspoon baking soda
– 1/2 teaspoon salt
– 1 teaspoon ground cinnamon (optional but adds warmth)
– 1/2 teaspoon ground nutmeg
– 1 cup granulated sugar
– 1 cup light brown sugar
– 1 cup vegetable oil or melted coconut oil (trust me, it keeps it super moist)
– 3 large eggs
– 1 teaspoon vanilla extract
– 1 cup mashed ripe bananas (about 2 large bananas)
– 1/2 cup crushed pineapple in juice, drained
– 1 cup chopped walnuts or pecans (optional but adds a lovely crunch)
For the Filling:
– 8 oz cream cheese, softened
– 1/2 cup powdered sugar
– 1 teaspoon vanilla extract
For the Glaze:
– 1 cup powdered sugar
– 2-3 tablespoons milk or lemon juice
– Optional: a splash of vanilla extract or a pinch of cinnamon for extra flavor
Step-by-Step Instructions
Step 1: Preheat & Prep Pan
Start by setting your oven to 350°F (175°C). Grease two 9-inch round cake pans or line them with parchment paper. I always do this because nothing ruins a beautiful cake more than sticking or tearing when you’re trying to serve it. You can also use a 9×13-inch pan if you prefer a sheet cake — just adjust baking time accordingly.
Step 2: Mix Dry Ingredients
In a medium bowl, whisk together the flour, baking soda, salt, cinnamon, and nutmeg. This step ensures all those spices and leaveners are evenly distributed, so every bite is perfectly flavored and risen. It’s a quick step but makes a big difference in texture.
Step 3: Mix Wet Ingredients
In a large bowl, beat the sugars and oil until well combined. Add the eggs one at a time, mixing well after each addition. Stir in the vanilla, mashed bananas, and crushed pineapple. The batter should be smooth and slightly thick — as if you’re making a fruit-yogurt smoothie, but thicker. I tested it with almond milk instead of pineapple juice (used in the pineapple), and it made it even creamier—give it a try if you’re feeling adventurous!
Step 4: Combine
Gently fold the dry ingredients into the wet mixture. Avoid overmixing — I say this every time but I still forget and end up with a slightly denser cake. Just stir until everything is combined, no streaks of flour should remain. That’s when the magic begins.
Step 5: Prepare Filling
In a small bowl, mix the softened cream cheese, powdered sugar, and vanilla until smooth. I like to keep it a little thicker than frosting—easy to dollop and swirl, not runny. If you want a tangier filling, add a splash of lemon juice; if you prefer sweeter, sprinkle in a tiny bit more powdered sugar.
Step 6: Layer & Swirl
Pour half of the batter into your prepared pans, then dollop the cream cheese filling on top, spreading it evenly. Pour the remaining batter over the filling and use a knife or skewer to swirl it gently—think of it as creating a marble pattern. This part is so pretty when it bakes; the marbled look makes it look fancy but it’s really easy to do.
Step 7: Bake
Bake for 30-35 minutes, or until a toothpick comes out clean. Every oven is different, so start checking at 30 minutes. If your cake is browning too quickly, tent it with foil — no need to over-bake. You want it moist inside, not dry, so don’t overdo it!
Step 8: Cool & Glaze
Allow the cakes to cool in the pans for about 15 minutes, then transfer to a wire rack and cool completely before glazing. Trust me on this — a warm cake and glaze don’t mix well. Mix your powdered sugar with milk and vanilla until smooth, then drizzle generously over the top. The glaze will set in a shiny finish that’s irresistible.
Step 9: Slice & Serve
Use a serrated knife for clean slices, serving slices slightly chilled or at room temperature. Garnish with extra chopped nuts or fresh fruit if you’re feeling fancy. This cake is fantastic when served with a dollop of whipped cream or a scoop of vanilla ice cream, especially on warm days.
What to Serve It With
This hummingbird cake is so versatile you can enjoy it in many ways. For breakfast, pair it with a robust coffee or a chai latte — the fruity spices complement a warm cup beautifully. On brunch, serve it sliced alongside fresh fruit and mimosas for that perfect Southern flair. As an after-dinner dessert, a scoop of vanilla ice cream or a drizzle of caramel sauce makes it extra indulgent. If you’re just craving a cozy snack, it’s lovely with a mug of hot lemon tea or even just a glass of cold milk. I grew up with my grandma’s classic way of serving this with extra toasted pecans on top — so many happy memories! This cake is also great for special occasions, where you can dress it up with edible flowers or a sprig of rosemary. My family loves to have a little slice after Sunday dinners — I swear, it disappears in minutes!
Top Tips for Perfecting Your Hummingbird Cake
Over the years, I’ve learned a few tricks that make this cake turn out even better every time. First, make sure your bananas are super ripe — the sweeter, the better; it really enhances that caramelized flavor. When grating zucchini or preparing any additional add-ins, always squeeze out excess moisture — soggy cake is no fun. To get that beautiful swirl in the middle, I gently drop dollops of filling onto the batter and swirl with a toothpick, but don’t overdo it — you want the pretty marble look, not a muddy mess. If you want to make it vegan or gluten-free, I’ve experimented with flax eggs and almond flour — results are delicious but a little different in texture. When it comes to baking, every oven varies, so start checking around 30 minutes, and remember, the cake shouldn’t be dry — moistness is key. For the glaze, I sometimes add a splash of lemon or orange zest to brighten the flavor. I’ve also tested using coconut milk instead of regular milk — it gives it a lovely tropical twist. Keep your ingredients at room temp for easier mixing, and trust your nose — if it smells divine while baking, you’re golden!
Storing and Reheating Tips
This hummingbird cake keeps well for several days, so don’t stress if you can’t finish it all at once. Cover it tightly with plastic wrap or store in an airtight container. At room temperature, it’ll stay fresh for about two days; after that, I pop it into the refrigerator, where it’s good for up to five days. Just make sure to cover it so it doesn’t dry out or absorb other fridge odors. For longer storage, slice and freeze individual pieces wrapped well in plastic — they defrost beautifully at room temperature or gently in the microwave. If you add the glaze after refrigerating, wait until the cake is fully thawed before drizzling — it helps keep the glaze from getting soggy or uneven. Reheating isn’t necessary unless you want it warm; in that case, a quick 10-second zap in the microwave does the trick. Honestly, the flavor only gets better the next day, and the texture remains tender and moist. To keep your cake looking fresh, I also recommend giving it a quick brush of lemon juice before adding the glaze — it brightens the flavor and keeps it shiny and appealing.
Frequently Asked Questions
Final Thoughts
There’s just something about hummingbird cake that feels like a warm hug in dessert form. It’s a nostalgic recipe that’s been a part of many family gatherings — my own included — and I love how simple ingredients come together to create something so extraordinary. The moistness, the fruity sweetness, and the hint of spice make each bite memorable. Once you try making this at home, I bet you’ll find yourself coming back to it again and again. Whether you serve it at brunch, a cozy coffee date, or just because you want a little slice of happiness, this hummingbird cake never disappoints. I encourage you to experiment with add-ins or toppings — maybe some toasted coconut or a splash of rum — and make it your own. And don’t forget, baking is all about love and fun, so enjoy every step! Can’t wait to hear how yours turns out — I bet you’ll be baking it often, just like me. Happy baking, my friend!
Hummingbird Cake
Ingredients
Method
- Preheat oven to 350°F. Prepare three 8-inch cake pans with parchment paper and grease the sides.
- Combine flour, baking powder, baking soda, salt, cinnamon, and nutmeg in a medium bowl and set aside.
- In a large mixing bowl, beat butter, oil, sugars, and vanilla until light and fluffy, about 2-3 minutes.
- Add eggs one at a time, mixing well after each addition, then add egg white and mix.
- Mix in half of the dry ingredients, then add mashed bananas and pineapple, followed by remaining dry ingredients. Do not overmix.
- Fold in pecans. Divide batter evenly into pans and bake for 27-30 minutes, or until toothpick comes out clean.
- Cool cakes in pans for 5 minutes, then transfer to wire racks to cool completely.
- Prepare frosting: Beat cream cheese and butter until smooth, then gradually add powdered sugar and vanilla. Frost cooled cakes.
- Assemble the cake layers, frost the outside, and decorate as desired.