Tropical Icebox Cake Recipe
There’s something so nostalgic about pulling out a dessert that looks simple but tastes like a victory. I remember the first time I tried making a coconut icebox cake; it was late on a lazy Sunday, and I was craving something sweet but didn’t want to turn on the oven. This cake is a lifesaver on busy nights, especially when family or friends drop in unexpectedly. Trust me, once you make it, it’s going to be your go-to dessert—my kids ask for it all the time, and I’ve lost count of how many times I’ve whipped this up just last-minute when I wanted something cool, creamy, and coconut-y. The smell alone makes my kitchen feel like a tropical getaway, and the best part? It comes together without any fuss, just a handful of ingredients and a bit of patience. If you love coconut, this one’s a must-try—you’ll be surprised how satisfying it is without needing to bake a thing.
What is coconut icebox cake?
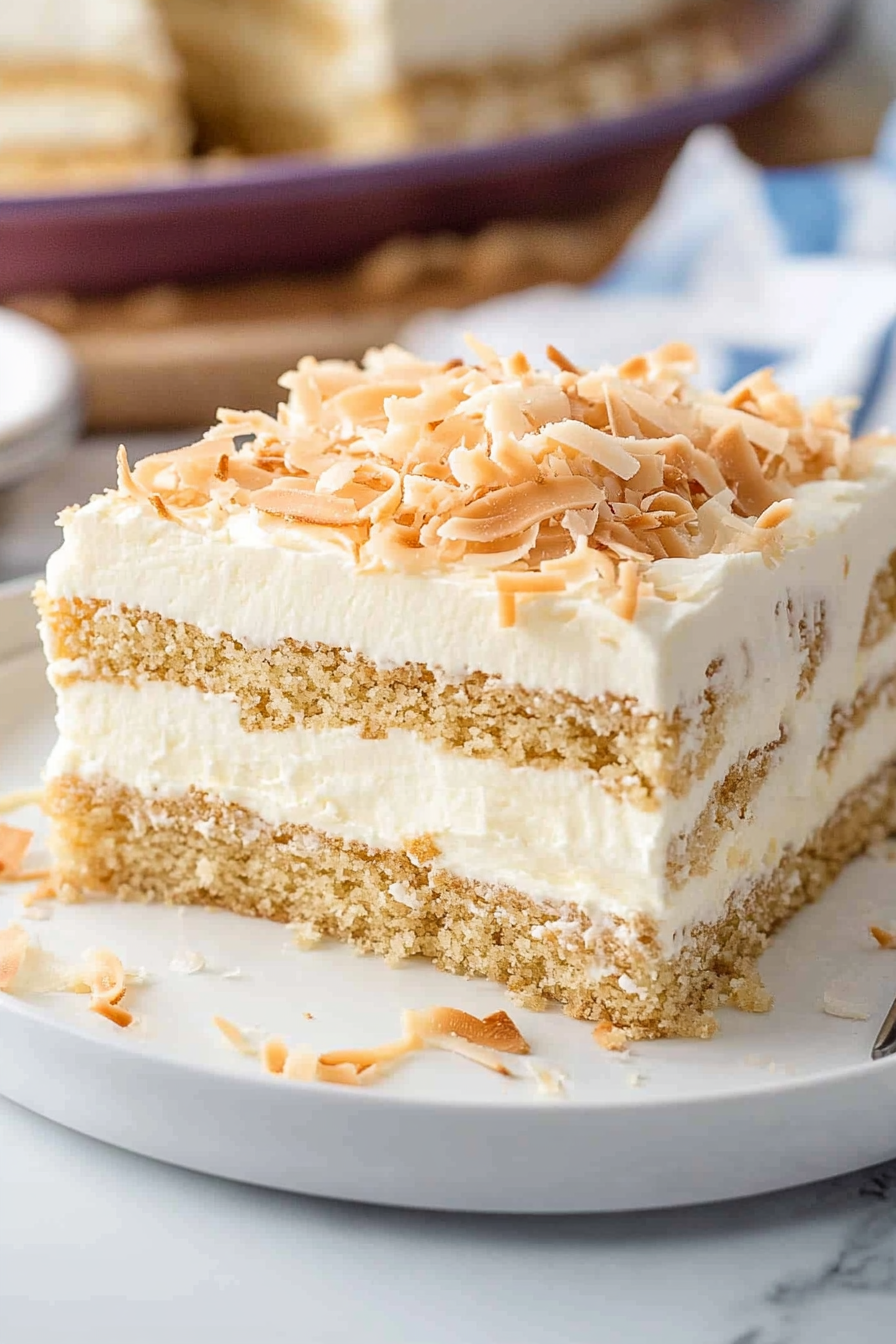
Think of a coconut icebox cake as a no-bake dream that layers crunchy cookies with luscious coconut-flavored filling, then chills until firm. It’s essentially a layered dessert that’s all about texture and flavor—crisp, soft, creamy, and totally refreshing. The name “icebox” harks back to a time when refrigerators were called iceboxes, and desserts like this were kept cool and simple. These cakes are super versatile; you can play with the cookies—graham crackers, digestive biscuits, or even coconut-flavored cookies—and adjust the sweetness to match your mood. Think of it as a mature version of a childhood icebox parfait, but with a tropical twist. It’s a cozy crowd-pleaser that you don’t need to fuss over—just layer, chill, and indulge.
Why you’ll love this recipe?
What I love most about this coconut icebox cake is how effortlessly it comes together. It’s perfect for those evenings when I want something sweet, but I also want to keep things light and breezy—no heavy baking or complicated steps. Plus, it’s incredibly budget-friendly; most of what you need is pantry staples or simple store-bought items. The flavor is just irresistible—rich coconut cream, hints of vanilla, and the crunch of biscuit layers that get perfectly infused with flavor during the chilling process. I’ve tested this with all kinds of coconut milk (even the unsweetened kind) and it’s always a hit, especially when served chilled on a warm day. It’s also a great way to use up leftover cookies or make a more sophisticated version with toasted coconut topping or even a drizzle of chocolate. What makes it stand out is how adaptable and forgiving it truly is—no oven required, and it’s ready in a matter of hours. It’s one of those recipes that feels a little fancy but is so simple to make, it quickly becomes a family favorite.
How do I make coconut icebox cake?
Quick Overview
This cake is all about layering crunchy cookies with a dreamy coconut cream filling, then letting it sit in the fridge until everything melds together into a luscious, sliceable dessert. You start by preparing a rich coconut filling — think whipped coconut milk with a touch of sugar and vanilla — then assemble with your choice of cookies. The magic happens in the fridge, where the cookies soften just enough to create that perfect contrast with the crunch. The process is straightforward, and I always do this when I want a dessert that’s quick, impressive, and just feels like an indulgent hug in every bite. It’s like making a super adult, tropical ice cream sandwich—without the hassle of an ice cream maker.
Ingredients
For the main layer:
- 1 packet of digestive biscuits or graham crackers (preferably coconut-flavored, if you can find them!)
- 1 can (13.5 oz) full-fat coconut milk, refrigerated overnight
- 1/2 cup sweetened shredded coconut
- 1/4 cup powdered sugar (adjust to taste)
- 1 teaspoon vanilla extract
- 2 tablespoons cornstarch (optional, for thickening)
For the Filling:
- Chilled coconut cream (from the can, solid part only)
- 2-3 tablespoons honey or agave syrup (or to taste)
- 1 teaspoon coconut extract (optional, for extra flavor)
- Fresh shredded coconut, for garnish
For the Glaze or Topping:
- Extra shredded coconut, toasted for depth
- Chocolate drizzle or caramel (if you like a little extra indulgence)
Step-by-Step Instructions
Step 1: Preheat & Prep Pan
Grab your favorite rectangular dish or a springform pan if you prefer easy removal. No need to preheat anything—just line your pan with parchment or lightly grease it. Doing this early makes assembling much easier later on. If you want very clean slices, I recommend placing the pan in the freezer for about 10 minutes before layering. Trust me, it helps everything not to slide around too much when you’re building this beauty.
Step 2: Mix Dry Ingredients
If you’re using shredded coconut to boost flavor, toast a handful in a dry skillet until golden and fragrant—that smell alone will make your house smell like a tropical paradise. Set aside. This little trick takes your coconut flavor up a notch and adds a slight crunch that is irresistible.
Step 3: Mix Wet Ingredients
Open that can of refrigerated coconut milk and scrape out the thick, creamy part—sometimes called coconut butter. Whisk it together with powdered sugar, vanilla, and coconut extract until smooth. If the mixture is too runny, sprinkle in a little cornstarch dissolved in cold water to help it firm up. I’ve tested this with almond milk once, and it actually made it even creamier, but full-fat coconut milk is the star here.
Step 4: Combine
Pour your coconut filling into the bowl with the shredded coconut and give it a gentle stir. Be careful not to overmix—just enough to incorporate everything evenly. This combo will be your luscious layer that gets absorbed by the cookies.
Step 5: Prepare Filling
Whip the chilled coconut cream with a hand mixer until soft peaks form. Gently fold in honey or your sweetener of choice and coconut extract. Trust me on this—the whipped coconut cream adds an airy, light texture that makes the cake feel decadently indulgent without being heavy.
Step 6: Layer & Swirl
Start with a layer of cookies at the bottom of your pan. Then dollop or spread a good layer of coconut cream filling over them. Add another layer of cookies, then more filling. Repeat until you reach the top, finishing with a layer of filling. For an eye-catching swirl, drop dollops of the filling across the layered cookies and gently swirl with a toothpick or knife for marbled effect. It makes every slice look like a little piece of art!
Step 7: Bake… Wait, What?
No baking necessary here! Just cover your pan with plastic wrap or foil and pop it in the fridge for at least 4 hours, but overnight is best. That allows the cookies to soften perfectly and the flavors to meld. The wait is so worth it for that melt-in-your-mouth texture.
Step 8: Cool & Glaze
If you want some extra flair, toast a bit more shredded coconut and sprinkle on top before serving. You can also drizzle melted chocolate or caramel for a richer finish. This step is totally optional but highly recommended for presentation and flavor contrast. Just make sure your cake is thoroughly chilled before adding any toppings to prevent smudging.
Step 9: Slice & Serve
Use a sharp knife dipped in hot water to make clean cuts, then serve chilled. This cake is best enjoyed straight from the fridge—creamy, crunchy, and utterly addictive. I like to present it with a dusting of extra shredded coconut and maybe a sprig of mint for a festive touch. My kids love grabbing a big slice, and if I’m lucky, I get a second piece myself!
What to Serve It With
This coconut icebox cake is incredibly versatile. For breakfast, pair it with a strong cup of coffee or coconut milk latte—oh, the aroma alone will make your morning brighter! During brunch, it makes a lovely centerpiece with fresh fruit like mango or pineapple. For dessert after dinner, add a dollop of whipped cream or a drizzle of chocolate sauce to elevate it further. It’s also fantastic as an afternoon snack, especially when served with a cold glass of coconut water or iced tea. I love serving this at family gatherings because it looks elegant but tastes so comforting. A scoop of vanilla ice cream alongside it is not cheating—just pure happiness. Honestly, this cake just keeps giving, no matter how you serve it.
Top Tips for Perfecting Your Coconut Icebox Cake
Over the years, I’ve learned a few tricks to make this cake even better. First, if you’re using shredded coconut, toasting it slightly enhances the flavor and texture—trust me, it’s worth the extra few minutes. When mixing the coconut cream, chill your mixing bowl and beaters beforehand; it whips up fluffier that way. To get a beautiful swirl pattern, drop spoonfuls of the whipped filling randomly on the layered cookies and use a toothpick to create a marbled effect—looks stunning and no one will guess how easy it was. If you want a more intense coconut flavor, add a splash of coconut extract to the filling or sprinkle extra toasted coconut on top. Don’t overmix your filling; a gentle fold preserves the airy texture. When baking (or rather, chilling), think about the timing—skip rushing the process, and let it sit overnight if you can. The flavors deepen, and the cookies soften just enough for that perfect bite. Also, if you’re experimenting with substitutions, I’ve tested coconut milk with a splash of almond extract—deliciously nutty and extra fragrant. The key is balancing sweetness and coconut intensity—trust your taste buds!
Storing and Reheating Tips
This cake keeps beautifully in the fridge for up to five days, but honestly, it’s best enjoyed within the first two days when the cookies are still delightfully soft. Cover it tightly with plastic wrap or store it in an airtight container—this prevents it from drying out. If you want to keep leftovers longer, pop slices in the freezer, wrapped well in plastic wrap and foil—just thaw overnight in the fridge before serving. Be aware that the texture might change slightly after freezing, with cookies becoming more crumbly, but the flavor remains fantastic. For the best experience, add any glaze or toppings just before serving to keep them fresh and vibrant. This cake is a flexible make-ahead option and travels well—perfect for picnics or potlucks. Just remember, the longer it sits, the more the flavors meld, so give it time for maximum flavor punch. Whether you’re refrigerating or freezing, just keep an eye on the texture and enjoy it as close to its freshest state as possible.
Frequently Asked Questions
Final Thoughts
If you’re looking for a dessert that’s packed with flavor but super easy to assemble, this coconut icebox cake is a total winner. It’s a perfect balance of crunch and cream, infused with that irresistible coconut aroma, and so adaptable—you can add your own twist every time. I’ve made this countless times for potlucks, backyard barbecues, or just because I needed a sweet escape, and it never fails to wow everyone. The best part? It’s a no-bake recipe that’s forgiving enough for beginner cooks but still feels fancy enough to wow guests. So, gather your ingredients, layer up some happiness, and pop it in the fridge—your tropical-inspired treat awaits! Can’t wait to hear how yours turns out—share your variations and photos in the comments below. Happy baking!
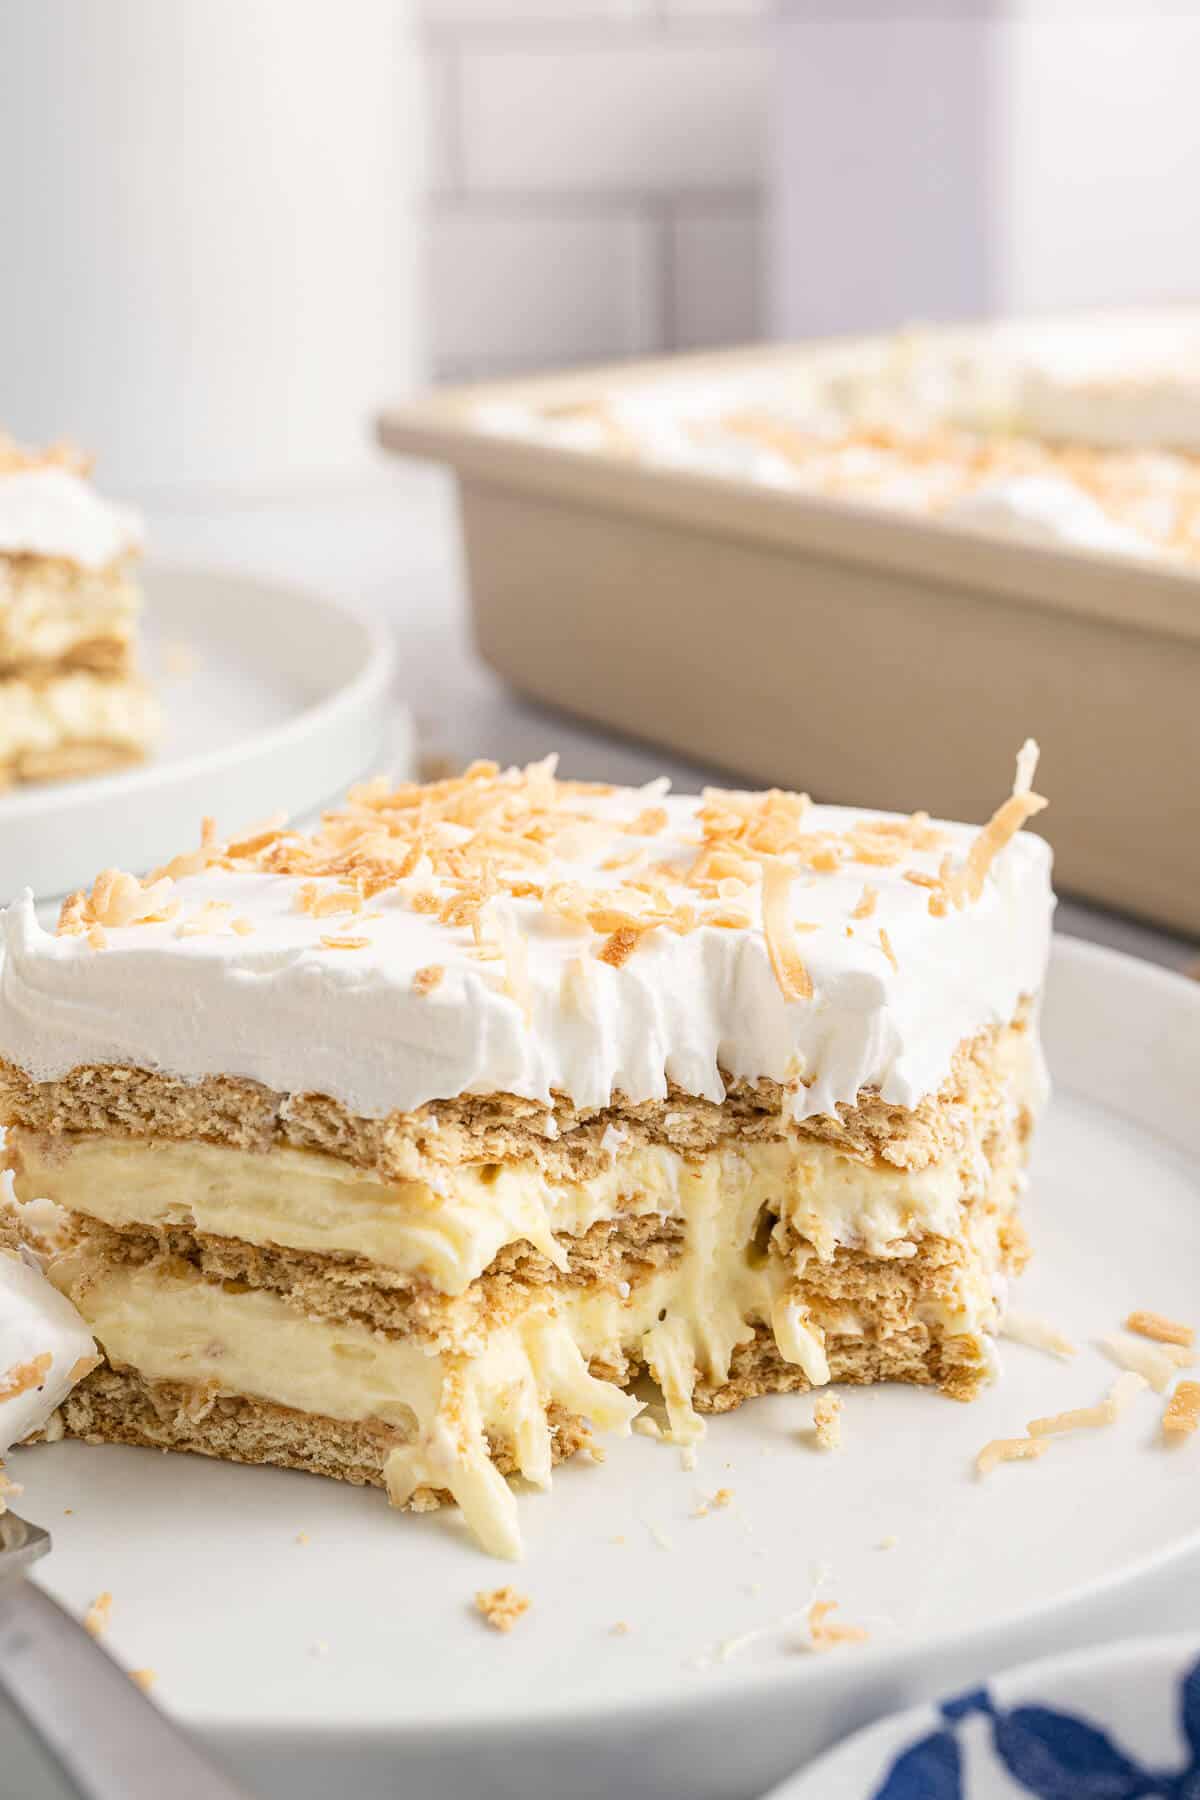
Coconut Icebox Cake
Ingredients
Method
- In a large bowl, whisk together the vanilla pudding mix, milk, and coconut extract for about 1 to 2 minutes until the pudding mix is dissolved and the mix has thickened.
- Add the coconut flakes and stir.
- Fold in one 8 oz container of thawed whipped topping until well-mixed.
- Line the bottom of a 9x13-inch baking dish with 8 to 9 graham crackers. You can break the graham crackers apart to ensure the whole bottom is covered.
- Spoon about half the pudding mixture over the graham crackers and smooth it out with a spoon or spatula.
- Layer another 8 to 9 graham crackers over the pudding mix, then cover those with the other half of the pudding mixture.
- Do one more layer of graham crackers then spread the second 8 oz container of thawed whipped topping over the top.
- Refrigerate for at least 4 hours, but chilling overnight is best.
- Sprinkle the toasted coconut on top, and serve chilled.