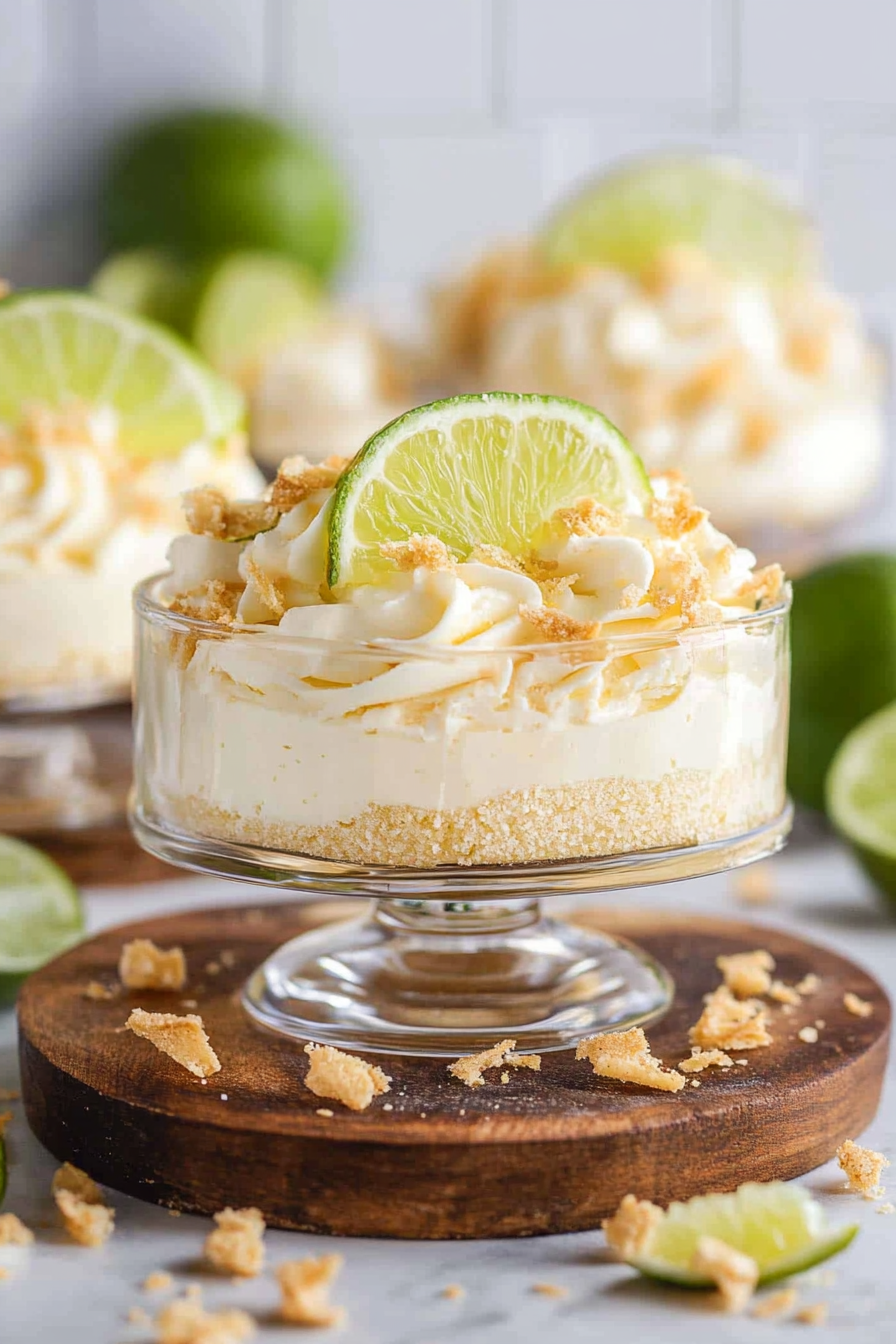
Zesty Cheesecake Parfaits A Simple Treat
There’s something about that first bite of lime cheesecake that instantly transports me back to lazy summer afternoons at my grandma’s house. The zing of fresh lime, perfectly contrasted by the velvety richness of the cream cheese—it’s a flavor combo that feels like sunshine in every spoonful. I always do this when I want to impress friends or just indulge myself after a long week, because honestly, lime cheesecake is one of those desserts that’s surprisingly easy to make and utterly addictive. You know those recipes that taste gourmet but somehow come together in less than an hour? This is definitely one of them. Plus, it’s a real crowd-pleaser—my kids ask for it all the time, and I’ve even made mini versions for brunch parties. Trust me, once you try this, it’s going to become your go-to sweet treat for any occasion, especially if you’re a fan of bright, citrusy desserts that refresh and satisfy all at once!
What is a lime cheesecake?
Think of lime cheesecake as a citrusy twist on the classic New York-style cheesecake, but with a lively, tangy edge that makes it feel like a bright splash of flavor on your palate. It’s essentially a creamy, smooth cheesecake speckled with fresh lime juice and zest, perched atop a buttery graham cracker crust. The idea is to balance that lush richness with enough acidity to keep things lively—kind of like how a good margarita hits all the right notes. Named after its signature ingredient, lime, this dessert is all about that perfect harmony: the sweetness of the cream cheese, the zing of bright lime, and the subtle crunch of the crust. Think of it as a summer in dessert form, but honestly, I love making it year-round—those vibrant flavors never get old, and it’s a real showstopper at family dinners or cozy weekends alone with a cup of coffee.
Why you’ll love this recipe?
What I love most about this lime cheesecake is how it manages to be both fancy and unpretentious. It’s incredibly simple to put together, but the final result feels like you’ve gone to a fancy bakery. The flavor profile is magical—crisp, fresh lime zest paired with that creamy, melt-in-your-mouth filling. It’s like a tropical getaway without leaving your kitchen! And because it’s no-bake—or at least, hardly baked—you don’t need to fuss over delicate techniques or worry about cracks ruining your masterpiece. Plus, it’s budget-friendly: most of the ingredients are staples in my pantry or fridge, which means you can whip this up on a weeknight when dessert cravings hit. My family devours this faster than I can say “lime,” and I’ve learned over the years that it’s perfect for anything from casual family dinners to fancy dinner parties when you want to dazzle with something bright and memorable. The best part? It keeps well in the fridge for a few days, so you can enjoy leftovers (if there are any!).
How do you make lime cheesecake?
Quick Overview
This lime cheesecake is a dream because it’s mostly about combining a few simple ingredients and letting them chill—no complicated techniques or tricky oven steps. You start with a buttery graham cracker crust, press it into a pan, then whip up a rich, tangy filling with cream cheese, sour cream, and fresh lime juice. Layer that into your crust, swirl in some extra lime zest if you’re feeling fancy, and let it set in the fridge for a few hours. The final touch? A sweet-tart glaze that ties everything together and makes each slice look picture-perfect. The whole process sounds fancy, but honestly, it’s foolproof once you get the hang of it. My secret weapon: I always do this when I want a no-fuss dessert that delivers big on flavor and wow factor. Perfect for making ahead or when friends drop by unexpectedly—it’s that reliable.
Ingredients
For the Main Batter:
- 16 oz (450 g) cream cheese, softened – I recommend using full-fat for the creamiest texture
- 1 cup sour cream – adds tang and dip-in-your-fingers creaminess
- 3/4 cup sugar – balances the tartness perfectly
- 1/4 cup fresh lime juice (about 2-3 limes) – for that vibrant zing
- 2 teaspoons lime zest – for extra punch and freshness
- 1 teaspoon vanilla extract – because a hint of vanilla makes everything better
- 3 large eggs – to give the filling structure and stability
For the Crust:
- 1 1/2 cups graham cracker crumbs – I like to crush my own—the flavor is better, but pre-made works, too
- 1/4 cup granulated sugar
- 6 tablespoons unsalted butter, melted – gives that buttery, cohesive crust
For the Glaze:
- 1/2 cup sweetened condensed milk
- 1/4 cup lime juice
- 2 tablespoons lime zest
- Optional: a few drops of green food coloring for extra pop
Step-by-Step Instructions
Step 1: Preheat & Prep Pan
Start by preheating your oven to 325°F (160°C). If you’re using a springform pan—which I always do—give it a light spray with non-stick spray and line the bottom with parchment for easy removal. This step is simple but saves a lot of hassle later. If you’re going for a no-bake vibe, just prepare your crust in a sturdy dish and chill right away. Trust me, the first time I skipped this step, I spent ages trying to pry my cheesecake out of the pan—lesson learned!
Step 2: Mix Dry Ingredients
In a small bowl, combine graham cracker crumbs with sugar. I like to do this first so the crust foundation is well blended. Stir until evenly mixed; it should resemble damp sand. The sugar helps the crust stay crispy and gives it a touch of sweetness, balancing the buttery richness later. I always sift my crackers if I’ve crushed them by hand—nothing worse than lumpy crusts!
Step 3: Mix Wet Ingredients
In a mixing bowl, beat your softened cream cheese until smooth—use a hand mixer or stand mixer if you have one. Add in sour cream, sugar, lime juice and zest, vanilla, and eggs, one at a time, mixing on low. You want this to be silky and creamy, not overbeat, or you risk incorporating too much air. The smell alone during this step is pretty much irresistible—the zingy lime aroma gets me every time.
Step 4: Combine
Pour the wet mixture into your prepared crust. If you’re swirling in extra lime zest or making a marble effect, do so gently now with a toothpick or a skewer. Don’t overmix here; just a few gentle swirl motions give it that beautiful marbled look. If you accidentally overmix, no worries—your cheesecake will still be delicious, just maybe a bit denser.
Step 5: Prepare Filling
If you want to add a little variation—maybe some thinly sliced lime or a layer of fruit—now’s the time. For this version, I prefer to keep it simple, letting the bright lime flavor do all the talking. Pour the filling into your crust, smooth the top with a spatula, and get ready for the best part: baking.
Step 6: Layer & Swirl
Once your filling is in the pan, I like to gently tap it on the counter to remove air bubbles. Then, I add a swirl of extra lime zest or even a little more sour cream on top and swirl it in a light figure-eight pattern. It adds a little extra visual fun and flavor pop.
Step 7: Bake
Pop it into your preheated oven and bake for about 45-50 minutes. It’s done when the edges are set but the center still has a slight jiggle—like setting jello, but with more cream cheese goodness. Keep an eye on it—every oven is a little different. I’ve learned that slightly underbaking and chilling thoroughly makes for the creamiest, crack-free cheesecake.
Step 8: Cool & Glaze
Let the cheesecake cool in the pan for about an hour at room temperature, then transfer it to the fridge for at least 4 hours, or overnight if you can wait—it’s worth it. Once chilled, pour your lime glaze over the top and then pop it back in the fridge for 30 minutes to set. The glaze adds that glossy finish and little extra zing that ties everything together beautifully.
Step 9: Slice & Serve
Use a sharp knife dipped in hot water to get clean, even slices. Wipe the knife after each cut. Serve chilled with a dollop of whipped cream or a few lime slices for garnish. The first time I served this at a dinner party, everyone went crazy over the vibrant flavor and creamy texture—definitely a new family favorite.
What to Serve It With
Because this lime cheesecake is so bright and refreshing, I love pairing it with light, crisp sides. For breakfast, it’s perfect with a hot cup of coffee or a glass of fresh orange juice—think of it as a citrusy wake-up call! For brunch, I usually top it with some fresh berries and a sprig of mint—looks pretty and adds a little extra sweetness. It’s also fantastic as a post-dinner dessert, especially when served with a drizzle of honey or a scattering of toasted coconut flakes. Sometimes, I’ll even layer some whipped cream on top to make it extra indulgent. When my family is craving comfort, I slice a piece, heat it just slightly in the microwave, and serve with a spoonful of vanilla ice cream. It’s a versatile dessert that makes every gathering a little more special—and it’s so much better than store-bought pie or those overly sweet options. Honestly, I keep the ingredients on hand just so I can whip it up whenever the mood strikes!
Top Tips for Perfecting Your Lime Cheesecake
Over the years, I’ve picked up a few tricks that turn an already good cheesecake into an irresistible one:
- Zucchini prep: Not necessary here, but if you want to sneak in some zucchini for extra moisture, grate it finely, squeeze out the excess water, and add it to the filling. Just trust me on this—moisture control is key to avoiding cracks.
- Mixing advice: Avoid overmixing once you add the eggs; otherwise, you’ll get too much air and your cake may crack in the center. Mix just until everything is combined.
- Swirl customization: Want more color or flavor? Mix in a few drops of green food coloring or a little extra lime juice into part of the filling and swirl for a marbled effect—your guests will love the visual punch.
- Ingredient swaps: Looking to make it dairy-free? Coconut cream and dairy-free cream cheese work well, just be prepared for a slightly different texture and flavor.
- Baking tips: Rotate your cheesecake halfway through baking to encourage even cooking. If the edges crack—isn’t that the worst?—try wrapping the pan in foil; moisture will help keep it smooth.
- Glaze variations: If you don’t want to do a glaze, dust the top with powdered sugar or serve with fresh fruit instead. Both bring out that zesty lime flavor without extra fuss.
Practice makes perfect, but honestly, I’ve made this so many times that I’ve learned to just trust the process. The key is chilling it fully—the flavors deepen, and the texture becomes impossibly smooth, like a little piece of citrus heaven on a plate.
Storing and Reheating Tips
This cheesecake keeps remarkably well. Cover it tightly with plastic wrap or store in an airtight container in the fridge for up to 4 days. It’s still creamy and fresh, with no loss of flavor. If you want to keep it longer, you can freeze individual slices wrapped in plastic, then thaw in the fridge when you’re ready to indulge—trust me, it’s just as good straight from the freezer, slightly frozen and super refreshing!
If you glazed it, it’s best to add the glaze just before serving so it stays glossy and vibrant. The cool thing? When stored in the fridge, it might develop a slightly firmer texture, but I find that a quick 10-second microwave blast restores its creaminess. Just be careful not to overheat—nobody wants a melted cheesecake!
Frequently Asked Questions
Final Thoughts
Honestly, this lime cheesecake has become my desert island dessert. It’s bright, creamy, and just the right amount of tangy to keep you coming back for seconds (or thirds!). Every time I serve it, I get compliments on how vibrant and dreamy it looks—kind of like summer on a plate. I love how versatile it is, too; whether I’m celebrating a special occasion or just craving something sweet after a busy day, it always hits the spot. Plus, I’ve learned over the years how forgiving it is—cracks, over-mixing, or even a slightly messy swirl seem to add character rather than ruin the look. My biggest tip? Make it a little ahead of time so the flavors can really develop, and then just indulge! I can’t wait to see how yours turns out—please do share your tweaks or favorite toppings. Happy baking!
Lime Cheesecake Parfait
Ingredients
Method
- Crumble cookies and evenly divide among 4 parfait dishes.
- In a mixing bowl, beat on medium high speed the cream cheese, lime juice, sugar, vanilla extract, salt and lime zest until smooth. Stir in whipped topping until smooth.
- Pipe with a pastry bag and tip (or simply use a spoon) to add cheesecake mixture to the parfait dishes. Crumble Golden Oreos and add to each dish for garnish. Refrigerate if not serving right away.