Easy Coffee Cookie Bites Delight
There’s just something so nostalgic about biting into a cookie that’s got that perfect crunch, paired with that irresistible hint of coffee flavor. I remember sneaking into the kitchen as a kid, eyes wide with curiosity, because my parents kept a box of Coffee Crisp chocolate bars tucked away — and honestly, I think I loved those bars more for what they symbolized than their taste. Years later, I realized I could recreate that magic in cookie form. These Coffee Crisp Cookies are a little piece of heaven: crunchy, sweet, and just enough coffee bitterness to keep you coming back for more. They’re honestly my go-to when I need a sweet pick-me-up, and trust me, they disappear faster than I’d like. I’ve made these countless times, tweaking the recipe here and there, and I promise — they’re surprisingly easy to whip up, even for a beginner. Best of all? They make a perfect gift, a snack for lazy afternoons, or a treat that my kids ask for all the time. Once you try these, I bet you’ll keep them in your baking rotation forever!
What is coffee crisp cookies?
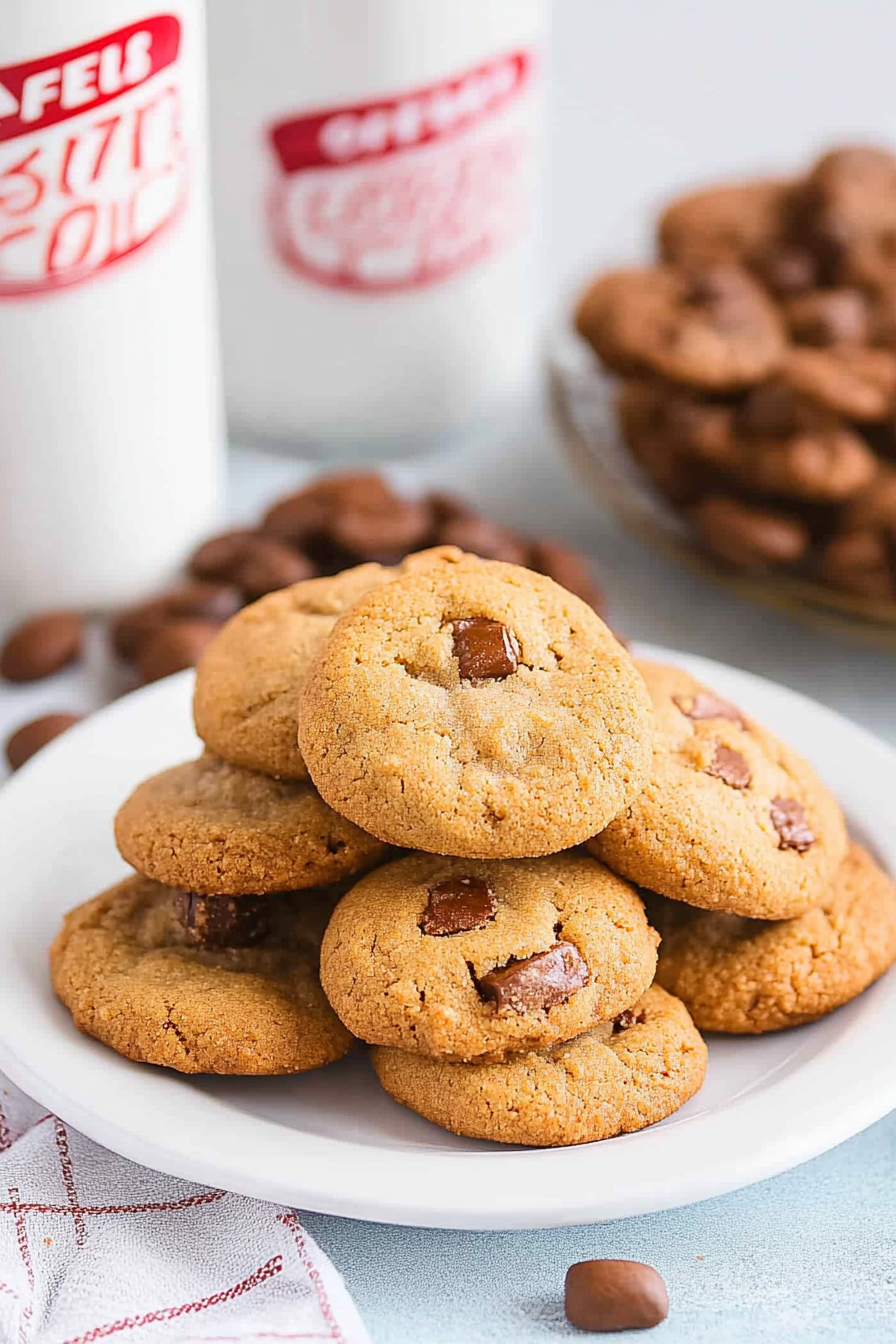
Think of Coffee Crisp Cookies as a delightful marriage between your classic crispy cookie and that iconic Canadian chocolate bar, Coffee Crisp. It’s essentially a buttery, crunchy cookie with tiny bits of Coffee Crisp embedded throughout, offering a satisfying texture with a burst of rich, coffee-infused flavor in every bite. The name? Well, it’s inspired by that beloved chocolate bar that combines the best of milk chocolate, malt, and a hint of coffee flavor — all in one bite-sized delight. These cookies are a clever way to take the familiar, nostalgic taste of the Coffee Crisp bar and turn it into something even more addictive. They’re best described as a cross between a biscotti’s crunch and a melt-in-your-mouth sweetness, balanced with just the right amount of coffee bitterness to keep your taste buds interested. Whether you’re a coffee lover or just adore a good cookie with a bit of crunch, these are sure to become a new favorite in your cookie jar.
Why you’ll love this recipe?
What I love most about these Coffee Crisp Cookies is how remarkably simple they are to make. You don’t need fancy equipment or lengthy steps — just good ingredients, a little patience, and a lot of love. The flavor is pretty unbeatable: the buttery richness of the cookie pairs perfectly with tiny bits of Coffee Crisp chocolate that melt slightly during baking, creating pockets of sweet coffee heaven in every bite. Plus, the crunch! I always do this when I bake cookies for friends or family — I love that satisfying snap as you bite through. And honestly, they’re budget-friendly, too. Most of the ingredients are pantry staples: butter, sugar, flour, eggs, and of course, those magical Coffee Crisp bars. They’re incredibly versatile: you can give these a coating of chocolate or dust them with powdered sugar for an extra special touch. All in all, they’re a cozy, comforting treat that makes me feel nostalgic and happy every time I bake them.
How do you make coffee crisp cookies?
Quick Overview
This recipe is a breeze — it’s basically a lazy Friday afternoon baking project. You start by creaming butter and sugar until fluffy, then mixing in eggs and vanilla. Next, fold in the dry ingredients followed by chopped Coffee Crisp bars. After chilling the dough briefly, you shape it into logs or rounds, bake until golden, and voilà — crunchy, coffee-flavored cookies ready to enjoy. The secret is chopping those Coffee Crisp bars small enough so they melt just right into the dough, creating delightful bursts of flavor with every bite. Whether you’re a seasoned baker or new to the kitchen, I promise, you’ll find this recipe straightforward and forgiving. Plus, the smell alone while baking — that warm, sweet coffee aroma — makes the whole house feel cozy and inviting.
Ingredients
[Organize ingredients as if you’re chatting with a friend, emphasizing quality and tips for sourcing.]
For the Main Batter:
– 1 cup (226 grams) unsalted butter, softened (trust me, soft butter makes all the difference here)
– 1 cup (200 grams) granulated sugar
– 2 large eggs
– 1 teaspoon vanilla extract
– 2 ½ cups (310 grams) all-purpose flour
– 1 teaspoon baking powder
– A pinch of salt
For the Filling:
– 6-8 Coffee Crisp bars, chopped into small pieces (I usually freeze mine first — easier to chop and they don’t get crumbled too much)
For the Glaze (optional):
– ½ cup powdered sugar mixed with a teaspoon of milk or lemon juice for drizzling or dusting.
Step-by-Step Instructions
Step 1: Preheat & Prep Pan
Preheat your oven to 350°F (175°C). Line a baking sheet with parchment paper or a silicone baking mat. I always do this to prevent sticking and make cleanup a breeze. If you want extra crispy cookies, you can bake them directly on an ungreased sheet, but I prefer parchment — crispy AND clean!
Step 2: Mix Dry Ingredients
In a bowl, whisk together the flour, baking powder, and salt. Set aside. This keeps everything evenly distributed and ensures the cookies bake evenly. I learned this trick after a few batches of unevenly baked cookies, trust me – it makes all the difference.
Step 3: Mix Wet Ingredients
In a large bowl, beat the softened butter and sugar until light and fluffy — about 2-3 minutes. I use a hand mixer; it’s quick and easy. Then add eggs one at a time, mixing well after each, and stir in the vanilla. The mixture should be smooth and creamy, with a lovely vanilla aroma wafting through the kitchen.
Step 4: Combine
Gradually add your dry ingredients into the wet mixture, mixing on low until just combined. Be careful not to overmix — overworking the dough can make the cookies tough. Once it’s just incorporated, fold in the chopped Coffee Crisp bars with a spatula. The dough might seem a little sticky, but that’s totally normal and will bake up just right.
Step 5: Prepare Filling
Chop your Coffee Crisp bars into tiny, evenly-sized pieces. I usually freeze mine first because it makes chopping so much easier and keeps the pieces nice and intact. Don’t skip this step — those little bits are what give the cookies that signature flavor and texture!
Step 6: Layer & Swirl
If you want a marbled look or layered effect, you can split the dough in half, mix one half with more Coffee Crisp pieces, then swirl them together slightly. I like to shape the dough into logs, then press a few extra bits into the surface before slicing. This creates a beautiful pattern when you slice the cookies later.
Step 7: Bake
Place the shaped dough or slices onto your prepared baking sheet, leaving about 2 inches between each. Bake for 12-15 minutes, or until edges are golden. Keep an eye on them! Every oven is different; I’ve learned that smaller cookies bake faster, so start checking at the 12-minute mark. You want them to be just firm but not overly brown.
Step 8: Cool & Glaze
Let the cookies cool on a wire rack for at least 10 minutes. This helps them crisp up fully. If you’re feeling fancy, drizzle with a simple powdered sugar glaze or dust with powdered sugar once cooled. I love to add a little lemon zest in my glaze sometimes — adds a fresh zing!
Step 9: Slice & Serve
Once cooled, serve these with a strong cup of coffee or tea. They taste best slightly warm but also keep well at room temperature for a few days. My family loves to dunk these in milk too, and they’re fantastic for packing in lunchboxes or gifting to friends.
What to Serve It With
These cookies are pretty versatile! For breakfast, pair them with your morning coffee or a glass of cold milk; they make a satisfying start to the day. For brunch or afternoon tea, serve them on a pretty plate with a plush napkin, alongside a latte or a chai tea latte — somehow, the coffee flavor complements creamy drinks perfectly. As a dessert, they’re fantastic on their own or served with a scoop of vanilla ice cream. And for those cozy nights, I love making a little “cookie plate” with a variety of homemade treats, these cookies always stealing the show. I also sometimes dip them in melted chocolate or sprinkle crushed nuts on top for an added crunch. Honestly, they’re such a crowd-pleaser, and I love that they bring back all those childhood memories.
Top Tips for Perfecting Your Coffee Crisp Cookies
Over the years, I’ve learned a few tricks to elevate this recipe from good to *wow*.
Zucchini Prep: Okay, so no zucchini here, but if you want to sneak in some moisture, a grated carrot or zucchini can work if you squeeze out excess moisture first — but honestly, I prefer sticking to the classic for that signature crunch.
Mixing Advice: Be gentle when mixing in the dry ingredients; overworking the dough makes for tough cookies. Use a spatula instead of an electric mixer once you add the flour — that keeps the dough tender.
Swirl Customization: If you want fun patterns, try layering different sections of dough with extra Coffee Crisp bits, then use a toothpick or skewer to swirl gently. It’s a fun way to impress friends or make picture-perfect cookies for photos!
Ingredient Swaps: No Coffee Crisp bars? No worries. You can substitute with chopped toffee, caramel bits, or even crushed malted cookies for a similar crunch and flavor. Just remember, the texture and flavor will shift slightly.
Baking Tips: Every oven is different. I find that rotating the baking sheet halfway through helps distribute the heat evenly. Also, your cookies are done when the edges are golden brown — they’ll firm up as they cool.
Glaze Variations: For a more decadent touch, melt a bit of dark chocolate and dip the edges or drizzle over the top. Or skip the glaze altogether and dust with powdered sugar for a simple, elegant finish. Trust me, experimenting is half the fun!
This recipe has been a labor of love, and each batch teaches me something new — like how chilling the dough makes it easier to handle or how adding a pinch more vanilla balances the sweetness perfectly. Don’t be afraid to tweak it to your taste; that’s part of the joy of baking!
Storing and Reheating Tips
If you’re lucky enough to have leftovers (ha!), store these cookies in an airtight container at room temperature for up to 3 days. They stay crisp and fresh, but I recommend keeping the glaze separate if you added one — it keeps everything looking neat. For longer storage, place them in a sealed container and pop them in the fridge for up to a week — just bring them out to warm slightly before serving. Want to freeze? Wrap individual cookies tightly in plastic wrap, then place them in a freezer-safe bag for up to 3 months. When you’re ready to indulge again, defrost at room temperature or give them a quick 10-second zap in the microwave. The texture might soften a little, but trust me — they’re just as delicious!
And if you added a glaze or chocolate drizzle, wait until the cookies are fully cooled before applying to prevent melting or streaking. That extra step keeps them looking professional and tasting perfect.
Frequently Asked Questions
Final Thoughts
If you’re craving that perfect balance of crunch and coffee kick, these Coffee Crisp Cookies deliver in every way. They’re nostalgic, easy to make, and so addictive — I always find myself reaching for one more, even after I think I’ve had enough. Baking them is like a little ritual that instantly brings me back to weekend mornings at home, fresh air coming through the window, and my kids asking for seconds. Honestly, once you get the hang of chopping the Coffee Crisp bars and shaping the dough, I promise you’ll be hooked. These cookies also make wonderful gifts; wrap them up in a cute box, and you’ve got a thoughtful, homemade treat that everyone will love. I encourage you to play around with different add-ins or coatings to make them your own. Happy baking, and I can’t wait to hear how yours turn out — trust me, these won’t last long in your house!
Coffee Crisp Cookies
Ingredients
Method
- Preheat oven to 350°F. In a large bowl, add the butter, brown sugar, and sugar and beat until fully combined and mixture is light and fluffy.
- Add in corn syrup, egg, and vanilla and beat until combined.
- In another bowl, mix together the flour, baking soda, and salt. Add dry mixture to wet mixture and beat until fully blended.
- Stir in Coffee Crisp chunks.
- Drop rounded tablespoons of dough onto a greased cookie sheet. Bake for 15 minutes or until golden brown.
- Cool on a wire rack before serving.