Easy Molten Chocolate Cake Recipe
There’s nothing quite like the first bite of a warm, gooey molten chocolate cake—rich chocolate, soft center, and that little rush of molten lava spilling out onto your plate. I remember the first time I made this myself, how the aroma immediately filled the kitchen and drew everyone in like a magnet. It’s one of those recipes that’s deceptively simple but feels like a gourmet treat, the kind that turns an ordinary evening into a celebration. My kids ask for this all the time, and honestly, it’s my go-to when I want something indulgent but don’t want to spend hours in the kitchen. It’s basically my secret weapon for impressing friends or just satisfying a sweet craving at 10 pm. Trust me, once you get the hang of this molten chocolate cake, it’s going to be your new favorite “special occasion” or “treat-yourself” dessert. And I promise, it’s way easier than it looks—like, “awesome surprise after a busy day” easy!
What is molten chocolate cake?
Think of molten chocolate cake as the lovechild of a flourless chocolate torte and a luscious lava cake. It’s essentially a tiny, individual cake that’s baked just enough to develop a delicate, slightly firm outer shell, while inside, it’s still molten, soft, and gooey. The name says it all—“molten” referring to the hot, flowing chocolate center. This dessert got hugely popular in posh restaurants because it’s both elegant and bombastically delicious. The best part? It’s a one-pan wonder and super quick to whip up, especially if you keep a few key ingredients in your pantry. It’s like the comfort food version of a fancy soufflé—rich, decadent, and so worth the moment of effort. I always say, it’s the perfect way to turn simple chocolate into a show-stopping masterpiece that’s impossible to resist.
Why you’ll love this recipe?
What I love most about this molten chocolate cake is how it combines incredible flavor with simplicity. The smell alone—that warm cocoa and butter aroma—kicks everyone into high gear, hungry and eager to dive in. It’s surprisingly straightforward to make, and I’ve tested it with different chocolates, almond milk, and even added a pinch of chili powder for a surprising twist—trust me on that last one, it’s a game-changer! This dessert is friendly on the budget, using ingredients most of us already have: chocolate, butter, eggs, sugar, and a touch of flour. Plus, it’s incredibly versatile: want it dairy-free? Use coconut oil or almond milk. Craving a boozy version? Toss in a splash of your favorite liqueur. The best part? It’s perfect for all occasions—romantic date night, family dinners, or just when you need a little pick-me-up after a long day. I honestly think it’s the kind of dessert that feels fancy but is wildly forgiving for home cooks.
And honestly, once you master the technique, you’ll find yourself sneaking into the kitchen just to make a quick batch when nobody’s watching. It’s that addictive. This one’s a lifesaver on busy nights, or when you’re craving chocolate but don’t want to commit to a whole cake or cookies. Plus, it disappears in minutes at my house—my kids actually ask for seconds before I’ve even finished plating it!
How do I make molten chocolate cake?
Quick Overview
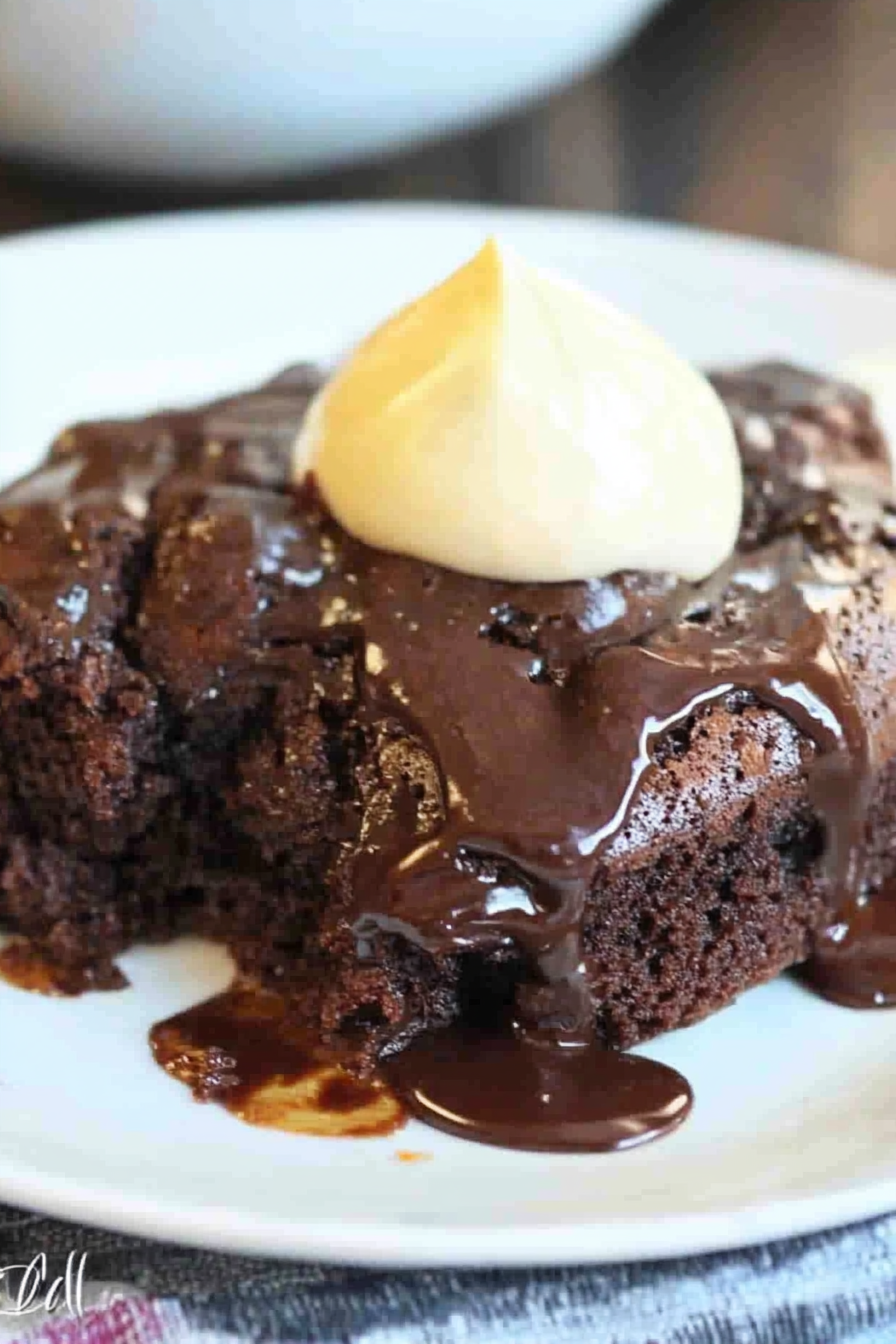
This molten chocolate cake recipe is a quick fix with a big reward. You melt your chocolate and butter together until silky smooth, whip up some eggs and sugar into a fluffy mixture, then gently fold everything together. Pour into ramekins, pop them into a hot oven, and bake just until the edges are set but the center is still irresistibly runny. The key here is timing—overbake it, and you lose that signature molten center. Once out of the oven, you gotta let it rest for a minute or two before flipping it out onto a plate. The result? A perfectly cracked crust with that molten lava oozing out on contact. Serve it with a dusting of powdered sugar or a scoop of vanilla ice cream, and it’s like a little slice of heaven on a plate.
Ingredients
For the Main Batter:
- 200g good quality dark chocolate (70% cacao is perfect)
- 1/2 cup (115g) unsalted butter
- 3 large eggs
- 3/4 cup (150g) granulated sugar
- 2 tablespoons all-purpose flour or almond flour for gluten-free
- A pinch of salt
For the Filling:
- Extra melted chocolate (optional, for richer lava)
- Fresh berries or a sprinkle of sea salt for contrast (optional)
For the Glaze (Optional):
- Powdered sugar or cocoa powder
- Chocolate sauce or caramel for drizzling
Step-by-Step Instructions
Step 1: Preheat & Prep Pan
I always start by preheating my oven to 425°F (220°C). Grab a few ramekins—these little dishes are perfect for individual servings. Grease them well with butter, then dust with a touch of cocoa powder or flour to prevent sticking. This step makes plating a breeze later. Trust me, I was impatient and didn’t prep well once, and it turned into a sticky mess—lesson learned!
Step 2: Mix Dry Ingredients
In a small bowl, whisk together the flour, salt, and any optional dry flavorings. This helps keep the flour from clumping with the wet ingredients and ensures even distribution later on. It’s a quick step but makes a noticeable difference in the batter’s smoothness.
Step 3: Mix Wet Ingredients
In a saucepan, melt your chocolate and butter together over low heat, stirring continuously until silky smooth. I usually do this while sneaking a little taste—because who can resist? Once melted, let it cool slightly so it doesn’t scramble the eggs. In a separate bowl, beat the eggs and sugar until they’re light and fluffy—about 2-3 minutes—that’s my secret to a tender crumb and airy texture.
Step 4: Combine
Pour the cooled chocolate mixture into the eggs and sugar, then stir gently. Fold in the dry ingredients just until combined—don’t overmix, or you’ll deflate that precious air. The batter should be thick but pourable, with a glossy sheen.
Step 5: Prepare Filling
If you’re feeling fancy, fill a small piping bag with extra melted chocolate, or just dollop a spoonful into the center of each ramekin. You can also add a few berries or a pinch of sea salt on top of the batter for extra flavor contrast if you’re feeling experimental.
Step 6: Layer & Swirl
Pour most of the batter into your ramekins, then add a spoonful of filling (like extra melted chocolate) in the center—then swirl gently with a toothpick for that beautiful marbled effect. This makes the molten center even more luscious and pretty!
Step 7: Bake
Pop the ramekins onto a baking sheet and bake for about 12-14 minutes. Here’s the trick: the edges should be set, but the center still looks slightly soft—like a thick pudding. Every oven is different, so I usually start checking around 12 minutes by gently nudging the side of the cake. When the top is cracked and a toothpick inserted in the edge comes out with moist crumbs, you’re good to go.
Step 8: Cool & Glaze
Let the cakes rest for about 2 minutes—this helps the molten center settle just right. Then, carefully invert each ramekin onto a plate, tapping gently if needed. Dust with powdered sugar or cocoa powder and drizzle with chocolate sauce if you’re feeling fancy.
Step 9: Slice & Serve
This is the best part—serving! The crust should crack open as you cut into it, revealing that glorious molten lava inside. Serve immediately with a scoop of vanilla ice cream or a dollop of whipped cream. Honestly, the warmth and richness make it impossible to resist—every single time, I get a round of “wow!” from family and friends.
What to Serve It With
This molten chocolate cake is a star on its own, but I love pairing it with a few simple touches to elevate the experience. For breakfast or brunch, it pairs surprisingly well with a cup of rich espresso or a latte—perfect for a slow morning. I’ve even topped it with a handful of fresh berries or a dusting of powdered sugar for a prettier presentation. As a dessert after dinner, a little vanilla bean ice cream melting into the warm cake creates a heavenly combo that’s both decadent and comforting. On casual nights, I hold back and serve a slice with a drizzle of caramel or chocolate sauce and maybe some toasted nuts for crunch—that’s my cozy treat. Little tip: I love to make an extra batch and freeze individual portions—then I just bake straight from the freezer for a quick, satisfying fix!
Top Tips for Perfecting Your Molten Chocolate Cake
Precision is key with this recipe, but don’t stress—you’ll get there with a few tidbits I’ve picked up over the years. First, make sure not to overbake! The timing is everything; slightly underbaking will give you that luscious molten center, while overbaking turns it into a regular cake (still delicious but not what we want here). I learned this the hard way—one time I left it in just a minute too long, and the gooey magic turned into a solid chocolate block. When mixing the batter, be gentle—overmixing can deflate the air you work so hard to whip up, and that’s what gives it that tender crumb. I’ve tested substituting butter with coconut oil, and surprisingly, it adds a subtle tropical note that pairs beautifully with dark chocolate. For the swirl, I recommend using a toothpick or skewer—easy to control and visually striking. Also, don’t forget—serve immediately for that perfect molten experience. If you need to make ahead, reheat in a warm oven for just a minute or two, and it’s almost as good as fresh out of the oven. The key is to keep experimenting—each oven and ingredient brand behaves a little differently—but trust me, the results are worth it every time.
Storing and Reheating Tips
If you happen to have leftovers (I rarely do!), I recommend storing the cakes in an airtight container in the fridge for up to 2 days. Just keep in mind, the molten center might set a little—no worries, just pop it in a 350°F (175°C) oven for about 5-7 minutes to warm it back up until the lava flows again. For freezer storage, wrap each ramekin or slice individually in plastic wrap, then foil, and keep for up to a month. Thaw overnight in the fridge, then reheat in the oven or microwave—just be careful not to overdo it, or you’ll turn it into a chocolate brick. When reheating, I prefer the oven for that fresh-from-the-oven texture, but a quick microwave blast works in a pinch. As for the glaze—adding a dusting of powdered sugar or cocoa powder just before serving keeps it looking perfect and adds that final touch of elegance. Trust me, once you master storage and reheat techniques, this dessert becomes a go-to treat for any time craving chocolate.
Frequently Asked Questions
Final Thoughts
If you’ve never tried making molten chocolate cake at home, I promise you’re in for a treat. It’s one of those desserts that feels fancy but is actually simple enough for any home cook to master with a little patience and a good timer. Every time I serve this, someone inevitably asks for the recipe—because that rich, gooey center is just unforgettable. Plus, it’s perfect for last-minute gatherings or when you need an instant pick-me-up—a true comfort in chocolate form. I hope you’ll give it a try and make it your own, experimenting with flavors and toppings. Once you start, I swear you’ll be hooked—this is one dessert that’s worth every minute of the effort. Happy baking—and can’t wait to hear how yours turns out!
Molten Chocolate Cake
Ingredients
Method
- Preheat the oven to 375°F. Grease 8 ramekins or small baking cups.
- In a medium bowl, whisk together flour, sugar, cocoa powder, baking powder, and salt.
- Add milk, vanilla extract, and melted butter; stir until smooth.
- Fold in chocolate chips.
- Divide batter evenly into prepared ramekins.
- Pour hot water or coffee over the batter in each ramekin without stirring.
- Bake for 20 minutes or until the edges are set but the center still jiggles slightly.
- Remove from oven and let cool for 5 minutes before serving. Serve warm, optionally dusted with powdered sugar or with vanilla ice cream.