Easy Roasted Parmesan Green Beans Recipe
You know those nights? The ones where you’re staring into the fridge, utterly exhausted, and the thought of chopping, dicing, and sautéing feels like climbing Everest? Yeah, I live for those nights. And for those nights, I have a secret weapon. It’s simple, it’s incredibly satisfying, and it always, *always* gets rave reviews. I’m talking about roasted green beans, but not just any roasted green beans. These are the ones that are perfectly tender-crisp, kissed with a hint of garlic and lemon, and they practically make themselves. Forget those sad, limp, boiled green beans from childhood; this is an entirely different universe. It’s the kind of dish that makes you feel like a culinary superhero, even if all you did was toss a few things on a baking sheet. Honestly, when I’m looking for a side dish that’s both elegant enough for company and ridiculously easy for a Tuesday, these roasted green beans are my go-to. They’re a game-changer, trust me.
What is roasted green beans?
So, what exactly are we talking about here? Simply put, roasted green beans are exactly what they sound like: fresh green beans that have been tossed with a little bit of oil, some seasonings, and then roasted in a hot oven until they’re tender on the inside with just the slightest bit of char and crispness on the edges. Think of it as transforming a humble vegetable into something utterly craveable. It’s not about drowning them in sauce or overcooking them into mush. It’s about coaxing out their natural sweetness and giving them a delightful texture that makes you want to reach for another bite. It’s that perfect balance – not too soft, not too crunchy, just… right. It’s essentially the easiest way to elevate a simple vegetable into a star player on your plate.
Why you’ll love this recipe?
Okay, let’s get down to why this particular recipe for roasted green beans is going to become your new best friend. First off, the flavor. Oh, the flavor! Roasting caramelizes the natural sugars in the green beans, bringing out a sweetness you wouldn’t expect. Then you add a whisper of garlic, a bright pop of lemon zest, and maybe a pinch of red pepper flakes if you like a little warmth – it’s just perfection. And simplicity? This is where this recipe truly shines. You can wash and trim the beans, toss them with oil and seasonings, spread them on a baking sheet, and pop them in the oven. That’s it. Seriously. No complicated steps, no fancy techniques. It’s ideal for those nights when you’re running on fumes but still want to serve something wholesome and delicious. Plus, it’s incredibly cost-effective. Green beans are usually pretty budget-friendly, and the other ingredients are pantry staples. What I love most is their versatility. They’re fantastic alongside grilled chicken, fish, steak, or even just tossed with pasta. They’re a welcome addition to any holiday spread, but they’re equally at home on a casual weeknight. They are, without a doubt, one of my most requested side dishes. My kids, who can be a bit picky, will devour these. They always ask for “the crispy green beans,” which, of course, is this recipe! It’s a testament to how much better simple roasting can be compared to boiling or steaming.
How do I make roasted green beans?
Quick Overview
This recipe is all about letting the oven do the work. You’ll quickly toss fresh green beans with olive oil, garlic, salt, and pepper, spread them onto a single layer on a baking sheet, and roast them at a relatively high temperature until they’re tender-crisp and slightly blistered. A final squeeze of lemon juice right before serving brightens everything up beautifully. It’s ridiculously straightforward and takes minimal hands-on time, making it a lifesaver for busy cooks.
Ingredients
What are the green beans?
1.5 pounds fresh green beans, trimmed (look for bright green, firm beans with no blemishes)
2 tablespoons olive oil (a good quality extra virgin olive oil really makes a difference here)
2-3 cloves garlic, minced (I like to use fresh garlic for the best flavor, but garlic powder works in a pinch)
1/2 teaspoon salt (or to taste)
1/4 teaspoon black pepper (freshly ground is always best!)
Pinch of red pepper flakes (optional, for a little heat)
For Finishing:
1 tablespoon fresh lemon juice (from about half a lemon)
Step-by-Step Instructions
Step 1: Preheat & Prep Pan
First things first, get that oven nice and hot. Preheat it to 400°F (200°C). While the oven is preheating, grab a large baking sheet. If you’re worried about sticking or want super easy cleanup, you can line it with parchment paper or aluminum foil. I usually just go for the foil because it makes cleanup a breeze, and honestly, who has time for scrubbing pans when there’s deliciousness to be eaten?
Step 2: Mix Dry Ingredients
This step is less about mixing dry ingredients and more about getting the green beans ready for their transformation. Make sure your trimmed green beans are nice and dry. If they’re wet, they’ll steam instead of roast, and we want that lovely char. Give them a good shake in the colander or pat them with a clean kitchen towel.
Step 3: Mix Wet Ingredients
In a large bowl, add the trimmed green beans. Drizzle them with the olive oil. Then, toss in your minced garlic, salt, pepper, and the optional red pepper flakes. Use your hands or a couple of spoons to toss everything together really well. You want every single green bean to be coated in that glorious garlicky, peppery oil. This ensures even cooking and maximum flavor.
Step 4: Combine
This is where everything comes together on the pan. Spread the seasoned green beans out in a single layer on your prepared baking sheet. This is super important! If you pile them up, they won’t roast properly; they’ll just steam in the middle. You want them to have plenty of space so the hot air can circulate around each one, giving them those lovely crispy bits.
Step 5: Prepare Filling
In this case, the “filling” is simply the seasonings we’ve already added to the beans! The magic really happens in the oven.
Step 6: Layer & Swirl
As mentioned in Step 4, the key is to ensure the green beans are in a single layer. No swirling needed here, just a nice, even distribution across the baking sheet for optimal roasting.
Step 7: Bake
Pop that baking sheet into your preheated oven. Now, this is where you get to relax a little. Bake for about 15-20 minutes. The exact time will depend on your oven and how crisp you like your beans. You’re looking for them to be tender-crisp (meaning they still have a little bite) and have some lovely browned spots. Give the pan a shake halfway through to ensure even browning.
Step 8: Cool & Glaze
Once they’re out of the oven, and they smell absolutely divine, it’s time for the finishing touch. Remove the baking sheet from the oven and immediately drizzle the fresh lemon juice all over the hot green beans. Toss them gently right on the pan. That burst of lemon juice at the end really wakes up all the flavors and adds a beautiful brightness. Don’t let them sit too long before serving, as they are best enjoyed warm!
Step 9: Slice & Serve
You don’t need to slice them, but you do need to serve them! Pile them high onto a serving platter or directly onto plates. They are fantastic served immediately while they’re still warm and have that lovely bright, garlicky aroma. They look so appealing with those little browned edges.
What to Serve It With
Honestly, these roasted green beans are so versatile, they practically go with *everything*. For a quick and easy breakfast, they’re surprisingly good alongside some scrambled eggs and toast – the garlicky notes are a nice change of pace. For a more substantial brunch, imagine them as part of a beautiful spread with quiches, smoked salmon, and mini muffins. They add a lovely pop of color and freshness. As a side for dinner, they are superstars. They pair beautifully with grilled steaks, pan-seared salmon, roasted chicken, or even pork chops. They provide a much-needed green element to any meal and balance out richer flavors perfectly. And for those nights when you just need a little something extra with a simple pasta dish or a hearty soup, these roasted green beans are the perfect accompaniment. They add a touch of elegance and vibrant flavor without any fuss. My personal favorite is serving them with a simple lemon herb roasted chicken – the flavors just sing together!
Top Tips for Perfecting Your Roasted Green Beans
I’ve made this recipe more times than I can count, and over the years, I’ve picked up a few tricks that really make a difference. First, when it comes to the green beans themselves, choose the freshest ones you can find. Look for bright, firm pods that snap cleanly when you break them. Trimming the ends is crucial – just a quick snap or cut off the woody ends. My personal preference is to leave them whole, but some people like to cut them into 2-inch pieces, which is perfectly fine too. The biggest tip I can give you is to NOT overcrowd the pan. Seriously, this is the golden rule of roasting. If you pile them up, you’ll end up with steamed, soggy beans instead of beautifully roasted ones. If you have a lot of beans, use two baking sheets. It’s better to use two pans than to sacrifice texture on one. When it comes to the garlic, mince it finely. This helps it distribute evenly and prevents any big, overpowering bites of raw garlic. And for the salt and pepper, don’t be shy! Seasoning is key to bringing out the best flavor. For ingredient swaps, if you don’t have fresh garlic, you can absolutely use about 1/2 teaspoon of garlic powder, but I find the fresh stuff gives it a more nuanced flavor. If you’re not a fan of lemon, a tiny splash of balsamic vinegar right at the end can also be delicious, though it changes the flavor profile. For baking, always preheat your oven properly. A hot oven is essential for that perfect tender-crisp texture and slight char. I also find that rotating the pan halfway through the baking time can help ensure even browning, though a good single layer is often enough. And one last thing: don’t overcook them! They should still have a slight bite. The lemon juice should be added right when they come out of the oven, not before, so it stays bright and zesty and doesn’t cook away.
Storing and Reheating Tips
These roasted green beans are truly at their best when served fresh, but life happens, and sometimes you’ll have leftovers. If you do, store them in an airtight container in the refrigerator for up to 3 days. They’ll lose a bit of their crispness over time, but they’re still quite tasty. When it comes to reheating, the best method is to give them a quick toss in a hot skillet over medium-high heat for a few minutes until they’re heated through and have regained a bit of their crispness. You can also reheat them in the oven at around 350°F (175°C) for about 5-7 minutes. I’ve even microwaved them in a pinch, but they tend to get a bit softer. If you’re planning to use leftovers in a dish where crispness isn’t as crucial, like mixed into a pasta salad, the refrigerator method is perfectly fine. I generally don’t recommend freezing roasted green beans, as the texture can become quite mushy upon thawing. The glaze, meaning the olive oil, garlic, salt, pepper, and lemon juice, is best applied right before serving for maximum impact, so don’t worry about saving it separately. Just toss the leftovers with a tiny bit more olive oil and lemon juice before reheating if they seem a little dry.
Frequently Asked Questions
Final Thoughts
There you have it – my absolute favorite way to make roasted green beans! I truly believe this is one of those simple recipes that punches way above its weight. It’s proof that you don’t need a ton of fancy ingredients or complicated techniques to create something truly delicious and satisfying. These roasted green beans are so versatile, so easy, and so darn tasty, they’ll become a staple in your kitchen, just like they have in mine. They’re perfect for impressing guests, pleasing picky eaters, or simply treating yourself to a healthy and flavorful side dish. If you love this recipe, you might also enjoy my roasted Brussels sprouts with balsamic glaze or my simple sautéed asparagus. Both are equally easy and packed with flavor! Give these roasted green beans a try, and I can almost guarantee you’ll be hooked. I can’t wait to hear how yours turn out! Don’t forget to leave a comment below and tell me about your experience, or share your own tips and variations. Happy roasting!
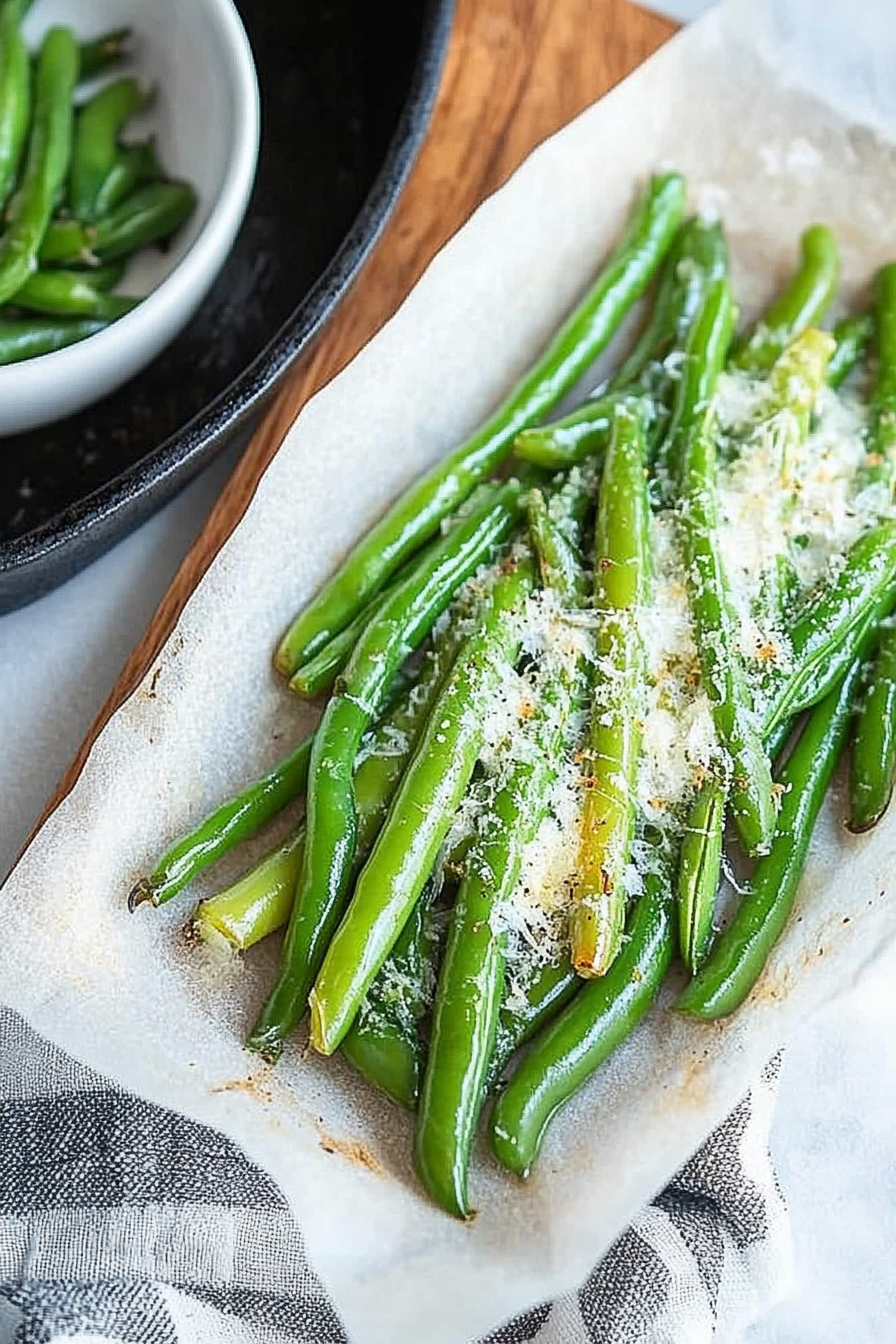
Garlic Roasted Green Beans
Ingredients
Method
- Preheat oven to 425°F. Line a baking sheet with parchment paper.
- Place green beans on the baking sheet and drizzle with olive oil. Season with garlic powder, salt, and pepper, then toss to coat evenly.
- Spread the green beans in a single layer on the baking sheet and roast for 10 minutes.
- Remove from oven, sprinkle with Parmesan cheese, and bake for an additional 5 minutes until cheese is melted and slightly browned.
- Serve immediately, garnished with additional Parmesan if desired.