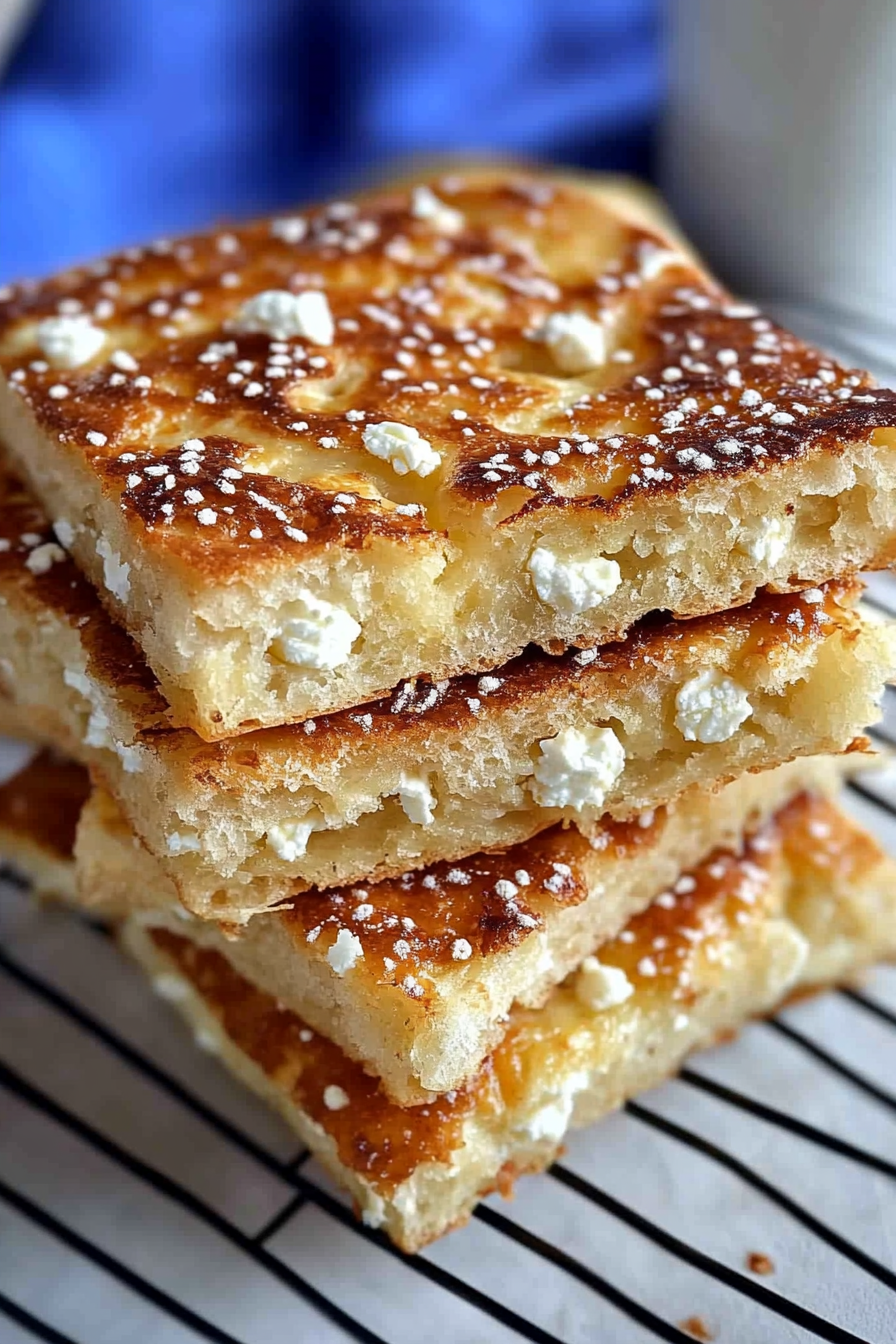
Simple Feta Flatbread Recipe
There’s something about biting into a warm, crispy flatbread topped with salty feta and fresh herbs that just makes your day better, doesn’t it? I remember the first time I made this feta flatbread — it was a lazy Saturday afternoon, and I was craving something delicious but didn’t want to fuss too much in the kitchen. The smell alone, with all that bubbling cheese and toasted crust, pulled everyone into the kitchen like magic. My kids asked for seconds before I even finished slicing it up, and honestly, it’s become one of those recipes I keep coming back to, especially when I need something satisfying yet simple. Whether it’s a quick weeknight dinner or a last-minute appetizer for friends, this feta flatbread is a total winner. It’s honestly one of those recipes that tastes way more impressive than it takes to make. Trust me on this one — once you try it, it’ll be a staple in your kitchen too!
What is Feta Flatbread?
Think of feta flatbread as a luscious, cheesy open-faced pizza from the Mediterranean, but with a rustic, simpler twist. It’s essentially pizza dough topped with crumbled feta, hearty herbs, and a drizzle of good olive oil, baked until perfectly crispy and inviting. The name might sound fancy, but it’s really just a casual, cozy dish that’s easy to put together with pantry staples. It’s like a celebration of flavor in each bite — salty feta, fresh herbs, maybe a little zing of lemon or chili, all wrapped up in that irresistible crispy crust. My favorite part? The way the feta melts slightly into the warm dough, creating a gooey, savory layer that’s absolutely addictive. This dish is all about letting quality ingredients shine, and it’s equally perfect for a casual weeknight dinner or a charming appetizer for your next gathering.
Why you’ll love this recipe?
What I love most about this feta flatbread is how straightforward it is to make — no complicated dough recipes, no fuss. Just a few ingredients, assembled in minutes, and you’re pretty much set. The flavors are incredible — the feta adds a salty, tangy punch that balances beautifully with the fresh herbs and maybe a hint of lemon zest or garlic. It’s so versatile too. I’ve made it with sun-dried tomatoes, olives, or even a splash of honey for a sweet-salty combo that’s out of this world. Plus, it’s budget-friendly, relying on pantry staples that I always keep stocked. This flatbread disappears so quickly at my house, I swear I should double the recipe! Whether I’m serving it as a snack, a light lunch, or part of a bigger spread, it always gets rave reviews.
How do I make Feta Flatbread?
Quick Overview
Making feta flatbread is honestly easier than ordering takeout. You start with a simple dough — store-bought or homemade if you’re feeling ambitious — that gets rolled out into a thin circle or oval. Then, spread a little olive oil over the surface, sprinkle generously with crumbled feta, herbs, and your favorite seasonings. Bake it in a hot oven until the edges puff up and turn golden, and the feta is beautifully melty. A quick drizzle of olive oil or a squeeze of lemon right after baking, and you’re done! It’s quick, satisfying, and full of flavor. The best part? No waiting around for long proofs or complicated layering. Just a handful of ingredients, quick assembly, and a few minutes in the oven — that’s all it takes to create magic.
Ingredients
For the Main Batter:
– 2 cups all-purpose flour (or bread flour for a chewier crust)
– 1 teaspoon salt
– 3/4 cup warm water
– 2 tablespoons olive oil
– 1 teaspoon sugar (optional, helps to hydrate the dough)
For the Topping:
– 1 cup crumbled feta cheese
– 2 tablespoons chopped fresh herbs (oregano, thyme, or dill)
– 1-2 cloves garlic, minced (optional but highly recommended)
– Zest of one lemon (for brightness)
– A drizzle of good olive oil
– Cracked black pepper (to taste)
For the Glaze (optional):
– 1-2 tablespoons olive oil mixed with a splash of lemon juice or honey for added shine and flavor
Step-by-Step Instructions
Step 1: Preheat & Prep Pan
Preheat your oven to 450°F (230°C). If you have a pizza stone, pop it in now so it heats up along with the oven — it helps get that nice, crispy crust. Lightly grease your baking sheet or line it with parchment paper. If you’re using a pizza stone, sprinkle a little flour or cornmeal to prevent sticking.
Step 2: Mix Dry Ingredients
In a large bowl, whisk together the flour, salt, and sugar if you’re using it. This step ensures everything’s evenly distributed — trust me, uneven seasoning can lead to weird patches of blandness or saltiness, so take a moment here.
Step 3: Mix Wet Ingredients
In a small bowl, combine the warm water and olive oil. Make sure the water isn’t too hot — just comfortably warm to the touch. Pour it into your dry ingredients and stir with a spoon or your hands until it comes together into a shaggy dough. If it’s sticky, add a little more flour; if it’s too dry, splash in a tiny bit more water.
Step 4: Combine
Turn the dough out onto a floured surface and knead gently for 1-2 minutes until smooth. Wrap it in plastic or cover with a damp towel and let it rest for about 10 minutes. Resting relaxes the gluten, making it easier to roll out and giving you a better texture overall.
Step 5: Prepare Filling
While the dough rests, prepare your topping. Crumble your feta cheese, chop herbs, and prepare any other add-ins. The lemon zest is a personal favorite of mine — it adds a fresh zing that makes everything brighter.
Step 6: Layer & Swirl
Once rested, roll the dough out on a floured surface into your preferred shape — I usually do a rough oval or circle about 1/4 inch thick. Transfer it to your prepared baking sheet or hot pizza stone. Brush the surface lightly with olive oil, then sprinkle with feta, herbs, garlic, and lemon zest. For a little visual fun, I like to add a tiny bit of extra feta or herbs in a swirling pattern on top — makes it prettier when sliced.
Step 7: Bake
Pop it into the oven and bake for about 12-15 minutes. Watch for the crust to puff and turn golden at the edges. The feta should be bubbly and slightly browned — trust me, that’s when all the magic happens. If using a pizza stone, give it an extra 2 minutes since it retains heat so well, but don’t let it burn.
Step 8: Cool & Glaze
Once out of the oven, let it cool just for a minute or two. Drizzle with a little flavored olive oil or honey for that beautiful shine and flavor boost. If you’re going for a little extra brightness, squeeze a splash of lemon juice over the top now.
Step 9: Slice & Serve
Slice into wedges or squares — I like to serve this hot, right out of the oven. It pairs perfectly with a light salad or just as it is, with a cold glass of something fizzy or rosé. Honestly, it’s so good you’ll want to keep the best pieces for yourself!
What to Serve It With
This feta flatbread is so versatile, I’ve served it in all kinds of ways. For breakfast, I love pairing it with a sharp coffee and a side of fresh fruit — the saltiness of feta just takes on a new dimension with that morning caffeine kick. When I’m throwing a lazy brunch, I sometimes add a dollop of Greek yogurt or a drizzle of balsamic reduction to make it feel more special. As a snack or appetizer, I slice it thin and serve with a little extra feta and fresh herbs on the side for dipping or crumbling over. It also makes a beautiful gallery of flavors for a casual dinner — pair with roasted veggies or a simple green salad. My family always asks for this when friends come over; it’s just so approachable, yet totally impressive to look at and taste.
Top Tips for Perfecting Your Feta Flatbread
There are a few tricks I’ve picked up over the years that help make this dish consistently amazing. First, always use good-quality feta — it makes a world of difference in flavor. If your feta is a little salty, taste the toppings before adding more salt or seasoning. When it comes to dough, don’t overmix — this can lead to tough crust. I tested this with different flours and found that bread flour gives a slightly chewier texture, which I love. If your crust isn’t crispy enough, try baking it directly on a hot pizza stone or preheated baking sheet, and make sure to give it enough baking time. The swirl pattern isn’t just for looks; it helps the ingredients distribute evenly and makes each slice equally delicious. For variations, I’ve tried adding caramelized onions or even a sprinkle of crushed red pepper for some heat — do what your taste buds crave! And a quick tip — if you find the feta isn’t melting enough, gently pressing it into the dough before baking helps it melt into that gooey, cheesy layer we all love. Trust me, little tweaks like these add up to a big difference.
Storing and Reheating Tips
This flatbread is best enjoyed fresh, but if you have leftovers, here’s how I handle it. Once cooled completely, store it in an airtight container at room temperature if you’re planning to eat it the next day — it stays pretty good for about 24 hours. For longer storage, pop it into the fridge in a sealed container — just know that the crust might soften a bit. To reheat, my favorite method is popping it into a hot oven at 375°F for about 8 minutes or so until it’s crispy again. If you’re in a hurry, a quick sizzle in a hot skillet for a few minutes does the trick, adding back some crunch. If I want to keep the feta topping just as fresh as when it came out of the oven, I wait to add extra herbs or drizzle until right before serving after reheating. Freezing isn’t my first choice — it’s still good, but the texture can change — so I recommend eating it fresh whenever possible. Oh, and if you want to make it ahead for a party, assemble everything but don’t bake — then bake right before serving so it’s hot and crisp.
Frequently Asked Questions
Final Thoughts
This feta flatbread is more than just a quick snack; it’s a cozy hug in food form. Every time I make it, I’m reminded of lazy weekend mornings and lively dinner parties alike. The combination of crunchy crust, creamy feta, and fresh herbs never fails to make my kitchen smell incredible, and honestly, it’s foolproof enough that I’ve never had a flop. The simplicity of the ingredients makes me feel good — I know I’m serving up something nourishing and full of flavor with just a handful of pantry staples. Once you get the hang of it, I bet you’ll start experimenting with all sorts of toppings — roasted veggies, spicy peppers, or even a sprinkle of za’atar. This recipe is a keeper for me, and I hope it becomes one for you too. Happy baking! I can’t wait to hear how yours turns out — don’t forget to leave a comment or share your own twists!
Classic Feta Flatbread
Ingredients
Method
- Preheat your oven to 375°F. Lightly oil a 7x10 inch baking dish with olive oil or butter.
- In a large bowl, whisk together the flour, baking powder, and salt. Add milk, eggs, and olive oil; mix well. Fold in the shredded mozzarella and crumbled feta until evenly combined. Transfer the batter to your prepared baking dish and spread evenly. Sprinkle sesame seeds on top and bake for 45 minutes until golden. Cool in the pan for 10 minutes before slicing.