Easy Chocolate Eclair Cake Recipe
Oh, where do I even begin with this chocolate eclair cake? It’s one of those recipes that feels like a warm hug on a plate, a childhood memory baked into a glorious, no-bake dream. You know, the kind of dessert that makes everyone stop and ask, “What IS this?!” It’s got that incredible texture of a classic eclair, that rich chocolatey goodness, and a creamy filling that just melts in your mouth, but without all the fuss of piping choux pastry. Honestly, if you’re a fan of chocolate, you’re going to fall head over heels for this. It’s like the love child of a decadent chocolate cake and a light, airy éclair, and it’s honestly one of my go-to’s when I want something truly special without spending hours in the kitchen.
What is chocolate eclair cake?
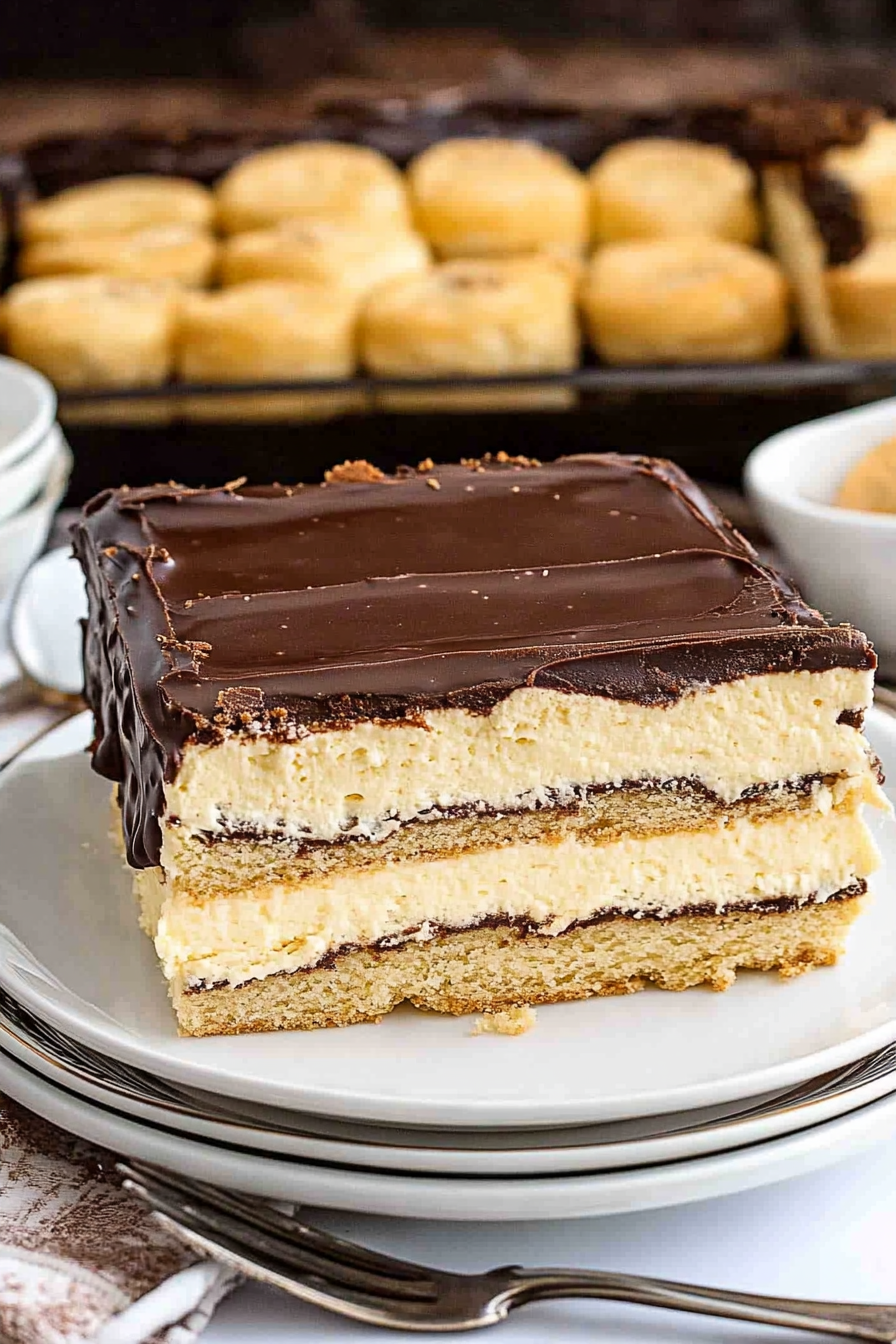
So, what exactly is this magical thing we’re calling chocolate eclair cake? Think of it as a deconstructed éclair, but in cake form! It’s a layered dessert, typically starting with a base of crushed cookies or a quick graham cracker crust, followed by a luscious layer of creamy pudding or custard, and then topped with a rich, glossy chocolate ganache or frosting. The “cake” part comes from the idea that you’re assembling it in a pan, like a cake, and then slicing it to serve. It’s not baked in the traditional sense, which is a huge part of its charm. It’s essentially all the best parts of an éclair – the creamy filling, the chocolatey topping, that delightful bite – brought together in a way that’s unbelievably simple to create. It’s the kind of dessert that makes you feel fancy without the stress, perfect for potlucks, parties, or just a Tuesday night craving!
Why you’ll love this recipe?
Let me tell you, there are so many reasons why this chocolate eclair cake has earned a permanent spot in my recipe binder. First off, the FLAVOR is just out of this world. You get that deep, satisfying chocolate richness from the glaze, which perfectly balances the sweet, creamy, vanilla-kissed pudding layer. It’s not overly sweet, which I really appreciate, and the texture contrast between the soft filling and the crumbly base is just divine. Then there’s the SIMPLICITY. Seriously, this is a lifesaver on busy nights or when unexpected guests pop over. You don’t need any fancy equipment, and the steps are so straightforward that even a beginner baker can nail it. I’ve even had my kids help with stirring the pudding, and they felt like master chefs! It’s also incredibly COST-EFFICIENT. Most of the ingredients are pantry staples you probably already have, making it a budget-friendly way to create a show-stopping dessert. What I love most, though, is its VERSATILITY. You can play around with the base (graham crackers are my favorite, but shortbread cookies are also amazing!), you can add a hint of coffee to the chocolate glaze for a mocha twist, or even sprinkle some chocolate chips on top for extra texture. It’s a dessert that’s always a crowd-pleaser, and it never fails to get rave reviews. It’s like a hug in dessert form!
How do I make chocolate eclair cake?
Quick Overview
This chocolate eclair cake is all about building layers of pure joy. We start with a simple, press-in cookie crust, then smother it with a dreamy, no-cook pudding filling, and crown it all with a decadent, easy chocolate glaze. It’s a no-bake wonder that comes together in under 30 minutes of active prep time, and then it just needs a little chill time to work its magic. The beauty of this recipe is its forgiving nature; it’s hard to mess up, and the results are consistently spectacular. It’s the perfect dessert when you’re craving something impressive but short on time or energy.
Ingredients
For the Main Batter:
You’ll need about 2 cups of crushed graham crackers. Make sure they’re finely crushed – no one wants to bite into a big cookie chunk in their creamy dessert! You can toss them into a food processor or just put them in a zip-top bag and go at them with a rolling pin. A quarter cup of granulated sugar adds just a touch of sweetness to the base, and half a cup of melted butter is the magic binder that holds it all together. Make sure your butter is melted but not scorching hot when you mix it in.
For the Filling:
This is where the magic happens! You’ll need two boxes (each 3.4 oz size) of instant vanilla pudding mix. Now, some people like to use regular pudding mix and cook it, but I find the instant stuff is a lifesaver and tastes just as good for this purpose. You’ll also need 3 cups of cold milk to whisk with the pudding mix. Using cold milk is super important; it helps the pudding thicken up properly. I’ve experimented with different types of milk, and honestly, whole milk gives the creamiest result, but I’ve also made it with 2% and it was still delicious! You could even try almond milk if you’re dairy-free, though it might be a tad less rich.
For the Glaze:
For that irresistible chocolate topping, we’ll use 1/2 cup of unsalted butter, 1/4 cup of unsweetened cocoa powder, and 3 cups of powdered sugar. The cocoa powder gives it that deep chocolate flavor, and the powdered sugar makes it smooth and sweet. Lastly, you’ll need about 1/3 cup of milk to get the glaze to the perfect drizzling consistency. You can add a splash of vanilla extract too, if you like, for a little extra depth of flavor. We want this glaze to be smooth and pourable, not too thick and not too thin – just right for coating the top beautifully.
Step-by-Step Instructions
Step 1: Preheat & Prep Pan
First things first, grab a 9×13 inch baking dish. This is the vessel for our delicious creation! You don’t need to grease it, as the crust will hold everything together. Give your dish a quick wipe-down just to make sure there’s no dust or anything from sitting in the cupboard. This step is super simple but crucial for a tidy assembly later.
Step 2: Mix Dry Ingredients
In a medium bowl, combine your crushed graham crackers, granulated sugar, and melted butter. Use a fork or a spatula to mix it all together until it’s evenly moistened. It should look like wet sand. This is the base that will give our cake a nice texture and hold everything in place. Make sure there are no dry pockets of crumbs!
Step 3: Mix Wet Ingredients
In a separate, larger bowl, whisk together your instant vanilla pudding mix. Then, pour in the 3 cups of cold milk. This is where you’ll want to whisk vigorously for about 2 minutes, or until the pudding starts to thicken. Don’t stop whisking too soon, or you’ll end up with a runny filling! It should become nice and thick, like a traditional pudding you’d eat with a spoon.
Step 4: Combine
Pour the thickened pudding mixture evenly over the graham cracker crust in your prepared baking dish. Use a spatula to spread it out smoothly, making sure you reach all the corners. You want a nice, even layer of creamy goodness. This is the heart of our eclair cake!
Step 5: Prepare Filling
This step is actually already done in Step 3! The pudding *is* the filling. So, once it’s thickened and spread, we’re good to go. The key here is making sure it’s properly thickened before spreading, so it holds its shape and doesn’t ooze out when you slice into it later.
Step 6: Layer & Swirl
This is where we add the glorious chocolate topping. In a small saucepan over medium heat, melt the butter. Once melted, whisk in the unsweetened cocoa powder until it’s smooth and there are no lumps. Then, gradually whisk in the powdered sugar until you have a thick, smooth chocolate mixture. Finally, whisk in the milk, a little at a time, until the glaze reaches your desired drizzling consistency. You want it pourable but not too thin. It should coat the back of a spoon beautifully. Pour this warm glaze evenly over the pudding layer. You can use an offset spatula to spread it gently if needed, but I often just let it flow naturally for a more rustic look.
Step 7: Bake
Here’s the best part: there’s no baking required for this chocolate eclair cake! You just need to chill it. Cover the dish tightly with plastic wrap or aluminum foil and pop it into the refrigerator for at least 2-3 hours. This allows the pudding to set up completely and the flavors to meld together. The longer it chills, the firmer it will be, making it easier to slice.
Step 8: Cool & Glaze
As mentioned in Step 7, the chilling is your cooling and setting phase. The glaze is applied right after you make it, while it’s still warm and pourable, over the pudding layer. So, no separate cooling and glazing steps here – it’s all integrated!
Step 9: Slice & Serve
Once thoroughly chilled, remove the plastic wrap and cut the chocolate eclair cake into squares. A sharp knife works best for clean cuts. You can serve it straight from the fridge. It’s delicious on its own, but I sometimes like to add a dollop of whipped cream or a few fresh berries on the side for a little extra flair. Enjoy every single bite!
What to Serve It With
This chocolate eclair cake is so versatile, it’s practically begging to be served at any occasion! For a quick Breakfast treat, I love cutting myself a small square with my morning coffee. It’s a little indulgent, but hey, it’s Tuesday! For Brunch, I’ll make it a bit more elegant by plating a generous slice with a few fresh raspberries or a drizzle of raspberry coulis. It looks so pretty and always impresses my guests. As a Dessert, it’s a no-brainer. It’s a guaranteed hit at potlucks and holiday gatherings, especially when served with a scoop of vanilla bean ice cream or a light dusting of powdered sugar. My family also loves it as a Cozy Snack – it’s the perfect comfort food for a movie night or a rainy afternoon. Sometimes, I’ll even make a smaller version in a square pan and call it individual eclair desserts, which is always a fun touch! Honestly, it’s good with pretty much anything, or even just by itself!
Top Tips for Perfecting Your Chocolate Eclair Cake
Over the years, I’ve learned a few tricks that make this chocolate eclair cake absolutely perfect every single time. For the crust, I always make sure my graham crackers are *really* finely crushed. You want that sandy texture so it presses together easily and creates a solid base, not chunky bits. If you use a food processor, pulse it until it’s almost like flour. When mixing the pudding, cold milk is your best friend. Seriously, don’t even think about using room temperature milk, or your pudding won’t set up right, and you’ll end up with a gooey mess instead of a creamy layer. I’ve tried using different fats for the crust, like coconut oil, but melted butter is truly the way to go for that classic flavor and binding power. If your pudding is a bit too stiff, you can always whisk in a tablespoon or two more of cold milk until it’s spreadable. For the chocolate glaze, the consistency is key. If it’s too thick, it’ll be hard to spread and might crack. If it’s too thin, it’ll just slide right off. Whisk in that milk slowly, adding just a tiny bit at a time, until it flows smoothly but still has some body. I’ve also found that if you’re in a real rush, you can speed up the chilling process by placing the dish in the freezer for about an hour, then transferring it to the fridge. Just keep an eye on it so it doesn’t freeze solid! If you want to make this a day ahead, that’s totally fine, and in fact, I think the flavors meld even better overnight. Just make sure it’s well-covered in the fridge.
Storing and Reheating Tips
This chocolate eclair cake is wonderfully forgiving when it comes to storage. If you happen to have any leftovers (which is rare in my house!), you can keep it at Room Temperature for a few hours, especially if your kitchen isn’t too warm. Just cover it loosely with plastic wrap. However, for optimal freshness and to prevent the pudding from getting too soft, Refrigerator Storage is best. Keep it tightly covered with plastic wrap or a lid in the fridge for up to 3 days. It actually tastes even better after the first day as the flavors meld. I’ve never tried freezing this cake, honestly, because it disappears so quickly! But if you wanted to try Freezer Instructions, I’d recommend covering it very well with a couple of layers of plastic wrap followed by aluminum foil. It should last for about a month. To thaw, let it sit in the refrigerator overnight. The Glaze Timing Advice is simple: the glaze is applied while it’s still warm and pourable, right after you make it, over the pudding layer, before it chills. You don’t want to reheat this cake as it’s a no-bake dessert and best served cold or at room temperature.
Frequently Asked Questions
Final Thoughts
So there you have it – my absolute favorite chocolate eclair cake! It’s a recipe that truly embodies comfort and joy, and it’s proof that you don’t need complicated techniques to create something truly delicious and impressive. The blend of textures and rich chocolate flavor makes it a winner every time. It’s the kind of dessert that brings smiles to faces and often leads to requests for the recipe itself. If you’re a chocolate lover looking for a dessert that’s easy, impressive, and utterly divine, then this is the one for you. Give it a try, and I have a feeling it will become a fast favorite in your home too! I can’t wait to hear how yours turns out, so please leave a comment below and share your experience, or any fun variations you try!
Chocolate Eclair Cake
Ingredients
Method
- Mix pudding with milk in a medium-sized bowl. Fold in thawed cool whip.
- Layer in a 13x9 dish: graham crackers, pudding, graham crackers, pudding, and top with graham crackers.
- For the homemade frosting, melt the baking chocolate with corn syrup in a double boiler over medium heat. Stir until smooth. Add vanilla, butter, milk, and powdered sugar; mix until well combined.
- Frost the top layer of graham crackers. Cover and refrigerate for at least 8 hours before serving.