Easy Peanut Butter Fudge Recipe
There’s something about biting into really good peanut butter fudge that just takes me back — to childhood Sunday afternoons in my grandma’s kitchen, the smell of melting butter, and the sticky sweetness coating my fingers. I’ve made this recipe countless times, and I swear it’s one of those desserts that’s both incredibly satisfying and stupidly simple to whip up at the last minute. The best part? It’s got that perfect peanut butter punch — rich, creamy, and just a little indulgent — but it’s also budget-friendly, only needing a handful of pantry staples. My kids ask for this all the time, especially when we’re craving something sweet but don’t want to turn on the oven. Trust me on this one — it disappears in minutes at my house, and I always do this when I want a little comfort in a square. So, grab your mixing spoon and let’s make some homemade peanut butter fudge that’s destined to become a new family classic!
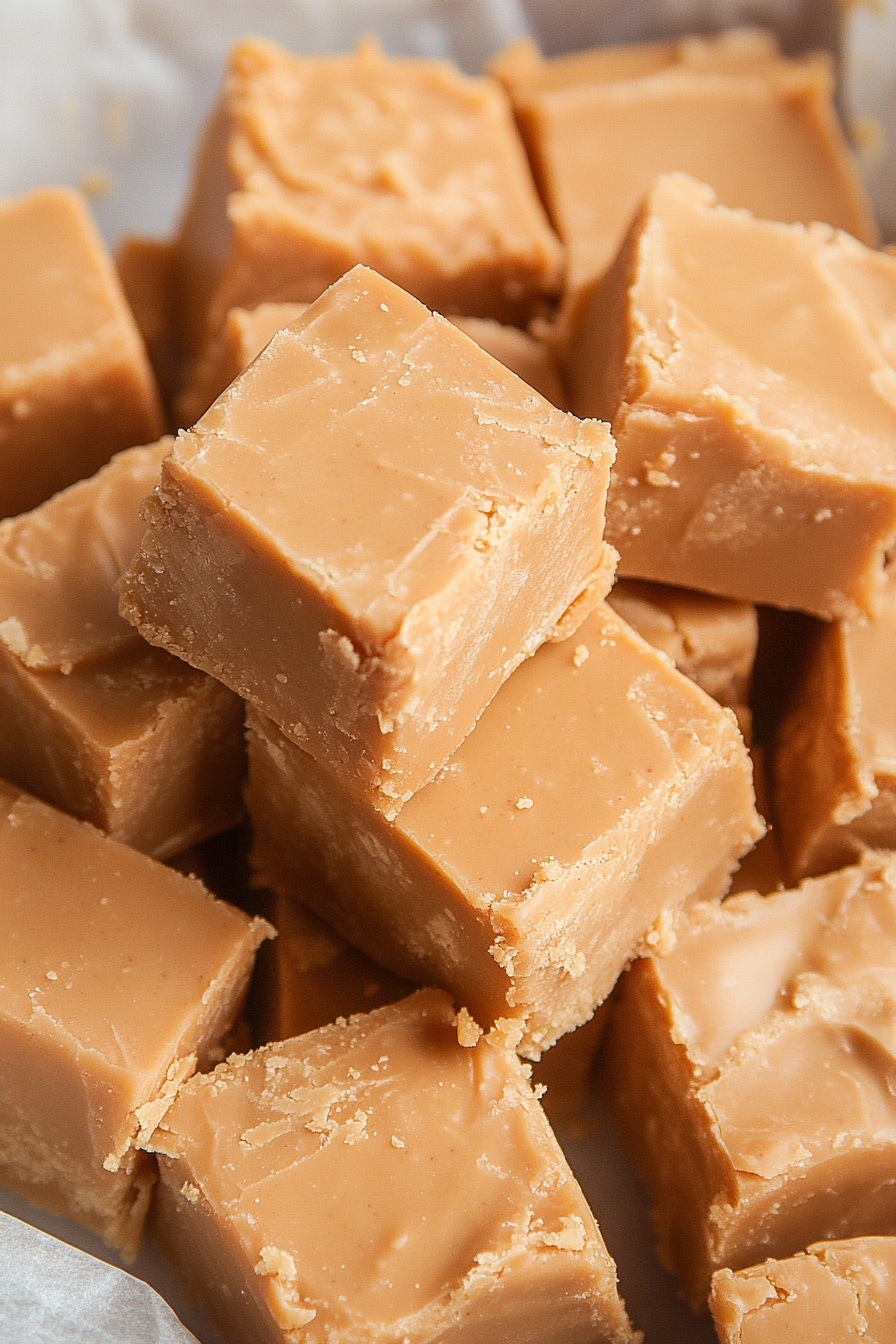
What is peanut butter fudge?
Peanut butter fudge is essentially a luscious, melt-in-your-mouth treat made with a blend of peanut butter, sugar, and butter, usually combined with a splash of milk or cream to give it that irresistibly smooth texture. The name “fudge” hints at its dense, velvety consistency — think of it as a cross between a rich candy and a creamy dessert. It’s one of those no-bake recipes that you can throw together in a flash, making it perfect for last-minute cravings or quick gift-giving during the holidays. Think of it as a homemade version of those peanut butter cups or the sweet, nutty crunch in your favorite chocolates. It’s essentially a love letter to all things peanut butter, wrapped up in a decadent, bite-sized package that you can easily cut into squares or even fun shapes for kids’ parties. My favorite part? You can customize it with chocolate swirls, a sea of sprinkles, or even a touch of sea salt for contrast — it’s pretty much foolproof and totally adaptable.
Why you’ll love this recipe?
What I love most about this peanut butter fudge is how quick and foolproof it is — I’ve tested this with only a handful of ingredients, and it comes out perfect every single time. The flavor? Oh man, the rich, nutty peanut butter combined with buttery sweetness hits all the right notes. Honestly, it’s like a little slice of childhood happiness in every bite. What is a lifesaver on busy nights? when I want something sweet but don’t have the energy to bake from scratch. Plus, it’s incredibly budget-friendly since you probably already have everything you need in your pantry — just peanut butter, sugar, butter, and a touch of vanilla. That said, it’s so versatile — I’ve whipped up variations with dark chocolate, added a sprinkle of sea salt, or even stirred in some chopped nuts for extra crunch. My kids ask for this all the time, and I love how it’s a treat that feels special but doesn’t require fancy ingredients or complicated steps. It’s a guaranteed hit at potlucks, school parties, or when I just need a little comfort in square form. Honestly, what’s not to love?
How do you make peanut butter fudge?
Quick Overview
This peanut butter fudge recipe is as simple as melting butter and sugar together, stirring in peanut butter, and pouring the mixture into a pan to set. The magic happens as it cools and firms up, transforming into velvety squares that melt in your mouth. You don’t need a candy thermometer or fancy equipment — just a few minutes of stirring and patience while it chills. I love that this method keeps the process straightforward, perfect for a quick treat that still feels quite decadent. The best part? No bake, no fuss, and you can customize it to your liking — swirl in some chocolate or sprinkle finishing touches on top. Once cooled, it slices beautifully, making it an ideal make-ahead dessert that tastes even better the next day!
Ingredients
For the Main Batter:
– 1 cup creamy peanut butter (I use natural or store-bought depending on what I have, both work great)
– 1/2 cup unsalted butter (trust me, real butter makes all the difference)
– 1 3/4 cups powdered sugar (super fine and smooth for that fudge-y texture)
– 1 teaspoon vanilla extract (for that warm, nutty aroma)
For the Filling (Optional):
– Chopped peanuts or mini chocolate chips (for added texture and flavor)
– A swirl of melted chocolate (if you really want to indulge)
For the Glaze:
– 1/2 cup semi-sweet chocolate chips (melted, for drizzling)
– A pinch of sea salt (optional but totally worth it)
Step-by-Step Instructions
Step 1: Preheat & Prep Pan
Line a 8×8-inch baking dish with parchment paper — it makes slicing so much easier later. No need to grease because the parchment does the work for you. Set the dish aside and get ready to melt some butter!
Step 2: Mix Dry Ingredients
In a small bowl, sift the powdered sugar to remove any lumps. Trust me, this minor step keeps your fudge ultra-smooth. Set aside for now.
Step 3: Mix Wet Ingredients
In a medium saucepan over low heat, melt the butter until smooth. Add the peanut butter and stir until it’s completely combined and glossy. I always do this — it smells heavenly and makes mixing the rest super easy. Once melted, remove from heat.
Step 4: Combine
Pour the peanut butter mixture into a large bowl and gradually stir in the powdered sugar, a handful at a time. Keep mixing until smooth — it’ll look thick but still soft enough to spread easily. If it feels too stiff, a tiny splash of milk can loosen it up.
Step 5: Prepare Filling
If you’re adding chopped peanuts or mini chocolate chips, gently fold them into the batter now. This gives each bite a little unexpected crunch or chocolate burst — my kids love both options equally.
Step 6: Layer & Swirl
Pour the batter into your prepared dish and smooth it with the back of a spoon. If you want to get fancy, melt a few more chocolate chips and drizzle over the top, swirling with a toothpick to create pretty marble effects.
Step 7: Bake
This fudge is actually no-bake but needs a good chill. Pop it into the fridge for at least 2 hours until firm. If you’re in a rush, the freezer cuts that down to about 1 hour. Just watch it so it doesn’t freeze completely — you want it firm but still pliable for slicing.
Step 8: Cool & Glaze
Once cooled and firm, take out of the fridge. If you’re using a glaze, melt the chocolate chips, then pour or drizzle over the fudge. Let it set for about 10 minutes before slicing.
Step 9: Slice & Serve
Lift the fudge out using the parchment paper, cut into squares with a sharp knife (warm the blade for cleaner cuts), and arrange on a platter. Serve at room temp for best flavor and texture — it’s crumbly yet melts in your mouth. My family always asks for seconds!
What to Serve It With
Honestly, peanut butter fudge is an anytime treat. But here are a few ideas for those special moments:
- For Breakfast: Pair a small square with a hot cup of coffee or a cold glass of milk for a sweet start. Yes, I’ve done it — and no one rebels. It’s a little guilty pleasure that feels almost healthy because of the peanut butter, right?
- For Brunch: Serve alongside fresh fruit and flaky croissants, maybe with a drizzle of honey. It’s a fun sweet contrast that’s perfect when you’re entertaining family or friends and want that ‘little something sweet’ after the savory bites.
- As Dessert: Turn these squares into a plated dessert with a dollop of whipped cream and a sprinkle of sea salt. Or melt some extra chocolate, drizzle it over the top, and serve with a scoop of vanilla ice cream while everyone’s still gathered around the table.
- For Cozy Snacks: Keep a few squares in your desk drawer or glove compartment for an instant pick-me-up during hectic days or long drives. They’re just enough to satisfy that sweet tooth without ruining dinner plans.
My favorite? A small piece after dinner with a good book. It’s cozy, nostalgic, and totally satisfying. Plus, it’s so easy to make ahead that I often prep a batch on Sunday for the week ahead — trust me, it’s better than store-bought candies!
Top Tips for Perfecting Your Peanut Butter Fudge
Over the years, I’ve picked up a few tricks that take this fudge from good to downright irresistible:
- Zucchini Prep: Okay, hear me out. Sometimes I’ve experimented with adding a tiny bit of shredded zucchini to make it a little more moist, especially if I forget to add enough butter. It’s optional, but if you’re feeling adventurous, give it a try. Just squeeze out excess moisture first.
- Mixing Advice: Don’t overmix once you add the powdered sugar — a quick stir is enough. Overmixing can make it crumbly, and we want that silky, fudge consistency, not grainy.
- Swirl Customization: When pouring melted chocolate over the top, use a toothpick or skewer to create pretty swirl patterns. It’s a simple step that makes your fudge look so professional.
- Ingredient Swaps: Want a more natural flavor? Try almond butter instead of peanut butter — it’s amazing. Or, for a dairy-free version, swap in coconut oil and dairy-free chocolate chips. The ratios stay pretty much the same, just test the texture as you go.
- Baking Tips: Since this is no-bake, focus on chilling time and ambient temperature. If your kitchen is warm, pop the fudge into the fridge or freezer sooner. Also, slice with a warm, sharp knife — run it under hot water and dry it before each cut for cleaner edges.
- Glaze Variations: For a different look and flavor, try dusting the top with cocoa powder, powdered sugar, or crushed nuts instead of chocolate drizzle. Or add a pinch of cinnamon or chili powder for a spicy kick — surprisingly good!
Honestly, these little tweaks are what make this recipe mine. It’s forgiving, customizable, and always turns out just right — perfect for beginner bakers or seasoned pros alike!
Storing and Reheating Tips
This fudge keeps beautifully, making it ideal for making ahead or sharing with friends. Here’s how I store it:
- Room Temperature: Store in an airtight container for up to 2 days — just keep it somewhere cool and dry. If your house is warm, I suggest refrigerating it sooner rather than later.
- Refrigerator Storage: Wrap tightly in plastic wrap or store in an airtight container for up to a week. I find that keeping it chilled keeps the texture firm and the flavors fresh.
- Freezer Instructions: Wrap individual squares tightly in plastic wrap, then place in a zip-top freezer bag. Freeze for up to 3 months. Thaw in the fridge or at room temperature for a quick treat. The texture might soften slightly, but it’s still delicious.
- Glaze Timing: If you want that glossy chocolate top, add the glaze after the fudge has fully set and chilled. If you’re freezing or refrigerating, it’s best to add the glaze just before slicing and serving, to keep everything looking shiny and fresh.
Pro tip: Let the fudge sit at room temperature for about 10-15 minutes before slicing — that’s when it’s easiest to cut clean, neat squares. And don’t forget to store leftovers in a sealed container to preserve that rich, peanut-buttery aroma!
Frequently Asked Questions
Final Thoughts
If you’re looking for a fudge that hits all the comforting, nostalgic notes while still being ridiculously easy, this peanut butter fudge is it. It’s a recipe I’ve handed down, tweaked, and loved for years — perfect for spontaneous cravings, gift boxes, or just because. The flavor is rich without being overwhelming, and the texture strikes that perfect balance between creamy and crumbly. Once you get the hang of it, I promise, you’ll keep coming back for batches and variations. It’s one of those recipes that feels like a warm hug — simple, sweet, and utterly satisfying. So, go ahead, get that peanut butter out, and let’s make some magic in the kitchen! I can’t wait to hear how yours turns out. Leave me a comment or share your favorite twists — I love seeing all the creative ways people enjoy this treat. Happy baking!
Creamy Peanut Butter Fudge
Ingredients
Method
- Combine the peanut butter, butter, and vanilla in a glass bowl and melt in the microwave for 90 seconds. Stir until smooth. Gradually add powdered sugar, stirring thoroughly.
- Grease an 8x8 inch pan and transfer the mixture. Press evenly and chill for at least 4 hours. Cut into squares before serving.