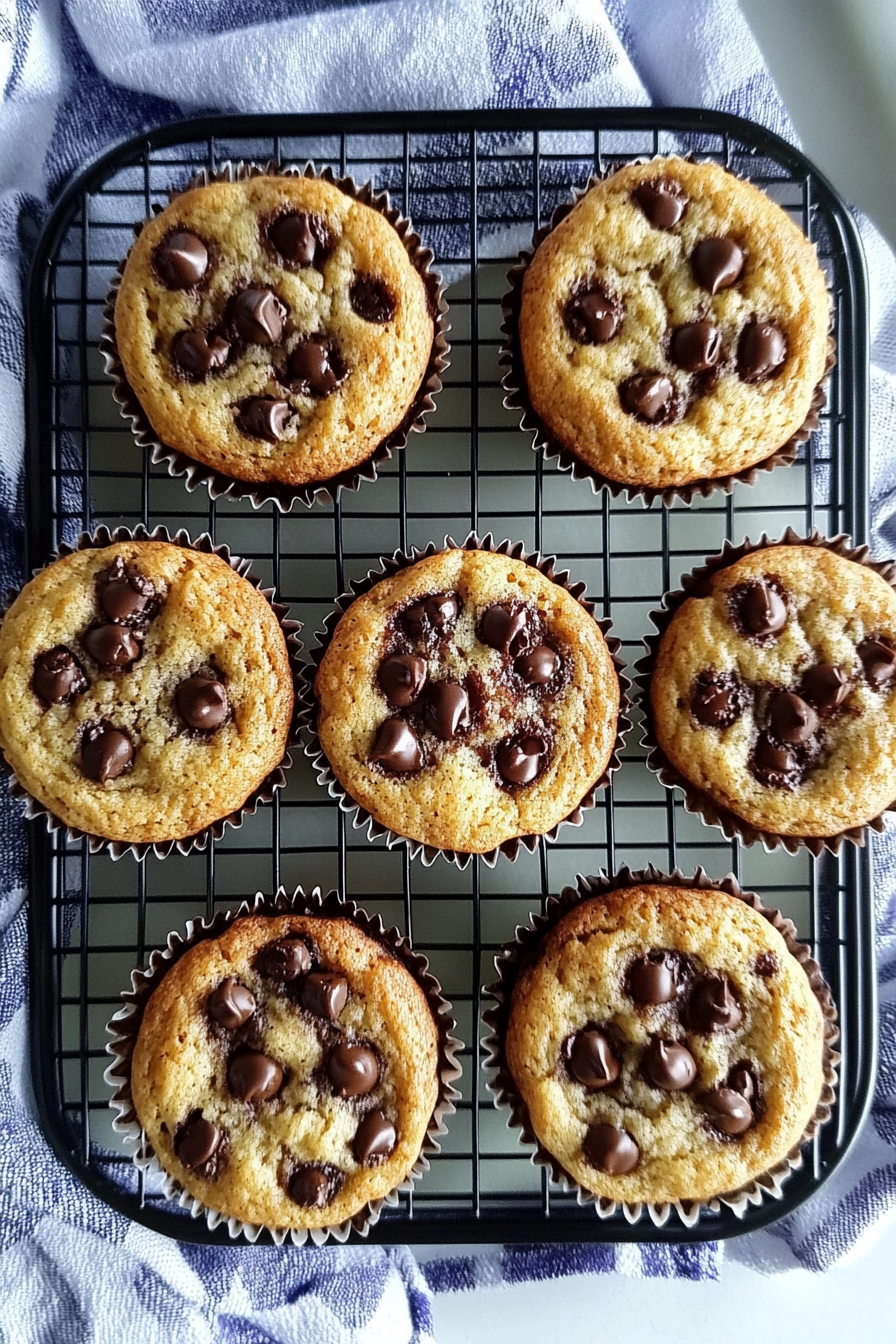
Easy Yogurt Banana Chocolate Chip Muffins
Have you ever had one of those mornings where everything just clicks? You wake up feeling a little sluggish, but the smell of freshly baked muffins creeps into your kitchen and suddenly, your whole day feels brighter. That’s exactly how I feel whenever I make a batch of these yogurt muffins. They’re the perfect blend of tang and sweetness, soft and moist, and somehow, they always disappear in minutes at my house. My kids ask for these all the time, especially when I tell them they’re made with real yogurt—because let’s face it, who doesn’t love a little tang in their baked good? Plus, this recipe is my secret weapon on busy nights when I just want a quick treat that feels indulgent but is still pretty healthy. Whether you enjoy them for breakfast, a snack, or even dessert, trust me — once you try these, they’ll become a staple in your kitchen too.
What is a yogurt muffin?
Yogurt muffins are little baked treasures that combine the moist, tender texture of a muffin with a subtle tangy flavor from the yogurt. Basically, think of it as a healthier twist on traditional muffins, with that creamy, slightly tart taste that pairs beautifully with sweet or fruity additions. The idea behind these muffins is simple: wholesome ingredients, quick prep, and results that are soft enough to melt in your mouth. They’re a little like a luxurious breakfast cupcake, but you don’t have to feel guilty snacking on them. Originally, they were popular in European baking—where dairy is often highlighted for its richness—and I like to think of these muffins as a way to bring some of that cozy, homemade charm into my own kitchen. It’s essentially a one-bowl wonder, making cleanup just as easy as eating one of these warm, little bites.
Why you’ll love this recipe?
What I love most about these yogurt muffins is how forgiving they are — I’ve made them more times than I can count, and they never fail to impress. The flavor is incredible; that gentle tang from the yogurt gives them a complex taste that’s a step above your average muffin. Plus, they’re super straightforward — you can whip up a batch in under 30 minutes, which is perfect when you’re short on time but craving something homemade. Budget-wise, they use pantry staples: flour, sugar, eggs, and of course, yogurt. No fancy ingredients needed. And the best part? They’re wildly versatile. You can fold in berries, chocolate chips, nuts, or even citrus zest to jazz them up. I especially love serving these with a smear of butter or a drizzle of honey — they’re equally lovely for breakfast, a quick snack, or afternoon tea. Honestly, once I started making these, they replaced most store-bought muffins in my home because they’re healthier and a lot more satisfying.
Thinking about a batch for brunch? These muffins hold up well and look pretty on a plate. Want to make them more decadent? Add some lemon zest or toss in a handful of blueberries. Looking for a touch of indulgence? Drop in chocolate chips. The beauty is how forgiving and adaptable this recipe is — it’s like a blank canvas, waiting for your personal touch. And let me tell you, the smell alone when these are baking? It’s enough to bring everyone to the kitchen, toes tapping and noses sniffing. These muffins have definitely become a family favorite because they’re easy, tasty, and, honestly, just darn comforting.
How do I make Yogurt Muffins?
Quick Overview
This recipe is as simple as whisking together your dry ingredients, blending some wet ingredients including yogurt, and folding everything gently before baking. The trick is not overmixing — that’s how you keep these muffins irresistibly fluffy. Once baked, they come out golden and fragrant, with a delicate crumb that’s just begging for a pat of butter or a drizzle of honey. I love how quick this comes together, making it perfect for a spontaneous treat or an impromptu breakfast. And because you can customize the mix-ins, no two batches need to be alike. Trust me, once you get the hang of this, you’ll be making muffins for every season and craving.
Ingredients
For the Main Batter:
- 1 cup plain yogurt (full-fat or Greek — I prefer Greek for its creaminess)
- 2 large eggs
- ½ cup granulated sugar (or honey/maple syrup for a natural sweetness)
- ¼ cup vegetable oil or melted butter
- 1 teaspoon vanilla extract
- 1 ½ cups all-purpose flour (you can swap part with whole wheat for extra fiber)
- 1 teaspoon baking powder
- ½ teaspoon baking soda
- ¼ teaspoon salt
For the Filling (Optional):
- Fresh berries or chopped fruit (blueberries, raspberries, chopped apples)
- Chocolate chips or chunks
- Chopped nuts (walnuts, pecans, or almonds)
- Sweet spices like cinnamon or nutmeg for extra warmth
For the Glaze (Optional):
- ½ cup powdered sugar
- 1-2 teaspoons milk or lemon juice
- Sprinkles of zest or flavor extracts for extra zing
Step-by-Step Instructions
Step 1: Preheat & Prep Pan
Set your oven to 375°F (190°C). Line a muffin tin with paper liners or grease it well — I like to use butter or non-stick spray. Preparing your pan ahead of time makes sure none of these little muffins stick to the sides, especially since they can be quite tender.
Step 2: Mix Dry Ingredients
In a medium bowl, whisk together the flour, baking powder, baking soda, and salt. Sifting isn’t necessary, but it helps prevent lumps and gives you a more airy muffin. This step is key for ensuring your muffins rise evenly and stay fluffy.
Step 3: Mix Wet Ingredients
In a large bowl, beat the eggs, then stir in the yogurt, oil (or melted butter), sugar, and vanilla until smooth. The mixture should look creamy and slightly frothy — that’s a good sign! I’ve tested using different yogurts, and honestly, Greek yogurt makes them richer and creamier, but regular yogurt works just fine too.
Step 4: Combine
Pour the wet mix into the dry ingredients. Gently fold everything together — don’t overmix! You want just enough until the flour disappears. Overmixing can lead to dense muffins, and nobody wants that. If you’re adding fruit, gently fold those in now.
Step 5: Prepare Filling
If you’re using fillings like berries or chocolate chips, toss them lightly with a teaspoon of flour to prevent sinking to the bottom. Then, fold them into the batter softly, just enough to distribute evenly.
Step 6: Layer & Swirl
Divide the batter into your muffin cups. For a pretty swirl, add a spoonful of filling on top of each and use a toothpick or skewer to swirl gently. It’s almost like giving each muffin a little marbled beauty. Don’t overdo it — a gentle swirl creates a lovely visual effect without mixing the colors entirely.
Step 7: Bake
Pop the muffins into the oven and bake for 18-20 minutes. They’re done when a toothpick inserted in the center comes out clean. Just watch for that golden edge and domed top. If your oven runs hot, check a little early to prevent overbaking.
Step 8: Cool & Glaze
Let the muffins cool in the tin for a few minutes, then transfer them to a wire rack. If you’re glazing, mix powdered sugar with a splash of milk or lemon juice until you get a smooth, pourable consistency. Drizzle on top while they’re still warm for the best shine and flavor infusion.
Step 9: Slice & Serve
The wait is the hardest part — but I promise, once they’re cooled just enough, they cut beautifully. A serrated knife works best. Serve warm or at room temperature, dressed with a pat of butter, some fresh fruit, or just on their own. These muffins taste just as good the next day, especially if stored in an airtight container.
What to Serve It With
This is such a flexible recipe — I love serving my yogurt muffins in different ways depending on the moment. For a quick breakfast, I’ll pair them with a steaming cup of coffee or tea. The tang in the muffins complements the richness of a nice latte perfectly. If I’m hosting brunch, I like to arrange a platter with a variety of muffins, fresh berries, and maybe some whipped cream or yogurt on the side. It feels fancy but is so simple to put together. As an afternoon treat, sliced muffins are perfect with a glass of cold milk or a little dollop of honey. They’re also exceptional as a post-dinner dessert, especially topped with a dusting of powdered sugar or a fruit compote. I’ve even made mini-muffins for the kids’ lunchboxes — they’re adorable and disappear just as quickly. Honestly, these muffins are one of those recipes that just makes everyone smile and always gets rave reviews.
Top Tips for Perfecting Your Yogurt Muffins
Over the years, I’ve picked up a few tricks that make these muffins turn out perfect every time. First, always measure your ingredients accurately — tiny variations can make a difference. I’ve tested with both Greek and regular yogurt; Greek gives a denser, creamier muffin, while regular yogurt makes a slightly lighter crumb. When I want an extra moist muffin, I throw in a tablespoon of applesauce or mashed banana — it adds moisture without sacrificing flavor. For a lovely fruit swirl, I find that tossing berries in a little flour prevents them from sinking to the bottom, which can be a little frustrating in the oven. Speaking of fillings, chocolate chips are a no-brainer for my household, but a sprinkle of cinnamon or zest of lemon can totally elevate the flavor profile. I’ve learned not to overmix — this will lead to dense muffins that aren’t nearly as fluffy as I want. Instead, I fold gently until everything is just combined. Baking on the middle rack ensures even cooking, especially if your oven tends to run hot in spots. And the glaze — oh, the glaze! Don’t skip it, even a simple drizzle adds a lovely sweetness and makes these muffins look irresistibly inviting. Trust me, a little patience during cooling and glazing makes all the difference. These muffins are forgiving, but a few small tips like these will make them truly bakery-worthy.
Storing and Reheating Tips
Once you’ve baked these yogurt muffins, you’ll want to keep them fresh and tasty for as long as possible. Let them cool completely on a wire rack before storing. If you plan to enjoy them within a day or two, keep them in an airtight container at room temperature — they’ll stay moist and soft for about 2 days. For longer storage, I recommend refrigerating them in a sealed container, where they should last up to a week. If you want to keep them beyond that, freezing is your friend: wrap each muffin tightly in plastic wrap or foil, then store in a freezer bag for up to 3 months. When ready to enjoy, thaw at room temperature or warm in a low oven for a few minutes. As for glazing, if you prefer the shiny top, add the glaze just before serving or reheat the muffins slightly — the glaze will re-melt and cling beautifully. Reheating for 10-15 seconds in the microwave works well, just don’t overdo it or they’ll dry out. The key is gentle reheating and keeping them covered so they don’t dry out or become stale.
Frequently Asked Questions
Final Thoughts
If you’re on the hunt for a fast, wholesome, and utterly delicious treat, these yogurt muffins might just become your new favorite. They’re soft, fluffy, and packed with flavor — and I love how adaptable they are to whatever ingredients I have on hand. The tang from the yogurt gives them such a lovely depth, and the best part? They come together in under half an hour, with very little fuss. Over the years, I’ve made these for my family countless times, tweaking a little here and there, and still, they never lose their charm. Whether you’re making them for breakfast, a snack, or even a cozy dessert, I know you’ll find plenty of reasons to keep this recipe in regular rotation. I’m excited for you to try it — and I can’t wait to hear how yours turn out!
Healthy Greek Yogurt Banana Muffins
Ingredients
Method
- Preheat your oven to 400°F. Grease a muffin tin or line with liners and spray with non-stick spray.
- In a blender, add Greek yogurt, mashed bananas, eggs, oats, coconut sugar, baking powder, baking soda, and salt. Blend until smooth.
- Stir in the mini chocolate chips with a spoon.
- Divide the batter evenly into the muffin cups. Top with additional chocolate chips if desired.
- Bake for 15-20 minutes or until a toothpick inserted in the center comes out clean.
- Allow muffins to cool in the tin for 5 minutes, then transfer to a wire rack to cool completely.