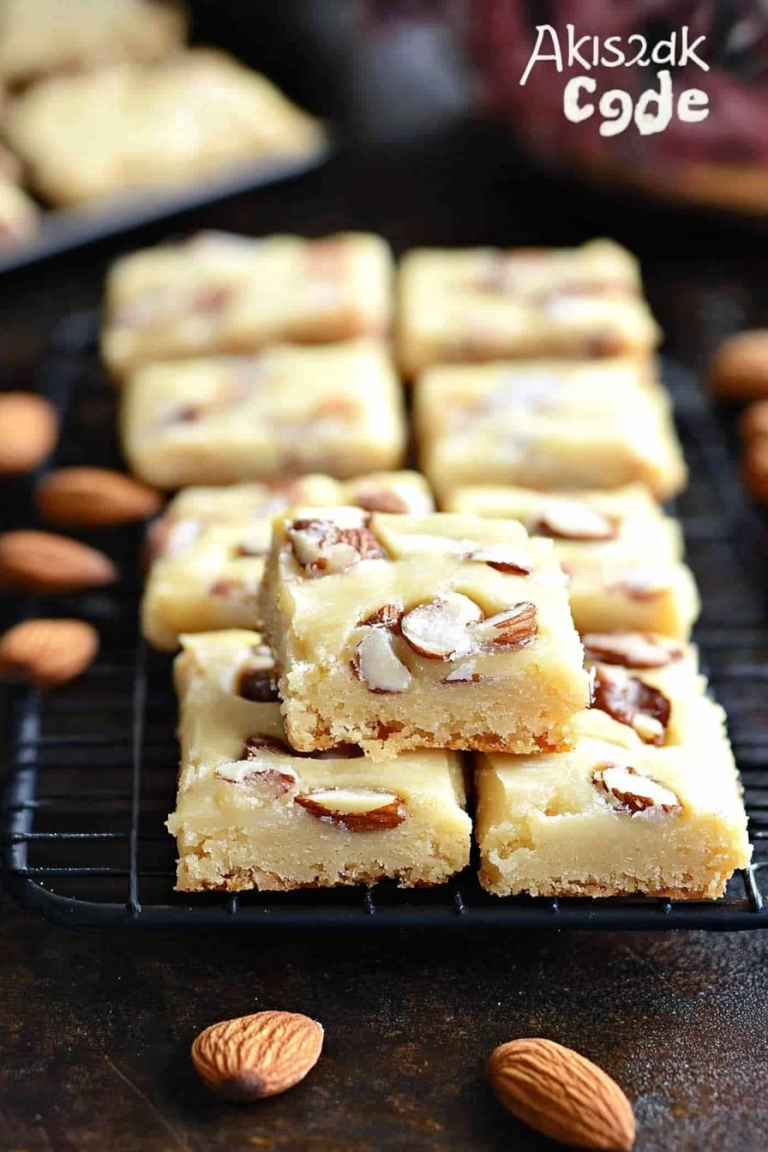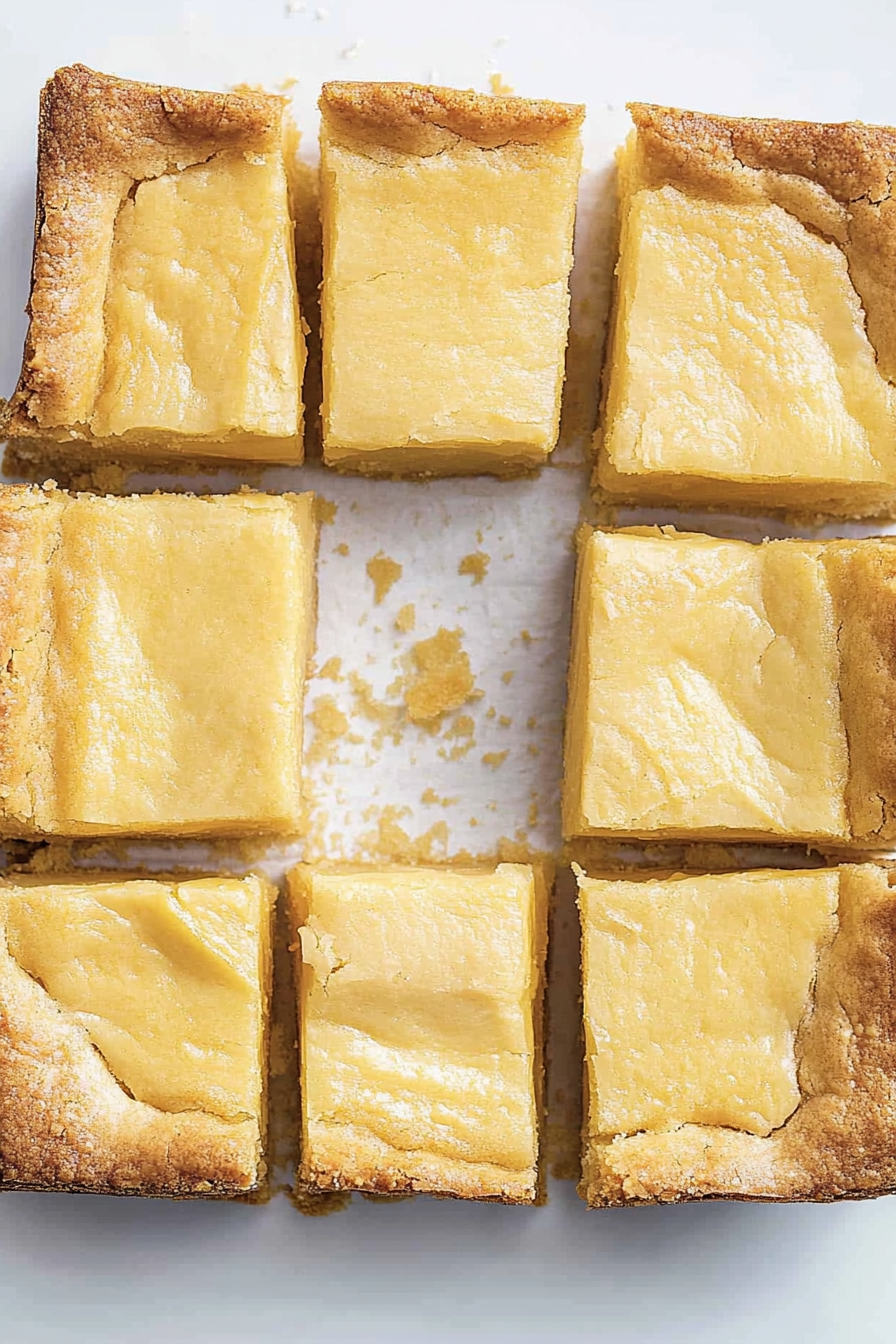
Simple Butter Cake Bars Delight
There’s something about curling up with a plate of homemade cake bars that instantly transports me back to childhood summers at grandma’s house. The smell of buttery goodness filling the kitchen, the slightly chewy edges, and that gooey, sweet swirl in the middle—trust me, it’s magic. I’ve made this recipe probably a dozen times, tweaking it here and there, and honestly, it’s become a family favorite. My kids ask for these butter cake bars all the time—they disappear in minutes at my house! I love how simple they are to throw together on busy nights when a sweet treat is calling my name, but I don’t want to spend hours baking. Plus, they’re budget-friendly with pantry staples you probably already have. The best part? You can jazz them up with your favorite add-ins or keep them classic—either way, they always turn out just right. So, if you’re craving something sweet, buttery, and totally comforting, stick with me—I’ll show you how to make these irresistible butter cake bars that taste just like a warm hug in every bite.
What is Butter Cake Bars?
Think of butter cake bars as a cross between your favorite buttery sheet cake and a chewy, melt-in-your-mouth bar cookie. They’re essentially a simple, layered treat made with a rich butter-based batter, swirled with a luscious vanilla or cream cheese filling, and finished with a drizzle of glaze. The name says it all—these bars are super buttery and indulgent, but because they come together so quickly, they feel like the kind of dessert you can whip up anytime. It’s a sort of dessert secret, really—something you can make in under an hour but feels much fancier than it is. Originating from classic baking traditions, these bars are perfect for sharing at potlucks, casual get-togethers, or just a lazy weekend snack. Plus, they’re endlessly customizable—you can add nuts, berries, or even a splash of lemon zest to make them your own. Think of it as your go-to baked comfort, in bar form, that’s totally foolproof and totally delicious.
Why you’ll love this recipe?
What I love most about these butter cake bars is how they hit all the right notes of flavor and texture—rich, buttery, with just the perfect amount of sweetness. The smell alone when they’re baking will make your whole house feel cozy and inviting. And trust me, this recipe is so straightforward that even if you’re a beginner in the kitchen, you’ll feel like a pro. There’s no fancy equipment needed—just a mixing bowl, a spatula, and a simple 9×13-inch pan. Budget-wise, it’s a total win because the ingredients are basic pantry staples: butter, sugar, flour, eggs, and vanilla. Plus, the filling is a lovely surprise—the swirl of cream cheese or even a fruity jam elevates these beyond your average cookie bar. I always do this when I want a dessert that’s guaranteed to satisfy everyone—my kids go crazy for it, my friends ask for the recipe, and I love that it’s something I can throw together in a flash. They’re perfect for a quick afternoon treat, a holiday gathering, or even an unexpected dinner guest. Honestly, once you make these, you’ll see why they’ve become a staple in my baking arsenal.
How do I make butter cake bars?
Quick Overview
This recipe is simplicity itself: start by mixing a rich buttery batter, prepare a smooth filling, then layer and swirl everything together in a pan. The magic happens in the oven, where the heat transforms it into gooey, chewy, golden-brown bars that are impossible to resist. The beauty of this method is that it’s foolproof—you just pour, swirl, and bake. And the best part? You can customize the filling and topping to match your mood or what you have on hand. Whether you like a classic vanilla swirl or a fruity twist, these bars are incredibly versatile. Honestly, once you try this technique, you’ll want to keep a batch of these in the fridge for when that sweet craving hits. They’re a total lifesaver on busy nights or lazy weekends when you’re craving comfort food without the fuss.
Ingredients
For the Main Batter:
- 1 cup (2 sticks) unsalted butter, softened to room temperature — I always use good quality butter; it makes such a difference!
- 1 cup granulated sugar — sweetens perfectly without being cloying.
- 3 large eggs — room temp is best for a smooth batter.
- 2 teaspoons vanilla extract — for that warm, aromatic flavor.
- 2 cups all-purpose flour — I prefer unbleached for better flavor.
- 1 teaspoon baking powder — to give it a slight rise and fluffiness.
- 1/4 teaspoon salt — to balance all that sweetness.
For the Filling:
- 4 oz cream cheese, softened — I’ve also tested this with mascarpone, which makes it extra silky.
- 1/4 cup granulated sugar — just enough to add a touch of sweetness to the swirl.
- 1 teaspoon vanilla extract — keeps the filling creamy and flavorful.
For the Glaze:
- 1 cup powdered sugar — sifted to avoid lumps.
- 2-3 tablespoons milk or cream — adjust to your desired drizzling consistency.
- Optional: a splash of vanilla or lemon zest for extra flavor.
Step-by-Step Instructions
Step 1: Preheat & Prep Pan
Set your oven to 350°F (175°C). Lightly grease a 9×13-inch baking pan and line it with parchment paper if you want easy removal. This little hack makes cutting so much easier, especially when the bars are still warm. I always do this because it prevents sticking and messy cleanup. Now, set your ingredients out so they’re at room temperature—trust me, it makes mixing and baking much smoother.
Step 2: Mix Dry Ingredients
In a small bowl, whisk together the flour, baking powder, and salt. This ensures everything is evenly distributed, which is key to a tender, even crumb. I’ve learned the hard way—don’t skip this step! Overmixing later is fine, but uneven dry ingredients can lead to weird pockets in your batter, and nobody wants that.
Step 3: Mix Wet Ingredients
Using a large mixing bowl, cream together the softened butter and sugar until the mixture is light and fluffy—about 2-3 minutes. I always scrape down the bowl halfway through to get everything evenly mixed. Then, beat in the eggs one at a time, mixing well after each addition. Finally, stir in the vanilla. This step is where the magic starts—your batter will look silky, like whipped butter.
Step 4: Combine
Gradually add the dry ingredients to the wet mixture, mixing just until combined. Be careful not to overmix; a few lumps are okay. Overmixing can make the bars tough rather than tender. Use a spatula to fold the ingredients gently—it makes a big difference in texture.
Step 5: Prepare Filling
In a small bowl, beat the softened cream cheese, sugar, and vanilla until smooth and creamy. I like to taste a tiny bit—sometimes I add a pinch more vanilla or a squeeze of lemon juice for a fresh kick. Keep this filling thick but spreadable; if it’s runny, pop it in the fridge for a few minutes to firm up.
Step 6: Layer & Swirl
Pour the batter into your prepared pan and spread it out evenly. Dollop spoonfuls of the cream cheese mixture on top, then use a butter knife or skewer to gently swirl it through the batter, creating beautiful marbled patterns. This step is so satisfying—trust me on this one, the more artistic your swirl, the more impressive it looks when sliced. Don’t overdo it, or the filling might sink or disappear entirely!
Step 7: Bake
Pop the pan into the oven and bake for about 30-35 minutes. You’ll know they’re done when the edges are golden, and a toothpick inserted in the center comes out with a few moist crumbs. Remember, ovens vary—start checking around the 30-minute mark. If you like your bars extra gooey, pull them out a little earlier; if you prefer firm and cakey, give them a few more minutes. Let the bars cool in the pan for at least 15 minutes before transferring to a wire rack.
Step 8: Cool & Glaze
Once cooled slightly, drizzle your glaze over the top. I like to keep it a little thick so it drips down the sides, but if you want a thinner drizzle, add a splash more milk. Wait about 10 minutes for the glaze to set—trust me, this will make slicing easier and give your bars a polished look.
Step 9: Slice & Serve
Use a sharp knife to cut the bars cleanly—warm slices tend to be a bit messier, so wait until they’re just about at room temperature. Serve them on a pretty plate, maybe with a dusting of powdered sugar or a few fresh berries for color. Honestly, they taste just as good slightly warmed or at room temp—your call! These bars are wonderful on their own, but a dollop of whipped cream or a scoop of vanilla ice cream doesn’t hurt either.
What to Serve It With
I love pairing these butter cake bars with a strong cup of coffee or a glass of cold milk—whichever floats your boat. They’re fantastic for a cozy breakfast on lazy weekends, especially when served alongside fresh fruit or yogurt. For a brunch spread, I like placing them on a nice platter with some extra berries and a few sprigs of mint—looks fancy but takes almost no effort. As an after-dinner treat, I sometimes warm a slice and top it with a scoop of vanilla ice cream and a drizzle of caramel—totally indulgent! And when I want a quick snack without the fuss, these bars are perfect—they’re rich enough that a small piece satisfies my sweet tooth without feeling overdone. My family loves to pack them in lunchboxes, too, because they stay moist and delicious for hours. Honestly, these bars are my go-to when I want something comforting, simple, and just a little special.
Top Tips for Perfecting Your Butter Cake Bars
With a little practice, you’ll be turning out picture-perfect bars every time. Here are some of my tried-and-true tips:
- Zucchini Prep: If you decide to add shredded zucchini for extra moisture (a sweet surprise), squeeze out as much excess water as possible using a clean towel. Moisture is the enemy of fluffy batter and neat swirls, so don’t skip this step!
- Mixing Advice: Overmixing the batter can lead to tougher bars—mix just until ingredients are combined. Use a gentle folding technique with a spatula for the best texture.
- Swirl Customization: Play with your swirl! Use a toothpick or skewer to create fun patterns—spirals, waves, or random swirls. It’s all about visual interest and personality.
- Ingredient Swaps: Want dairy-free? Swap butter for coconut oil or vegan butter, and use plant-based cream cheese. Results are still creamy and divine—just adjust the baking time slightly and keep an eye on texture.
- Baking Tips: If your oven runs hot, turn it down a bit or check earlier—nothing’s worse than overbaked, hard bars. Use a toothpick to check for doneness—I love this trick because it’s precise.
- Glaze Variations: For a tangy twist, swap powdered sugar with citrus zest and juice—lemon or orange work beautifully. Or add a dash of cocoa powder for a chocolate glaze. That’s the fun in baking—making it your own!
Honestly, these tips come from years of trial, error, and tasting. I learned that patience and attention to detail matter more than fancy ingredients. Trust me, once you get the hang of swirls and timing, you’ll be making these blindly, and your family will think you’re a baking wizard.
Storing and Reheating Tips
If you’re anything like me, leftovers are rare, but if you do have some, here’s how to keep them fresh:
- Room Temperature: These bars are best enjoyed within 2 days at room temp—cover tightly with foil or store in an airtight container to keep them feeling soft and fresh.
- Refrigerator Storage: Wrap individual slices or place in an airtight container—these will keep well for up to a week. Just let them come to room temp before serving, or warm slightly in the microwave for a cozy treat.
- Freezer Instructions: Wrap bars tightly in plastic wrap and stash in a freezer bag—these will stay good for up to 3 months. To serve, thaw in the fridge overnight and warm for a few seconds if you’d like that freshly-baked feel.
- Glaze Timing: If you plan to freeze, wait to add the glaze until just before serving or after thawing. This keeps everything looking sleek and fresh.
My little trick? Slice and freeze individual pieces, then grab when a craving hits—works like a charm on busy mornings or when unexpected guests arrive. Just a quick warm-up, and they taste just like fresh out of the oven.
Frequently Asked Questions
Final Thoughts
If you’re yearning for a dessert that’s rich, buttery, and honestly a little addictive, these butter cake bars are your new best friend. They’re easy to make, endlessly customizable, and taste like a special treat—no fancy ingredients or complicated steps required. Over the years, I’ve found they’re perfect for everything from lazy Sunday afternoons to festive holiday gatherings. The best part? Watching people’s faces light up when they take that first bite. I truly believe baking is about sharing love—these bars are the ultimate expression of that. Once you try making them, I bet they’ll become a staple in your own kitchen too. So go ahead, gather your ingredients, and make a batch. Trust me, your taste buds will thank you! And I’d love to hear how yours turn out—drop a comment or share your own twists and tips below. Happy baking! 😊
Cream Cheese Butter Bars
Ingredients
Method
- Preheat oven to 350°F and line a 9x13-inch baking dish with parchment paper.
- In a large bowl, combine flour, confectioners' sugar, and kosher salt.
- Add melted butter to the dry mixture and mix until crumbly. Press firmly into the bottom of the prepared pan.
- Bake the crust for 20 minutes. Let cool slightly before adding toppings.
- In a bowl, beat cream cheese, softened butter, confectioners' sugar, eggs, egg yolks, and vanilla until smooth.
- Pour the cream cheese mixture over the baked crust and bake for an additional 35-40 minutes until edges are golden and center is slightly jiggly.
- Allow the bars to cool at room temperature, then chill in the refrigerator for at least 2 hours before serving.