Easy Oven-Baked Pancakes Recipe
There’s nothing quite like the smell of a Dutch baby pancake filling the kitchen on a lazy weekend morning. I remember the first time I made one—my kids’ eyes lit up the moment it hit the table. It’s that perfect combo of crispy edges, pillowy soft center, and a touch of sweetness that makes it seem so fancy but honestly, it’s one of the easiest things you’ll ever whip up. This recipe quickly became a family staple—the kind of dish that looks impressive but is really just a handful of simple ingredients thrown together. Better yet, it’s super adaptable: you can top it with fresh fruit, sprinkle it with powdered sugar, or drizzle it in syrup. It’s incredible how a single skillet of batter transforms into a feast that everyone devours. Trust me, once you try Dutch baby pancakes, they’ll become your go-to for brunch, breakfast, or even a cozy snack. I always do this when I want something comforting and wow-worthy—it never disappoints.
What is Dutch Baby Pancakes?
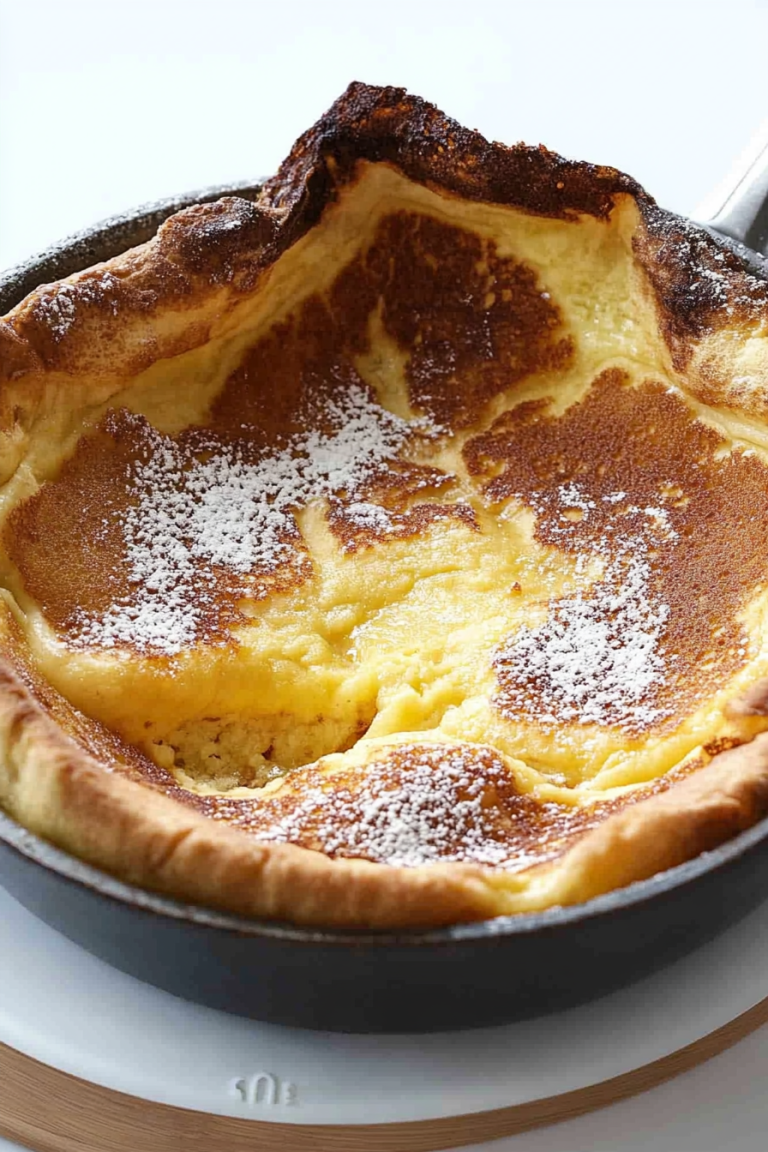
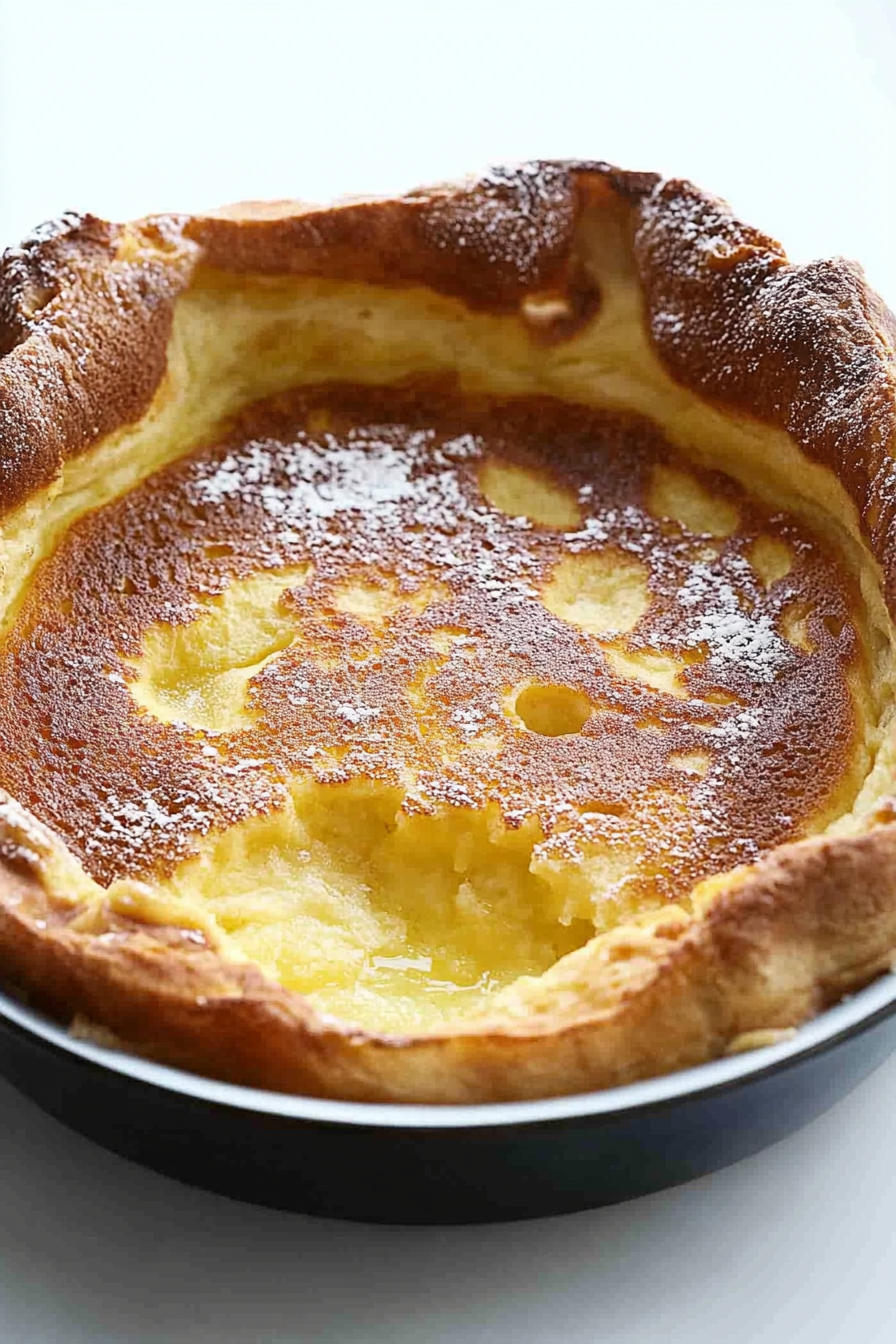
Think of Dutch baby pancakes as a cross between a giant pancake and a souffle—kind of like a fluffy, custardy pancake that puffs up dramatically while baking in the oven. The name “Dutch baby” actually comes from a restaurant in Seattle called Manca’s, where it was famously served back in the 1940s. It’s essentially a large, oven-baked pancake made from a simple batter of eggs, flour, milk, and butter. What makes this dish so delightful is how it rises in the oven, creating those dramatic, crispy edges and a soft, airy center. You can enjoy it plain, topped with fruit, whipped cream, or even savory toppings if you’re feeling adventurous. It’s a versatile, crowd-pleasing dish that feels like a special treat but only takes minutes of prep. Think of it as your secret weapon for turning ordinary ingredients into breakfast magic.
Why you’ll love this recipe?
What I love most about Dutch baby pancakes is how effortlessly impressive they are. The smell alone—buttery, slightly caramelized, with a hint of vanilla—draws everyone into the kitchen. They’re perfect when you want something warm, comforting, and a little indulgent, but don’t want to spend hours cooking. Plus, this recipe is budget-friendly—basic ingredients that most of us already have lurking in the pantry or fridge. The best part? It’s versatile! You can dress it up with fresh berries and whipped cream for a sweet start to your day or make it savory with cheese, herbs, and crispy bacon for dinner. I’ve tested this with almond milk, and honestly, it made it even creamier—so don’t shy away from trying substitutions. It’s one of those dishes that feels special but is really a no-fuss, one-pan wonder. My kids ask for this all the time because it’s like a breakfast hug in every bite. And trust me, the crispy edges combined with that soft, almost custardy center—pure comfort.
How do I make Dutch Pancakes?
Quick Overview
Making a Dutch baby pancake is all about simple ingredients and a handful of steps. Preheat your oven, whisk together the batter, pour it into a hot, buttered skillet, and bake until it’s puffy and golden. As it bakes, it’ll transform from a runny mixture into a wow-worthy, towering pancake with crispy edges that make it impossible to resist. The best part? Once you master the basic technique, you can easily switch up toppings or incorporate flavors to match your mood. It’s quick, fuss-free, and always makes a stunning presentation—perfect for an effortless brunch or even a sweet snack on a weekday.
Ingredients
For the Main Batter:
– 3 large eggs (farm fresh eggs work wonders! They’re richer and give a lovely rise)
– ¾ cup all-purpose flour (or use a gluten-free blend if you need gluten-free, just keep an eye on batter consistency)
– ¾ cup milk (whole milk is best for richness, but I’ve tested with almond or oat milk—still delish!)
– 2 tablespoons melted unsalted butter (plus extra for the pan)
– 1 teaspoon vanilla extract (adds a lovely sweet depth; omit for savory)
– 1 tablespoon sugar (optional, but I do love a touch of sweetness)
For the Filling:
– Fresh berries or sliced fruit (strawberries, peaches, apples—whatever’s in season)
– A sprinkle of powdered sugar or a drizzle of honey
– Whipped cream or Greek yogurt (for extra indulgence)
– A touch of lemon zest or a dash of cinnamon for flavor variation
For the Glaze:
– Maple syrup or honey
– A squeeze of fresh lemon juice
– Alternatively, a dusting of powdered sugar or a caramel sauce for richness
Step-by-Step Instructions
Step 1: Preheat & Prep Pan
Start by preheating your oven to 425°F (220°C). Place a heavy ovenproof skillet—my go-to is cast iron—on the stovetop over medium heat. Once hot, add a generous tablespoon of butter and let it melt until bubbling and fragrant. This is key for that crispy edge and prevents sticking. Make sure your pan is oven-ready, because this pancake bakes directly in the skillet for that dramatic rise.
Step 2: Mix Dry Ingredients
In a bowl, whisk together the flour, sugar, and a pinch of salt. I always do this first to ensure everything’s evenly combined. Sifting the flour isn’t necessary but can help with a smoother batter. This step is quick but makes a big difference—no lumps, just a silky batter.
Step 3: Mix Wet Ingredients
In a separate bowl, whisk the eggs until just combined. Then, add milk, melted butter, vanilla, and lemon zest (if using). Whisk until smooth. I sometimes warm the milk slightly just to help blend everything easily. The batter should be thin—think pancake batter consistency—so don’t overthink it.
Step 4: Combine
Poor the wet ingredients into the dry and gently fold together just until combined. No overmixing here—lumps are okay! A few small ones help keep the pancake tender. Overmixing can make it dense, which is exactly what we don’t want.
Step 5: Prepare Filling
While the batter rests for about 5 minutes, prep your toppings: slice berries, peel peaches, or gather your favorite fruit. If you like, sprinkle a little cinnamon or lemon zest into the batter to add a flavor twist. I always like to have the toppings ready because this baked pancake comes together fast.
Step 6: Layer & Swirl
Once the batter is ready, pour it into the hot skillet. If adding fillings like chopped fruit or dollops of jam, sprinkle or spoon them on top now. A quick swirl with a toothpick or the back of a spoon creates lovely marbling effects. Just be gentle so the batter doesn’t deflate—it’s all about visual contrast and flavor bursts.
Step 7: Bake
Place the skillet in the oven and bake for 20-25 minutes. You’ll see it puff up dramatically, with crispy, caramelized edges that look almost like a giant, golden crown. Keep an eye on it—you want it puffed, golden, and just set in the center. The smell is intoxicating; buttery, sweet, and a hint of vanilla. When it’s ready, it’ll look impressive but don’t worry, this only means it’s perfectly cooked.
Step 8: Cool & Glaze
Remove from the oven and let it sit for a couple of minutes—this helps it settle so it’s easier to slice. Drizzle with maple syrup, honey, or dust with powdered sugar while it’s still warm. If you’re feeling decadent, whip some cream or dollop yogurt on top. I’ve even tried a splash of balsamic reduction—trust me on this one, it’s surprisingly good!
Step 9: Slice & Serve
Use a sharp spatula and cut into wedges like a cake. Serve immediately—nothing beats the contrast between the crispy edges and soft center while it’s hot. Bonus: it looks so pretty on the plate, especially with fresh berries artfully arranged on top. I love serving this with a side of crispy bacon or scrambled eggs for a full breakfast spread, but honestly, it’s perfect on its own.
What to Serve It With
This pancake is downright versatile. For breakfast or brunch, I like to pair it with freshly brewed coffee, a glass of orange juice, or a frothy latte. My family loves it topped with a handful of fresh berries and a dusting of powdered sugar, especially when strawberries are in season. When I want to make it more special for brunch, I’ll serve it alongside crispy bacon or sausage links, and maybe even some scrambled eggs. For a more decadent dessert, a scoop of vanilla ice cream or Greek yogurt topped with honey or fruit syrup makes it heavenly. And on cozy nights, I’ve been known to revisit it as an easy midnight treat—just warm and topped with a little caramel sauce or chocolate drizzle. This dish’s appeal is how many ways you can enjoy it, and how it always turns any meal into a little celebration of comfort.
Top Tips for Perfecting Your Dutch Baby Pancakes
Over the years, I’ve learned a few tricks that make all the difference with this dish. First, always start with a hot pan—cold butter just won’t give you that crispy bottom. The moment your butter is bubbling, pour in your batter quickly. I’ve tested this with different types of flour, and honestly, gluten-free blends work beautifully if you want to make it allergy-friendly. When mixing the batter, avoid overdoing it—I always fold gently until just combined. Overmixing leads to dense, flat pancakes instead of that gorgeous puffiness.
Swirling in fruit or jam before baking creates that lovely marbled look and infuses bites with flavor. If you’re topping with fresh berries or sliced fruit, do so right before baking to keep them plump and juicy. When baking, keep an eye on the timing, as oven temperatures can vary slightly. I recommend checking around the 20-minute mark—if it’s golden-brown and puffy, it’s ready.
For the glaze, I love a simple drizzle of pure maple syrup, but a dusting of powdered sugar can add a pretty touch. For a flavor twist, sprinkle some cinnamon or lemon zest into the batter—my kids love the citrus version. Testing different toppings and flavor combos is part of the fun—this pancake is like a blank canvas waiting for your personal touch. The first time I added a splash of orange zest, it was game-changing!
Personally, I learned not to rush the cooling stage—let it sit for a few minutes before slicing. This helps the structure set, so your slices stay pretty. And don’t forget—you can freeze leftovers (if there are any!) by wrapping slices in plastic, then reheating in a toaster or oven. Just a quick warm-up and you’re set.
Storing and Reheating Tips
If you happen to have leftovers (which is rare—I’ll admit), storing is easy. Let the pancake cool completely, then transfer it to an airtight container or wrap tightly in plastic wrap. At room temperature, it’s best enjoyed within a few hours—about two max before it starts to lose its crispness.
In the refrigerator, it’ll last up to 2 days. Simply reheat slices in a toaster or oven at 350°F (175°C) until warm and crispy around the edges. If you want to keep the toppings fresh, hold off on adding glaze or powdered sugar until just before serving. For longer storage, freeze individual slices wrapped tightly—just microwave or reheat in the oven for a few minutes.
When reheating, avoid the microwave if you want that crispy texture—use the oven or toaster oven instead. I’ve tested this with fruit toppings, and it’s still delicious, just a bit softer. Freshly baked is definitely best, but leftovers are still pretty dang good, especially with a quick warm-up.
Frequently Asked Questions
Final Thoughts
If you’ve never tried making a Dutch baby pancake before, now’s the perfect time. It’s a showstopper on the table but, honestly, so simple to pull together. The combination of crispy edges, airy center, and fruity toppings makes it feel like a special occasion every time. Plus, it’s flexible—dare I say forgiving—and you can customize it to suit your mood or ingredients on hand. Over the years, I’ve made this for everything from weekend brunch with friends to a cozy weeknight treat after a long day. It always disappears in minutes at my house, leaving everyone asking for seconds. The smell alone draws everyone into the kitchen like a siren. So grab your skillet, gather your ingredients, and get ready to create breakfast magic. I can’t wait to hear how yours turns out! Feel free to leave a comment below, share your favorite toppings, or tell me about your own twists on this beloved Dutch baby. Happy baking!
Delicious Dutch Baby Pancakes
Ingredients
Method
- In a blender, combine eggs, milk, flour, sugar, and vanilla. Blend until smooth. Let the batter rest while preheating the oven and skillet.
- Place a 9-inch oven-safe skillet in the oven and preheat to 425°F. Once preheated, carefully add melted butter to the skillet.
- Pour the batter into the hot skillet and bake for 20 minutes until puffed and golden.
- Remove from oven, dust with confectioners' sugar, and serve immediately.
- Optional: top with fresh fruit, syrup, or other toppings as desired.