Easy Dark Chocolate Brownies Recipe
There’s something about reaching for a rich, gooey dark chocolate brownie that just hits the spot like nothing else. I remember the first time I baked these — my grandma’s recipe, actually. She always had a way of making everything feel cozy and special, and these brownies are no exception. They’re incredibly flavorful, with that deep, bittersweet chocolate taste that you just can’t get enough of. I love how simple they are to whip together on a busy weeknight — no fancy ingredients, just good old pantry staples. My kids ask for these all the time, especially when we’re craving something sweet but don’t want to spend hours in the kitchen. Trust me, once you try these, they’ll become a staple in your house too. They disappear in minutes at my house, and I’m pretty sure they’ll do the same for you.
What is dark chocolate brownie?
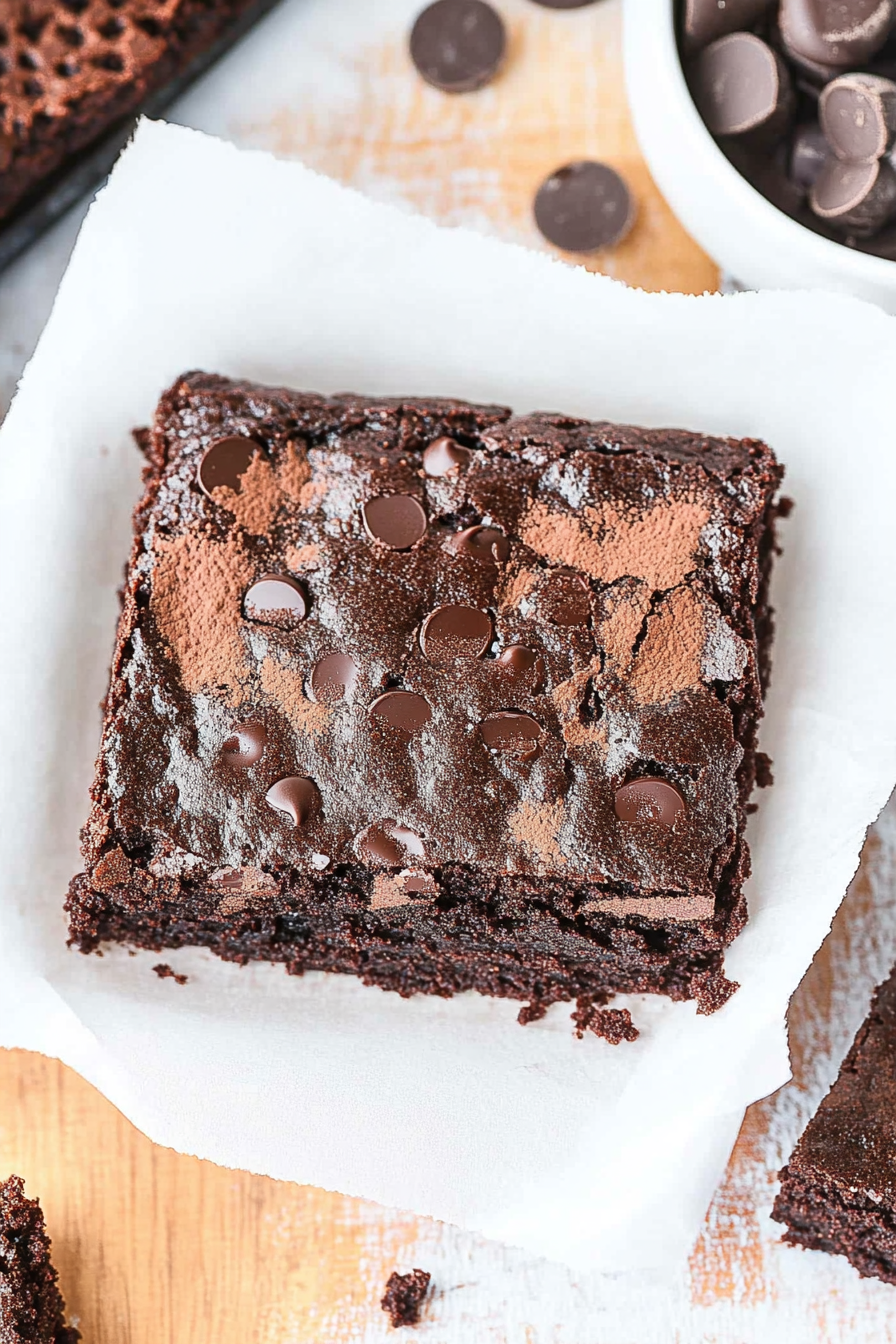
Think of dark chocolate brownies as the rich, fudgy, slightly chic cousin of the classic brownie. They’re essentially a dense, moist chocolate treat made with high-quality dark chocolate that gives them that irresistible bittersweet flavor. The name itself hints at a more sophisticated twist — the dark chocolate, with its intense flavor, elevates the experience from just “sweet” to truly luxurious. It’s basically a simple baked good, but with a deep chocolate punch that’ll make your taste buds sing. Usually, these brownies are moist in the middle with just a hint of a crackly topside — their texture is what makes them so addictive. When I say “dark,” I mean a good percentage of cacao, like 70% or higher — it’s my little secret to achieving that intense chocolate flavor. Think of it as a cozy hug wrapped in rich, velvety chocolate.
Why you’ll love this recipe?
What I love most about these dark chocolate brownies is how they strike the perfect balance between luscious and simple. They’re not overly sweet — the dark chocolate brings depth and bitterness that’s balanced by a touch of sugar, creating an experience that’s both indulgent and refined. The smell alone when they’re baking? It’s heavenly — that rich, roasted chocolate aroma fills the whole house and instantly lifts everyone’s mood. Plus, these brownies are incredibly easy to make; I’ve tested them with different types of dark chocolate and even used almond butter instead of butter (guilty pleasure!), and they always turn out amazing. They’re also super budget-friendly because you mostly just need good chocolate and pantry staples. And the best part? You can jazz them up in so many ways: add chopped nuts, swirl in caramel, or dust with a little sea salt. Whatever mood strikes, these brownies are an easy, go-to treat.
What I love most about this recipe is how versatile it is — you can serve it as a quick snack, a decadent dessert, or even pack a small piece in a lunchbox for a sweet surprise. My kids love them with a dollop of whipped cream or a scoop of vanilla ice cream — honestly, they’re the perfect comfort food for any occasion.
How do I make dark chocolate brownies?
Quick Overview
This recipe is a one-bowl marvel — I love that I can mix everything in 10 minutes and pop it in the oven. The secret to that irresistible fudginess? Use high-quality dark chocolate, melt it gently, and don’t overmix the batter. That’s how you get that shiny, crackly top and moist interior. The steps are straightforward, with plenty of room for personal touches: add nuts, swirl in peanut butter, or keep it pure — your call. The best part? In less than an hour, you’ll have a batch of decadent brownies that taste way more special than their simple ingredients suggest.
Ingredients
For the Main Batter:
– 200g (about 7 ounces) high-quality dark chocolate (70% cacao or higher)
– 1/2 cup unsalted butter (or coconut oil for a dairy-free option)
– 1 cup granulated sugar
– 3 large eggs
– 1 teaspoon vanilla extract
– 1/2 cup all-purpose flour (you can swap for gluten-free if needed)
– 1/4 teaspoon salt
For the Filling (optional):
– Chopped nuts (like walnuts or pecans)
– Chocolate chips or chunks
– Swirls of peanut butter or caramel for added richness
For the Glaze (optional):
– Melted dark chocolate or cocoa glaze
– A pinch of sea salt or a dusting of powdered sugar for presentation
– A splash of bourbon or espresso powder can also deepen flavor if you’re feeling adventurous
Step-by-Step Instructions
Step 1: Preheat & Prep Pan
Set your oven to 350°F (175°C). Grease an 8×8-inch square baking dish with butter or line it with parchment paper — I always do this because cleanup is a breeze. This step ensures nothing sticks and your brownies come out perfectly shaped.
Step 2: Mix Dry Ingredients
In a small bowl, whisk together the flour and salt. It’s a subtle step, but it helps the dry ingredients distribute evenly when you combine everything later. This prevents pockets of flour, which can make your brownies grainy.
Step 3: Melt the Chocolate
Chop your dark chocolate into small pieces and melt it gently with the butter over a double boiler or in short bursts in the microwave, stirring in between. The mixture should be silky and smooth — trust me, this is the secret to that glossy top we all love.
Step 4: Combine Wet Ingredients
In a large bowl, whisk together the eggs, sugar, and vanilla until pale and fluffy — about 2 minutes. Slowly pour in the melted chocolate mixture, stirring constantly to keep it smooth. This step makes sure everything gets fully integrated and prevents the eggs from cooking.
Step 5: Mix the Batter
Gradually add the dry ingredients to the wet mixture. Gently fold everything together with a spatula just until combined — no overmixing! You’ll notice a thick, shiny batter that’s just begging for some added fun like nuts or chips.
Step 6: Prepare Filling
If you’re using fillings like nuts or chocolate chunks, fold them into the batter now. For swirl options like peanut butter, drop dollops on top of the batter before layering in the next step.
Step 7: Layer & Swirl
If you want a marbled effect, add your fillings or flavor swirls on top of the batter and use a toothpick or skewer to swirl them gently through. Don’t overdo it — just enough to create a pretty marbling pattern.
Step 8: Bake
Pour the batter into your prepared pan and smooth the top. Bake for about 25-30 minutes, or until a toothpick inserted into the center comes out with moist crumbs but not wet batter. Every oven is different, so start checking around the 25-minute mark.
Step 9: Cool & Glaze
Let the brownies cool in the pan for at least 15 minutes before transferring them to a wire rack. While they’re still slightly warm, you can drizzle with melted dark chocolate or your favorite glaze. If you wait until totally cooled, the glaze will set beautifully.
Step 10: Slice & Serve
Use a sharp knife to cut into squares — I prefer to wipe the blade between cuts for clean edges. Serve warm or at room temperature, with a side of whipped cream or a scoop of ice cream if you’re feeling fancy.
What to Serve It With
This brownie is totally versatile. For a cozy breakfast, pair it with your morning coffee or a tall glass of milk — it’s a sweet start to a busy day. For a brunch centerpiece, plate a few squares with fresh berries and whip some cream on top. As a dessert, I love serving them warm with vanilla ice cream and a drizzle of caramel, or dusted lightly with powdered sugar — that little touch makes it feel special. If you’re craving a quick snack, these brownies are perfect heated slightly in the microwave, so the chocolate melts in your mouth. My family’s little tradition is to hide a few for ourselves during movie nights — they’re that good!
Top Tips for Perfecting Your Dark Chocolate Brownies
Over the years, I’ve learned a few tricks to make these even better. First, don’t skimp on the quality of your chocolate — it’s the star of the show, after all! I always opt for a bar of 70% or higher cacao, chopped into small pieces. When melting, do it gently — low heat and patience prevent burning. Trust me, the glossy, smooth mixture you get is worth the extra steps. When mixing your wet and dry ingredients, a light hand keeps the brownies tender and fudgy — overmixing is the enemy here, and can lead to tough edges.
If you want a more pronounced marbling effect, add your fillings in layers and swirl carefully. Remember, less is more — a few streaks of peanut butter or caramel can elevate your brownies without overpowering the chocolate. Baked just until a toothpick has moist crumbs keeps them perfectly moist and fudgy. Every oven bakes a little differently, so I recommend checking around the 25-minute mark and adjusting as needed.
For fillings, nuts add a nice crunch, but I’ve also tested chopped dried fruits or even crushed peppermint candies for holiday vibes. When it comes to glazed tops, I’ve found that adding a splash of espresso powder to the glaze enhances the depth of the chocolate flavor, and a pinch of sea salt on top balances out the sweetness.
My biggest lesson? Be patient and don’t rush the cooling — this helps the brownies set beautifully, making them easier to cut without gooey messes. Once cooled, you’ll find they develop a dense, silky texture that only gets better the next day.
Storing and Reheating Tips
Once your brownies are cooled, storing them correctly makes all the difference. Keep them in an airtight container at room temperature for 2-3 days — the airtight seal prevents them from drying out. If you want to keep them longer, pop individual slices in the refrigerator for up to a week. Just make sure they’re tightly wrapped or stored in an airtight container to prevent fridge odors from seeping in. For longer storage, freezing is perfect — wrap the slices individually in plastic wrap and then foil, and they’ll stay fresh for up to 3 months.
If you plan to reheat, a quick 15-20 second burst in the microwave revives that fudgy texture beautifully. For best flavor, add your glaze or toppings after reheating to prevent them from becoming soggy. And if you like warm brownies with melty chocolate on top, microwave just until the center is gooey — it’s like heaven in a bite.
Frequently Asked Questions
Final Thoughts
There’s truly nothing quite like a batch of dark chocolate brownies to bring a little happiness into your day. They’re rich enough to satisfy any sweet tooth, yet simple enough that you’ll want to make them again and again. Over the years, I’ve tweaked and tested this recipe countless times — every time, it turns out just as luscious. They’re a reminder that sometimes, the best things in life are surprisingly easy to make! Whether you’re celebrating a special occasion or just craving a cozy treat after a long day, these brownies are your go-to. Don’t forget to let me know how yours turn out — I love hearing about your twists and variations. Happy baking, and enjoy every decadent bite!
Decadent Dark Chocolate Brownies
Ingredients
Method
- In a glass bowl, melt butter in microwave for 30 seconds to one minute. Add sugar, flour, cocoa and eggs. Stir with a spoon until well combined. Fold in morsels.
- Line a 9-inch square baking dish with parchment paper. Pour batter into dish, spreading evenly. Bake in a 350 degree oven for 25-28 minutes. For fudgy brownies, slightly underbake.
- Cool completely. Optionally, dust with powdered sugar before serving.