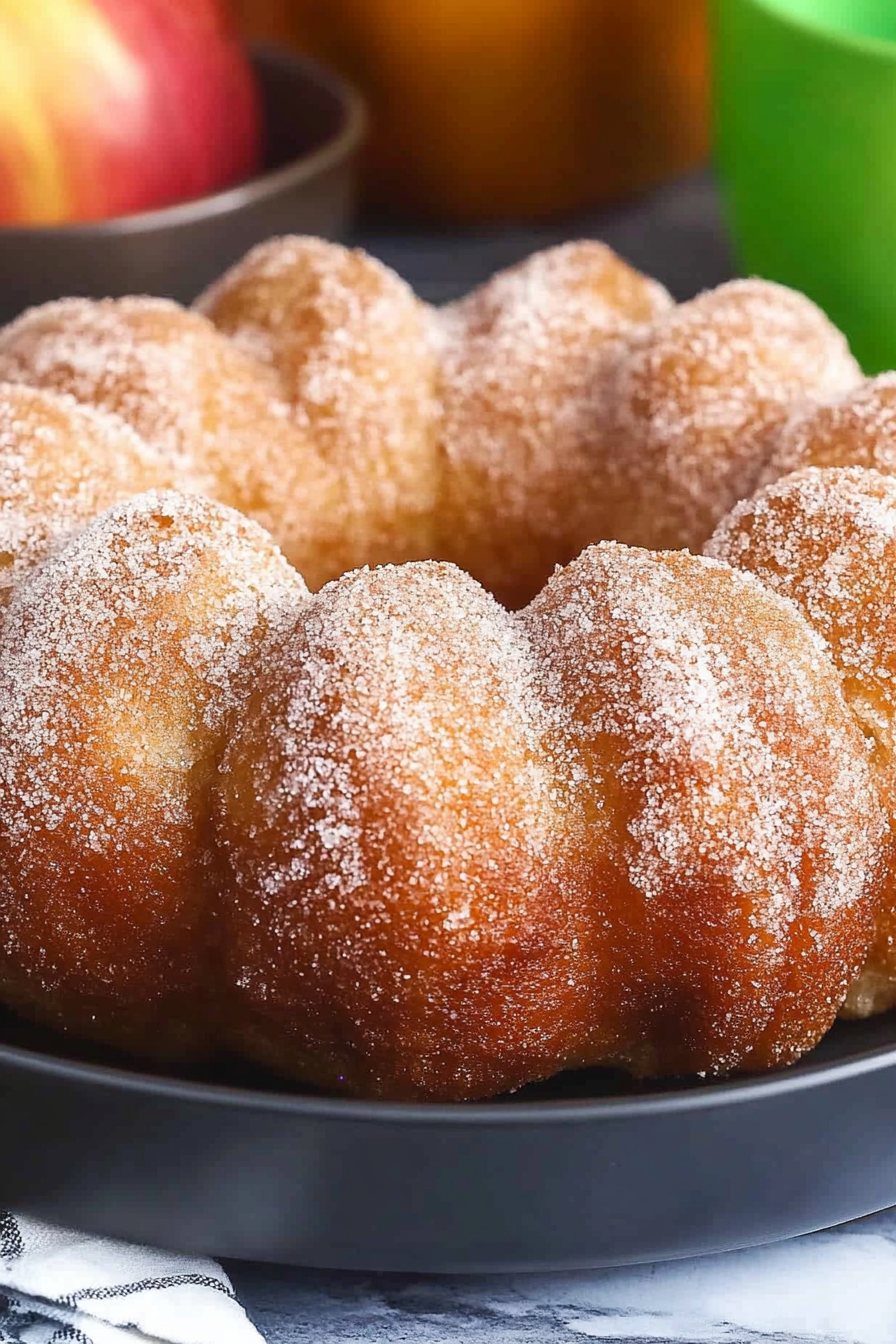
Autumn Spiced Doughnut Cake How to Bake
Oh, hello there! Come on in, grab a mug. I was just thinking about those crisp autumn days, the kind where the air smells like woodsmoke and fallen leaves. And what’s the first thing that pops into my head? Apple cider doughnuts, of course! Specifically, the ones from that little farm stand we love to visit every fall. They’re so tender, perfectly spiced, and that glaze… sigh. I’ve spent years trying to recreate that magic at home, and I think I’ve finally cracked it. This isn’t just any apple cider doughnut recipe; this is the one that tastes exactly like my fondest autumn memories. Forget those dry, crumbly imitations you sometimes find. These are wonderfully moist, bursting with real apple cider flavor, and surprisingly simple to whip up. If you’ve ever felt intimidated by making doughnuts from scratch, trust me, this apple cider doughnut recipe is your new best friend.
What is Apple Cider Doughnut?
So, what exactly *is* an apple cider doughnut? Well, think of it as a love letter to fall, baked into a ring. At its heart, it’s a cake doughnut where the liquid element isn’t just milk or buttermilk, but good old-fashioned apple cider. We’re talking about the unfiltered, cloudy stuff that’s pressed fresh at orchards. This cider infuses the entire doughnut with a subtle, sweet-tart apple flavor that’s just divine. It’s usually spiced with cinnamon, nutmeg, and sometimes a touch of cloves, giving it that warm, cozy aroma that just screams autumn. Unlike yeast doughnuts, these are typically baked, which makes them incredibly approachable for home bakers. They’re not as airy and chewy as a fried yeast doughnut, but they have this wonderfully dense, tender crumb that’s just perfect with a cup of hot coffee or tea. It’s the essence of autumn, captured in a single, delicious bite, and it’s far more than just a pastry; it’s an experience.
Why you’ll love this recipe?
Honestly, there are so many reasons why I’ve made this apple cider doughnut recipe my go-to, and I just know you’re going to fall in love with it too. First off, the FLAVOR. It’s just… *real*. You get that genuine apple cider taste, not some artificial flavoring. It’s perfectly balanced with warm spices – cinnamon is my favorite, of course, but a little nutmeg and clove really bring it home. It’s like autumn in your mouth. Then there’s the SIMPLICITY. I know, I know, “doughnuts from scratch” sounds daunting, but I promise you, this recipe is designed to be foolproof. We’re baking these, not frying, and the batter comes together in one bowl. It’s honestly easier than making a batch of muffins, and the results are so much more impressive. And let’s talk about COST-EFFICIENCY. You probably have most of the ingredients already in your pantry. Good quality apple cider is readily available, and the rest are pantry staples. It’s a fraction of the cost of buying fancy doughnuts from a bakery, but it tastes ten times better. I also love its VERSATILITY. While I adore them plain with a simple glaze, they’re also fantastic with a cream cheese frosting, or even just a dusting of cinnamon sugar. They’re perfect for a weekend breakfast, a special occasion brunch, or even just a treat when you need something sweet in the afternoon. What I love most about this recipe is that it truly captures that nostalgic, farm-stand feeling. It’s the kind of treat that makes people smile, and that’s priceless. It’s my personal answer to that craving for something comforting and delicious when the weather turns cool, and I can’t wait for you to experience it.
How do I make Apple Cider Doughnuts?
Quick Overview
This apple cider doughnut recipe is all about simple steps leading to incredible flavor. We’ll mix up a tender cake batter, infused with the goodness of real apple cider and warm spices. After a quick bake in a doughnut pan, we’ll finish them off with a sweet, dreamy glaze. It’s a straightforward process that guarantees delicious results, making homemade apple cider doughnuts achievable any day of the week. No fuss, just pure autumn joy.
Ingredients
For the Main Batter:
You’ll need all-purpose flour, of course. I usually use about 2 cups. Make sure it’s spooned and leveled, not scooped directly from the bag – that makes a big difference in texture! For sweetness and moisture, granulated sugar is key, about 3/4 cup. A little baking powder (around 2 teaspoons) and baking soda (1/2 teaspoon) are our leaveners. Don’t forget the warming spices: 1 teaspoon of ground cinnamon, 1/4 teaspoon of ground nutmeg, and a tiny pinch of ground cloves if you like it extra cozy. A good pinch of salt balances everything out. For the wet ingredients, we need 2 large eggs, lightly beaten. Unsalted butter, melted and slightly cooled, about 1/2 cup, adds richness. And the star, of course: 3/4 cup of good quality apple cider. Make sure it’s not sparkling or overly sweetened; the cloudy, unfiltered kind is best for flavor. A teaspoon of vanilla extract rounds out the aromatics.
For the Filling:
Actually, for this particular apple cider doughnut recipe, we’re not doing a separate filling! The apple cider *is* the flavor that infuses everything, so we get that wonderful taste throughout the whole doughnut without any extra fuss. It keeps things wonderfully simple!
For the Glaze:
This is the crowning glory! You’ll need powdered sugar, about 1.5 cups, sifted to avoid lumps. For our liquid, we’ll use more apple cider, starting with about 2-3 tablespoons. You can add more or less to get the consistency just right – we want it pourable but not too thin. A tiny splash of vanilla extract adds a nice touch. Sometimes, I’ll add a tiny pinch of cinnamon right into the glaze too, just for an extra pop of spice.
Step-by-Step Instructions
Step 1: Preheat & Prep Pan
First things first, let’s get our oven ready. Preheat it to 350°F (175°C). Now, if you’re using a standard doughnut pan, give each cavity a good spray with non-stick cooking spray or brush it with melted butter. If you don’t have a doughnut pan, you can use muffin tins, but the shape will be different (more like little cakey domes, which are still delicious!). It’s important to prep your pan well so the doughnuts slide out easily after baking. I find a light coating of cooking spray is usually enough, but sometimes I’ll use a pastry brush with melted butter for an extra layer of insurance.
Step 2: Mix Dry Ingredients
Grab a large mixing bowl. Into this bowl, whisk together your all-purpose flour, granulated sugar, baking powder, baking soda, cinnamon, nutmeg, pinch of cloves (if using), and salt. Give it a really good whisk for about 30 seconds. This step might seem small, but it’s crucial for making sure your leaveners and spices are evenly distributed throughout the batter, which means a nice, consistent rise and flavor in every bite. No one wants a bite that’s just plain flour!
Step 3: Mix Wet Ingredients
In a separate, medium-sized bowl, whisk together your lightly beaten eggs, melted and slightly cooled butter, apple cider, and vanilla extract until everything is well combined and looks nice and smooth. Make sure your butter isn’t too hot when you add it to the eggs, or you might end up with scrambled eggs instead of a smooth batter! Just let it cool for a few minutes after melting.
Step 4: Combine
Now, pour the wet ingredients into the bowl with the dry ingredients. Gently stir everything together with a spatula or wooden spoon until *just* combined. Seriously, stop mixing as soon as you don’t see any more dry streaks of flour. A few lumps are perfectly fine! Overmixing is the enemy of tender baked goods, especially doughnuts. We want them light and fluffy, not tough and chewy.
Step 5: Prepare Filling
As I mentioned before, this recipe gets its amazing apple cider flavor directly from the batter itself, so there’s no separate filling to prepare! The cider is incorporated right into the dough, giving you that delicious, subtle apple note throughout the entire doughnut. This keeps things wonderfully simple and streamlined.
Step 6: Layer & Swirl
This is where the magic happens for getting them into the pan. You can use a piping bag or a large zip-top bag with a corner snipped off to fill the doughnut cavities. Alternatively, a spoon works too, but it can be a bit messier. Fill each cavity about two-thirds of the way full. Don’t overfill them, or they’ll bake into a messy blob rather than a nice doughnut shape. The batter will puff up as it bakes, so give it some room to grow!
Step 7: Bake
Pop those filled doughnut pans into your preheated oven. Bake for about 10-14 minutes, or until a toothpick inserted into the center comes out clean. The exact time will depend on your oven and your pan. Keep an eye on them towards the end of the baking time; you don’t want them to get too dark. They should be lightly golden brown on top.
Step 8: Cool & Glaze
This is perhaps the hardest part: waiting! Let the doughnuts cool in the pan for about 5 minutes. This allows them to firm up a bit so they don’t break when you try to remove them. Then, gently invert the pan onto a wire rack to release the doughnuts. Let them cool completely on the wire rack before glazing. For the glaze, whisk together the sifted powdered sugar, 2 tablespoons of apple cider, and vanilla extract until smooth. If it’s too thick, add a little more cider, a teaspoon at a time. If it’s too thin, add a little more powdered sugar. Once the doughnuts are completely cool, dip the top of each one into the glaze, letting the excess drip off, and place them back on the wire rack to set. This usually takes about 15-20 minutes.
Step 9: Slice & Serve
Once the glaze has set, your apple cider doughnuts are ready to be devoured! They are best enjoyed fresh, ideally within a day or two of baking for the best texture. You can certainly slice them in half horizontally if you like, but they are perfectly delightful just as they are. Serve them with your favorite hot beverage – coffee, tea, or even a warm glass of milk. They’re absolutely magical enjoyed still slightly warm from baking, but they’re also delicious at room temperature.
What to Serve It With
These apple cider doughnuts are honestly fantastic all on their own, but they also play wonderfully with other things! For a cozy Breakfast, I love pairing them with a steaming mug of strong black coffee or a latte. The richness of the coffee cuts through the sweetness of the doughnut beautifully. Sometimes, I’ll even serve them alongside a simple fruit salad, like sliced apples and pears, to add a bit of freshness to the morning. For a more elegant Brunch, imagine these little beauties arranged on a tiered stand. They look so charming! I’d pair them with a crisp apple cider mimosa (if you’re feeling festive!) or a sparkling rosé. They also make a delightful accompaniment to a slice of quiche or some savory breakfast sausage. As a Dessert, these apple cider doughnuts are pure comfort. They’re wonderful served slightly warm with a scoop of vanilla bean ice cream or a dollop of freshly whipped cream. A drizzle of caramel sauce is also divine! They’re perfect after a hearty meal, offering a sweet, spiced finish without being too heavy. And for those perfect Cozy Snacks, when you just need a little something to lift your spirits, these doughnuts are it. I love them with a big glass of cold milk, or a warm cup of herbal tea. Sometimes, my family will just grab one straight from the cooling rack (after the glaze sets, of course!) and call it a day. It’s that simple comfort food feeling. My personal favorite tradition is to have them on the first truly chilly day of fall, sitting on the porch with a thermos of hot apple cider, just soaking it all in.
Top Tips for Perfecting Your Apple Cider Doughnuts
Okay, let’s get down to the nitty-gritty. Over the years, I’ve learned a few tricks that make these apple cider doughnuts truly shine, and I want to share them with you! First, regarding the apple cider itself: use the good stuff! Unfiltered, cloudy apple cider will give you a much richer flavor than the clear, highly processed kind. It really makes a difference. For the batter consistency, don’t be tempted to add extra flour if it seems a little wet. The key to that tender crumb is a slightly looser batter. Trust me on this one! When you’re mixing the wet and dry ingredients, the absolute most important thing is to NOT overmix. As soon as you no longer see streaks of dry flour, stop. A few small lumps are perfectly fine and actually desirable. Overmixing develops the gluten in the flour, which will make your doughnuts tough and dense, and we definitely don’t want that. For the glaze, consistency is king. You want it thick enough to coat the doughnuts nicely but thin enough to drip just a little, creating those lovely peaks. I always start with less cider and add more a teaspoon at a time until it’s just right. If you accidentally make it too thin, you can always whisk in a bit more powdered sugar. For baking, make sure your oven is accurately preheated. An oven thermometer can be a lifesaver! Also, doughnut pans can vary, so keep an eye on your first batch. They bake pretty quickly, so don’t wander too far away! If you don’t have a doughnut pan, don’t despair. Muffin tins work great, though the shape is different. Just make sure to adjust the baking time, as they might take a little longer to cook through. For ingredient swaps, if you can’t find fresh apple cider, you can sometimes get away with using apple juice mixed with a tablespoon of apple cider vinegar, but the flavor won’t be quite as robust. I’ve also experimented with using a gluten-free flour blend, and it works reasonably well, though the texture might be slightly different. I’d recommend a blend that contains xanthan gum. When it comes to storing, these are best enjoyed fresh, but if you have leftovers, they’ll keep okay for a couple of days in an airtight container. The glaze helps them stay moist. Honestly, the biggest “lesson learned” for me was just how critical not overmixing the batter is. It sounds so simple, but it’s the most common mistake that leads to less-than-perfect doughnuts. And remember, a little imperfection is what makes them homemade and charming!
Storing and Reheating Tips
So, you’ve made these amazing apple cider doughnuts, and you have a few left over (which is rare in my house, but it happens!). Here’s how to keep them tasting their best. For Room Temperature storage, and this is your best bet for immediate enjoyment, store the cooled, glazed doughnuts in an airtight container. They should stay fresh and delicious for about 2 to 3 days. The glaze helps to seal in some of the moisture. I usually put them in a single layer if possible, with parchment paper between layers if I need to stack them. If you’re not glazing them right away, they’ll keep fine at room temperature for a day, but the glaze is best applied when they’re fully cooled. For Refrigerator Storage, I tend to avoid refrigerating baked goods if I can, as it can sometimes dry them out. However, if you live in a very warm climate or want to extend their life a bit, you can refrigerate them in an airtight container for up to 4-5 days. Just be aware that the texture might change slightly, becoming a bit denser. When you’re ready to eat them, let them come to room temperature for about 30 minutes before enjoying; they taste much better that way. For Freezer Instructions, these apple cider doughnuts freeze surprisingly well, especially if you glaze them *after* thawing. You can freeze the unglazed doughnuts for up to 2-3 months. Wrap each doughnut individually and tightly in plastic wrap, then place them in a freezer-safe bag or container. To thaw, remove them from the freezer and let them come to room temperature on a wire rack. Once they’re fully thawed and no longer frosty, you can then dip them in your prepared glaze. If you want to freeze glazed doughnuts, make sure the glaze is completely set before wrapping and freezing. The glaze might get a little sticky upon thawing, so it’s usually better to glaze after thawing. Glaze Timing Advice is key: for the best texture and appearance, I always recommend glazing the doughnuts once they have completely cooled to room temperature. If you’re freezing them, it’s best to freeze them unglazed and then glaze them after thawing. This prevents the glaze from becoming sticky or uneven during freezing and thawing.
Frequently Asked Questions
Final Thoughts
There you have it – my go-to recipe for the most incredible apple cider doughnuts! I truly believe this recipe captures the cozy essence of autumn in every single bite. It’s that perfect blend of tender cake, warm spices, and that unmistakable apple cider flavor that just makes you feel good. Whether you’re making them for a special occasion, a weekend treat, or just because, I promise they’ll be a hit. They’re simple enough for a weeknight craving but special enough for company. If you love this recipe, you might also enjoy my other fall-inspired treats, like my spiced apple bread or my easy pear crumble. They’re all about bringing that comforting, home-baked goodness to your table. I really hope you give these apple cider doughnuts a try. I can’t wait to hear what you think! Please leave a comment below with your thoughts, or share any variations you’ve tried. And if you share a photo on social media, be sure to tag me – I’d love to see your delicious creations!
Warm Apple Cinnamon Pancakes
Ingredients
Method
- In a large mixing bowl, whisk together the flour, sugar, baking powder, cinnamon, and salt.
- In a separate bowl, beat the eggs and then whisk in the milk and melted butter.
- Pour the wet ingredients into the dry ingredients and stir until just combined. Fold in the chopped apples.
- Heat a non-stick skillet or griddle over medium heat. Pour 1/4 cup of batter for each pancake.
- Cook until bubbles form on the surface and the edges look set, about 2-3 minutes. Flip and cook for another 2 minutes until golden brown.
- Serve warm, topped with whipped cream and maple syrup if desired.