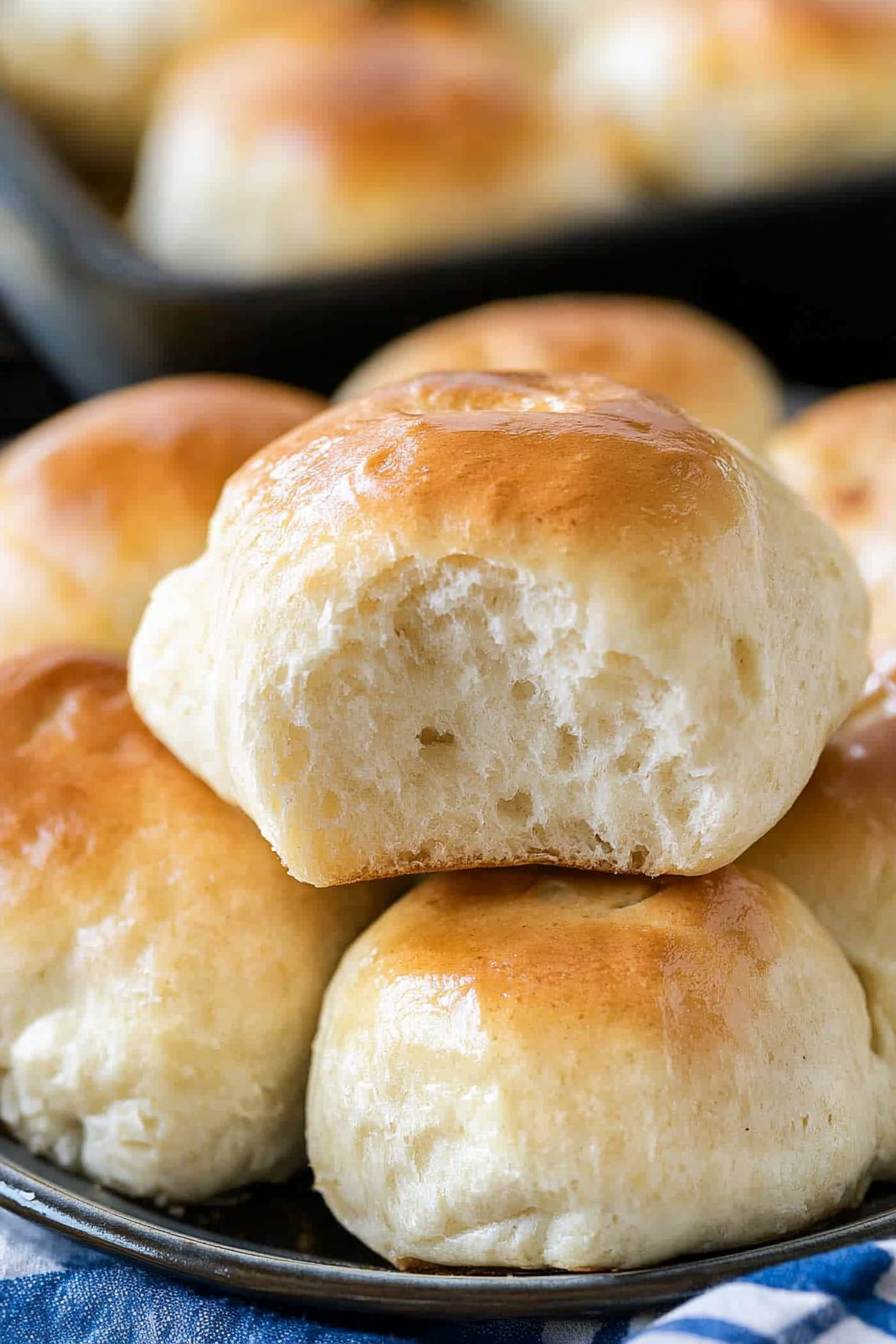
Flaky Homemade Rolls Four Delicious Ways
If you’ve ever walked into the kitchen craving something warm and comforting—like a soft, buttery roll—you’re going to love these homemade rolls. I always do this when I want something that feels like a warm hug after a long day. They’re surprisingly easy to make, even if you’ve never kneaded dough before. My kids ask for these all the time, especially when I serve them fresh out of the oven, dripping with butter or jam. The scent alone—oh my gosh—fills the house with happiness. It’s almost impossible to resist. Plus, I think these rolls have a certain magic because you can customize them easily, making them perfect for breakfast, dinner, or even as a snack. Trust me, once you try making your own, you’ll never go back to store-bought again. And honestly? They’re such a hit with family and friends—it’s like sharing a little piece of homemade heaven. Ready to join me in the kitchen and bake up some magic? Let’s do it!
What is a home made roll?
Homemade rolls are soft, fluffy bread buns that are traditionally made from simple ingredients like flour, yeast, milk, butter, and sugar. Think of them as the bread cousin to cookies—comforting, versatile, and just downright delicious. The name “homemade rolls” basically says it all: these are fresh-from-the-kitchen bread rolls made with love, kneaded until smooth, and baked to golden perfection. They’re essentially a blank canvas. You can enjoy them on their own, slathered with butter, or fill them with everything from ham and cheese to sweet cinnamon sugar. What’s so lovely about homemade rolls is how adaptable they are—you can tweak the amount of butter or sugar for sweetness or richness, add herbs or cheese for flavor, or even make them gluten-free if you need to. They’ve been a staple at our dinner tables for generations because, really, there’s nothing quite like biting into a warm, freshly baked roll. It’s comfort food in its purest form—simple, soulful, and endlessly customizable.
Why you’ll love this recipe?
This recipe for homemade rolls is a total game-changer, and I’ll tell you why I keep coming back to it. First off, the flavor—oh wow—the smell of warm bread fresh out of the oven alone is worth the whole process. It’s buttery, slightly sweet, and just the right amount of yeasty goodness. Second, the best part? It’s surprisingly easy. Even if you’ve never kneaded dough before, I promise you, this process is straightforward, and I’ll guide you through every step. I love how customizable they are, too. Want garlic and herbs? Done. Cashews and raisins? Absolutely. My husband’s favorite are these with a bit of honey and cinnamon—trust me on this one, they’re addictive. Plus, these homemade rolls are budget-friendly and use everyday ingredients you probably already have in your pantry. They’re perfect for casual weeknight dinners, weekend brunches, or holiday feasts. What I love most about this recipe is how much warmth and love it brings to the table. There’s something magical about pulling these out of the oven—everyone gathers around, hungry and happy.
How do I make homemade rolls?
Quick Overview
Making homemade rolls isn’t as complicated as it might seem at first glance. Basically, you combine your warm milk, yeast, and sugar to activate the yeast, then mix in softened butter and eggs. After that, you add in your flour and knead it until the dough is silky and smooth—that’s the secret to fluffy rolls! You’ll let the dough rise until it’s doubled in size, then punch it down and shape into balls or logs. A short second rise, then into a hot oven, and voila—golden, irresistible rolls! The trick is letting that dough rise properly; if you rush it, your rolls might turn out dense. But I promise, patience makes all the difference. Once baked, I love brushing them with butter or glazing with honey for an extra touch of indulgence. This recipe is perfect because it’s straightforward, forgiving, and absolutely delicious—a true labor of love in every bite.
Ingredients
For the Main Batter:
– 4 cups all-purpose flour (I like King Arthur for the best texture)
– 1 packet active dry yeast (about 2¼ teaspoons)
– 1 cup warm milk (around 110°F to activate yeast)
– ¼ cup granulated sugar (sweetens perfectly without overpowering)
– ½ cup unsalted butter, softened (instant melt-in-your-mouth richness)
– 2 large eggs (bring richness and structure)
– 1 teaspoon salt (for flavor balance)
For the Filling (Optional, but highly recommended):
– ¼ cup softened butter
– ¼ cup cinnamon sugar or honey (for sweet rolls)
– Chopped herbs, grated cheese, or dried fruits, if you want savory or fruity variations
For the Glaze:
– 2 tablespoons melted butter
– Honey or maple syrup, to brush on fresh out of the oven
– Optional: a sprinkle of sea salt or herbs for finishing
Step-by-Step Instructions
Step 1: Preheat & Prep Pan
Start by preheating your oven to 375°F (190°C). Lightly grease a baking dish or line it with parchment paper. I always do this early so I don’t forget while the dough is rising—it’s a simple step but so essential to prevent sticking. This is where your beautiful, golden-brown rolls will soon make their debut! Make sure your ingredients, like softened butter and eggs, are at room temperature—that helps everything blend smoothly. Also, warm your milk, but not too hot—around 110°F is perfect to activate the yeast without killing it.
Step 2: Mix Dry Ingredients
In a large bowl, whisk together the flour, yeast, sugar, and salt until well combined. This helps distribute everything evenly. I’ve learned the hard way that skipping this step can lead to uneven rising. The yeast should be fresh—if it’s old or expired, your rolls might not rise properly. So, I always double-check before I start. When you mix, the mixture should look like a fluffy, slightly grainy powder—set aside and get ready for the fun part!
Step 3: Mix Wet Ingredients
In a separate bowl, mix your warm milk with the softened butter and eggs. Whisk until the eggs are fully beaten and the butter is well incorporated. I love how it smells at this stage—rich, inviting, like a bakery in motion. Make sure your milk isn’t too hot, or you’ll cook the eggs—not what we want! The mixture should be smooth and slightly frothy. I’ve tested with almond milk lately, and honestly, it made the rolls slightly creamier, which was a nice twist, but regular milk is classic and perfect.
Step 4: Combine
Pour the wet mixture into the dry ingredients and stir until just combined. Now, I do my best not to overmix because that can make the rolls dense instead of fluffy. Use a wooden spoon or a dough hook if you’re using a mixer—just mix until the dough pulls away from the sides and feels soft but not sticky. If it’s a little sticky, don’t worry—that’s normal. Just flour your hands and knead it gently on a floured surface for about 5 minutes. The dough should be elastic and smooth.
Step 5: Prepare Filling
If you’re making sweet rolls, mix softened butter with cinnamon sugar or honey. For savory versions, consider chopped herbs, grated cheese, or even bits of cooked bacon. The filling is where you can really get creative! I love spreading a thin layer of butter over the rolled-out dough before adding my fillings—it helps everything stick together and creates that gooey, flavorful inside.
Step 6: Layer & Swirl
Once your dough has risen and doubled in size (about 1 to 1.5 hours), punch it down gently and roll it out on a floured surface into a rectangle about 12×8 inches. Spread your filling over the surface, then roll it up tightly from the short end. Slice into 12-15 pieces and place them onto your prepared baking dish. For that beautiful swirl, I recommend gently twisting the filled roll before slicing—looks fancy, tastes amazing! If you want a marbled effect, layer a bit of filling in the dough before rolling, then swirl lightly with a toothpick.
Step 7: Bake
Cover the rolls loosely with a clean kitchen towel and let them rise for another 20-30 minutes—this second rise is the magic that gives them fluffiness. Bake in your preheated oven for 15-20 minutes, or until they’re golden brown on top. Keep an eye towards the end—overbaking can dry them out, but underbaking leaves them doughy. When you tap the tops—they should sound hollow. The smell that wafts through the house? Pure comfort.
Step 8: Cool & Glaze
Remove from the oven and let the rolls cool slightly for about 5 minutes. Then, brush them with melted butter or honey for that glossy, irresistible finish. I love doing this when they’re still warm—it makes the tops so shiny and flavorful. If you want an extra touch, sprinkle a little sea salt or herbs over the glaze for contrast. The aroma at this stage? Like a bakery explosion—my whole house smells incredible!
Step 9: Slice & Serve
Slice the rolls gently with a serrated knife, and serve them warm or at room temperature. Trust me, they’re incredible fresh out of the oven, but I’ve also reheated leftovers in a low oven or microwave. The texture stays soft and tender, and they make great sandwiches or just a comforting snack. I always double the batch because they disappear so fast at my house—sometimes my kids even ask for a second helping before breakfast is over!
What to Serve It With
My favorite thing about these homemade rolls? They’re so versatile that they fit into practically any meal or occasion. For breakfast, I love serving them warm with a drizzle of honey and a good cup of coffee—nothing beats starting the day with that cozy aroma. During brunch, they’re fantastic alongside scrambled eggs, bacon, and fresh fruit, giving the table that homemade touch. As a side at dinner, they’re perfect with roasted chicken, hearty stews, or even a big bowl of spaghetti. And if I’m feeling indulgent, I’ll slice them open, butter them generously, and sprinkle with cinnamon sugar for a sweet treat. My family’s tradition is to slip a pat of butter inside while they’re still warm—instant melt-in-your-mouth goodness. Sometimes I’ll make them into sliders for a picnic or even turn them into sweet mini bread puddings the next day. These rolls truly become the star of any meal, and I promise—they’ll become a staple in your repertoire too!
Top Tips for Perfecting Your Homemade Rolls
After making these a dozen times, I’ve picked up some tricks to make each batch better than the last. First, always check the freshness of your yeast—expired yeast is a fast pass to dense rolls. I’ve tested with both instant and active dry yeast; either works, but I find instant yeast messes with the rising time a little. When proofing the yeast, make sure your milk is the right temperature—if it’s too hot, it kills the yeast, and if it’s too cold, it won’t activate. For the best rise, I cover my dough with a damp towel or plastic wrap and leave it in a warm corner. If your kitchen is chilly, I turn on the oven to 200°F for a few minutes, then turn it off and let the dough rise inside—it’s surprisingly effective. When shaping your rolls, don’t roll too tightly; gentle work yields fluffier results. For fillings, I’ve experimented with adding chopped dried fruits or cheese—but remember, too much filling can make baking tricky, so keep it balanced. When it comes to baking, I always position my baking sheet in the middle of the oven and rotate halfway through for even browning. Finally, don’t skip the glaze—trust me, that glossy, buttery coating makes all the difference. A little patience during the second rise pays off, giving you soft, airy rolls that your loved ones will rave about.
Storing and Reheating Tips
If you’re like me, you’ll want to extend the joy of these homemade rolls beyond the first day. To keep them fresh, store leftovers in an airtight container at room temperature for up to 2 days—cover them with a clean towel if you’re eating within that window to preserve their softness. For longer storage, these freeze beautifully. Wrap each roll tightly in plastic wrap and place in a freezer bag; they’ll stay good for up to 3 months. When you’re ready to enjoy again, thaw at room temperature or pop them straight into a low oven (about 300°F) until warm. Reheating in the microwave works too—just 15-20 seconds for soft, fresh-like goodness. I wouldn’t recommend refrigerating overnight unless you’re planning to reheat, as they tend to dry out. About glazing—if you want a fresh shiny finish after reheating, brush them with a little melted butter and honey. You’ll be surprised how delicious they still taste, even days later. Proper storage and reheating techniques make these rolls a reliable, comforting treat anytime you want it!
Frequently Asked Questions
Final Thoughts
There’s honestly nothing quite like the smell of freshly baked homemade rolls wafting through the house. They’re cozy, satisfying, and perfect for almost any occasion. Plus, once you master this basic recipe, you can let your creativity run wild—add cinnamon, cheese, herbs, or dried fruits. It’s become a part of my family’s traditions because those warm, soft bites bring everyone together. I love how forgiving the process is, and trust me, the first time you pull a batch out of the oven and see everyone’s faces light up, you’ll know it was so worth it. These homemade rolls have become my go-to for everything from comfy weekend breakfasts to holiday feasts—they’re a true labor of love in every warm, buttery bite. I’d love to hear how yours turn out, so drop a comment or share your favorite toppings and variations. Happy baking—and enjoy every delicious second of it!
Homemade Dinner Rolls - 4 Ways
Ingredients
Method
- Preheat oven to 375°F. Prepare a baking pan.
- Whisk 3/4 cup of flour, sugar, yeast, and salt in a large bowl.
- Heat milk, water, and butter until very warm (120°F-130°F). Add to dry ingredients.
- Mix for 2 minutes, then add an additional 1/4 cup flour gradually until a dough ball forms.
- Knead dough for 5 minutes, cover, and let rest for 10 minutes.
- Shape dough into desired forms: rolls, twists, knots, or buttered croissants.
- Bake for 10-20 minutes until golden. Brush with melted butter before serving.