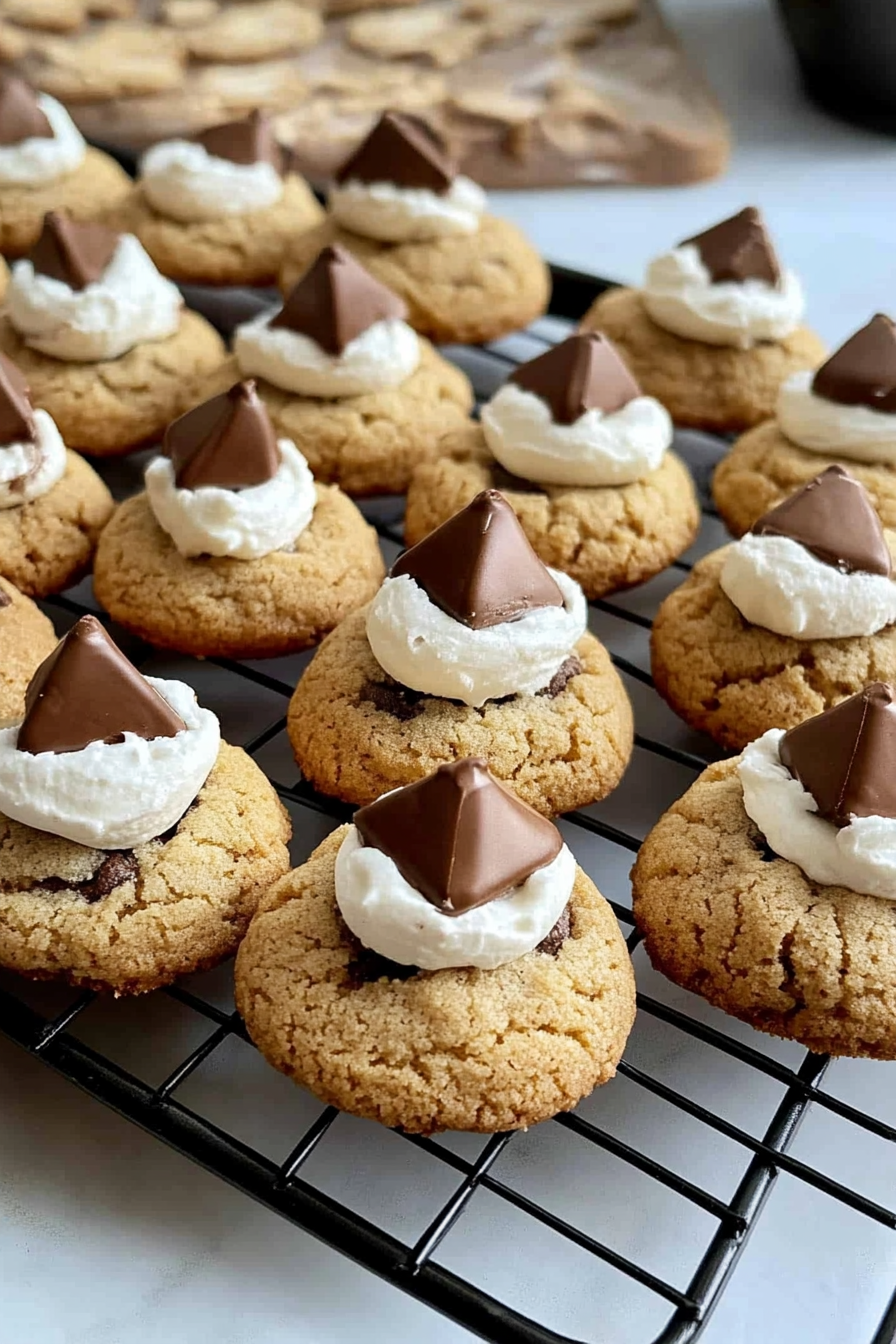
Graham Cracker Cookies How to Make S’mores Bliss
You know that irresistible smell of toasted marshmallows melting into chocolate? I always do this when I need a comfort boost or want to bring a little bit of backyard campfire magic inside—these S’mores cookies are like a nostalgic hug wrapped in a cookie. They’re one of those recipes that’s deceptively simple but makes everyone at the table grin like a kid. Honestly, I learned this trick after countless tries—perfecting the gooey center, the crispy edges, and that dreamy chocolate swirl. My kids ask for these all the time, and I can’t blame them—they disappear in minutes at my house! This one’s a lifesaver on busy nights when I want something homemade but don’t want to spend hours in the kitchen. Plus, it’s a fantastic way to use up leftover graham crackers and chocolate bars. Trust me, once you try these, they’ll become a regular in your cookie rotation, promising a little sweet escape whenever you need it.
What are S’mores cookies?
S’mores cookies are essentially all the magic of a campfire s’more packed into a chewy, crispy cookie form. Think of it as a cookie version of that classic treat—marshmallows, chocolate, and graham crackers, all rolled into one heartwarming bite. The idea is to capture that gooey, melty texture and smoky flavor, but in a handheld dessert. It’s technically a fusion of a few sweet favorites, but honestly, it’s just pure fun and nostalgia. You get a soft, tender interior with swirls of melted chocolate and bits of crunch from finely crushed graham crackers. The marshmallow topping gets toasted slightly in the oven, giving off that irresistible aroma and a bit of that campfire campfire vibe—minus the actual fire pit. This recipe is perfect when you’re craving something sweet but want that familiar, comforting flavor of s’mores in a new, more portable way.
Why you’ll love this recipe?
What I love most about these S’mores cookies is how they strike that delicate balance between crispy edges and gooey centers. The aroma when they’re baking? Pure heaven. It’s like a little slice of summer happiness no matter the season. They’re so easy to make that even if you’re not a seasoned baker, you’ll surprise yourself. The ingredients are simple—nothing fancy or hard-to-find—and you probably already have most of them in your pantry. Plus, these cookies are budget-friendly; you’re basically just using chocolate, graham crackers, marshmallows, and basic baking staples. And the best part? They’re incredibly versatile. Want to make them a little richer? Toss in some peanut butter chips or swirl in caramel. Looking for a gluten-free version? Swap regular flour for almond or oat flour. What I love most about this recipe is that it’s great for any occasion—casual movie night, a quick family treat, or even a fun baking project with kids. Trust me, once you make these, they’ll be the go-to for satisfying that sweet craving, especially when you’re feeling nostalgic for those carefree campfire nights.
How do I make S’mores cookies?
Quick Overview
This recipe comes together faster than you might expect. You start by mixing a soft yet sturdy cookie dough, then gently fold in crushed graham crackers and chunks of chocolate. Once the dough is ready, you scoop it onto baking sheets, top each with mini marshmallows, and bake until the edges are golden and the marshmallows are delightfully toasted. The magic happens when you pull these out of the oven—the smell alone will make everyone come rushing. For the finishing touch, I like to drizzle melted chocolate or even add a sprinkle of crushed graham crackers on top. These cookies are best enjoyed warm, with a cold glass of milk or a hot cup of cocoa. They’re guaranteed to brighten any day—simple, cozy, and downright addictive.
Ingredients
For the Main Batter:
– 1 cup unsalted butter, softened (trust me, room temp is key for spreading comfort)
– ¾ cup brown sugar
– ½ cup granulated sugar
– 2 large eggs
– 1 teaspoon vanilla extract
– 2 ½ cups all-purpose flour
– 1 teaspoon baking powder
– ½ teaspoon salt
– 1 cup crushed graham crackers (about 8 full sheets)
– ½ cup mini chocolate chips or chopped chocolate bars
For the Filling:
– 1 cup mini marshmallows (or more if you’re feeling extra indulgent!)
– 1 cup milk or dark chocolate chunks
– Optional: caramel bits or peanut butter chips for a flavor twist
For the Glaze (Optional):
– ½ cup melted chocolate
– A pinch of sea salt or sprinkles for decoration
– Additional crushed graham crackers for garnish
Step-by-Step Instructions
Step 1: Preheat & Prep Pan
Set your oven to 350°F (175°C). Line baking sheets with parchment paper or silicone baking mats—I always do this first to avoid any sticky mess. Have your marshmallows ready to go, as they only need a few minutes in the oven to toast up beautifully. Trust me, it’s worth prepping everything ahead of time so you can move swiftly once the dough is baked!
Step 2: Mix Dry Ingredients
In a small bowl, whisk together the flour, baking powder, salt, and crushed graham crackers. This ensures everything’s evenly distributed. Proper mixing here makes your cookies come out uniform and fluffy—not dense or uneven.
Step 3: Mix Wet Ingredients
In a large bowl, beat together the softened butter, brown sugar, and granulated sugar until creamy. Add eggs one at a time, beating well after each. Stir in vanilla. Look for a fluffy, pale mixture—this means it’s ready for the dry stuff. I’ve tested this with a little almond extract for extra warmth, and it worked beautifully.
Step 4: Combine
Gradually add the dry ingredients into the wet, mixing just until combined. Be careful not to overmix; the dough should look cozy and slightly shaggy, not stiff like bread dough. Overmixing can make your cookies tough, and that’s the last thing you want.
Step 5: Prepare Filling
Gently fold in the chocolate chunks and crushed graham crackers. If you’re feeling adventurous, this is when you can add in nuts or other goodies. Set aside some mini marshmallows for topping—these will toast in the oven for that gooey effect.
Step 6: Layer & Swirl
Scoop about 2 tablespoons of dough onto your prepared baking sheet, spacing them out as they spread. Press a few mini marshmallows into the center of each cookie dough ball, then top with more dough to seal in the marshmallows. For a fun swirl, you can gently drag a toothpick through the top to create a marbled look with melted chocolate or caramel.
Step 7: Bake
Bake for 10-12 minutes, or until the edges turn golden. Keep an eye on the marshmallows—they’ll puff and get that lovely toasted color. If some marshmallows escape a little, no worries, that just adds to their charm. Oven times can vary, so start checking around the 9-minute mark if your oven runs hot.
Step 8: Cool & Glaze
Allow the cookies to cool on the baking sheet for 5 minutes, then transfer to a wire rack. While still warm, you can drizzle melted chocolate over the tops or sprinkle crushed graham crackers for extra crunch. When I do this, I love to sprinkle a tiny pinch of sea salt—it heightens all the sweet flavors.
Step 9: Slice & Serve
Serve these warm with a glass of milk or a cup of tea. They’re delicious on their own or even with a scoop of vanilla ice cream on the side. I like cutting them slightly warm and watching the gooey marshmallow and melting chocolate ooze out—pure magic. Store leftovers in an airtight container, but honestly, they’re best enjoyed within a couple of days before they lose that perfect chewy-crisp combo.
What to Serve It With
These S’mores cookies are so versatile it’s almost silly. For a cozy breakfast, pair them with a strong cup of coffee and a fresh fruit platter—you’ll feel like you’re having a little slice of childhood treasure before the day officially begins. When I serve them as part of a brunch spread, I like to add fresh berries and whipped cream for a more luxurious vibe. As an after-dinner treat, these cookies shine with a scoop of vanilla ice cream or a drizzle of caramel sauce. And, of course, in my family, they’re the perfect casual snack on movie nights or snuggling up on the couch with a good book. I swear, they are a crowd-pleaser for all ages, filling the house with that irresistible smell that makes everyone come running!
Top Tips for Perfecting Your S’mores Cookies
Over the years, I’ve picked up a few tricks that make these cookies even better. First, don’t skip the graham cracker crushing—finely crushed crackers blend seamlessly into the dough, giving that signature crunch and flavor. When mixing, I always make sure not to overdo it; overmixing can create dense, tough cookies, and nobody wants that. The marshmallows—oh, they’re the star—so gently press them into the dough, and if you want a more toasted look, use the broiler for a quick flash—they’ll toast up perfectly in seconds. For a richer chocolate flavor, try using a higher percentage cocoa or adding a few chocolate bars chopped into chunks. I’ve also tested swapping regular flour for gluten-free options like oat flour, and the texture was still pretty close—just watch closely during baking so they don’t dry out. Also, I’ve found that baking the cookies on the middle rack ensures even heat, preventing burnt bottoms or undercooked centers. When adding the glaze, a double boiler works wonders for smooth, glossy chocolate. Trust me on this—these little tweaks can elevate your cookies from simple to spectacular.
Storing and Reheating Tips
If you happen to have leftovers (which is rare in my house), here’s how I store and reheat them so they stay fresh and gooey. Keep the cookies in an airtight container at room temperature for up to two days—they’re best fresh out of the oven, but they’ll stay quite delicious for a little while. For longer storage, pop them into a freezer-safe bag or container and freeze for up to a month. When you’re ready to enjoy them again, I recommend letting them thaw at room temperature for about 15 minutes, then popping them in a 300°F (150°C) oven for a few minutes to revive the crispy edges and gooey centers. As for adding the glaze, I usually wait until the cookies are completely cooled—otherwise, the chocolate might melt too much and become a bit runny. If you want to keep that shiny, freshly baked look, add it right before serving. These cookies are surprisingly forgiving and still taste amazing reheated, so don’t hesitate to make them ahead for special occasions or busy weeks.
Frequently Asked Questions
Final Thoughts
Honestly, these S’mores cookies are more than just a treat—they’re a little bit of kid magic you get to enjoy anytime you want. The smell alone is worth the effort, filling your kitchen with that warm, chocolatey, toasted aroma that transports you straight to summer nights around a campfire. I’ve made these countless times, and each batch comes out just a little different—sometimes extra toasted marshmallows, sometimes extra gooey chocolate—yet they always bring a smile. What I hope you take from this is that baking should be fun, forgiving, and a chance to create something personal and memorable. Once you try these, I bet they’ll become a favorite for your family’s dessert lineup, too. Happy baking, and don’t forget to share your own tweaks—I’d love to hear what delicious variations you come up with! Now go ahead—grab some marshmallows and get baking. You’re about to turn a simple cookie into a cherished memory.
Chocolate Chip Cookies
Ingredients
Method
- Preheat your oven to 350°F. Line baking sheets with parchment paper.
- In a bowl, whisk together the flour, baking soda, and salt.
- In a large bowl, cream the softened butter, granulated sugar, and brown sugar until fluffy.
- Add eggs one at a time, then vanilla extract, beating well after each addition.
- Gradually add the dry ingredients to the wet mixture and mix until combined.
- Stir in chocolate chips.
- Drop spoonfuls of dough onto prepared baking sheets, spacing about 2 inches apart.
- Bake for 12-15 minutes or until golden brown. Cool on wire racks before serving.