Rich Chocolate Cupcakes A Southern Delight
There’s something about Mississippi Mud that just makes me feel like I’ve stepped back into my grandma’s kitchen — warm, cozy, with the smell of rich chocolate wafting through the air. I remember sitting at her big wooden table, a glass of milk in hand, eagerly waiting for her to serve up this gooey, chocolatey dessert that’s more like a luscious, chocolaty hug than just a cake. Honestly, it’s one of those recipes that everybody in my family always asks for, especially when we’re craving something sweet but don’t want to fuss over complicated desserts. Think of it as a cross between a fudge brownie and a dense cake — absolutely indulgent but surprisingly easy to whip up. And I promise, once you try this Mississippi Mud, it’ll become an instant family favorite because it’s simply that good. Plus, it’s a total lifesaver on busy nights when you need something quick but still want to impress with flavor — trust me on this one! Let’s dive into what makes Mississippi Mud so irresistible and how you can make your own perfect batch. Bring on the chocolate — this one’s a keeper!
What is Mississippi Mud?
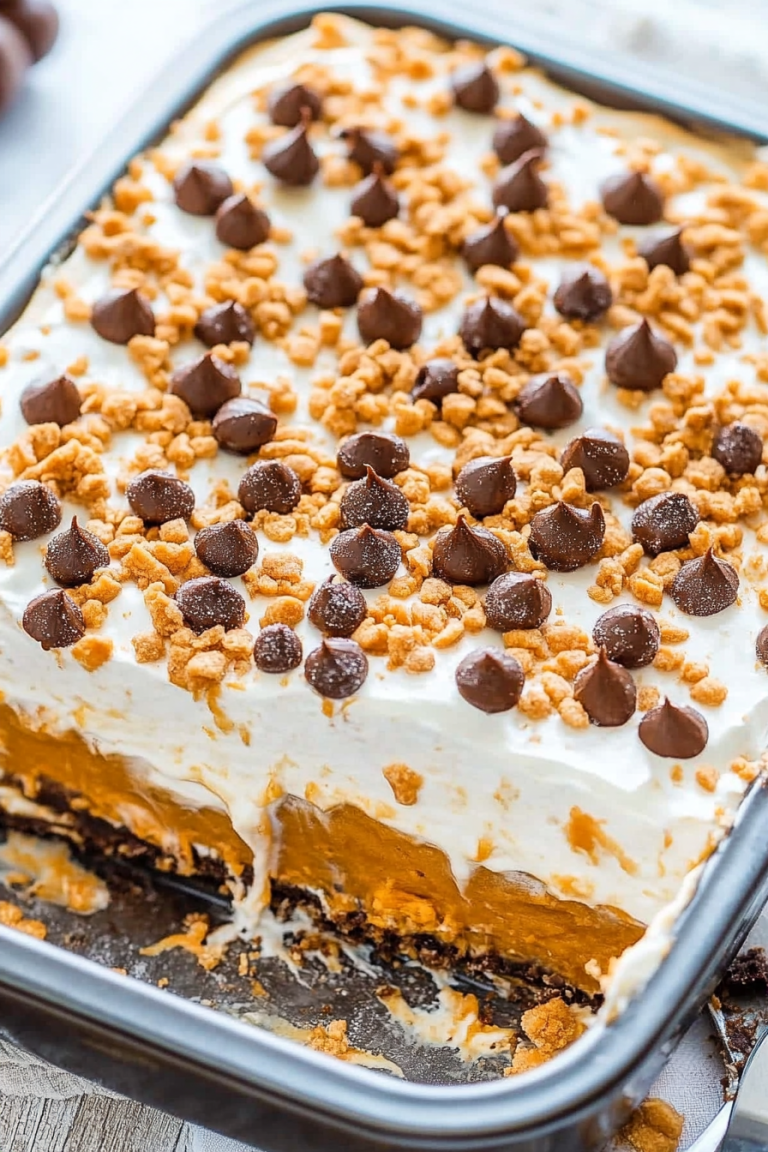
Think of Mississippi Mud as a decadent, chocolate-laden dessert with a name that hints at the deep, rich soil of the South — and boy, does it live up to its name! It’s essentially a no-fuss, layered chocolate treat that combines a fudgy brownie base with a fluffier, marshmallow or meringue topping, often finished with a drizzle of chocolate glaze. The “Mississippi Mud” name captures its beautifully dark, almost muddy-looking layers, but don’t let that fool you; it’s the sweetest, most indulgent mess you’ll ever fall for. The origins are a little fuzzy — some say it started as a simple Southern comfort cake, others see it as a kind of homey, family recipe that’s been passed down through generations. Either way, it’s all about embracing that irresistible combo of rich chocolate, soft marshmallow, and a bit of crunch from nuts or cookies, depending on how you like it. Think of it as a dessert that’s rustic, a little messy (in the best way), and entirely comfort food. It’s like your favorite childhood treat, but with a gourmet twist — perfect for sharing at family gatherings or just spoiling yourself after a long day.
Why you’ll love this recipe?
What I love most about Mississippi Mud is how it hits all the right notes in just a few simple steps. First off, the flavor — oh wow, the flavor! It’s deeply chocolaty without feeling heavy, thanks to the rich cocoa and chocolate chips I always sneak in. The marshmallow topping? It’s like biting into fluffy clouds that melt right in your mouth, giving that perfect balance of sweetness and texture. The best part? This recipe is incredibly forgiving. I’ve tested it with different types of chocolate (dark, semi-sweet, even dairy-free options), and it always turns out delicious. Plus, it’s budget-friendly — most ingredients are pantry staples, and you probably already have what you need. I also love how versatile this dessert is. It’s amazing warm with a scoop of vanilla ice cream, but it’s equally fantastic after chilling for a few hours in the fridge — especially if you like it a little firmer. Honestly, what’s not to love? It’s the kind of dessert that disappears in minutes at my house, no matter how many people are around. I’ve even made this for potlucks and parties, and it’s always the first to go. Trust me on this — once you make Mississippi Mud, it’s going to be a staple in your recipe box too.
How do you make Mississippi Mud?
Quick Overview
This dessert is surprisingly easy to pull together, and once you get the hang of it, it’s practically foolproof. You start by making a rich, fudgy brownie batter as the base — think melt-in-your-mouth chocolate with just enough chewy texture. While that bakes and cools, you prepare a fluffy marshmallow topping, which you spread on top once the brownie layer is cooled. Then, a quick drizzle of chocolate glaze pulls everything together, making it look Insta-worthy and even more tempting. What makes this method special is how effortlessly the layers blend, giving you that irresistible messy, gooey look that’s exactly how Mississippi Mud should be — a little rustic, totally delicious. And the whole process, from mixing to baking, only takes about an hour or so, making it perfect for whenever a craving strikes or you need an impressive-looking dessert in a pinch.
Ingredients
For the Main Batter:
– 1 cup all-purpose flour (I always use unbleached for a richer flavor)
– 3/4 cup unsweetened cocoa powder (Dutch-process if you can find it, for a smoother taste)
– 1 teaspoon baking powder
– 1/2 teaspoon salt
– 1/2 cup unsalted butter, melted (trust me, it makes a difference)
– 1 cup granulated sugar
– 2 large eggs
– 2 teaspoons vanilla extract
– 1/2 cup semi-sweet chocolate chips (or dark chocolate for a deeper flavor)
For the Filling:
– 3 cups mini marshmallows (or large ones chopped into smaller pieces)
– Optional: 1 cup chopped nuts (pecans or walnuts are classic, but I’ve tested with almonds, yum!)
– A splash of vanilla to enhance the marshmallow flavor
For the Glaze:
– 1/2 cup semi-sweet or dark chocolate chips
– 2 tablespoons heavy cream or coconut cream for dairy-free vibe
– A pinch of sea salt (to balance the sweetness and intensify the chocolate)
Step-by-Step Instructions
Step 1: Preheat & Prep Pan
I always start by heating my oven to 350°F (175°C), and I line my 9-inch square baking pan with parchment paper — makes it so much easier to lift out the dessert without mess. A quick butter or spray on the pan’s sides helps everything slide out cleanly. Trust me on this — nothing worse than a stuck brownie!
Step 2: Mix Dry Ingredients
In a small bowl, whisk together the flour, cocoa powder, baking powder, and salt. Sifting the dry ingredients helps prevent clumps and creates a smoother batter, which is key to that fudgy, professional look. I’ve learned that combining these thoroughly first makes the wet ingredients come together more evenly later.
Step 3: Mix Wet Ingredients
In a bigger bowl, stir together the melted butter, sugar, eggs, and vanilla until silky smooth. You want everything well combined but not overbeat — just enough to get a nice, shiny batter. I always do this by hand; overmixing can make the brownies less fudgy and more cake-like, which is not what we’re after here.
Step 4: Combine
Dump the dry ingredients into the wet and gently fold everything together with a spatula. Don’t overmix — just until you see no streaks of flour or cocoa. Remember, overworking the batter can lead to tougher brownies. Once it’s combined, fold in the chocolate chips.
Step 5: Prepare Filling
While the batter rests for a few minutes, prepare your marshmallow layer. If you’re using large marshmallows, chop them into smaller pieces so they spread more evenly. Adding a splash of vanilla here really brings out that marshmallow flavor in the final dessert. If you like nuts, sprinkle some on top of the marshmallows later for a little crunch — it’s a game changer!
Step 6: Layer & Swirl
Pour the batter into the prepared pan and spread it out evenly. Then, sprinkle the marshmallows over the top. Using a spatula or your fingers, gently press some of the marshmallows into the batter to ensure they stay in place. For a fun swirl effect, I sometimes gently drag a toothpick through the marshmallows and batter — it creates a pretty marbled look that kids love.
Step 7: Bake
Pop it into the oven and bake for about 25-30 minutes. You want a toothpick inserted into the center to come out with moist crumbs, not wet batter. If you see marshmallows start to brown too much, tent it with foil. Every oven is different — I’ve learned to start checking around 25 minutes and adjust time accordingly. The smell alone will have everyone rushing to the kitchen!
Step 8: Cool & Glaze
Once out of the oven, let it cool completely in the pan on a wire rack — patience is key here! If you try to cut it while still warm, it’ll be a gooey mess. When totally cooled, melt your chocolate chips with the cream and stir until smooth. Pour over the top, using a spatula to spread evenly. The glaze adds just the right sheen and ensures the dessert holds together beautifully.
Step 9: Slice & Serve
Use a sharp knife dipped in hot water for clean cuts and slice into squares. Serve warm with a scoop of vanilla ice cream or a dollop of whipped cream — absolutely divine! I like to add a little chopped nuts or a dusting of powdered sugar for presentation. Honestly, this looks impressive yet feels like comfort food at its best. Don’t be surprised if everyone asks for seconds!
What to Serve It With
This dessert is so versatile that I’ve served it in a bunch of ways, depending on the occasion. For breakfast, a small warm piece with a hot cup of coffee is divine — trust me, the chocolate and marshmallow combo is a decadent start to the day. At brunch, I like to serve it alongside fresh berries and whipped cream for that perfect sweet contrast. It makes a jaw-dropping dinner finale, especially when topped with vanilla ice cream or a drizzle of caramel. My kids actually steal slices for quick snacks, especially when I’ve chilled it in the fridge — the fudge-like consistency gets even creamier. I also love making mini muffins from the batter; they’re perfect for portion control, and they bake in about 15 minutes. No matter how you serve it, Mississippi Mud always brings smiles around the table.
Top Tips for Perfecting Your Mississippi Mud
Over the years, I’ve picked up some tricks that make this dessert turn out just right every time. First, don’t skip sifting your dry ingredients — it keeps your brownies extra smooth and fudgy. I’ve tested with different chocolates and found that high-quality chips melt better and taste deeper. When mixing the wet and dry, use a gentle fold — overmixing will make your brownies tougher, and no one wants that chewy texture. Want a more pronounced swirl? Use a skewer or a toothpick to drag through the batter and marshmallows before baking for a stunning marbled look. If you prefer your Mississippi Mud less sweet, try reducing the sugar slightly or swapping in dark chocolate chips — the bitterness balances the marshmallows beautifully. I’ve also experimented with swapping the marshmallows for whipped meringue, which gives a lighter, crispier top, so feel free to get creative! Remember, baking is all about personal touches. I’ve learned that checking early and adjusting baking time based on your oven makes a big difference. And don’t forget the glaze — I often add a splash of espresso or a pinch of cinnamon to deepen the chocolate flavor. Trust me, a little experimentation with these tips will make your Mississippi Mud uniquely yours.
Storing and Reheating Tips
Leftovers? Absolutely! Store your Mississippi Mud in an airtight container at room temperature for up to two days — if it lasts that long! If you want to keep it a bit longer, pop it in the fridge for up to five days. Just cover it tightly with plastic wrap or store in a sealed container — the fridge helps it set nicely and keeps that marshmallow topping fresh. To reheat, microwave a slice for about 15-20 seconds until warm and gooey again. If it’s refrigerated and you want it fluffy, a quick stint in the microwave (with a damp paper towel on top) works wonders. For freezing, wrap individual slices tightly in plastic wrap, then foil, and store for up to a month. When you’re ready to enjoy, let it thaw at room temp for 15 minutes or warm it up gently in the microwave. I’ve found that adding a touch more glaze or a sprinkle of nuts after reheating makes it taste just like fresh out of the oven. The flavors actually deepen overnight, so don’t be shy about making this a day ahead — it’s even better the next day!
Frequently Asked Questions
Final Thoughts
If you’re looking for a dessert that’s both nostalgic and utterly indulgent, Mississippi Mud is your answer. Its layers of gooey chocolate, fluffy marshmallow, and that rich, fudgy base make it a showstopper without much fuss. I always do this when I want to treat my family or friends to something memorable — it’s surprising how effortless it is to create something that looks and tastes like it took hours to make. Over the years, I’ve learned that the magic lies in simplicity: quality chocolate, a gentle hand, and plenty of love. Once you try this, I have no doubt it’ll become part of your regular dessert lineup. So, gather your ingredients, put on your favorite tunes, and enjoy the process — and when you finally get to taste that first warm, melty bite, I guarantee you’ll be hooked. Happy baking, and I can’t wait to hear how yours turns out! Don’t forget to leave a comment, share your photos, or tell me about your own twists — I love hearing all about it! Cheers to chocolate dreams coming true!
Mississippi Mud Cake
Ingredients
Method
- Preheat oven to 350°F. Prepare cupcake or cake pan with liners or grease well.
- In a medium bowl, whisk together flour, cocoa powder, baking soda, and salt.
- In a large bowl, beat butter, sugar, oil, and vanilla until light and fluffy.
- Add eggs one at a time, mixing well after each addition.
- Alternately add dry ingredients and milk to the butter mixture, starting and ending with dry ingredients. Mix until just combined.
- Pour batter into prepared pan and bake for 18 minutes or until a toothpick comes out clean.
- Allow cake to cool completely before frosting.