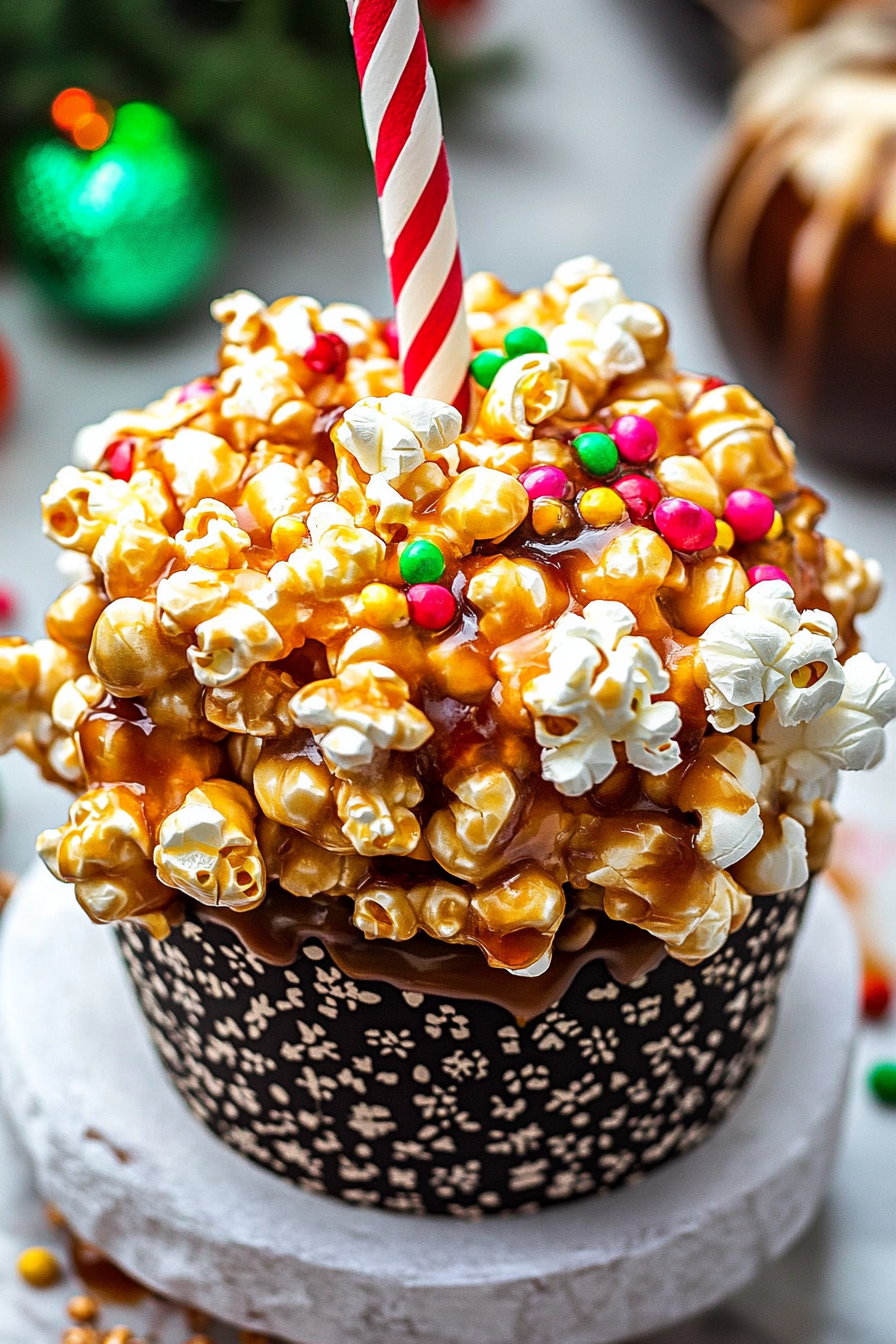
Sweet Caramel Popcorn Balls A Simple Treat
There’s just something magical about the smell of caramel popcorn drifting through the house — it instantly takes me back to childhood movies nights on the couch, blankets wrapped tight, giggling at silly comedies while munching away. I’ve always loved popcorn (who doesn’t?), but adding that luscious, buttery caramel sauce takes it to a whole new level. This isn’t the kind you buy at the store — nope, this is the good stuff, real caramel made from scratch, crunchy, sticky, sweet, and just a little bit salty in all the right places. And the best part? It’s shockingly easy to make. Trust me on this: once you get the hang of it, it’s a total game-changer. Plus, it’s perfect whether you’re hosting a movie night or just craving a sweet treat without turning on the oven. My kids ask for this all the time, and honestly, I sneak a handful myself — it’s that addictive. So, grab some popcorn, let’s get caramelizing, and I’ll show you how simple this divine snack really is!
What is caramel popcorn?
Think of caramel popcorn as the lovechild of movie theater classics and your grandma’s sweet tooth. It’s essentially popcorn coated in a rich, buttery caramel sauce that hardens just enough to give you that satisfying crunch with every bite. The name “caramel popcorn” might sound straightforward, but don’t let that fool you — there’s a comforting, nostalgic quality to it that makes it feel like a warm hug. The concept is simple: fluffy, freshly popped popcorn gets tossed in a glossy caramel coating, then baked briefly to set that perfect sticky-crispy combo. It’s a fantastic crowd-pleaser, a little treat for yourself, or even a thoughtful homemade gift. Think of it as a more indulgent, gourmet take on your favorite snack that everyone from kids to grown-ups will devour. It’s so versatile, too — you can add nuts, sea salt, or even a drizzle of chocolate if you’re feeling fancy. But honestly, the classic version is what my family loves best — pure, sweet, crunchy caramel goodness.
Why you’ll love this recipe?
One of my favorite things about making caramel popcorn at home is how forgiving and adaptable it is — once you get the hang of the caramel sauce, you’ll find it’s pretty much impossible to mess up. What I love most about this recipe is that it’s loaded with flavor but doesn’t require any fancy ingredients or complicated techniques. Just good quality popcorn, sugar, butter, and a splash of cream — simple ingredients that come together to create a flavor explosion in your mouth. Plus, it’s super budget-friendly! I’ve tested this with different types of popcorn, like homemade or microwave bags, and it always turns out just right. This is a lifesaver on busy nights when you need a quick treat, but it also feels really special — no one can resist that crackly caramel crunch. And if you’re a fan of salted caramel or think you’d enjoy adding nuts or sprinkles, this recipe is easily customizable. Honestly, what I love most about it is how joyous the process is — pouring that hot caramel over popcorn and watching it transform into that glossy, irresistible snack. It’s like magic happening right in your kitchen.
How do you make caramel popcorn?
Quick Overview
This recipe boils down to a simple sequence: pop your popcorn, make a caramel sauce, toss them together, bake briefly for crunch, and then let it cool down until the caramel hardens just right. I’ve tested this many times, and the key is in the caramel — it needs to be smooth and glossy, not stringy or burnt. Once you master that, the whole process is a breeze! It’s ideal when you want something sweet, crunchy, and totally satisfying, with hardly any fuss. Plus, it makes your home smell incredible — that warm, buttery aroma that signals “treats are ready.” The best part? It’s ready to eat within about an hour, start to finish, and you don’t need any fancy gadgets—just a good pot, a baking sheet, and some patience.
Ingredients
For the Popcorn:
– 1/2 cup unpopped popcorn kernels (I swear by fresh, high-quality kernels for maximum fluffiness)
– Optional: a little oil or butter for popping, if you’re using a pan (I do this for stovetop popcorn, but microwave popcorn works fine too!)
For the Caramel Sauce:
– 1 cup granulated sugar (trust me, don’t skimp here — it makes all the difference)
– 6 tablespoons unsalted butter (preferably real, salted butter for that perfect salty-sweet combo)
– 1/2 cup heavy cream (or whole milk for a lighter version, but cream really makes it velvety)
– 1 teaspoon vanilla extract (for warmth and depth)
– A pinch of salt (if using unsalted butter, to balance everything out)
Step-by-Step Instructions
Step 1: Pop Your Corn
Start with fresh popcorn. If you’re using a stovetop, heat a few tablespoons of oil over medium-high heat, add the popcorn kernels, cover, and shake the pan occasionally until popping slows. Or, if you’re lazy like me, microwave a good-quality bag of popcorn and pour into a large bowl. Either way, aim for fluffy, fully popped kernels with no burnt bits. Set aside.
Step 2: Make the Caramel Sauce
In a medium heavy-bottomed saucepan, melt the sugar over medium heat. Stir constantly with a silicone spatula or wooden spoon until it turns a deep amber color and smells like caramel. Be patient — this can take 5-7 minutes. Once the sugar is melted, carefully add the butter (it may bubble up!) and stir until smooth. Then slowly pour in the cream — it will bubble up fiercely, so add it gradually while stirring. Keep stirring until the sauce is glossy, smooth, and thickens slightly. Remove from heat, stir in vanilla and a pinch of salt. Now, this is the magic moment — your kitchen will smell like heaven.
Step 3: Coat the Popcorn
Pour the hot caramel sauce over your popcorn in batches, gently tossing to evenly coat every kernel. Use a spatula or big spoon to fold it in — don’t be shy! The caramel may still be runny, but that’s okay. It will harden beautifully after baking.
Step 4: Bake for Crunch
Preheat your oven to 250°F (120°C). Spread the coated popcorn on a lined baking sheet in an even layer. Bake for about 45 minutes, stirring every 15 minutes — this helps the caramel set and gives that irresistible crunch. Your house will smell like sweet, salty perfection. Once done, take it out and let it cool completely. It will clump together a little, but that’s part of the charm.
Step 5: Cool & Break Apart
When cooled, break the popcorn into clusters or pieces. If you want a super glossy finish, you can drizzle a bit more caramel or melt some chocolate to add on top. But honestly, plain caramel popcorn is divine as it is.
Step 6: Serve & Share
Transfer to an airtight container and store at room temperature. It stays fresh for several days (if it lasts that long!). I find that the flavor deepens after a day or so, as the caramel fully sets and the flavors meld. It’s perfect for gifting or just keeping on hand for when the sweet tooth strikes. My kids love sneaking bites straight from the jar, and I might have to hide a batch just for myself — no judging here!
What to Serve It With
This caramel popcorn pairs beautifully with just about anything. For breakfast, I toss some crumbles into yogurt with fresh berries — yes, I do! It adds a sweet crunch that makes mornings extra special. For brunch, serve it alongside fluffy pancakes or waffles, with a drizzle of maple syrup. It’s fantastic as a dessert, of course, served on a pretty platter with a scoop of vanilla ice cream or a drizzle of melted chocolate. When I want a cozy snack, I simply enjoy it straight from the jar with a hot cup of coffee or a cold glass of milk. Sometimes, I even sprinkle a little sea salt or chopped nuts on top before baking — trust me on this, it elevates everything. Whatever your style, this caramel popcorn is a crowd-pleaser that brings smiles all around, and I promise, once you make it once, you’ll be hooked!
Top Tips for Perfecting Your Caramel Popcorn
Over the years, I’ve learned a few tricks that really make the difference between good and jaw-droppingly delicious caramel popcorn. First, don’t rush the caramel — patience is key when melting sugar; rushing can lead to burnt bits and bitter flavor. I always do this step with a heavy-bottomed pan and a silicon spatula, stirring constantly. When adding the cream, be careful — the bubbling can be fierce, and I’ve burned my fingers more than once! To get that shiny, firm caramel coating, make sure your sauce is thick and glossy before tossing it with popcorn. If you like a slightly gooey texture, bake for less time — for that satisfying crunch, I recommend the full 45 minutes. As for ingredient swaps, I’ve tried coconut cream instead of heavy cream, which gives a subtle coconut flavor, and it’s just as creamy. Want to jazz it up? Mix in chopped pecans or drizzle some white chocolate on top once cooled. And don’t skip the baking — it’s what gives the popcorn that irresistibly crispy finish. One mistake I used to make was pouring hot caramel over popcorn that wasn’t fully cooled — it caused the coating to slide off. Now I always wait until it’s at room temperature, and it’s perfect every time. Trust me, just a little patience makes all the difference.
Storing and Reheating Tips
Once you’ve made your caramel popcorn, the best way to keep it fresh is in an airtight container — I prefer mason jars or resealable bags. It stays good at room temperature for up to five days, maybe a little longer if it’s really humid outside, but honestly, it disappears pretty fast in my house! If you want to store it longer, I suggest refrigerating it, but be aware that the caramel can get a bit sticky — just bring it back to room temp before snacking. To freeze, tightly wrap the popcorn in plastic wrap and place in a freezer-safe container; it’ll be good for up to a month. When you’re ready to enjoy again, let it thaw at room temperature for about 10-15 minutes. A quick tip: if it’s gotten a little soft after storage, pop it back in a low oven (about 200°F) for 5-10 minutes to crisp it up again. As for the glaze, I like to add any extra drizzle or toppings only after reheating, so it stays glossy and fresh. Overall, this recipe is quite resilient, and with a little storage know-how, you can enjoy that irresistible aroma and flavor anytime you want!
Frequently Asked Questions
Final Thoughts
Honestly, I could go on and on about caramel popcorn because it’s just one of those snacks that never get old in my house. It’s simple but utterly satisfying, perfect for lazy weekend movies or a quick pick-me-up after a long day. Over the years, I’ve learned to tweak this recipe to suit my mood — whether that’s adding sea salt, tossing in roasted pecans, or drizzling white chocolate on top. Each variation feels special and personal, and I love how easy it is to customize. If you’re new to making caramel at home, don’t worry — once you get the hang of that bubbling sugar, you’ll be hooked. Easy, affordable, irresistible — that’s my motto with this treat. I hope you give it a try and tell me all about your favorite twists! And honestly, I’d love to hear how yours turns out or if you’ve added your own secret touches. Happy baking, and don’t forget to save a handful for yourself — it disappears in minutes at my house!
Caramel Popcorn
Ingredients
Method
- Pop the popcorn according to the package instructions. Place in a large bowl and set aside.
- Melt the caramel candies with the butter in a medium saucepan over medium-low heat, stirring until smooth.
- Pour the melted caramel over the popcorn and toss to coat evenly. Allow to cool for a few minutes.
- Spread the coated popcorn onto a baking sheet lined with parchment paper and let set.
- Optional: Melt some chocolate and drizzle over the popcorn for added flavor.