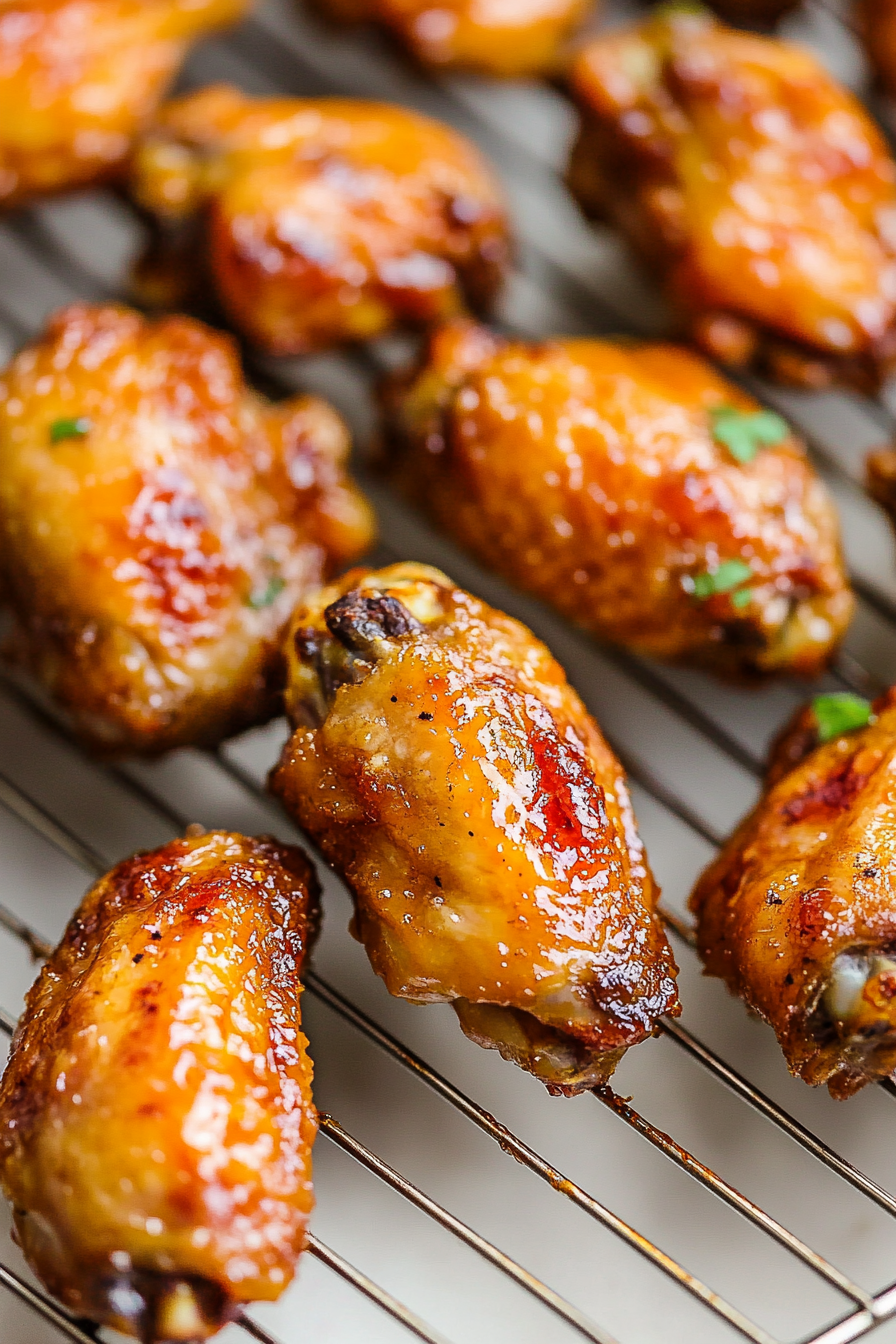
How to Make Amazing Baked Chicken Wings
There’s nothing quite like the smell of baked chicken wings drifting through my kitchen — it’s that warm, savory aroma that makes everyone stop what they’re doing and head straight to the stove. I have such vivid memories of doing this recipe with my kids when they were little; the first time I made these, they asked if they could have “extra crispy ones like at that fancy restaurant.” But honestly, what I love most about this baked version is that it’s way healthier than fried, super easy to whip up last-minute, and trust me — it’s foolproof. I always do this when I want something smoky and flavorful but don’t want to spend hours in the kitchen. Plus, it’s a recipe the whole family can get involved with — my kids actually ask for seconds, and that’s saying something! So here I am to share my secret weapon: baked chicken wings that come out crispy, juicy, and packed with flavor. Whether it’s game night, a casual dinner, or just a craving at midnight, these wings are my go-to. Ready to make your house smell amazing? Let’s get started!
What is baked chicken wings?
Think of baked chicken wings as those popular, finger-licking treats you often see at sports bars or at neighborhood gatherings — but instead of deep-fried, they’re oven-baked for that perfect combo of crispy and tender. The “baked” part is what makes them a healthier choice, while still delivering all that addictive flavor we love. The name itself is pretty straightforward: “baked” just means cooked in the oven, and “chicken wings” refer to the meaty, yet small, part of the chicken that’s perfect for snacking. It’s essentially a simpler, more wholesome way to enjoy what you’d probably order on a night out or grab from the street vendor. I like to think of it as a DIY version of that restaurant favorite — easier, more customizable, and just as delicious. Plus, with a few simple pantry ingredients, they come together so quickly that you’ll wonder why you ever relied on takeout so much.
Why do you like Baked Chicken Wings?
What I love most about these baked chicken wings is how incredibly flavorful and satisfying they are, without all the greasy guilt. The smell alone is enough to make everyone in the house come running — imagine garlic, smoky paprika, a hint of spice, and that crispy skin. And let’s be honest, they’re just so easy to make. No need for fancy equipment or deep fryers, just your oven, a baking sheet, and a few spices. Plus, they’re super budget-friendly — chicken wings are usually pretty affordable, and you can spice them up or down depending on your mood. I’ve made these for everything: lazy weeknights, family get-togethers, even potlucks. The versatility part is what really wins me over. You can serve them with classic blue cheese or ranch dressing, toss them in buffalo sauce, or keep it simple with just a sprinkle of sea salt. Trust me — once you try this method, it might just become your new favorite weekend treat. Mine, at least!
How do I make Baked Chicken Wings?
Quick Overview
This recipe is straightforward: you marinate or season the wings, toss them on a baking sheet in a single layer, then bake at a high temperature until crispy. The secret to that crispy-on-the-outside, juicy-on-the-inside texture lies in the hot oven and a bit of baking science — I always swear by preheating well and giving the wings a good, even coat of seasoning for maximum flavor. In just about 40 minutes, with minimal fuss, you’ll have an irresistible plate of wings that crunch with every bite and are so flavorful, you won’t even miss the frying. It’s perfect for when you want that ultimate game-day snack or just a fun dinner idea. The best part? You can tweak the seasonings endlessly — spicy, smoky, tangy — whatever suits your mood or your cravings. Easy enough for weeknights, impressive enough to serve to guests.
Ingredients
For the Main Seasoned Wings: For the Main Seasoned Wings: For the Main Seasoned Wings: For the Main Season
– 2 pounds of chicken wings (fresh or frozen, thawed thoroughly)
– 2 tbsp olive oil or melted butter (for crispiness and flavor)
– 1 tsp garlic powder
– 1 tsp smoked paprika (or regular paprika if you prefer milder)
– ½ tsp chili powder (optional for a kick)
– Salt and freshly cracked black pepper to taste
– ½ tsp onion powder (for depth of flavor)
– A pinch of cayenne (if you like heat)
For the Extra Crispy Finish:
– A little cornstarch or baking powder (see tip below for the secret to extra crispiness!)
For the Dipping & Sauce Options:
– Blue cheese or ranch dressing
– Hot sauce or buffalo sauce
– Honey or maple syrup (for a sweet glaze)
– Fresh herbs like parsley or cilantro for garnish
Step-by-Step Instructions
Step 1: Preheat & Prep Pan
Set your oven to 425°F (220°C) — really crank it up! Line a baking sheet with foil and place a wire rack on top if you have one. This allows the heat to circulate all around the wings, making them crispier. If not, no worries, just use a parchment-lined tray. Pat the wings dry with paper towels to remove excess moisture, because that’s key for crispy skin. I always do this when I want wings that actually crackle when you bite into them!
Step 2: Mix Dry Ingredients
In a small bowl, combine the garlic powder, smoked paprika, chili powder, salt, pepper, onion powder, and cayenne if you’re feeling spicy. Mix well. This spice blend is what gives these baked wings that mouthwatering flavor. I’ve tried adding a pinch of cumin or even curry powder — totally optional, but it adds a fun twist.
Step 3: Mix Wet Ingredients
In a large bowl, toss the wings with olive oil or melted butter until evenly coated. This helps the spices stick and promotes browning. I like to do this step with my hands — it feels more natural and ensures every wing gets coated. Trust me, do not skip this part; it’s the base layer of flavor and crispiness.
Step 4: Combine
Add the spice mixture to the wings and toss again until everything is coated evenly. If you really want that extra crunch, sprinkle a little cornstarch or baking powder over the wings before tossing them again. This trick—used by many professional chefs—is what makes baked wings so irresistibly crispy without frying!
Step 5: Prepare Filling (Optional)
If you want to toss your wings in sauce after baking, wait until they’re cool enough to handle or toss them lightly with your sauce before baking — both work! For a dry rub, just sprinkle the seasoning mixture now. If you prefer a glaze, you can brush on your favorite sauce right after baking or during the last 5 minutes.
Step 6: Layer & Swirl
Arrange the wings on your prepared rack or tray in a single layer. Give each wing space so the hot air can flow around them. If you’re feeling cozy, you can toss a few to coat evenly with hot sauce or glaze now, but I usually leave that for after baking.
Step 7: Bake
Pop them into the oven and bake for about 35-40 minutes, flipping them halfway through. Keep an eye on them — they should be golden, crispy, and cooked through. The best way to check? Cut into one and make sure there’s no pink in the meat. The aroma that fills your kitchen will tell you they’re ready.
Step 8: Cool & Glaze
Once out of the oven, let them sit for 5 minutes — this helps the juices settle. If you like them coated in sauce, brush on hot sauce or glaze now and toss gently to coat. For extra crunch, I sometimes give them a quick broil—just a minute or two—to crisp up the exterior even more. But don’t walk away; they burn fast at that stage.
Step 9: Slice & Serve
Plate your wings with some chopped herbs or a sprinkle of more spices. Serve alongside your favorite dips and maybe some celery sticks — classic! I love to plate them on a rustic wooden board for that cozy, at-home vibe. These wings are best enjoyed hot, with that perfect balance of crispy skin and tender meat. Trust me, your friends will be asking for this recipe before they leave!
What to Serve Them With
Honestly, baked chicken wings are such a versatile snack or meal that they go with just about anything. Here are a few of my favorite combos:
- For a lazy Sunday snack: Pair them with creamy ranch or blue cheese dressing (my kids’ favorite) and some crunchy celery and carrot sticks. It’s the classic combo that never fails, especially when everyone’s watching the game together.
- For a festive brunch: Serve wings as a savory side with eggs and crispy breakfast potatoes. Add a splash of hot sauce and a fresh squeeze of lemon, and you’re good to go.
- As a dinner starter: Pair them with a simple side salad with vinaigrette, and you’ve got a perfect light meal, especially if you toss some extra herbs on top. This is how I often serve them when I want an easy but impressive dinner for friends.
- Casual comfort: Sometimes I just plate them with crispy chips or pita bread and call it a night. These wings are so flavorful, they turn any gathering into a feast. I constantly experiment with different dips — hummus, spicy mayo, or even a sweet-and-sour fruit salsa — depends on the mood.
My family loves to have a platter of these wings for movie nights, parties, or even picnic days. They’re so fuss-free, everyone ends up going back for seconds — I swear, it’s a crowd-pleaser no matter where or when.
Top Tips for Perfecting Your Baked Chicken Wings
Over the years, I’ve picked up a few tricks I’d love to share that make these wings even better:
- Dry the wings thoroughly: I can’t emphasize this enough — moisture is the enemy of crispiness. Always pat them dry with paper towels before seasoning.
- Use high heat and a wire rack: This combo is what makes the skin crisp up evenly. If you don’t have a wire rack, tucking some foil underneath is fine, but the rack really is a game-changer.
- Adding cornstarch or baking powder: I’ve tested this tip after countless recipes — sprinkle a little before tossing in the spices, and your wings will turn out crackly and golden. Just don’t overdo it; a teaspoon per pound is enough.
- Marinate or season in advance: If I want extra flavor, I toss the wings with the spices and oil, then refrigerate for an hour or overnight. This makes them taste even deeper.
- Adjust baking time for size: Larger wings may need extra minutes; smaller ones cook faster. Keep an eye after 35 minutes.
- Broil briefly for extra crisp: When I want that restaurant-style crunch, I switch to broil for a quick 2-minute blast — just watch it like a hawk so they don’t burn!
- Experiment with sauces: Buffalo, honey mustard, garlic Parmesan, or even sweet chili — switch it up for variety. Just add the sauce after baking unless you like a baked-on glaze.
This recipe has been a process of trial and error for me, but I’ve found that patience and a few key tricks get you consistently crispy, flavorful wings that vanish in minutes. Trust me on this — once you start, you’ll never go back to greasy takeout wings again.
Storing and Reheating Tips
If you happen to make too many (which I never do, of course!), here’s how I store and reheat them without sacrificing flavor or texture:
- Room temperature: It’s best to eat them fresh, but if needed, they can sit covered on the counter for a few hours. Just don’t leave them out too long — food safety first!
- Refrigerator: Store leftovers in an airtight container for up to 3 days. Reheat in a 375°F (190°C) oven or toaster oven for about 10 minutes, flipping halfway, to help regain some crunch. Avoid microwave unless you want soggy wings — it’s the worst, I know.
- Freezing: Pack the cooled wings in a sealed freezer bag or container. They’ll last up to 2 months. To reheat, thaw overnight in the fridge then bake again at high heat for best crispy results.
- Glaze freshness: If you’ve coated with sauce, it’s best to add it after reheating to keep the skin crispy and avoid a soggy mess. Trust me, I’ve made that mistake more times than I can count!
Storing these wings is easy, and with the right reheating method, they taste almost as good as fresh — just a little extra love needed for that perfect crunch.
Frequently Asked Questions
Final Thoughts
Honestly, if you’ve never baked chicken wings before, this recipe might just change your game. It’s simple, quick, and endlessly customizable — and the best part? It’s hard to mess up. I’ve made these countless times for family dinners, snacks, and even spontaneous gatherings, and they always disappear in minutes. The crispy skin, tender meat, and punch of flavor make every bite satisfying. And once you get the hang of it, you’ll find yourself experimenting with sauces, seasonings, and accompaniments. Trust me, your taste buds are in for a treat. Plus, knowing you’re serving something homemade and healthier than fried wings feels pretty good too, right? I hope you enjoy making and eating these as much as I do — happy baking, friends! Feel free to drop me a comment or share your favorite twist — I love hearing how others enjoy this dish. Here’s to more delicious, stress-free nights in the kitchen!
Baked Crispy Chicken Wings
Ingredients
Method
- Preheat oven to 250°F and place racks at the lowest and top positions.
- Pat the chicken wings dry with paper towels.
- In a large bowl or ziplock bag, toss wings with baking powder, salt, and pepper to coat evenly.
- Line a baking sheet with foil and set a wire rack inside. Spray with cooking spray.
- Arrange wings on the wire rack in a single layer, skin side up, without touching.
- Brush or spray wings with vegetable oil.
- Bake at 250°F for 30 minutes to render fat.
- Increase oven temperature to 400°F and move wings to top rack. Bake for an additional 45-50 minutes until crispy and golden.
- While wings bake, prepare the honey soy sauce: bring honey, soy sauce, garlic, ginger, and water to a boil, then simmer until reduced to 1/4 cup.
- Once wings are done, toss them in the sauce or serve it on the side.