Easy Patriotic Fruit Skewers for Summer
There are some recipes that just instantly bring a smile to your face, and for me, these vibrant fruit skewers are definitely one of them. I can still remember being a little kid and seeing these at birthday parties, a dazzling array of colors that felt like pure magic. They were always the first thing to disappear, and as an adult, I get the exact same excitement when I whip them up. They’re incredibly simple, which is a lifesaver on busy days, but they feel so special and festive. Honestly, they’re the perfect answer when you want something sweet and refreshing without all the fuss of baking. Think of them as edible confetti – joyful, bright, and always a crowd-pleaser. They’re like nature’s own candy, but way healthier and so much more fun than anything from a wrapper. If you’ve ever scrolled through Pinterest and seen those impossibly perfect looking fruit platters, these fruit skewers are your secret weapon to achieving that kind of effortless elegance.
What are rainbow fruit skewers?
So, what exactly are rainbow fruit skewers? At their heart, they’re exactly what they sound like: fresh, colorful fruits threaded onto a skewer in a way that mimics the beautiful arc of a rainbow. It’s this simple concept that makes them so universally loved. We’re talking about taking nature’s most stunning ingredients – juicy strawberries, sweet oranges, sunshiney pineapple, lush kiwi, plump blueberries, and maybe even some deep purple grapes – and arranging them artfully. The “rainbow” aspect isn’t just for show; it’s about creating a visually stunning experience that tantalizes your eyes before you even take a bite. It’s essentially a deconstructed fruit salad, but with the added fun factor of being on a stick. No complicated techniques here, just good, honest fruit looking its absolute best. It’s the kind of dish that makes you feel like you’ve pulled off something impressive, even if it took you mere minutes to assemble.
Why you’ll love this recipe?
Oh, where do I even begin with why this recipe is a total winner? First off, the flavor explosion is just incredible. You get that burst of natural sweetness from the berries, the tangy zest from the citrus, the tropical notes of pineapple, and the refreshing crispness of melon – it’s a symphony in your mouth. And the best part? It’s ridiculously easy to make. Seriously, if you can thread a bead onto a string, you can make these fruit skewers. There’s no baking, no complicated sauces, just pure, unadulterated fruit goodness. Plus, they are so budget-friendly! You can often find seasonal fruits on sale, making these a really cost-effective way to serve a crowd or just treat yourself. What I love most is their sheer versatility. You can use them as a light dessert, a healthy snack, or even as part of a brunch spread. They’re a fantastic way to get kids to eat more fruit, too. I’ve found that when they’re presented this way, my little ones are way more enthusiastic about trying new fruits, and they even ask for seconds! They stand out because they take simple, familiar ingredients and elevate them into something truly special. It’s like serving up a little bit of edible happiness. If you’re looking for a dessert alternative to something like my What are some easy chocolate chip cookies?, these fruit skewers are a fantastic choice that feels both indulgent and wholesome.
How to Make Rainbow Fruit Skewers
Quick Overview
Making these rainbow fruit skewers is all about selecting beautiful, ripe fruits and arranging them in a colorful sequence on skewers. You’ll wash and chop your fruits into bite-sized pieces, then thread them onto skewers, aiming for that vibrant rainbow effect. It’s a straightforward process that requires minimal effort but delivers maximum visual appeal and deliciousness. This method is perfect for parties, picnics, or even just a fun afternoon snack because it’s so quick and requires no cooking whatsoever. You’re literally just assembling edible art!
Ingredients
For the Rainbow Skewers:
We’re going for the classic ROYGBIV (Red, Orange, Yellow, Green, Blue, Indigo/Violet) color scheme here, but feel free to play around! The key is variety and ripeness. I always try to pick fruits that are in season for the best flavor and value.
- Red: About 1 pint of fresh strawberries, hulled and halved or quartered depending on size.
- Orange: 2-3 clementines or navel oranges, peeled and segmented. If using larger oranges, cut segments into bite-sized pieces.
- Yellow: 1 cup fresh pineapple chunks. Make sure they’re nice and sweet!
- Green: 2-3 kiwis, peeled and sliced into thick rounds or half-moons.
- Blue/Indigo: 1 cup fresh blueberries. You can keep them whole.
- Violet: 1 cup seedless red or black grapes, halved if large.
Optional for an extra touch:
Sometimes, I like to add a little something extra to make them pop even more.
- A few fresh mint leaves for garnish and a hint of freshness.
- A drizzle of honey or a light yogurt dip served on the side.
Step-by-Step Instructions
Step 1: Gather and Prepare Your Fruit
The first step is always the most important: selecting gorgeous, ripe fruit. Give all your fruits a gentle wash under cool water. For the strawberries, remove the green tops (hull them). I like to halve or quarter them depending on their size so they’re easy to skewer and eat. Peel the oranges and separate them into segments. If your orange segments are really large, you might want to cut them in half too. Cut the pineapple into bite-sized chunks, making sure to remove the tough core. Peel the kiwis and slice them into nice, thick rounds or half-moons – they have such a lovely vibrant green color! Wash your blueberries and grapes. If your grapes are particularly big, I find it’s best to halve them so they don’t overpower the other fruits on the skewer. This prep work is crucial for easy assembly later on.
Step 2: Prepare Your Skewers
Now, grab your skewers! I prefer using wooden skewers for a rustic look, but the metal ones work just as well. If you’re using wooden ones, it’s a good idea to soak them in water for at least 30 minutes beforehand. This prevents them from burning if you plan to grill them later or just helps them stay sturdy. You can also trim the sharp point off the end if you have very young children eating them, just to be on the safe side. Make sure you have enough skewers for all your fruit. I usually plan for 4-6 pieces of fruit per skewer, depending on the size of the fruit and the skewer itself. Don’t overcrowd them; you want them to look appealing and be easy to handle.
Step 3: Begin Assembling Your Rainbow
This is where the fun really begins! Start with your red fruit, like a strawberry half or a grape, and thread it onto the skewer. Then, follow with the orange (orange segment), yellow (pineapple chunk), green (kiwi slice), blue (blueberry), and finally, the violet (another grape or dark berry). You’re essentially building your rainbow, layer by colorful layer. I always try to make sure the colors transition smoothly. It’s okay if a piece of fruit rotates slightly; the overall effect is what matters. Don’t worry about making it absolutely perfect; a little bit of artistic license is encouraged!
Step 4: Continue Threading Until Complete
Keep going with the same color sequence for each skewer. If you run out of a certain fruit before you finish, don’t fret! You can always adjust the color order or substitute with a similar colored fruit. For example, if you don’t have blue grapes, maybe use a darker plum slice or more blueberries. The goal is to have a visually appealing, colorful skewer that’s a joy to behold. I often find myself humming a little tune as I assemble these, it’s just that kind of happy food. Once you’ve got all your fruit threaded onto your skewers, arrange them on a platter.
Step 5: Add Optional Garnishes
If you’re feeling fancy, this is the time to add those little extras. Tuck a fresh mint leaf between fruit pieces for a pop of green and a delightful aroma. Or, if you’re serving them with a dip, arrange them attractively next to a small bowl of honey-sweetened yogurt or a light fruit-based coulis. These small touches really elevate the presentation and make the fruit skewers feel extra special. It’s the little details that can make a dish memorable, even something as simple as fruit skewers.
Step 6: Chill and Serve
Once your fruit skewers are assembled and beautifully arranged, it’s best to chill them in the refrigerator for at least 15-20 minutes before serving. This helps the fruits firm up a bit and ensures they are refreshingly cold. Chilling them also helps all those lovely fruit flavors meld together. When you’re ready to serve, arrange them on a platter or in a tall glass for a fun presentation. They are best served chilled and are perfect for any occasion.
What to Serve It With
These rainbow fruit skewers are so wonderfully versatile! For breakfast, they’re a fantastic addition to a spread alongside pancakes or waffles. Imagine serving them with a light dusting of powdered sugar or a dollop of Greek yogurt – it’s a cheerful way to start the day. For a more substantial brunch, they can be a refreshing counterpoint to savory dishes like quiches or breakfast burritos. I love serving them in a tall, clear vase with the colorful fruit sticking out; it looks like a floral arrangement made of fruit! As a dessert, they are an absolute dream. They’re light, naturally sweet, and a welcome relief after a heavier meal. Serve them with a small dish of melted dark chocolate for dipping, or perhaps a scoop of vanilla bean ice cream. For those cozy snack times, especially for the kids, they’re a perfect grab-and-go treat. I often make a big batch and leave them in the fridge, and my kids will happily grab one (or two!) when they’re craving something sweet. My family has a tradition of having these on the first day of summer vacation; it just screams fun and sunshine to us. They pair beautifully with a light bubbly water, a fresh lemonade, or even a mocktail. Really, they go with almost anything because they are so pure and refreshing!
Top Tips for Perfecting Your Rainbow Fruit Skewers
Alright, let’s talk about a few little tricks I’ve picked up over the years that make these fruit skewers even better. First, about the fruit prep: always use firm, ripe fruit. Mushy fruit is not fun on a skewer! If your strawberries are huge, cutting them into smaller pieces or even quarters will make them easier to manage and ensure they fit well with other fruits. For the oranges, I like to peel them and then cut each segment in half horizontally, like little orange coins. This makes them super easy to thread and gives a nice, even surface. When it comes to mixing the colors, don’t be afraid to get creative! While the ROYGBIV order is classic, I sometimes swap things around. If I have some beautiful raspberries, I’ll use those instead of strawberries for an even deeper red. A few chunks of mango can add a beautiful bright yellow or orange. My kids actually love it when I add starfruit slices because they look like little stars and add such a unique shape. I’ve learned that overstuffing skewers is a common mistake. You want enough fruit to make it look impressive, but not so much that it’s difficult to eat or the skewer bends. Aim for about 4-6 pieces of fruit per skewer, depending on their size. For the glazing, I usually skip it entirely because the natural sweetness of the fruit is usually enough. However, if you want that extra touch, a very light drizzle of honey or maple syrup *after* assembling and *just before serving* is lovely. Don’t drench them, though, or the fruit will get slippery and the colors might run. If you’re making these for a party and want to do some prep ahead of time, you can wash and chop the firmer fruits (like pineapple, melon, kiwi) a few hours in advance and store them in airtight containers in the fridge. However, I recommend assembling the skewers closer to serving time, especially if you’re using softer fruits like berries, as they can get a bit mushy if they sit too long. And a little tip for presentation: if you’re using wooden skewers, sometimes I’ll tie a small colorful ribbon around the end of each skewer for an extra festive touch. It’s these little things that make them extra special!
Storing and Reheating Tips
Storing these beautiful fruit skewers is all about preserving their freshness and vibrant colors. If you happen to have any leftovers (which is rare in my house!), you can store them in the refrigerator. The best way to do this is to arrange them in a single layer on a baking sheet or in a shallow container, then cover it tightly with plastic wrap or a lid. This prevents them from drying out and keeps them from picking up any other odors from the fridge. They’ll typically stay good for about 1-2 days. Honestly, the texture is best when they’re fresh, so I always aim to make just what we’ll eat. If you do find some are looking a little sad after a day, you can always repurpose them! Chop them up and add them to a fruit salad, blend them into a smoothie, or even use them as a topping for yogurt or granola. Reheating isn’t really a concept here since they are meant to be served cold and refreshing. The goal is to keep them chilled and crisp. If you’re preparing them for an event the next day, I strongly advise washing and cutting all your fruits and storing them separately in airtight containers in the fridge. Then, assemble the skewers a couple of hours before your guests arrive and keep them chilled. This way, the fruit stays at its peak and won’t get waterlogged or bruised. For the glaze timing, if you decide to add one, definitely do it right before serving. Drizzling honey or syrup too early can make the fruit slippery and harder to handle, plus it can start to break down the fruit’s structure over time. So, for maximum freshness and visual appeal, think of these as best enjoyed the day they are made!
Frequently Asked Questions
Final Thoughts
So there you have it – my super simple, incredibly cheerful rainbow fruit skewers! I truly believe these are one of those recipes that brings pure joy, both in making them and in eating them. They’re a vibrant reminder of how beautiful and delicious nature can be, and they prove that you don’t need complex steps or fancy ingredients to create something truly special. Whether you’re hosting a big party, planning a picnic, or just looking for a healthy and fun snack for the family, these skewers deliver every single time. They are a total win for their incredible flavor, ease of preparation, and how much everyone, big or small, seems to adore them. I really hope you give these a try; they’re a staple in my kitchen and I think they’ll become one in yours too! Don’t hesitate to experiment with your favorite fruits or to get the kids involved – that’s half the fun! Let me know in the comments below how yours turned out, or if you have any fun variations you’ve tried. I’m always curious to hear about your kitchen adventures! Happy assembling!
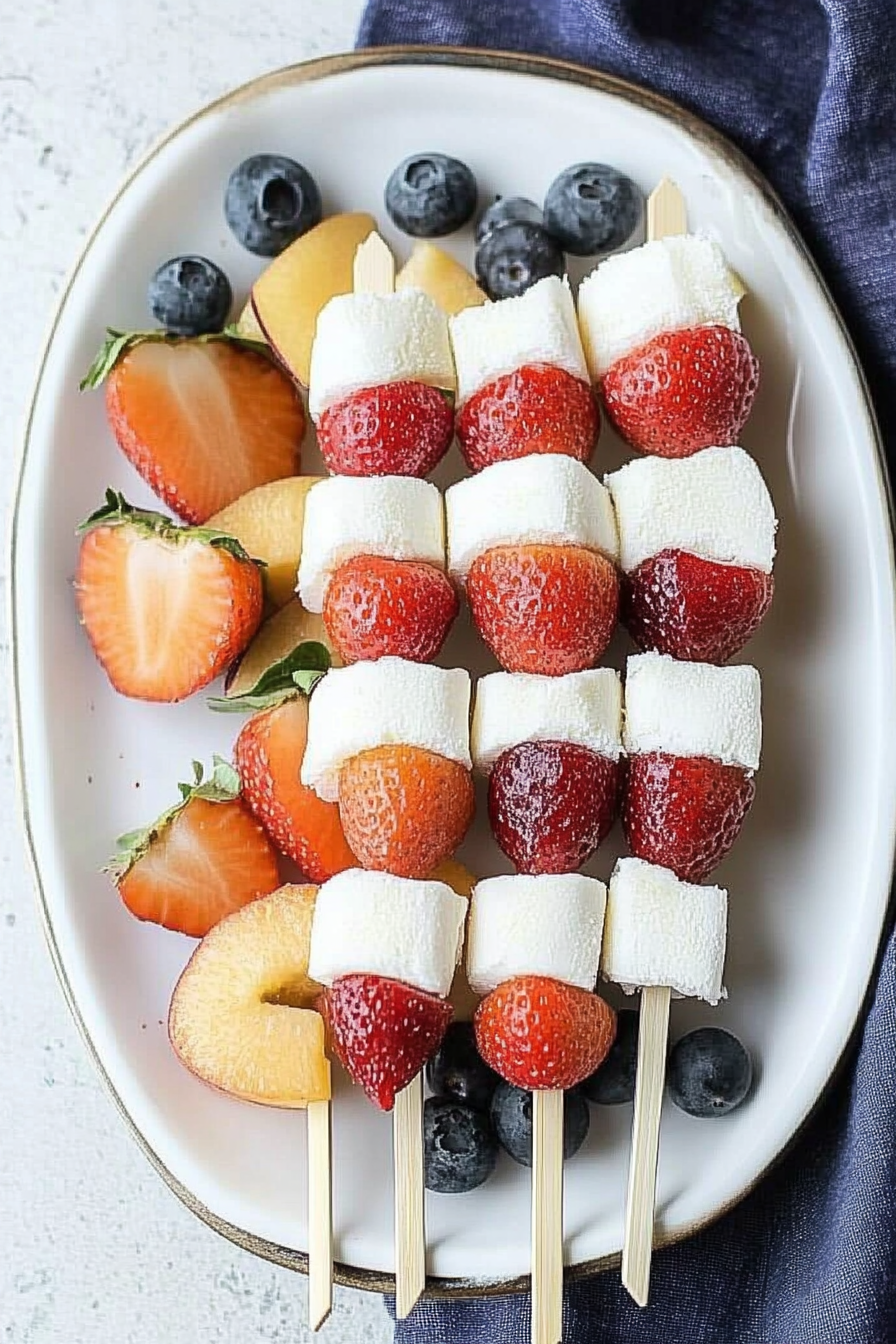
Red White and Blue Fruit Skewers with Cheesecake Yogurt Dip
Ingredients
Method
- In a medium bowl, combine the cream cheese with yogurt, vanilla, and sugar. Mix well until sugar dissolves; set aside.
- Thread 3 strawberries and 2 cubes of angel food cake onto each skewer, alternating between strawberries and cake.
- Finish each skewer with 3 blueberries.
- Place finished skewers on a platter and refrigerate until ready to eat.