Sweet Onion Red Pepper Delight Recipe
You know those moments when a craving hits, a real deep-down hunger for something comforting, something intensely flavorful, something that just feels like *home*? For me, that’s almost always a craving for deeply caramelized onions. Forget the quick sauté; I’m talking about onions so tender, so sweet, and so utterly delicious they practically melt in your mouth. I used to think making them this good was some kind of culinary magic, a secret passed down through generations. But then I figured out the real trick: patience. And a little bit of love, of course! This isn’t just about cooking onions; it’s about transforming them into pure gold. If you’ve ever tried to caramelize onions and ended up with sad, browned bits at the bottom of your pan, or onions that are just… well, still onions, then you’re in for a treat. This recipe is the one that changed everything for me, turning an often-intimidating process into a joy. It’s my absolute favorite way to coax out that incredible sweetness, and honestly, the aroma alone is worth it. It’s like a warm hug for your kitchen. So, grab your favorite pot, because we’re about to unlock the magic of the perfect caramelized onion.
What are caramelized onions?
So, what exactly are we talking about when we say “caramelized onions”? Think of them as the rockstars of the onion world. They’re not just regular onions that have spent a little time in a pan; they are onions that have been slowly, gently cooked down until all their natural sugars have broken down and transformed into something truly magical. It’s a process that takes time, often an hour or more, but oh, is it worth it! We’re talking about onions that go from sharp and pungent to incredibly soft, sweet, and rich. The color deepens from pale white to a beautiful, deep golden brown, almost mahogany. It’s like the onion’s personality really comes out when it’s cooked this way. It’s essentially a slow-cooked symphony of sweetness and savory depth. They aren’t just a topping; they’re a flavor bomb, a foundation for so many incredible dishes. They’re what makes a simple burger extraordinary, what elevates a grilled cheese to gourmet status, and what adds that je ne sais quoi to dips and sauces.
Why you’ll love this recipe?
Honestly, there are so many reasons I keep coming back to this method for caramelized onions, and I have a feeling you’ll fall in love with it too. First and foremost, the flavor is just out of this world. It’s that deep, complex sweetness that you just can’t get any other way. It’s savory, a little bit sweet, with a hint of umami that makes everything it touches taste better. If you’ve ever had French onion soup with those impossibly tender, sweet onions swimming in it, you know what I mean. That’s this! And the simplicity? It’s almost embarrassingly easy. Once you get the hang of the low-and-slow method, it’s mostly hands-off. You just need a good pot and a bit of patience. Seriously, I’ve made this on nights when I’ve been exhausted, just chopping onions and letting them do their thing while I put my feet up for a bit. It’s also surprisingly cost-effective! Onions are one of the cheapest ingredients out there, and transforming them into this incredible delicacy feels like a culinary superpower you can achieve without breaking the bank. What I love most, though, is the sheer versatility. I’ll make a big batch of these caramelized onions and then use them all week. They’re fantastic on steak, stirred into mashed potatoes, smeared on crostini, or even just eaten straight from the container (don’t judge!). Compared to other recipes that might call for adding sugar or other quick fixes, this method relies purely on the onion’s natural goodness, which I find so much more satisfying. It’s a little bit of kitchen alchemy that yields incredible results, every single time.
How do you make caramelized onions?
Quick Overview
This is all about coaxing out the natural sweetness of onions through slow, gentle cooking. We’ll start by thinly slicing a good amount of onions, then let them soften in a bit of fat over medium-low heat. The key is patience; we’re not rushing this. We’ll stir occasionally, allowing the onions to gradually deepen in color and flavor over an hour or more, until they are rich, jammy, and intensely sweet. It’s a process that requires minimal active cooking time but yields maximum flavor payoff. It’s surprisingly hands-off, making it perfect for busy days when you need something delicious to happen in the background.
Ingredients
For the Onions: What is the meaning of the word “for the onions”?
2 pounds yellow onions (about 3-4 large ones). Yellow onions are my absolute favorite here because their natural sweetness really shines. You can use sweet onions too, but yellow ones give that classic depth. I always try to get them fresh from the farmer’s market if I can; they just seem to have a better flavor. Don’t skimp on the quantity – they cook down a *lot*! I often double this recipe because they disappear so quickly in my house. A good rule of thumb is to use about 1 pound of onions per pound of meat if you’re serving them as a topping, or just a huge amount if you’re like me and love them on everything.
For Cooking:
2 tablespoons unsalted butter OR olive oil (or a mix of both!). Butter adds a lovely richness, but olive oil is great for a lighter touch. Sometimes, I’ll use a blend for the best of both worlds. The fat is crucial for helping the onions soften and preventing them from sticking to the pan. You want enough to coat the bottom of your pan nicely, but not so much that the onions are swimming in it.
For Enhancing Flavor (Optional but Recommended!):
1 teaspoon salt. This isn’t just for seasoning; salt actually helps draw out moisture from the onions, which speeds up the caramelization process and intensifies their flavor. I add it early on, and it makes a noticeable difference.
1/2 teaspoon sugar (optional, if your onions aren’t super sweet). I rarely need this if I’m using good quality onions and have the patience, but if you’re in a pinch or your onions are a bit bland, a tiny pinch of sugar can help kickstart the browning.
A splash of balsamic vinegar or a tablespoon of red wine (towards the end). This is my little secret weapon! It adds a beautiful tang and depth that complements the sweetness perfectly. Don’t add too much, just a little drizzle to deglaze the pan and add complexity.
Step-by-Step Instructions
Step 1: Prepare the Onions
First things first, let’s get these onions ready. You want to peel them and then slice them thinly. I like to aim for about 1/8-inch thickness. You can do this by hand with a sharp knife, or if you have a mandoline, that’s a great tool to get uniform slices. I find that slicing them from root to tip is usually easier and results in longer, more manageable strands. If they’re too thick, they won’t soften properly; if they’re too thin, they might burn too quickly. Uniformity is key for even cooking. Make sure you have a big pile of sliced onions because, as I said, they reduce dramatically!
Step 2: Heat the Pan and Fat
Now, grab a large, heavy-bottomed pot or skillet. I swear by my cast iron skillet for this; it distributes heat so evenly. Add your butter and/or olive oil to the pan. Place it over medium-low heat. You want to give the fat a minute to melt and warm up gently. You don’t want it to smoke or brown; just get it nice and warm. This slow start is crucial for building that deep flavor without scorching.
Step 3: Add the Onions and Salt
Carefully add all those sliced onions to the warm pan. They’ll look like a mountain, but don’t worry, they’ll shrink. Sprinkle the salt evenly over the onions. The salt will start to draw out moisture, and you’ll notice the pile begin to subside a bit. Give everything a good stir to coat the onions in the fat and salt. Make sure they’re spread out as much as possible in the pan.
Step 4: The Slow Cook Begins
Now for the most important part: the patience! Keep the heat on medium-low or even low. You want the onions to be gently sizzling, not aggressively frying. Stir them every 5-10 minutes. At first, they’ll just soften and become translucent. You’ll see them start to change color gradually. This is where the magic really begins. Resist the urge to crank up the heat! If you see any parts browning too quickly, just give them a stir and perhaps push them to a cooler part of the pan. The goal is a slow, even caramelization.
Step 5: Deepening the Color and Flavor
As the hours (yes, hours!) go by, you’ll see the onions turning from pale yellow to a lovely golden hue, then to a rich amber, and finally to that deep, beautiful mahogany brown. This can take anywhere from 45 minutes to 1.5 hours, depending on your stove, your pan, and how many onions you’re cooking. Keep stirring every so often. If you notice any bits sticking to the bottom of the pan, which is a good sign that flavor is developing, you can deglaze with a tiny splash of water or broth to scrape them up. This is also the point where you might add that optional sugar or a splash of balsamic vinegar or red wine. Let it bubble and reduce for a few minutes, stirring to incorporate.
Step 6: Finishing Touches
Once the onions have reached your desired color and sweetness, give them a final taste. Adjust seasoning with a pinch more salt if needed. They should be incredibly tender, almost jammy, and taste intensely sweet with a deep savory note. If they seem a little dry, you can add another tiny splash of liquid to loosen them up. Remove the pan from the heat.
Step 7: Cool Slightly
Let the caramelized onions cool in the pan for a few minutes. They’ll continue to thicken slightly as they cool. They are incredibly versatile, and you can use them immediately while warm, or let them cool completely for storage. The flavor will even deepen a bit as they sit.
Step 8: Serve or Store
Use them in any recipe you like, or simply enjoy them as a side dish. If you’re not using them right away, transfer them to an airtight container once they’ve cooled down. They are fantastic served warm or at room temperature.
Step 9: Enjoy the Bliss!
Take a moment to savor that incredible aroma and the deep, rich flavor. You’ve transformed humble onions into something truly spectacular. This is the kind of simple, yet profound, transformation that makes cooking so rewarding.
What to Serve It With
Okay, now that you’ve got this gorgeous, golden pot of caramelized onion goodness, the real fun begins: figuring out how to use it! Seriously, the possibilities are endless, and I love having a jar of these in the fridge for quick flavor boosts. For breakfast, a little dollop on top of scrambled eggs or an omelet is just divine. It adds a savory sweetness that’s totally unexpected and incredibly satisfying. Or, try it on top of a savory breakfast hash. For brunch, these are a game-changer. Imagine them piled high on mini quiches, stirred into a creamy frittata, or as the star on bruschetta with a sprinkle of goat cheese. They make even the simplest brunch feel a little bit fancy. As a dessert? I know it sounds wild, but hear me out! A thin layer on a tart with some sharp cheese, like Gruyère or aged cheddar, is absolutely phenomenal. The sweet and savory combination is just *chef’s kiss*. And for cozy snacks, this is where they truly shine for me. My family devours them on burgers, of course, but also on grilled cheese sandwiches – it’s a game-changer! A smear on top of homemade pizza before baking adds an amazing depth. They’re also incredible stirred into warm dips like spinach and artichoke or served alongside roasted meats. My kids actually ask for “onion jam” on their grilled cheese all the time. It’s a simple addition that takes a regular meal to something truly special and memorable.
Top Tips for Perfecting Your Caramelized Onions
I’ve made a lot of batches of caramelized onions in my day, and let me tell you, I’ve learned a few things along the way. The biggest lesson? Patience is your best friend. Don’t rush them! For the onions themselves, using yellow onions is my preferred method because they have a fantastic balance of sweetness and pungency that really caramelizes beautifully. If your onions are super watery, you might find they take a bit longer to soften down. Some people like to give them a quick pat with a paper towel after slicing, but I usually find the salt does enough to draw out moisture. When it comes to mixing, it’s really about vigilance, not constant stirring. You want to stir enough to prevent sticking and ensure even browning, but let them sit undisturbed for a few minutes at a time to let that caramelization really happen. If you see darker bits forming on the bottom of the pan – that’s flavor gold! Just scrape them up with a little liquid. For ingredient swaps, butter adds a wonderful richness, but if you’re going dairy-free or prefer olive oil, that works perfectly too. Sometimes, I’ll even use a neutral oil like avocado oil. The optional splash of balsamic vinegar or red wine at the end is a trick I picked up years ago, and it really adds a layer of complexity that elevates the sweetness. Don’t go overboard, though; you want it to enhance, not overpower. Baking tips? Well, this isn’t really a baking recipe, but if you were to add them *to* something baked, just remember they’ve already been fully cooked. The biggest tip I can give you for baking *with* caramelized onions is to ensure they’re not too wet, so they don’t make your baked good soggy. If they seem a bit moist after cooking, just let them cool uncovered for a bit. For glaze variations, if you’re using them as a topping for something sweet like a tart, you might add a touch more sugar or even a drizzle of honey in the last few minutes of cooking. But for savory uses, the balsamic or red wine is usually all the “glaze” you need.
Storing and Reheating Tips
This is where having a batch of caramelized onions really shines, because they store so well! Once they’ve cooled down completely, I like to transfer them to an airtight container. At room temperature, they’re usually good for about 2-3 days, but honestly, they rarely last that long in my house. Just keep them covered tightly to maintain freshness. For longer storage, the refrigerator is your best bet. In an airtight container in the fridge, they’ll stay delicious for about 1 to 2 weeks. The flavor might even get a little deeper and more complex over time! I always try to use up older batches first. If you’ve made a truly massive batch (which, let’s be honest, I sometimes do!), freezing is an excellent option. Let them cool completely, then transfer them to freezer-safe bags or containers. They’ll be good in the freezer for up to 3 months. When you’re ready to use them, you can thaw them overnight in the refrigerator or gently reheat them on the stovetop. For reheating, I usually just pop them back into a lightly oiled skillet over low heat, stirring occasionally until they’re warmed through and have that lovely jammy consistency again. You might need to add a tiny splash of water or broth if they seem a bit dry. And for glaze timing advice, if you’re planning to store them, I usually add the balsamic or wine towards the very end of cooking and let it reduce down completely. This way, the flavor is integrated and not too liquidy, which helps with storage.
Frequently Asked Questions
Final Thoughts
There you have it – my absolute favorite way to make caramelized onions. It’s a process that truly transforms humble ingredients into something extraordinary, and I honestly believe it’s one of the most rewarding techniques for any home cook. The depth of flavor you achieve, the incredible sweetness, the tender texture… it’s just magical. This recipe is a testament to the fact that sometimes, the best things in life really do take a little bit of time and patience. But the payoff is enormous! It’s that feeling of accomplishment when you taste something you’ve made from scratch, something that tastes so much better than anything you could buy. If you’ve enjoyed this, you might also love exploring other slow-cooked recipes or discovering more ways to add intense flavor to your meals. Give these caramelized onions a try, and I promise, you’ll be hooked. I can’t wait to hear how yours turn out and what delicious ways you find to use them. Happy cooking, my friends!
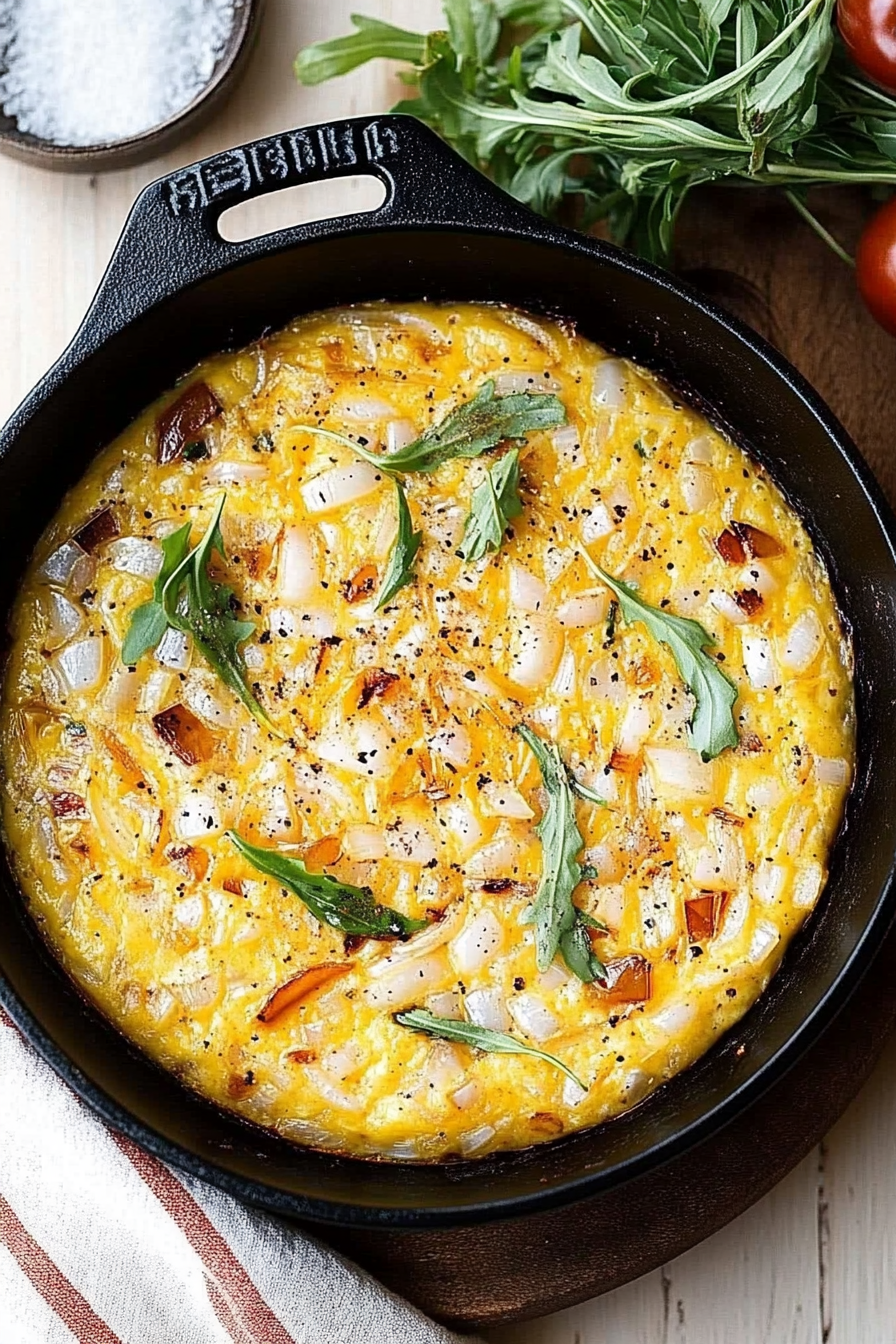
Caramelized Onion, Red Pepper, and Zucchini Frittata
Ingredients
Method
- Preheat oven to 400°F (200°C). Over medium-low heat, heat olive oil in a 10-inch oven-safe skillet. Stir in the sliced onion and cook until slightly browned, about 10 minutes. Add the diced red bell pepper and cook for 5 more minutes. Then, add the diced zucchini. Season with salt and pepper and cook for 3 more minutes, stirring occasionally.
- In a medium bowl, whisk together the eggs, grated Parmesan cheese, salt, and pepper.
- Pour the egg mixture into the skillet, ensuring the eggs cover all the vegetables. When the edges begin to set, about 2 minutes, carefully move the skillet to the preheated oven.
- Bake for 10-15 minutes, or until the frittata is completely cooked and set. The center should not be jiggly.
- Let it cool slightly, then serve warm, cut into 4 pieces.