Adorable Rabbit Cookies A Simple Treat
Oh, you guys. I’m so excited to finally share this recipe with you! If there’s one thing that brings a guaranteed smile to my face, and more importantly, to the faces of my littles, it’s these bunny cookies. They’re not just cookies, they’re little bundles of joy, perfect for Easter, spring birthdays, or honestly, just because you need a little bit of whimsical sweetness in your day. I remember making these with my grandma when I was no taller than the kitchen counter, the scent of vanilla and sugar filling her cozy home. Now, I get to pass that magic on, and let me tell you, the sheer delight when my kids see these little guys pop out of the oven is priceless. They’re kind of like a sugar cookie meets a shortbread, but with a shape that’s just… well, irresistibly cute! If you’ve ever loved a classic thumbprint cookie, imagine that delightful crumb but with a whole lot more personality.
What Are Bunny Cookies?
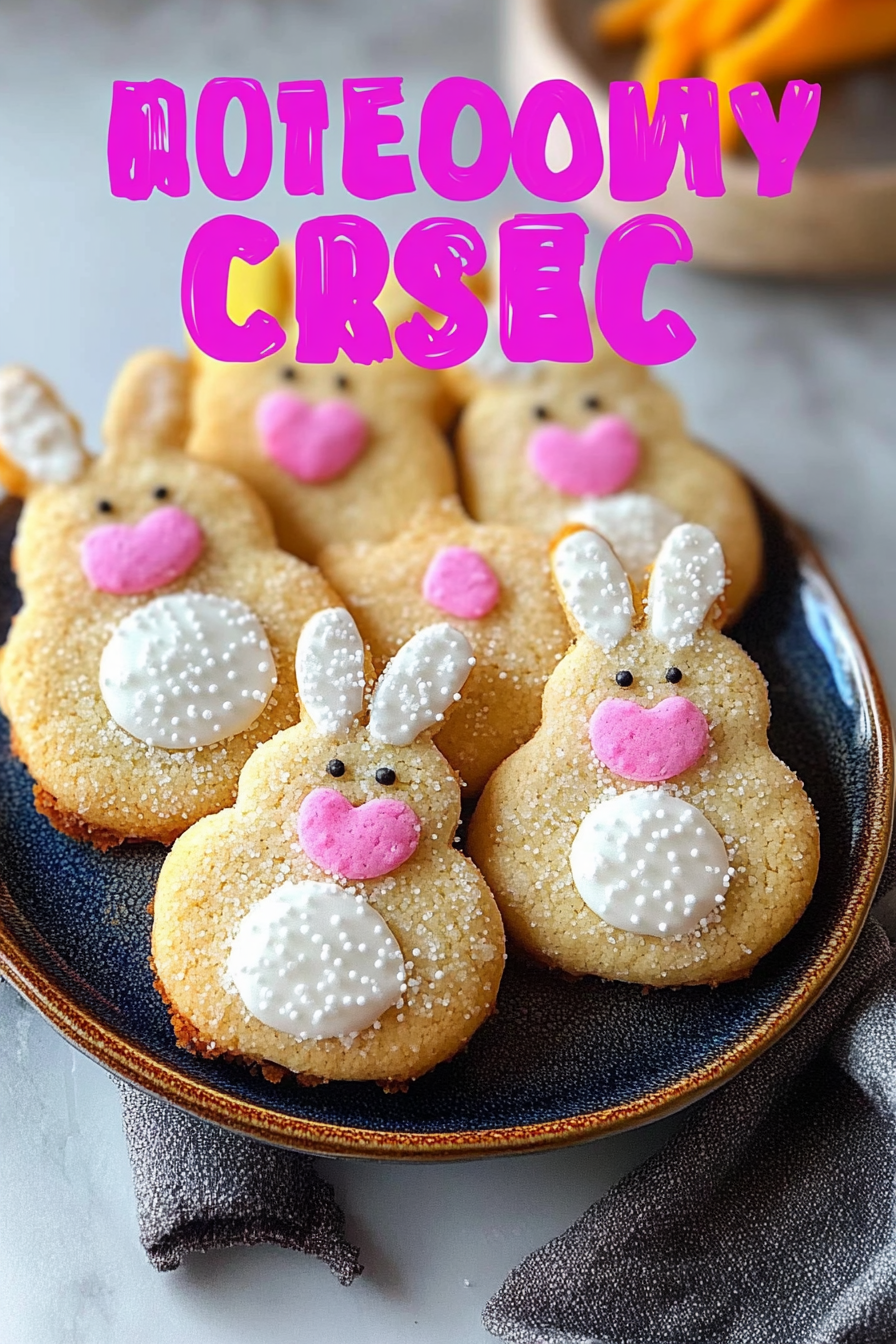
So, what exactly are these magical bunny cookies? Think of them as a delightful little treat that uses a simple, melt-in-your-mouth cookie dough shaped and decorated to resemble adorable bunnies. The ‘bunny’ part usually comes from the way they’re formed – often using a simple ball of dough, a little indent for the ‘face’, and two ‘ears’ made from smaller pieces, all baked to a lovely golden hue. They’re not overly complicated, which is what I adore about them, but the visual impact is HUGE. They’re essentially a celebration of simple baking with a fun, whimsical twist. They’re the kind of cookie that makes you feel like you’ve really *done* something special, even if you’ve just followed a few straightforward steps. It’s baking that brings a bit of story and imagination to the plate, and who doesn’t love that?
Why you’ll love this recipe?
Honestly, there are so many reasons why this bunny cookie recipe has become an absolute staple at my house. First and foremost, the FLAVOR. These cookies are tender, buttery, and have that perfect hint of sweetness that’s not overwhelming. They’re the kind of cookie that just melts in your mouth and leaves you wanting another. And don’t even get me started on the aroma while they’re baking – pure heaven! Then there’s the SIMPLICITY. I know sometimes baking can feel like a daunting task, but these cookies are surprisingly easy. Even if you’re a beginner baker, you can absolutely nail these. The dough comes together quickly, and the shaping is straightforward (and actually pretty fun to do with kids!). Plus, they’re incredibly COST-EFFECTIVE. You likely already have most of the ingredients in your pantry, and the ones you might need to pick up are usually budget-friendly staples. What I really love is their VERSATILITY. While they’re obviously amazing for Easter, they’re fantastic for spring parties, baby showers, or just as a sweet treat any time of year. You can even play around with the ‘decorations’ – a little sprinkle of edible glitter, some colored icing for the eyes, or even a tiny jelly bean nose. I’ve even found them to be a lovely alternative to a more elaborate cake when I’m craving something sweet but don’t have a lot of time. They’re just universally loved, and that’s a pretty special thing in my book.
How to Make Bunny Cookies
Quick Overview
This recipe is all about creating a wonderfully tender, buttery cookie dough that’s simple to shape into adorable bunny forms. You’ll mix up a quick dough, form the bunnies with minimal fuss, bake them until golden, and then, if you wish, add a simple glaze or decoration. It’s a straightforward process that results in a big visual and taste payoff, making it perfect for busy bakers who still want to impress. The key is a well-chilled dough and gentle handling, which ensures those cute bunny shapes hold up beautifully in the oven.
Ingredients
For the Main Cookie Dough:
2 1/4 cups all-purpose flour: I always use unbleached all-purpose flour. It gives a slightly better texture, in my opinion. Make sure to spoon and level it into your measuring cup, don’t scoop directly from the bag, or you’ll end up with too much flour and dry cookies!
1 cup (2 sticks) unsalted butter, softened: Make sure it’s truly softened, not melted! This is crucial for a creamy dough. I usually leave mine on the counter for about an hour before I start.
3/4 cup granulated sugar: For that perfect sweetness.
1 large egg: Room temperature is best.
1 teaspoon vanilla extract: Use good quality vanilla; it really makes a difference in the overall flavor.
1/2 teaspoon baking powder: Just a touch to give them a little lift without spreading too much.
1/4 teaspoon salt: Balances out the sweetness.
For the Simple Glaze (Optional):
1 cup powdered sugar: Sifted, if you want a super smooth glaze.
2-3 tablespoons milk (or water): Start with 2 tablespoons and add more until you reach your desired drizzling consistency.
1/2 teaspoon vanilla extract: For added flavor!
Step-by-Step Instructions
Step 1: Preheat & Prep Pan
First things first, let’s get your oven ready! Preheat it to 350°F (175°C). Then, line your baking sheets with parchment paper. This is a lifesaver for easy cleanup and ensures your beautiful bunny cookies don’t stick. You don’t need to grease the parchment paper; it’s usually not necessary for this type of cookie.
Step 2: Mix Dry Ingredients
In a medium bowl, whisk together the flour, baking powder, and salt. Just give it a good whisk until everything is well combined. This ensures the leavening agent and salt are evenly distributed, which is important for consistent cookies. Set this aside for now.
Step 3: Mix Wet Ingredients
In a large bowl, using an electric mixer (or a stand mixer with the paddle attachment), cream together the softened butter and granulated sugar until the mixture is light and fluffy. This usually takes about 2-3 minutes. Then, beat in the egg and vanilla extract until just combined. Don’t overmix here!
Step 4: Combine
Gradually add the dry ingredients to the wet ingredients, mixing on low speed until just combined. Be careful not to overmix! Overmixing can lead to tough cookies. You want to stop mixing as soon as you don’t see any more streaks of dry flour. The dough will be soft but should hold its shape.
Step 5: Chill the Dough
This is a crucial step for shaping! Turn the dough out onto a piece of plastic wrap, form it into a flat disc, wrap it tightly, and refrigerate for at least 30 minutes, or until it’s firm enough to handle. This makes it so much easier to shape without it getting sticky and messy.
Step 6: Shape the Bunnies
Once the dough is chilled, take about 1 tablespoon of dough for the body. Roll it into a ball, then gently shape it into an oval. For the ears, take a small piece of dough (about 1/2 teaspoon) and roll it into a little log. Gently press one end of the log onto the top of the oval body, curving it slightly to resemble a bunny ear. Repeat with another small piece for the second ear, positioning it next to the first. You can use the back of a wooden skewer or a toothpick to gently define the ears if you like. Place the shaped bunnies about 2 inches apart on your prepared baking sheets.
Step 7: Bake
Bake for 10-12 minutes, or until the edges are lightly golden. The centers should still look slightly soft. They will continue to cook a little on the hot baking sheet after you remove them from the oven. I always watch mine closely because ovens can vary!
Step 8: Cool
Let the cookies cool on the baking sheets for 5 minutes before carefully transferring them to a wire rack to cool completely. This is important; if you move them too soon, they might break.
Step 9: Glaze (Optional) and Serve
Once the cookies are completely cool, you can whip up the glaze. In a small bowl, whisk together the powdered sugar, 2 tablespoons of milk, and vanilla extract. Add more milk, a teaspoon at a time, until you reach a drizzling consistency. Drizzle the glaze over the cooled bunny cookies. Let the glaze set completely before enjoying or storing.
What to Serve It With
These bunny cookies are so wonderfully versatile, you can pair them with so many delightful things! For a lovely BREAKFAST treat, they’re just perfect alongside a warm mug of coffee or a glass of cold milk. They add a touch of fun to an ordinary morning. If you’re planning a BRUNCH spread, these little bunnies look absolutely charming arranged on a tiered stand or nestled amongst fresh fruit. They pair beautifully with a mimosa or a fresh fruit juice. As a light DESSERT, they’re a fantastic ending to a meal, especially when served with a scoop of vanilla ice cream or a small bowl of fresh berries. For COZY SNACKS, they’re unbeatable. I love having them with a cup of herbal tea while curled up with a good book. My family also loves them after school with a glass of chocolate milk – it’s their favorite pick-me-up! Honestly, their simple charm means they fit in anywhere, bringing a little bit of happy to any occasion.
Top Tips for Perfecting Your Bunny Cookies
I’ve learned a few things over the years of making these sweet little guys, and I want to share them so you can have the absolute best results! First, **dough chilling is your best friend**. Seriously, don’t skip this! Chilled dough is much easier to handle and holds its shape beautifully. If your kitchen is warm, you might even need to chill it again briefly between batches. For **shaping**, don’t aim for perfection; a little rustic charm is what makes them endearing. If the dough feels too sticky, just a little dusting of flour on your hands can help. When it comes to the **ears**, sometimes I find that gently pinching the tip of the log before attaching it makes it look more like a delicate ear. For the **glaze**, consistency is key. Too thick and it’s hard to drizzle; too thin and it will run everywhere. Start with less liquid and add more gradually until it flows nicely off the spoon. If you’re looking for **ingredient swaps**, I’ve experimented! For a dairy-free version, I’ve used plant-based butter sticks (like Miyoko’s or Earth Balance) and almond milk in the glaze, and they turned out wonderfully creamy. You can also try using brown sugar instead of white for a slightly deeper flavor profile, though it might make the cookies spread a tiny bit more. For **baking**, keep an eye on them. They go from perfectly golden to a little too brown very quickly! They should look pale with just the faintest golden edge. And if you want to get fancy with the **decorations**, try using a toothpick dipped in edible food coloring to add little eyes or a nose. Or, pipe on some royal icing for more intricate details. The possibilities are endless, and that’s part of the fun!
Storing and Reheating Tips
These bunny cookies are quite sturdy, which is lovely! For storing them at **room temperature**, I usually keep them in an airtight container, and they’ll stay fresh for about 3-4 days. Make sure they’re completely cooled before sealing them up, otherwise, you risk condensation forming, which can make them soggy. If you’ve glazed them, I’d give the glaze a good few hours to fully set before storing. For **refrigerator storage**, they’ll last a bit longer, around 5-7 days, but they can sometimes lose a bit of their tender texture in the fridge, so I tend to only refrigerate them if it’s very warm out or if they have a cream cheese-based frosting. Wrap them well in plastic wrap or place them in a sealed container. If you need to **freeze** these little cuties, they freeze beautifully! I like to wrap them individually in plastic wrap, then place them in a freezer-safe bag or container. They’ll keep well for about 2-3 months. To thaw, just unwrap them and let them come to room temperature on a wire rack. If they seem a little dry after thawing, you can always give them a light brush of simple syrup or a very thin glaze to refresh them. For **glaze timing**, if you plan to store them for more than a day or two, I often prefer to frost them *after* they’ve been thawed from the freezer, or right before serving if they’ve been at room temperature, just to ensure the glaze stays looking its best.
Frequently Asked Questions
Final Thoughts
So there you have it – my beloved bunny cookies! They’re more than just a sweet treat; they’re a little piece of handmade joy that I genuinely hope you’ll love as much as my family and I do. The simple ingredients, the easy steps, and the unbelievably adorable outcome make them a winner in my kitchen every single time. They have this wonderful way of bringing a little bit of magic to any occasion, whether it’s a special holiday or just a Tuesday afternoon that needs a pick-me-up. If you’re a fan of buttery, tender cookies that are as fun to make as they are to eat, you simply have to give these a try. I’m already dreaming of the next time I’ll whip up a batch! Don’t forget to let me know in the comments below how yours turn out – I’d absolutely love to hear about your decorating ideas and any little twists you add! Happy baking, everyone!

Easy Bunny Cookies
Ingredients
Method
- When making your sugar cookies, cut out bunny shapes. Bake as directed.
- Once cool, tint your frosting the color of your sanding sugars.
- Place sugar on a shallow plate (use different plates for different colors).
- Frost bunnies all over with frosting. Dip frosting side down in sugar and press to coat.
- Place white frosting in a piping bag fitted with a small star tip. Pipe a tail on the bottom of the cookie.
- Use sprinkles to make eyes and noses.
- Store in an airtight container for up to 3 days.