Cozy Slow Cooker Peppermint Chocolate
There’s nothing quite like a warm mug of something comforting when the cold hits outside. I remember cuddling up on the couch as a kid, my grandma’s kitchen filled with a fragrant swirl of cocoa and peppermint, her hands guiding me through making the most irresistible peppermint hot chocolate. That smell—rich chocolate, fresh mint, a hint of vanilla—still transports me every single time. Over the years, I’ve perfected my own version of this classic, and I swear it’s become our winter staple. It’s surprisingly simple to make, yet feels fancy enough to serve to friends. Plus, the peppermint gives it this refreshing zing that cuts through the richness of the chocolate. Honestly, once you try it, your regular hot chocolate will never be the same. Trust me on this one — it’s magic in a mug, perfect for cozy nights, snowy mornings, or whenever you need a little festive cheer. And yes, my kids ask for this all the time—especially around Christmas—they can’t get enough! So, let’s get into it — I promise, you’ll want to make this recipe all season long.
What is Peppermint Hot Chocolate?
Think of peppermint hot chocolate as a warm, velvety hug with a lively peppermint twist. It’s essentially a rich, creamy hot chocolate infused with a dash of peppermint extract or crushed peppermint candies. The idea is simple: classic hot chocolate gets a refreshing upgrade. The name pretty much says it all—peppermint lends a cool brightness to the sweet, indulgent cocoa, creating a perfect balance of flavors. This drink has become a favorite during the chilly winter months because it hits all the right notes: cozy, invigorating, and just a little bit luxurious. It’s the hot chocolate you’d sip after skating on a frozen lake or sitting by the fireplace while snowflakes dance outside. It’s friendly enough for kids but sophisticated enough for adults to enjoy an extra splash of peppermint schnapps if you’re feeling festive. Think of it as a childhood treat with a grown-up twist—something that’s incredibly easy to whip up but feels special enough for the holidays or any cold, dark night.
Why you’ll love this recipe?
What I love most about this peppermint hot chocolate is how instantly comforting it is—like a little bit of magic in every sip. The flavor combo of deep, bittersweet chocolate with a cool, minty kick is honestly addictive. It’s a treat that instantly lifts my mood, especially during those hectic holiday mornings or when I need a moment of calm. Plus, it’s so easy that I can whip it up in minutes—no fancy equipment needed, just a good pot and some pantry staples. Budget-wise, it’s a winner because you probably already have most ingredients—you don’t need fancy syrups or mixes. I’ve tested this with everything from whole milk to almond milk, and honestly, it comes out divine every time. If you want to shake things up, you can add a splash of peppermint schnapps for an adult twist or top it with whipped cream and crushed peppermint for extra flair. What makes this recipe stand out is how customizable it is—whether you’re craving something super rich or a lighter, more refreshing version, it’s got you covered. Plus, it’s a sure crowd-pleaser—my kids ask for this all winter, and friends always leave with a container of leftovers. It’s more than a drink; it’s a little ritual that creates cozy moments and happy memories.
How do you make Peppermint Hot Chocolate?
Quick Overview
This peppermint hot chocolate is a simple, three-step process—combine rich cocoa with warm milk, add peppermint flavor, and sweeten to taste. I love how fast it comes together, making it perfect for those nights when you want something warm but don’t want to fuss too much. The secret is simmering the chocolate gently so it melts smoothly into the milk, then adding peppermint at just the right moment so its freshness stays vibrant. Topping with whipped cream and crushed peppermint is optional but honestly elevates it to something show-stopping. The best part? No complicated techniques or special equipment needed—just your favorite mug and a spoon. Once you get the hang of it, you’ll be making this all season long, whether it’s alone with a good book or served for a crowd on a snowy evening.
Ingredients
What is hot chocolate?
- 2 cups whole milk (or almond milk for a dairy-free version)
- 1/2 cup good quality cocoa powder (Dutch-processed gives a richer flavor)
- 1/4 cup sugar (or honey/maple syrup for a natural sweetness)
- 1 teaspoon vanilla extract
For the Peppermint Flavor:
- 1/2 teaspoon peppermint extract (start small—you can always add more!)
- Crushed peppermint candies or candy canes for garnish (optional but so pretty!)
For the Topping:
- Whipped cream (homemade or store-bought)
- Additional crushed peppermint or chocolate shavings (for extra flair)
Step-by-Step Instructions
Step 1: Preheat & Prep Your Mug
Warm up your favorite mug by rinsing it with hot water—this helps keep the drink warm longer. Set everything within reach — your ingredients, a whisk, and a nice spoon for stirring. I like to use a small saucepan over medium heat because it heats evenly, but a microwave can work in a pinch. Just ensure you’re stirring continuously so the cocoa doesn’t burn or stick.
Step 2: Mix Dry Ingredients
In your saucepan, whisk together the cocoa powder and sugar until they’re combined. This step prevents clumps and ensures a smooth, velvety drink. When you add the milk, it’ll integrate much more easily. I’ve learned the hard way that skipping this step can leave you with lumps—trust me, it’s worth taking that extra minute.
Step 3: Mix Wet Ingredients
Slowly pour in the milk while whisking vigorously. Keep the heat on medium-low—moral of the story: don’t let it boil! You want the mixture to be steaming and warm, not boiling. Once it’s hot, stir in the vanilla extract. This is the flavor anchor that makes all the difference; don’t skip it. Now, carefully taste and decide if you want a little more peppermint—start small and add gradually to avoid overpowering.
Step 4: Combine
Keep whisking gently until everything is smooth and hot. If you see tiny bubbles forming, you’re there. Just be sure not to let it boil over—that’s why low and slow wins the race here. Your kitchen should smell like rich cocoa with a hint of mint—amazing!
Step 5: Prepare Filling
If you want a thicker, more indulgent treat, whisk in a few semi-sweet chocolate chips at the end so they melt into the hot milk. This makes it extra creamy. For a dairy-free version, skip the chips but consider adding a dash of coconut cream for extra richness. Adjust the sweetener if you like it sweeter—sometimes I add a touch more sugar or honey if I want it especially decadent.
Step 6: Layer & Swirl
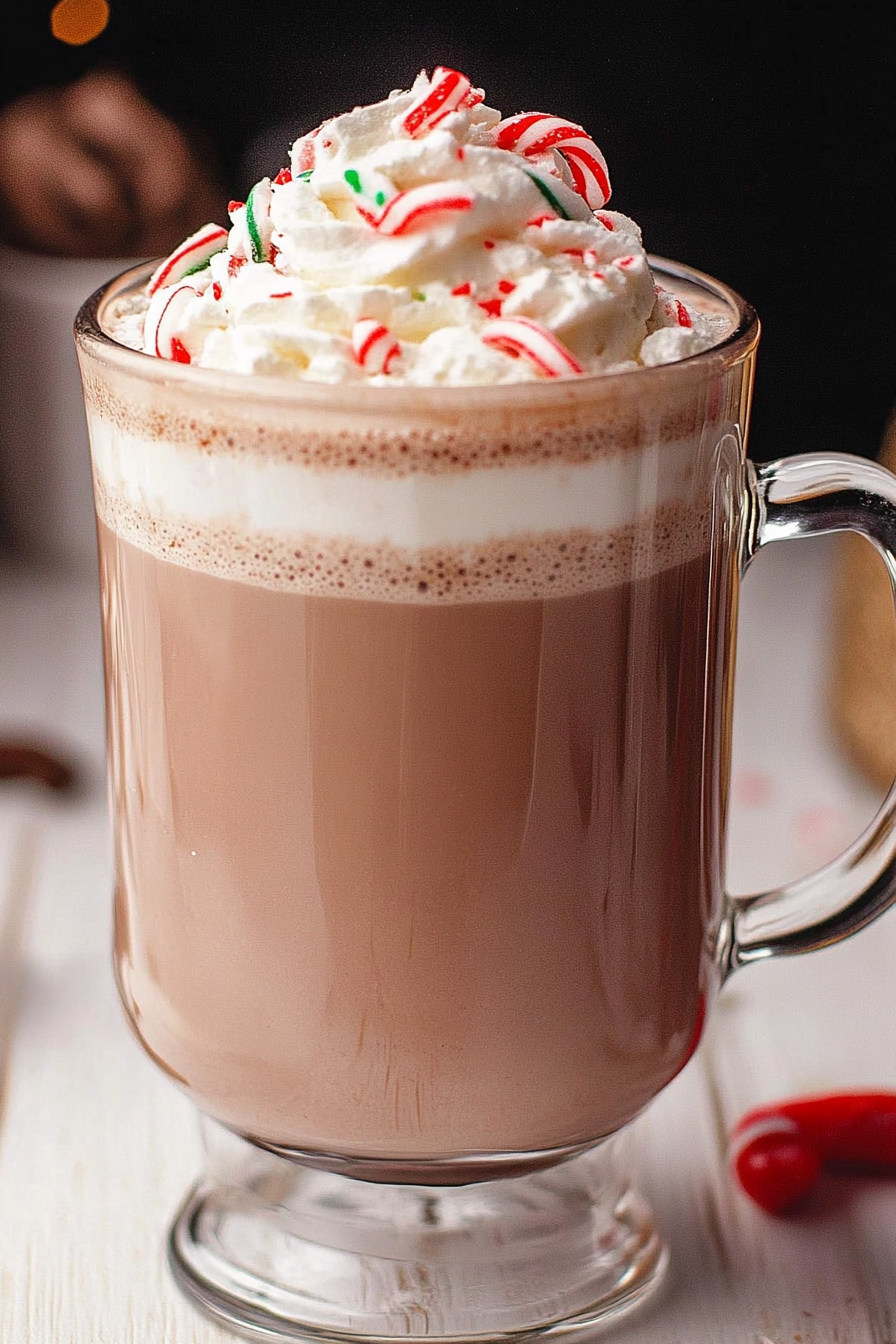
Pour your hot chocolate into a cozy mug. If you’re feeling fancy, add a dollop of whipped cream and sprinkle crushed peppermint candies on top. For a swirl effect, spoon a little whipped cream on top and use a toothpick to draw swirling patterns—so pretty and fun! The peppermint candies give a nice crunch and a burst of flavor in every sip.
Step 7: Bake (Optional for Garnish)
This isn’t baking, but if you want a toasted marshmallow or a crispy topping, you can briefly broil your whipped cream or marshmallows — just keep a close eye so nothing burns. It’s a fun trick that makes your drink look irresistible.
Step 8: Cool & Glaze (Optional)
This step is for those who like to add a fancy finish: drizzle some melted chocolate or a sprinkle of peppermint powder over the whipped cream after it’s set. It’s pretty and tastes divine! But honestly, the best flavor comes from enjoying it hot, right away.
Step 9: Slice & Serve
Sip slowly, savor every warm, minty sip. You can add a little extra peppermint or chocolate shavings for presentation. Or serve with cookies for an extra special treat. This hot chocolate is best enjoyed right off the stove, but leftovers—if you have any—store in an airtight container in the fridge and reheat gently. It’s equally comforting as a warm sip the next day, just a touch less frothy.
What to Serve It With
This peppermint hot chocolate practically demands a cozy vibe—think blanket, fuzzy slippers, and maybe a Christmas movie on. For breakfast or brunch, serve it alongside morning pastries or cinnamon rolls. I love pairing it with a tall glass of cold milk or even a splash of Bailey’s or peppermint schnapps for the grown-ups. When it’s time for dessert, a slice of peppermint bark cake or crisp cookies complement the cool mint flavor perfectly. For a casual snack, serve it in little cups during a holiday bake-off or a fireside chat. It’s downright addictive, and I’ve lost count of how many times I’ve seen my kids dip cookies into the mug for a peppermint-soaked treat. Sharing this with friends feels like a warm hug, especially when everyone’s gathered around the table with mugs steaming away. If you’re feeling extra festive, add candy canes or sprinkles, and your presentation will look just as dreamy as the flavor.
Top Tips for Perfecting Your Peppermint Hot Chocolate
After making this dozens of times, I’ve picked up a few little secrets that elevate the experience:
- Use good quality cocoa powder: This truly makes a difference; I always go for Dutch-processed cocoa for that smooth, rich flavor.
- Control the heat: Gentle simmering prevents the milk from scorching or bubbling over. Low and slow is the way to go!
- Peppermint extraction: Start with less and build up — peppermint is potent and it’s easy to overdo. Trust your nose; it’ll tell you when it’s right.
- Adjust sweetness: I often taste test, especially when I use unsweetened cocoa or almond milk. Sometimes I add a little more sugar or honey to balance things out.
- Extra flavor tweaks: Want a bit of vanilla or a splash of peppermint schnapps? Go ahead! Just remember, a little goes a long way.
- Presentation matters: A swirl of whipped cream and colorful peppermint candies turn this soothing drink into a holiday showstopper. Use clear mugs for a pretty presentation, and don’t forget a festive napkin!
My biggest lesson? Don’t rush the melting of the chocolate or the infusion of peppermint. Those small, patient steps make all the difference in achieving a velvety, flavorful hot chocolate. And honestly, I’ve learned to experiment a little—sometimes I add a pinch of cinnamon or a splash of peppermint extract at different stages, and it’s always a fun surprise. Just go with what makes your heart smile; you’ll end up with a mug of pure comfort every time.
Storing and Reheating Tips
If you happen to make extra (which I highly recommend—you’ll want seconds), here’s how to keep it fresh:
- Room temperature: Best enjoyed fresh, but if you need to keep it for a short while, cover with a lid or plastic wrap and keep it warm on a low burner—just don’t let it boil or burn.
- Refrigerator: Store leftovers in an airtight container for up to 24 hours. Reheat gently on the stove over low heat, stirring constantly so the cocoa stays smooth. You might need to add a splash more milk to loosen it up.
- Freezing: Not ideal, but you can freeze leftovers in a freezer-safe container for up to a month. Thaw in the fridge overnight, then gently rewarm. Just don’t expect it to be quite as luscious as fresh.
- Adding glaze or toppings: Wait to add whipped cream or candies until right before serving. Reheating with toppings on can make them melt or lose their texture.
Bottom line: best enjoyed fresh and hot, but a quick reheat can bring those cozy feelings back quickly.
Frequently Asked Questions
Final Thoughts
Honestly, once you try making your own peppermint hot chocolate, it’s hard to go back to store-bought mixes. There’s something so satisfying about crafting it yourself—the rich aroma, the perfect balance of sweetness and mint, and that warm, cozy feeling it creates. It’s more than just a drink; it’s a way to slow down and enjoy a little moment of joy. I love experimenting with different toppings, from whipped cream to crushed candies or even a splash of peppermint schnapps for the grown-ups. Plus, it’s universally loved—kids, parents, friends—everyone requests this during winter. So, grab your favorite mug, gather some ingredients, and get ready to indulge. And if you’ve tried it, I’d love to hear about your twists or how it turned out for you! Share your stories in the comments—happy baking and even happier sipping. Stay warm, and keep that peppermint cheer going all season long!
Peppermint Hot Chocolate
Ingredients
Method
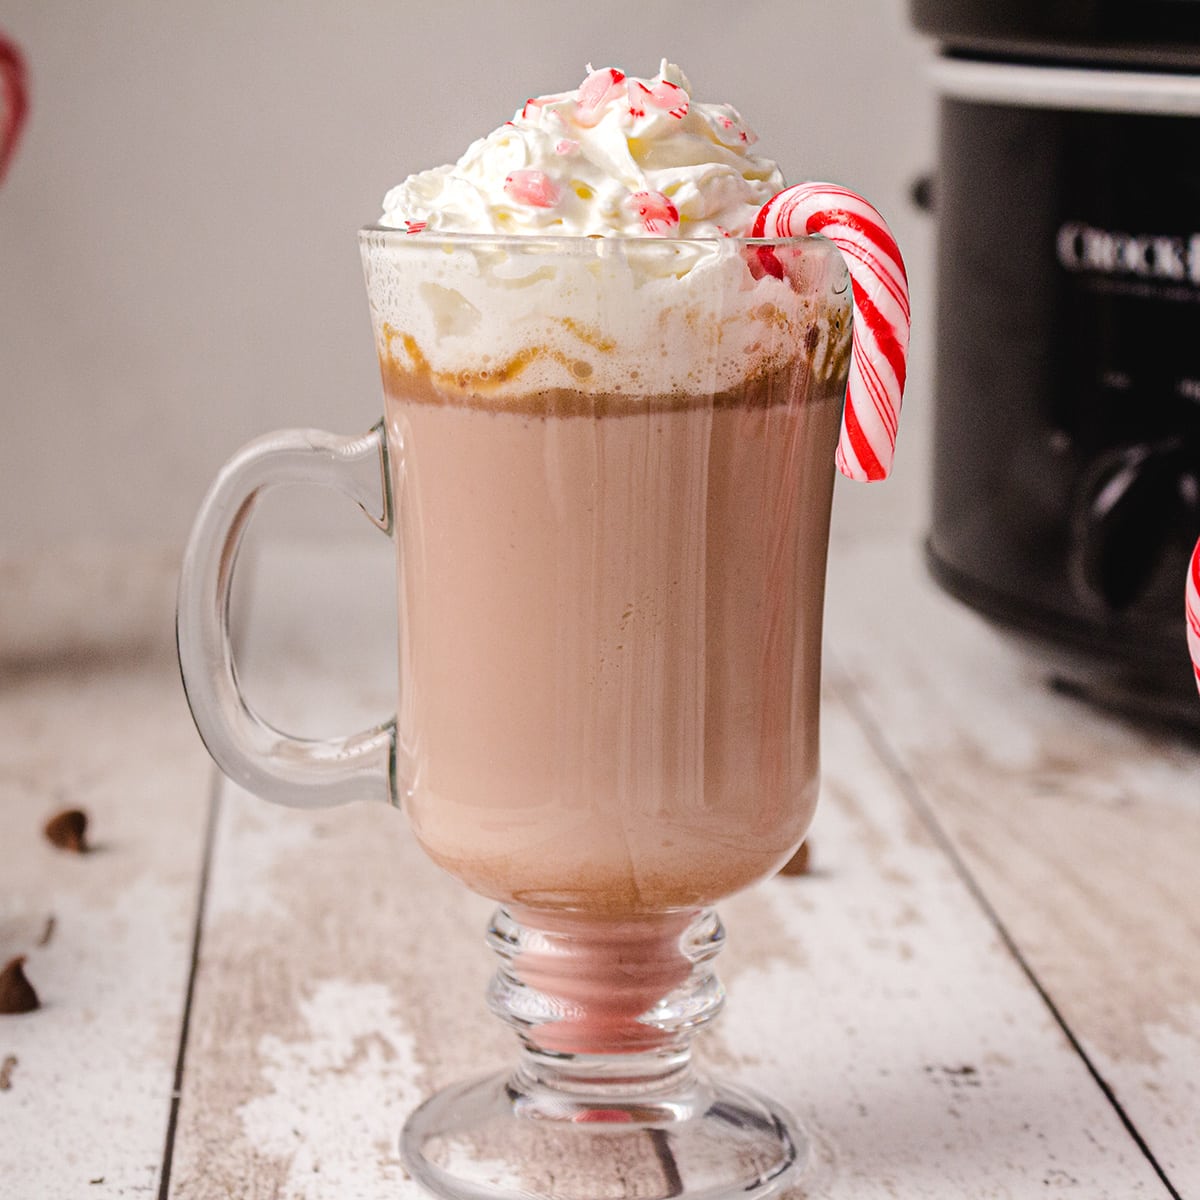
- Place chocolate chips, crushed candy canes, vanilla extract, and milk in a slow cooker.
- Heat on high for 45 minutes or low for 90 minutes, stirring occasionally.
- Whisk well and use a ladle to pour into mugs.
- Serve garnished with whipped cream and additional candy canes.