Dreamy Chocolate Marshmallow Delight
Honestly, I can’t remember the first time I made a chocolate marshmallow pie, but I do know it became a cozy weekend ritual for my family. There’s just something about that combination—rich chocolate, fluffy marshmallows, creamy filling—that feels like a warm hug on a busy Tuesday or a special treat to share with friends. My kids ask for this all the time, and I swear, it disappears in minutes at our house. The smell alone, when the pie is baking, makes everyone drop what they’re doing and flock to the kitchen. It’s not fancy or complicated—just pure, homemade goodness that somehow tastes like a little slice of childhood comfort. If you’re craving something sweet but don’t want to fuss with complicated desserts, trust me on this one. It’s a lifesaver on busy nights or when you just need a little indulgence that brings all the feels—and trust me, it’s even better when you share it!
What is chocolate marshmallow pie?
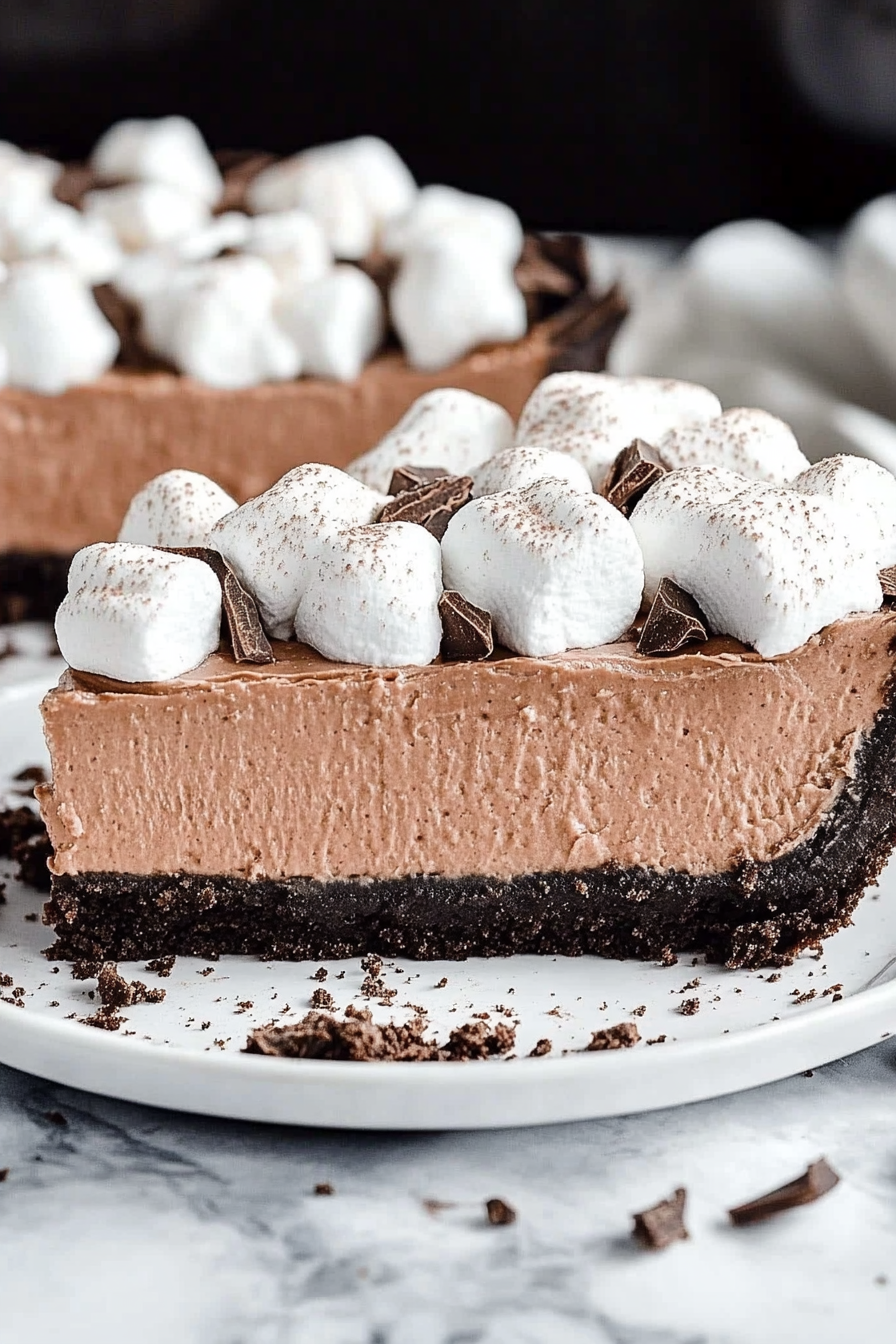
Think of this as a luscious, crowd-pleasing dessert that’s kind of like a magic trick—layers of creamy chocolate filling topped with a gooey, toasted marshmallow crown. The name itself says it all: chocolate marshmallow pie. It’s essentially a no-fuss pie that combines the richness of chocolate with the fun, nostalgic twist of toasted marshmallows. It’s like a s’mores-inspired treat in pie form—without the campfire. The best part? You don’t need fancy baking skills to pull this off. It’s a blend of simple steps, familiar ingredients, and a little love. I always do this when I want a dessert that’s impressive but honestly takes less time than ordering takeout. Plus, it’s the kind of recipe that gets better with age—the marshmallows get beautifully caramelized, and the chocolate filling firms up just enough to slice perfectly. Think of it as a crowd-pleaser, a comfort food, and an instant family favorite all rolled into one.
Why you’ll love this recipe?
What I love most about this is how it hits all the right notes—rich, sweet, slightly gooey, and oh-so-satisfying. The flavor of the chocolate combined with toasted marshmallows is honestly addictive; I swear, one slice is never enough. And don’t be fooled by its simple appearance—this pie brings a party to your taste buds. The process is straightforward enough that even if you’re a beginner, you’ll feel like a baking hero. It’s also budget-friendly since the ingredients are common pantry staples—you don’t need any fancy chocolates or special techniques. What’s more, it’s endlessly versatile. Want to make it a little different? Swap dark chocolate for milk chocolate, add some crushed peanuts for crunch, or drizzle caramel on top. I’ve made this countless times, and every single time, it gets rave reviews. Honestly, it’s one of those recipes that never fails to delight, whether I’m making it for a casual weeknight or a special occasion. My kids ask for this all the time, and honestly, I don’t mind whipping it up on a whim—it’s that good.
How do I make chocolate marshmallow pie?
Quick Overview
This pie is surprisingly easy to assemble. First, you bake a simple graham cracker crust (or any crust you prefer). Then, you prepare a luscious chocolate filling that’s poured into the cooled crust. Next, you top it with a mountain of marshmallows—my secret is to spread them evenly and toast them just right under the broiler until they’re golden and slightly caramelized. After that, you let it set in the fridge for a few hours, so all those flavors meld beautifully. The process might look fancy, but honestly, it’s just a collection of simple steps that come together practically on their own. It’s perfect when you want something show-stopping but don’t want to spend hours in the kitchen. I love that it’s both a quick dessert and one that feels indulgent—something that always makes everyone smile.
Ingredients
For the Main Batter:
– 1 ½ cups graham cracker crumbs (or digestive biscuits if you prefer a different crust)
– ¼ cup granulated sugar
– ½ cup unsalted butter, melted
– Pinch of salt
For the Filling:
– 1 cup heavy cream
– 1 ½ cups semi-sweet chocolate chips or chopped chocolate (oyo, that’s a little more decadent!)
– ¼ cup powdered sugar (optional, for extra sweetness)
– 1 teaspoon vanilla extract
For the Topping:
– About 2 cups mini marshmallows or regular marshmallows cut into smaller pieces
– A handful of extra mini marshmallows for garnish if desired
– Optional: toasted crushed nuts or sprinkles for added texture
For the Glaze (optional):
– Melted chocolate or caramel sauce, or even a drizzle of dulce de leche if you’re feeling fancy
Step-by-Step Instructions
Step 1: Preheat & Prep Pan
Set your oven to 350°F (175°C). Lightly butter or spray a 9-inch pie dish. Mix graham cracker crumbs, sugar, salt, and melted butter until the mixture resembles wet sand. Press it evenly into the bottom and slightly up the sides of your pie dish. Bake for about 8-10 minutes until fragrant and firm. Remove from oven and let cool completely—it’s the sturdy, delicious base for your pie.
Step 2: Mix Dry Ingredients
In a small bowl, combine the graham cracker crumbs, sugar, and salt. These dry ingredients lock in flavor and give your crust a wonderful texture. Make sure to press the mixture tightly into the dish—use the bottom of a glass if needed—to create an even crust.
Step 3: Mix Wet Ingredients
Warm the heavy cream in a small saucepan or microwave until just simmering. Pour it over the chocolate chips and let sit for a minute, then stir gently until silky smooth. Add the vanilla and powdered sugar if using, and mix again until fully combined.
Step 4: Combine
Pour the rich chocolate filling into the cooled crust. Smooth the top with a spatula or the back of a spoon. It’s okay if it’s slightly glossy—that means it’s luscious and inviting. Pop it in the fridge for at least 2 hours or until set, but honestly, overnight is even better for full flavor development.
Step 5: Prepare Filling
While the pie is chilling, prep your marshmallows. Use mini marshmallows for easy coverage, or cut regular marshmallows into smaller pieces if that’s what you have. Setting aside a handful for garnish is a good idea—they look adorable toasted on top later!
Step 6: Layer & Swirl
Once the chocolate filling is firm, evenly sprinkle the marshmallows on top. For an extra fun touch, you can create swirling patterns or arrange them in concentric circles. This is where your artistic side can shine—you can even add rainbow sprinkles or tiny chocolate chips for extra flair.
Step 7: Bake
Preheat your broiler or toaster oven. Toast the marshmallows for 1-3 minutes, watching closely so they don’t burn—trust me, burnt marshmallows are not the goal here. Look for a golden, slightly caramelized topping. Remove from oven promptly, and let cool for a few minutes so the marshmallow topping stabilizes.
Step 8: Cool & Glaze
If using a glaze, now’s the time to drizzle melted chocolate or caramel over the marshmallows. It adds that shiny, irresistible finish and a little extra flavor. Let everything chill in the fridge for another 15-20 minutes if you want neat slices.
Step 9: Slice & Serve
Use a sharp knife dipped in hot water for clean slices. Serve chilled, maybe with a dollop of whipped cream or a sprinkle of sea salt for a sophisticated twist. Honestly, this pie looks pretty enough to impress, but it tastes even better—like a nostalgic hug rolled into a dessert.
What to Serve It With
This pie is such a chameleon—serve it as a sweet finish after a hearty meal, or break it out at a weekend brunch to add a little fun. For breakfast (don’t judge!), I’ve been known to pair a small slice with strong coffee and a drizzle of caramel on top. It’s decadent enough to feel like a special treat. During family gatherings, I set it out alongside fresh berries and whipped cream, and everyone dives in with big smiles. My kids love to help toast the marshmallows—turning it into an interactive dessert that makes everyone feel involved. For a more casual vibe, I like to cut small squares and serve them with hot cocoa or ice cream. Honestly, it’s one of those desserts that’s just as delicious on its own as it is with other treats—think of it as a little piece of happiness you can enjoy any time.
Top Tips for Perfecting Your Chocolate Marshmallow Pie
Over the years, I’ve picked up a few tricks that make this dessert even better. First, when preparing the crust, I always pulse the graham crackers in a food processor if I want a finer, more uniform texture. If you notice your crust isn’t holding together well, add a touch more melted butter or even a tiny bit of honey—it helps everything stick. For the marshmallow topping, I tested multiple toasting times; trust me, watching them until just golden is key to that perfect caramel flavor—burned marshmallows ruin the look and taste. If you want a more gooey marshmallow top, skip toasting altogether or toast for just a minute to enhance the texture without risking burning. For ingredient swaps, I’ve tried coconut cream in the filling, which made it a little creamier and changed the flavor in a good way—though make sure to chill the coconut cream well so it whips nicely. When it comes to baking, I always position my pie on the middle rack for even heat. To get a flawless cut, I run my knife under hot water and wipe after each slice. As for the glaze, a drizzle of caramel or even a sprinkle of flaky sea salt can elevate the whole experience, balancing out the sweetness with a little savory punch.
Honestly, I’ve made this so many times that I’ve learned to adapt it based on what I have in the pantry or how much time I have. The biggest lesson? Be gentle when folding in the ingredients, take care to toast the marshmallows at just the right moment, and don’t rush the cooling stage. That’s when all the magic really happens. Every time I try a new twist—like adding a splash of coffee liqueur or stirring in some crushed cookies—it turns out surprisingly delicious. The key is to keep it fun and relaxed, and remember that imperfections only add character.
Storing and Reheating Tips
This pie holds up pretty well, but a little care helps keep it at its best. If you have leftovers, cover the pie loosely with foil or plastic wrap and store it in the fridge. It’s best eaten within 2-3 days, as the marshmallows can get a bit soft or sticky if left out too long. You can also freeze slices—wrap them tightly in plastic, then foil, and they’ll stay fresh for up to a month. To serve again, just thaw in the fridge for a couple of hours; sometimes I pop a slice in the microwave for 10 seconds to get that comforting warmth—and the marshmallows gooey again. If you’re worried about the glaze, wait to add it until just before serving—reheating can melt or soften it in a less-than-appealing way. I’ve found that the flavor stays amazing even after sitting in the fridge, especially if you let it come back to room temperature for about 10 minutes before slicing. It’s honestly just as good as fresh, and sometimes I even like it better—more time for the flavors to mingle.
Frequently Asked Questions
Final Thoughts
Honestly, if you’re looking for a dessert that’s easy, crowd-pleasing, and packed with nostalgic flavor, this chocolate marshmallow pie is where it’s at. It’s one of those recipes that makes people smile—not just because it looks good, but because the taste transports everyone back to childhood summers around the campfire, or cozy nights in front of a movie. Over the years, I’ve tinkered with it—adding a splash of coffee flavor here, swapping in vegan marshmallows there, or sprinkling sea salt on top for contrast—and it always turns out spectacular. The beauty of this pie is it’s forgiving and flexible. Plus, once you master the basic steps, you can personalize it endlessly. So next time you’re craving something sweet, give this a try. Serve it at your next gathering, and I bet it’ll become a new family favorite. Happy baking, and I can’t wait to hear how yours turns out! Feel free to leave comments or tag me in your photos—I love seeing how you make it your own.
Creamy Marshmallow Chocolate Pie
Ingredients
Method
- Finely crush the chocolate sandwich cookies in a food processor or blender. Mix in the melted butter until evenly combined. Press the mixture into the bottoms and up the sides of a deep dish pie plate (9.5"x 2") or a Springform pan evenly and firmly. Chill the crust for at least 30 minutes.
- Meanwhile, over a double boiler melt the marshmallows and the milk together, stirring frequently. Once the marshmallows are all melted remove the bowl from the double boiler and stir in the chopped chocolate until it’s melted and smooth. Allow the chocolate mixture to cool to room temperature, stirring occasionally.
- Once the chocolate is cooled, place the heavy cream in the bowl of your stand mixer fitted with the whisk attachment. Beat the cream on medium high speed for 1-2 minutes until stiff peaks form. Fold the whipped cream into the cooled chocolate until it’s evenly combined.
- Pour the mixture into the chilled crust.
- Cover and chill the pie for at least 2 hours.
- When you’re ready to serve it you can garnish it with extra whipped cream, if desired.