Easy Baked Chicken Bites Recipe
There’s just something about biting into a crispy, golden chicken nugget that instantly takes me back to childhood: lazy Saturday afternoons, the smell of fried food wafting through the house, and the happy chaos of kids clamoring for seconds. I’ve always loved how versatile and forgiving chicken nuggets are—they’re like comfort food in mini, portable form. And trust me, the best part is that making homemade chicken nuggets is way easier than you think! No need for fancy ingredients or deep-frying nightmares—this recipe is fuss-free, budget-friendly, and honestly, way more delicious than anything you’d get from the drive-thru. My kids ask for these all the time, especially when I want to whip up something quick and satisfying. Plus, I love how I can customize the flavors or even sneak in veggies. It’s ultimate family food that I always do this when I need a hug in food form. And really, once you make these, you’ll never want to go back to store-bought again! Shall we get cooking? Trust me, your taste buds are in for a treat.
What are chicken nuggets?
Think of chicken nuggets as small, bite-sized pieces of tender chicken coated in a crispy crust—think crunchy on the outside, juicy on the inside. The name “nugget” comes from the idea of a little “golden nugget,” which perfectly describes how adorable and satisfying these morsels are. It’s essentially a fun way to serve chicken, making it perfect for kids and adults alike. The concept originated in the mid-20th century when fast-food joints wanted a tasty, finger-friendly snack that’s easy to eat without utensils. Over time, chicken nuggets have turned into a household staple, with everyone from gourmet chefs to home cooks giving them a personal twist. The beauty of these is their simplicity: you can bake, fry, or air fry them, and you can season or glaze them however you like. With just a few ingredients, you’ve got a crowd-pleasing dish that’s equally perfect for a quick lunch, dinner, or cozy snack—an all-around winner to add to your recipe box.
Why you’ll love this recipe?
What I love most about making homemade chicken nuggets is how they turn out irresistibly crispy every single time—better than anything you’d buy, I promise. The smell alone when they’re baking is enough to make the whole house smell like a tiny, delicious bakery. They’re incredibly simple; you don’t need fancy equipment or hard-to-find ingredients—just good, honest stuff from your pantry. Plus, these nuggets are super budget-friendly, especially since you probably already have everything you need on hand. My favorite part? How versatile they are. You can customize the flavor with different seasonings, add a little lemon zest for brightness, or even toss in some grated cheese for a bonus umami kick. They’re great plain for kids, but also elevate beautifully with a spicy dip or a sweet honey glaze for adults. This recipe is a lifesaver on busy nights when you want something homemade but don’t want to spend hours in the kitchen. And honestly, once you master it, your family will be asking for these all the time—trust me, these disappear in minutes at my house! Honestly, making your own means you’re controlling the ingredients—no weird preservatives or mystery fillers—so it’s wholesome, too. The crispy texture, tender chicken, and customizable flavors make these a true family favorite. No more boring store-bought nuggets—this is comfort food you can feel good about.
How do I make chicken nuggets?
Quick Overview
This recipe walks you through creating irresistibly crispy chicken nuggets from scratch. We start by tenderizing and seasoning chicken pieces, then coat them in a crunchy breadcrumb mixture—my secret is adding a touch of Parmesan for extra flavor—and bake or fry until golden. The whole process is straightforward and doesn’t require any complicated steps. What makes this recipe special is that you can prep everything ahead of time and bake in batches. Plus, it’s fully customizable, so you can switch up the seasonings or toppings to suit your mood or the occasion. These nuggets come out crunchy, juicy, and downright addictive. So whether you’re making a quick snack or a dinner, this method keeps it simple but totally satisfying.
Ingredients
For the main coating:
– 2 cups breadcrumbs (panko gives the best crunch, but regular works too)
– 1/2 cup grated Parmesan (optional but adds amazing flavor)
– 1 teaspoon garlic powder
– 1 teaspoon onion powder
– 1 teaspoon paprika (smoked if you like a deeper smoky flavor)
– Salt and pepper to taste
– 2 eggs, beaten (for the egg wash)
– 1/2 cup milk or buttermilk (for extra tender chicken)
For the Chicken:
– 1.5 pounds boneless, skinless chicken breasts or thighs, cut into bite-sized pieces
– A pinch of salt and pepper to season
– Optional: a dash of hot sauce or lemon juice for marinade
For the Glaze or Dipping Sauce:
– Honey, buffalo sauce, or barbeque sauce for dipping or drizzling
Step-by-Step Instructions
Step 1: Preheat & Prep Pan
Preheat your oven to 400°F (200°C). Line a baking sheet with parchment paper or a silicone mat—trust me, this makes cleanup way easier and helps the nuggets crisp up evenly. If you’re frying, get your oil heated to 350°F in a deep pot or skillet. I always do this first so I don’t forget once I start coating the chicken.
Step 2: Mix Dry Ingredients
In a shallow dish, combine the breadcrumbs, Parmesan, garlic powder, onion powder, paprika, salt, and pepper. Mix it well so all those flavors are evenly distributed. This seasoned coating is what turns boring chicken into something special, so don’t skip this step.
Step 3: Mix Wet Ingredients
In another bowl, whisk together the eggs, milk, and a pinch of salt. I sometimes add a splash of hot sauce here if I want a bit of heat. This mixture is what helps the breadcrumbs stick and gives the nuggets that tender inside.
Step 4: Combine
To coat, dip each piece of chicken into the egg mixture first, letting the excess drip off, then dredge it in the breadcrumb mixture. Use one hand for wet and one for dry to keep things neat—trust me on this. Press lightly to make sure the coating sticks well. If you want an extra thick crust, repeat the process and double coat.
Step 5: Prepare Filling
I often keep it simple but you can jazz up your filling by adding herbs, minced garlic, or even grated cheese directly into the chicken before coating. For a family-friendly version, I stick to plain seasoned chicken—easy and crowd-pleasing.
Step 6: Layer & Swirl
Arrange the coated chicken pieces on your prepared baking sheet. If you want a swirl effect or a little marbling inside, before baking, you can lightly brush some melted butter or drizzle a bit of honey over the nuggets. Trust me, it makes a difference—just don’t go overboard!
Step 7: Bake
Bake in the preheated oven for about 20-25 minutes, flipping halfway through, until they’re golden and crispy. If you prefer frying, cook in hot oil for about 4-5 minutes per batch. Keep an eye on them; oven temperatures vary and crispy perfection lies just a few minutes longer or shorter.
Step 8: Cool & Glaze
Let the nuggets rest for a few minutes once out of the oven—this helps them set up and stay crispy. Drizzle with honey or your favorite glaze while still warm if you like that added shine and flavor boost. I like to do a quick toss in a spicy buffalo sauce too, for a little kick.
Step 9: Slice & Serve
If you cut into larger pieces, a clean, sharp knife helps keep the shape tidy. Serve hot with extra dipping sauces on the side, or let them cool down a little for a crispy snack. My kids love these dipped in ranch or ketchup—they ask for seconds and thirds every time!
What to Serve It With
These chicken nuggets play well with almost anything. For a quick lunch or dinner, I usually serve them with a side of crispy fries or a fresh, crunchy salad. Want to elevate it for brunch? A side of roasted veggies or a light coleslaw makes the perfect pairing. And honestly, they’re just as tempting served with a sweet honey mustard or spicy sriracha mayo—delicious! When I want something a little more indulgent, I’ll whip up a big batch of homemade mac and cheese or cheesy rice and let the nuggets be the star of the plate. For dessert, I sometimes serve fresh fruit or a quick fruit salad to keep everything balanced. These nuggets also make a fabulous snack platter—add some sliced carrots, celery, and a few dips, and you’ve got a crowd-pleaser for game day or family movie night. My family absolutely loves making a “nuggets bar” where everyone gets to dip, drizzle, and customize their own bites—that’s a total hit in my house!
Top Tips for Perfecting Your Chicken Nuggets
After making these dozens of times, I’ve learned a few tricks that really help turn out perfect nuggets every time. First, make sure to dry your chicken pieces thoroughly before coating—they stick better and fry more evenly. When breading, avoid overloading the coating—you want just a light, even layer for maximum crunch. If you want an extra crispy crust, try double-dipping: dip, coat, dip again, and coat again. To keep them crispy longer, bake on a wire rack set over your baking sheet—the air circulation prevents sogginess. For seasoning, I’ve tested adding a pinch of cayenne or smoked paprika—those little upgrades really deepen the flavor. About the filling, I love adding a touch of grated cheese or minced herbs to give the chicken some unexpected flavor. Don’t be afraid to adjust the cooking time if your nuggets look golden but aren’t quite cooked through—you can always bake a little longer. I’ve also experimented with different breadcrumbs; panko gives the most crunch, but seasoned Italian breadcrumbs add a nice twist. And if you’re making a glaze or sauce, keep it thick enough to cling but not so gloopy that it pools—trust me, a little glaze brushed on right after baking makes them extra tantalizing. My biggest lesson? Don’t rush the cooling period—it helps everything set and stay crispy. And finally, tweak the seasoning to suit your taste—nothing beats a personal touch!
Storing and Reheating Tips
Leftovers are rare in this house, but when I do package them up, I make sure they’re completely cooled first—hot nuggets in a sealed container can turn soggy fast. For storing, use an airtight container and keep them in the refrigerator for up to 3 days—though they’re so good fresh, they rarely stick around that long! When reheating, the best method is to bake in a warm oven at 375°F for about 10 minutes to restore crispiness. If you’re in a hurry, an air fryer at 350°F for 3-4 minutes works magic; it makes them almost as good as freshly baked. I don’t recommend microwaving—unless you’re okay with a less crispy outcome—because it tends to make the coating soft and floppy. For freezing, arrange the nuggets on a baking sheet lined with parchment, freeze until solid, then transfer to a zip-top bag. They’ll stay good for up to 3 months. When ready to eat, defrost in the fridge overnight, then reheat in the oven or air fryer. If you plan to glaze or sauce them later, wait until they’re reheated to avoid sogginess. These simple tricks keep your chicken nuggets tasting amazing, even days later!
Frequently Asked Questions
Final Thoughts
Really, these homemade chicken nuggets are like a warm hug wrapped in crispy goodness. After all my experimenting, I can honestly say that once you get the technique down, it’s hard to go back to store-bought. They’re perfect for busy weeknights, game days, or just when the craving hits—you know, that irresistible urge for something crunchy and savory. The best part? They’re customizable, forgiving, and so much better than anything you’ll find in a plastic bag. My family’s become quite the fan—sometimes I make a batch just for fun, and they disappear so quick I barely get a taste! I hope you give this recipe a try; I think you’ll love it as much as I do. And do drop a comment or share your own twists—I’d love to hear how yours turn out. Happy baking, my friend—your kitchen is about to get a whole lot tastier!
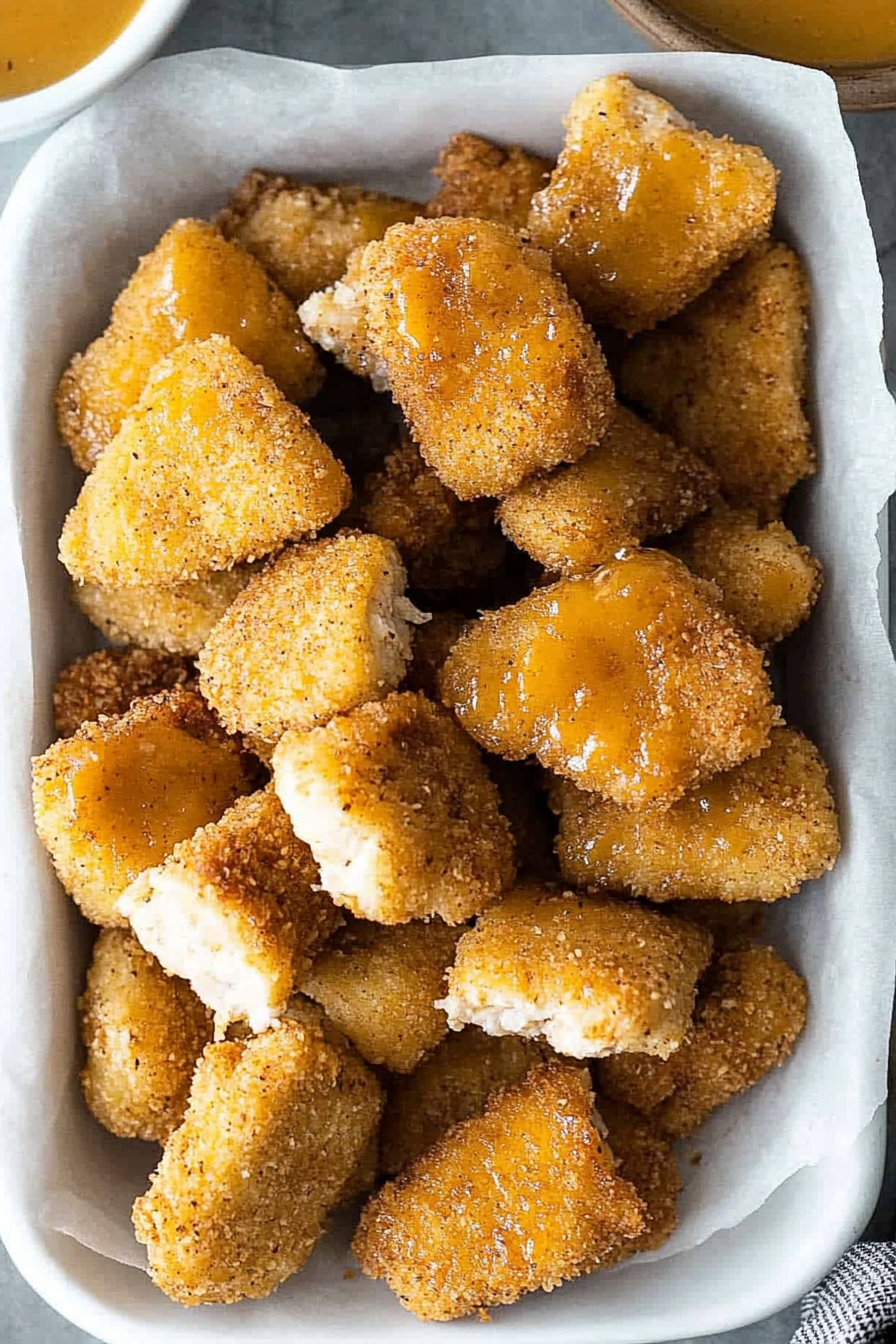
Homemade Chicken Nuggets
Ingredients
Method
- Preheat the oven to 400°F and place a metal rack on a baking sheet. Spray with non-stick spray.
- Cut chicken into 1-inch nuggets and set aside.
- Mix breadcrumbs, flour, garlic powder, thyme, paprika, salt, and pepper in a large bowl.
- Whisk eggs in a separate bowl.
- Dip chicken pieces into egg wash, then coat with breadcrumb mixture.
- Place coated chicken on the prepared rack.
- Drizzle chicken nuggets with olive oil.
- Bake for 14-16 minutes, flipping halfway.
- Turn broiler on and broil for 1-2 minutes until golden brown.
- Remove from oven and serve with favorite dips.