Easy Banana Breakfast Bowl Recipe
You know those mornings? The ones where you’re staring into the abyss of your kitchen, desperately craving something sweet and comforting, but the thought of making a whole batch of pancakes feels like an Olympic sport? Yeah, me too. For years, I’d resort to store-bought granola or, let’s be honest, just staring longingly at the pancake mix in the pantry. But then, a little culinary spark happened, and I discovered the absolute joy of banana pancake cereal. Imagine this: all the fluffy, golden goodness of your favorite banana pancakes, but shrunk down into adorable, bite-sized morsels, swimming in a pool of maple syrup. It’s like a breakfast dream come true, a playful twist on a classic that my whole family, especially the kiddos, goes absolutely bonkers for. Honestly, it feels like a secret little indulgence, a fun way to make even a rushed Tuesday feel like a special occasion.
What is banana pancake cereal?
So, what exactly is this magical “banana pancake cereal”? Think of it as the miniature version of your beloved banana pancakes. Instead of one big fluffy disc, we’re talking about dozens of tiny, perfectly golden pancakes, about the size of a quarter or a little larger. The name itself just perfectly captures the essence, doesn’t it? It’s essentially taking all the wonderful flavors and textures of a classic banana pancake – that soft, fluffy interior, the sweet hints of ripe banana, the hint of cinnamon – and transforming them into something you can eat with a spoon, just like cereal. It’s not a pancake *mix* in the traditional sense; it’s a whole new way to enjoy pancakes! The beauty of it lies in its playful presentation and the sheer fun of scooping up these little golden coins. It’s a concept that’s both whimsical and wonderfully practical, bringing a smile to your face before you even take the first bite.
Why you’ll love this recipe?
Honestly, if you’re anything like me, you’ll fall head over heels for this banana pancake cereal for so many reasons. First and foremost, the flavor is just out of this world. You get that warm, comforting taste of banana bread meets fluffy pancake, with a subtle sweetness that doesn’t overwhelm. It’s like a hug in a bowl! And the texture? Oh, it’s divine. Each little pancake is soft and tender on the inside with just a hint of golden crispness on the edges, especially when they’re fresh off the griddle. What I really adore, though, is the sheer simplicity of it all. Even on a chaotic morning, you can whip up a batch of these little guys without breaking a sweat. It feels way more impressive than it actually is, which is always a win in my book! Plus, let’s talk about cost-effectiveness. Bananas are usually super budget-friendly, and the other ingredients are pantry staples. This is a fancy-feeling treat that won’t break the bank, which is a lifesaver for busy families. And the versatility! You can customize them endlessly. Add blueberries, chocolate chips, different spices – the possibilities are truly endless. It’s the perfect recipe for when you’re craving something sweet but don’t want the commitment of a full-blown cake or pie, or when you just want to add a little bit of pure joy to your breakfast routine. This is the kind of recipe that makes everyone feel a little bit special.
How do I make banana pancakes?
Quick Overview
The process for making banana pancake cereal is surprisingly straightforward. We’ll be mixing up a simple batter that’s rich with ripe banana flavor, then carefully spooning out small amounts to cook into perfect little pancakes. The key is to keep them small and cook them quickly so they achieve that ideal fluffy-yet-tender texture. Once they’re golden brown, they’re ready to be served up in a bowl, just like your favorite breakfast cereal, usually with a generous drizzle of maple syrup. It’s a process that feels more like a fun craft project than cooking, and the results are always worth it.
Ingredients
For the Main Batter:
Here’s what you’ll need to get that perfect pancake base. Always try to use ripe bananas – the browner, the better! They’re sweeter and mash up so much easier. It’s usually about 2 large, very ripe bananas for this recipe. You’ll also need all-purpose flour, baking powder for that lovely lift, a pinch of salt to balance the sweetness, a little bit of sugar (or maple syrup if you prefer to reduce refined sugar), one large egg, some milk (I’ve tested this with whole milk for richness, but almond or oat milk works beautifully too, making it even creamier sometimes!), and melted butter or vegetable oil for that perfect tenderness. A little dash of cinnamon is optional but highly recommended for that classic banana bread aroma.
For the Filling:
This is where we add a little extra oomph! You can keep it simple with just the mashed banana in the batter, or you can add a tablespoon or two of peanut butter or almond butter stirred into the batter just before cooking for a nutty twist. Some people like to add mini chocolate chips directly into the batter. If you’re feeling adventurous, you could even swirl in a bit of Nutella or a dollop of your favorite fruit jam right into the bowl before you start spooning out the pancakes. It’s all about personal preference here!
For the Glaze:
While technically not a “glaze” in the thick sense, the maple syrup is your best friend here. You’ll want a good quality maple syrup for drizzling. If you’re feeling fancy, you can warm up a little bit of maple syrup with a tiny pat of butter. Some people even like to whisk a tablespoon of heavy cream into their maple syrup for a slightly richer, almost glaze-like finish. Don’t overthink this part; the natural sweetness of the pancakes and bananas is the star!
Step-by-Step Instructions
Step 1: Preheat & Prep Pan
First things first, get your griddle or a large non-stick frying pan heated up over medium-low heat. This is super important. If the pan is too hot, your tiny pancakes will burn before they cook through. If it’s too cool, they might get greasy. I like to test it by flicking a tiny drop of water; it should sizzle gently and evaporate. You can lightly grease the pan with butter or cooking spray if you’re not using a super non-stick surface, but often, with the butter in the batter, it’s not strictly necessary. Just a light wipe is usually enough.
Step 2: Mix Dry Ingredients
In a medium bowl, whisk together your flour, baking powder, salt, and sugar (if using). Give it a good whisk to make sure everything is evenly distributed. This ensures your little pancakes have a consistent, fluffy texture all the way through. I always make sure there are no lumps of baking powder. It seems like a small step, but it really makes a difference in the final outcome.
Step 3: Mix Wet Ingredients
In a separate, larger bowl, mash your very ripe bananas until they’re smooth and lump-free. Seriously, the riper the better – they add so much natural sweetness and moisture. Then, whisk in your egg until it’s well combined, followed by your milk and melted butter (or oil). If you’re adding cinnamon or vanilla extract, this is the time to stir them in. You want a nice, smooth, wet mixture that smells heavenly.
Step 4: Combine
Now, gently pour your dry ingredients into the wet ingredients. Using a spatula or a wooden spoon, mix them together *just until combined*. This is crucial for tender pancakes. Overmixing develops the gluten in the flour, which can make your pancakes tough and rubbery. A few small lumps in the batter are perfectly fine – I actually prefer it that way! If you’re adding any mix-ins like chocolate chips or nuts, fold them in now.
Step 5: Prepare Filling
If you’re adding any extra filling ingredients like nut butter or jam, you can gently swirl them into the batter now. Don’t overmix! Just a few gentle folds to create lovely pockets of flavor. The goal isn’t to fully incorporate them, but to create little swirls or pockets that will be revealed as the pancakes cook. This is where the magic happens for those extra flavor bursts.
Step 6: Layer & Swirl
This is the fun part! Using a small spoon or a mini ice cream scoop, carefully drop small dollops of batter onto your preheated griddle. Think dime-sized to quarter-sized. Don’t overcrowd the pan; give them a little space to cook evenly. If you’re swirling anything in, you can add a tiny bit of your swirl ingredient on top of a dollop of batter and gently swirl with a toothpick. The key is small, consistent portions for that “cereal” effect.
Step 7: Bake
Let the mini pancakes cook for about 1-2 minutes per side, or until they are golden brown and you see little bubbles forming on the surface. Flip them gently with a small spatula or even chopsticks (they work great for tiny things!). Cook the other side until golden. You’ll get a feel for it quickly, and since they’re so small, they cook remarkably fast! Keep an eye on them, as they can go from perfect to overdone in a flash.
Step 8: Cool & Glaze
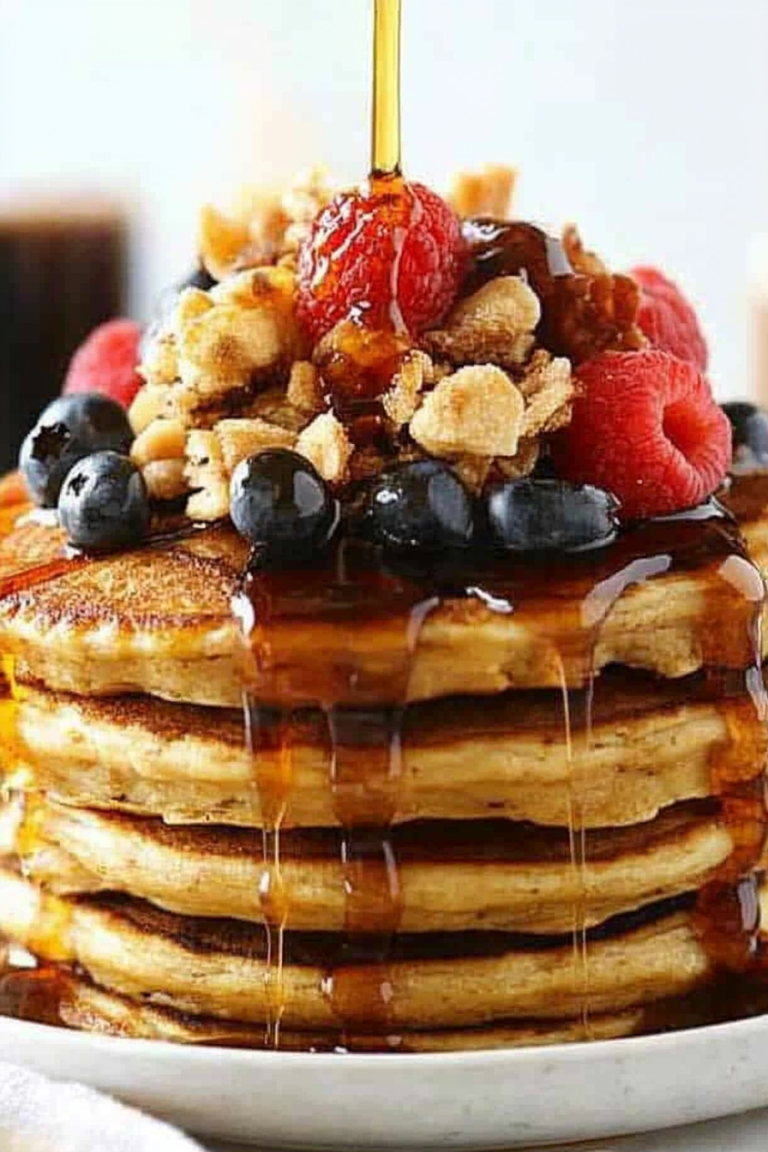
As the mini pancakes are done, transfer them to a plate. They’re best served warm. Just before serving, pour them into bowls and drizzle generously with warm maple syrup. This is where they really transform into “cereal.” The warm syrup coats all those little nooks and crannies, making every bite irresistible. You can also add a pat of butter on top if you’re feeling indulgent.
Step 9: Slice & Serve
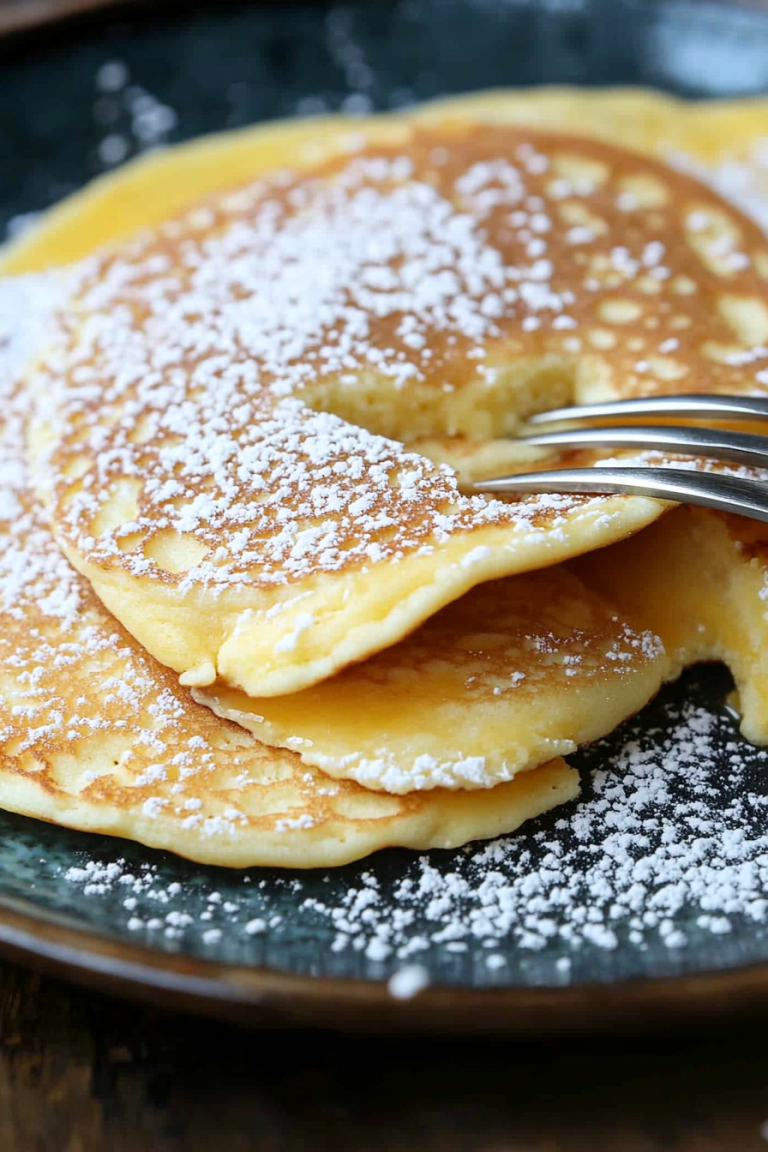
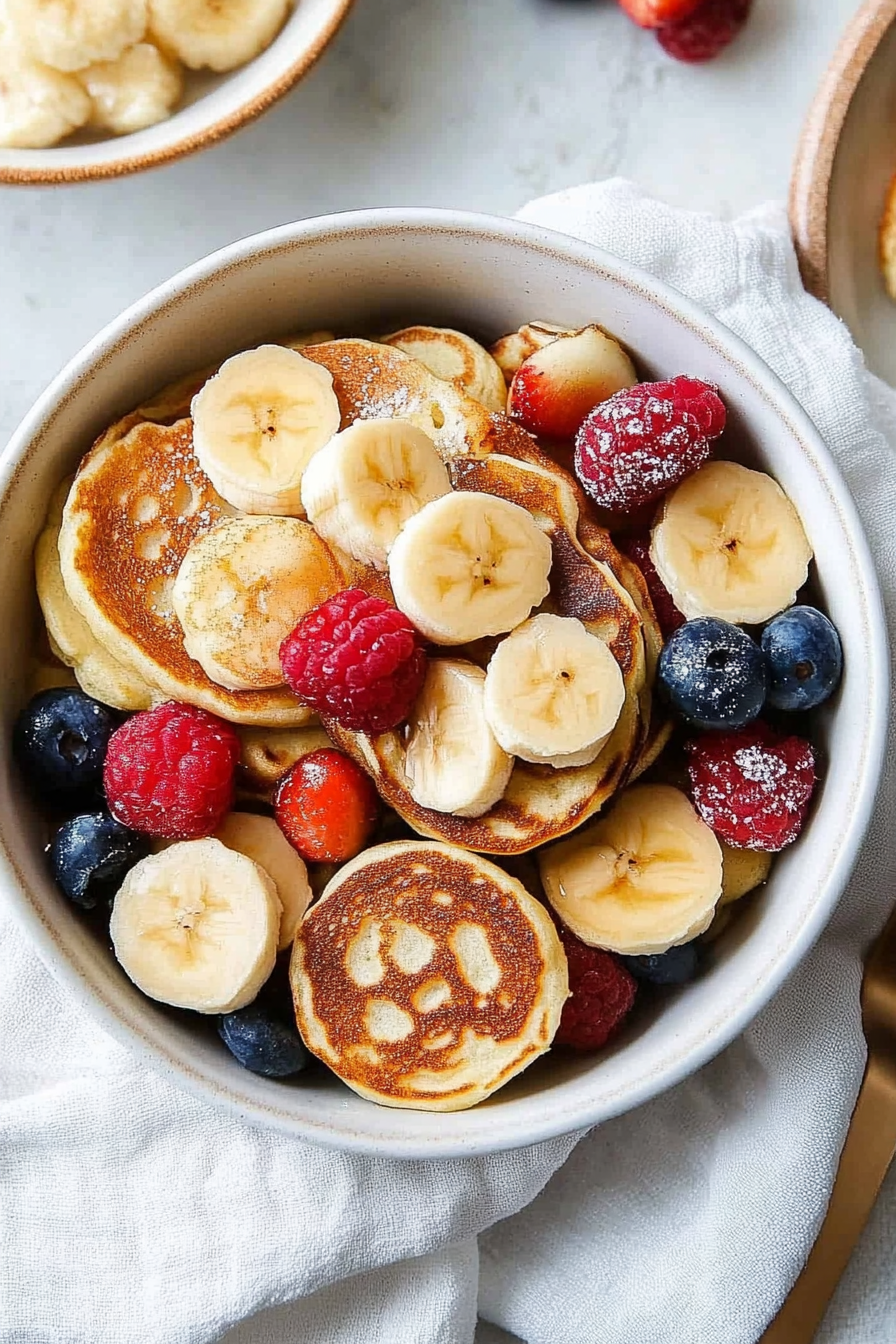
Since they’re already bite-sized, there’s no slicing needed! Simply serve them up in bowls. You can garnish with a few fresh banana slices, a sprinkle of powdered sugar, or a dollop of whipped cream for an extra special touch. They are best enjoyed immediately while they’re warm and fluffy, but leftovers (if you have any!) are still delicious.
What to Serve It With
The beauty of banana pancake cereal is that it’s so versatile, it fits into almost any mealtime scenario. For a quick and cheerful breakfast, I love pairing these little gems with a hot cup of coffee or a glass of cold milk. It’s like a childhood memory in a bowl, and it just makes the morning feel a little brighter. For a more leisurely weekend brunch, elevate it by serving it alongside some crispy bacon or sausage, fresh fruit salad, and maybe a light yogurt parfait. It makes for such a fun centerpiece, and everyone gets to enjoy a little bit of everything. And dessert? Absolutely! Serve these warm with a scoop of vanilla bean ice cream, a drizzle of chocolate sauce, or some whipped cream and berries. It’s a playful, comforting dessert that’s much lighter than a slice of cake but just as satisfying. Even for a cozy afternoon snack, especially for the kids after school, a small bowl of these with a glass of milk is pure comfort. My family often requests these when they want something sweet but not too heavy, and they disappear in minutes. It’s a truly adaptable recipe for any craving or occasion.
Top Tips for Perfecting Your Banana Pancake Cereal
After making these hundreds of times (seriously, they’re a staple!), I’ve picked up a few tricks that I swear by. For the bananas, always use the ones that are practically begging to be thrown out – the ones with lots of brown spots. They’re naturally sweeter and mash up into a smooth, lump-free batter so much easier. Don’t even think about using a perfectly yellow banana; it just won’t have the same flavor impact. When you’re mixing the batter, remember the golden rule of pancakes: don’t overmix! A few lumps are your friends. Overmixing develops the gluten, leading to tough, dense little pancakes instead of light and fluffy ones. Just stir until you don’t see any dry flour anymore. For the swirling, if you’re adding something like nutella or jam, use just a small amount and don’t stir it in completely. You want those gorgeous ribbons of flavor, not a muddy mess. For baking, the heat is everything. Medium-low heat is your best friend. If the pan is too hot, the outside will burn before the inside cooks, and you’ll have sad, burnt little circles. Be patient! And as for ingredient swaps, I’ve accidentally made these with almond milk before, and you know what? They came out even creamier, so don’t be afraid to experiment. Gluten-free flour works too, but you might need to adjust the liquid slightly as different GF blends absorb moisture differently. You’ll be surprised how forgiving this recipe is!
Storing and Reheating Tips
Okay, let’s talk about what happens if you miraculously have leftovers (it rarely happens at my house!). If you want to keep them at room temperature, store them in an airtight container for up to a day. They’ll lose a tiny bit of their crispness, but they’re still pretty darn good. For longer storage, the refrigerator is your best bet. Pop them in an airtight container or a resealable bag for up to 3-4 days. They might get a little softer in the fridge, but that’s to be expected. Honestly, though, the best way to enjoy them is fresh. If you need to freeze them, lay them in a single layer on a baking sheet lined with parchment paper and freeze until solid. Once frozen, transfer them to a freezer-safe bag or container. They can stay in the freezer for about 1-2 months. To reheat, you can pop them in a toaster oven or a regular oven at around 350°F (175°C) for a few minutes until warmed through. Microwaving works too, but they can get a bit chewy, so use that as a last resort. And a crucial tip: if you plan on storing them, hold off on the maple syrup until just before serving. Drizzling syrup on them before storing can make them soggy, and nobody wants soggy cereal pancakes!
Frequently Asked Questions
Final Thoughts
So there you have it – the little banana pancake cereal that brings so much joy to my kitchen. It’s one of those recipes that proves you don’t need complicated techniques or fancy ingredients to create something truly special. It’s the perfect blend of nostalgic comfort and playful fun, and I can honestly say it’s a recipe that never fails to put a smile on my face, and more importantly, on the faces of my family. If you’re looking for a way to make your mornings (or even your afternoons!) a little brighter and a whole lot tastier, give this a try. I promise, you won’t regret it. If you enjoy this, you might also love my [Link to another pancake or breakfast recipe] or my [Link to a banana bread recipe] for more delicious ways to use ripe bananas! I can’t wait to hear how your banana pancake cereal turns out. Let me know in the comments below how you like to serve yours!
Banana Pancake Cereal
Ingredients
Method
- Add milk, flour, banana, eggs, oil, vanilla, baking powder, and salt to a blender and pulse until smooth.
- Pour pancake batter into a condiment squeeze bottle or ziplock bag with a cut corner.
- Heat a pan to medium-high heat and spray with cooking spray.
- Squeeze small dots of batter onto the pan, about the size of a nickel, and cook until bubbles form and tops are dry.
- Flip the mini pancakes and cook for an additional 1-2 minutes until golden.
- Transfer pancakes to bowls, top with sliced banana, mixed berries, and optional toppings like whipped cream and sprinkles.