Easy Creamed Corn Casserole Makeover
There’s something about the smell of baked corn filling the house that instantly takes me back to summer afternoons at my grandma’s kitchen table. It’s warm, cheesy, sweet, and buttery all at once, and honestly, it’s one of those comfort foods that never gets old. My kids ask for this all the time, especially around holidays, but I make it year-round because it’s just so darn good. Think of it as the lovechild of cornbread and creamy savory goodness — it’s super easy to throw together on a weeknight, and trust me, it disappears in minutes at my house.
If you’re craving something cozy that pairs perfectly with roasted chicken or a simple salad, this corn casserole is your new best friend. Believe me, once you try it, you’ll want to keep the recipe close because it’s just that addictive. Plus, it’s a one-dish wonder that’s budget-friendly and feeds a crowd. It’s basically foolproof, which is exactly what I need on busy nights. So, grab your favorite skillet or baking dish, and let’s get this deliciousness started!
What is a corn casserole?
Think of corn casserole as a sort of hybrid between a savory cornbread and a creamy baked pudding. It’s essentially a comforting dish made with sweet corn, eggs, butter, cheese, and a touch of flour or cornstarch to give it structure. The idea is to create a dish that’s rich and gooey but with enough texture to hold its shape when served. The name “corn casserole” comes from its American roots, especially popular at holiday tables in the South as a hearty side dish. But honestly, it’s become a year-round staple in many households because it’s just so darn versatile.
This dish is all about balancing the sweet corn flavor with a creamy, cheesy base. It’s a little bit like eating a warm, cheesy pudding with bits of tender corn in every bite. What I love most about it is how forgiving it is — you can tweak the ingredients to suit your taste or what you have in the pantry. Plus, you can add extras like chopped green chiles or shredded jalapeños for a spicy kick, or sprinkle a little more cheese on top for extra gooeyness. It’s comfort food with a personal touch!
Why you’ll love this recipe?
What is the reason corn casserole is a go-to in my home for years?
- Flavor:What makes corn taste like a warm hug?
- Simplicity: It’s remarkably easy to make — no complicated steps or fancy ingredients. Usually, I throw everything together in one bowl and pour it into the oven; it’s that straightforward.
- Cost-effective: Most ingredients are pantry staples or budget-friendly, so it’s perfect whether you’re feeding a big family or just want something delicious without breaking the bank.
- Versatility: It’s great as a side for everything from rotisserie chicken to BBQ ribs, or even as a casual side at potlucks and picnics. I’ve even made it as a quick breakfast when I had leftover corn and eggs — it doubles as a hearty brunch!
What I really love about this dish is how it’s a bit nostalgic but also endlessly adaptable. I’ve played around with adding chopped green chilies, swapping out sharp cheddar for pepper jack, or even mixing in cooked bacon — every variation is a hit. Plus, it’s perfect when you’re craving something cheesy and comforting but don’t feel like fussing in the kitchen for hours. It’s one of those recipes that, once you master it, becomes a family tradition.
How to Make Corn Casserole
Quick Overview
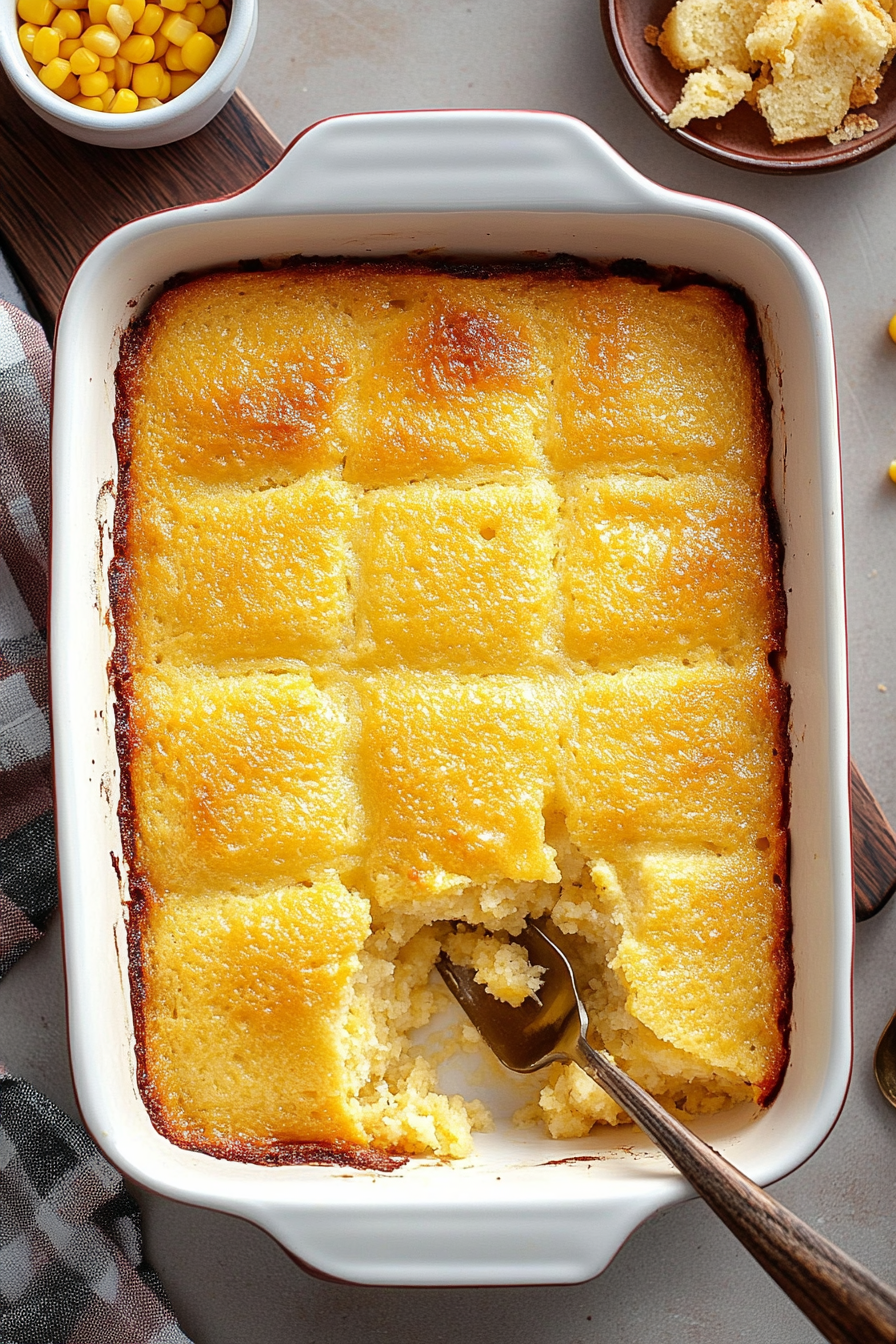
This corn casserole is basically mixing all your ingredients in one big bowl, pouring it into a greased baking dish, and baking until golden and bubbly. It’s the kind of recipe where you can prep everything in just 10 minutes, pop it into the oven, and then forget about it while your house fills with that irresistible smell. The key is not overmixing — a gentle fold is all you need to keep it light and fluffy. When it’s done, you get this beautiful golden top with a creamy, cheesy center that’s perfect for scooping up with a spoon. Trust me, once it’s baking, you’ll be counting down the minutes until it’s ready.
Ingredients
For the Main Batter:
- 2 cups sweet corn kernels (frozen, fresh, or canned — drained)
- 1 cup shredded sharp cheddar cheese (feel free to mix it up with pepper jack or Monterey Jack)
- 3 large eggs
- 1/2 cup melted unsalted butter (or substitute with olive oil for a lighter version)
- 1 cup all-purpose flour (or sub with gluten-free flour if needed)
- 1/2 cup sugar (adjust to taste; I like mine just a touch sweeter)
- 1 teaspoon baking powder
- 1/2 teaspoon salt
- 1/4 teaspoon black pepper (optional but recommended)
For the Filling:
- 1 cup additional corn or creamed corn (for extra creaminess)
- Optional: chopped green chiles or jalapeños for heat
For the Glaze (optional but pretty):
- 1/4 cup honey or maple syrup (for a sweet glaze)
- Extra shredded cheese or chopped herbs for topping
Step-by-Step Instructions
Step 1: Preheat & Prep Pan
Set your oven to 350°F (175°C). Grease a 9-inch square baking dish or a similar-sized casserole dish with butter or non-stick spray. I like to use glass because it bakes evenly, but metal works just fine. If you want that crispy edge, just increase the oven temperature to 375°F for the last five minutes of baking.
Step 2: Mix Dry Ingredients
In a large bowl, whisk together the flour, sugar, baking powder, salt, and pepper. I’ve learned the hard way that overmixing can make the casserole dense, so I just fold everything gently until combined. This step helps ensure your batter is light and fluffy once baked.
Step 3: Mix Wet Ingredients
In another bowl, beat the eggs lightly, then stir in the melted butter (make sure it’s not too hot — you don’t want scrambled eggs!). I’ve tried this with almond milk once, and it actually made it even creamier, so feel free to experiment if you’re dairy-free. Add the corn and cheese, then blend it into the eggs and butter mixture until it’s smooth and slightly thickened.
Step 4: Combine
Gently fold the wet mixture into your dry ingredients until just combined. Don’t overmix — you want some lumps and bits of corn to stay intact. That’s what gives the casserole its wonderful texture.
Step 5: Prepare Filling
If you’re using creamed corn or chopped chiles, stir them into the batter now. This step is where you can get creative! I love adding a handful of cooked bacon bits or jalapeños for a spicy kick. Just mix until evenly distributed.
Step 6: Layer & Swirl
Pour half the batter into your prepared dish, then sprinkle some additional cheese or toppings if you like. Add the rest of the batter on top, then gently swirl with a fork or knife to create a marbled effect. This is one of my favorite parts — it looks pretty when it’s baked, with a gooey cheese swirl weaving through the golden top.
Step 7: Bake
Pop it into the oven and bake for about 35-40 minutes. You’ll know it’s ready when the top is golden and a toothpick inserted near the center comes out clean. If the top starts to brown too quickly, throw a piece of foil on top for the last 10 minutes. I like to check a few minutes early because every oven is different.
Step 8: Cool & Glaze
Let it cool for about 10 minutes before slicing. If you’re adding a glaze, brush it over while still warm but not hot — it helps it soak in a little. The glaze adds just a touch of sweetness and makes it even prettier for serving.
Step 9: Slice & Serve
Use a sharp knife and serve warm. It’s perfect on its own, or with a simple side salad. The great thing about this dish is how easily you can make it ahead or refrigerate leftovers — just reheat in the oven and enjoy the warmth and cheesy goodness all over again.
What to Serve It With
This corn casserole is a real star on its own, but pairing it with the right dishes can elevate any meal. For breakfast, serve it alongside fluffy scrambled eggs and crispy bacon; the sweet and savory combo is unbeatable. It’s perfect for brunch too — add some fresh sliced tomatoes and a huge mug of coffee or fresh orange juice. For dinner, I love it alongside roasted chicken or grilled steaks, because it helps soak up all those flavorful juices. If you’re looking for a casual, family-friendly vibe, this casserole can even be a main dish for a comfort-food night. Sometimes, I serve it with a dollop of sour cream or a sprinkle of chopped green onions for added brightness. It also makes a wonderful potluck contribution — just bake it in a larger dish or even in muffin tins to make individual servings. Warm, cheesy, and totally satisfying — what’s not to love?
Top Tips for Perfecting Your Corn Casserole
After making this dish countless times, I’ve picked up a few tricks to keep it perfect every single time:
- Zucchini prep: Sometimes I add shredded zucchini for extra moisture and nutrients. I always squeeze out the excess water after grating; otherwise, it can make your casserole soggy.
- Mixing advice: Gentle folding is key — overmixing will make it dense. Use a light touch, and fold until just combined.
- Swirl customization: For a pretty marbled effect, pour half the batter, add toppings, then layer the rest and swirl with a toothpick or skewer. It looks gorgeous and adds a little surprise in every bite.
- Ingredient swaps: Swap sour cream for Greek yogurt or cream cheese for extra richness. I’ve even tested coconut milk in place of dairy — it’s subtly sweet and works well.
- Baking tips: Keep an eye on the top — if it’s browning unevenly, tent it with foil. Oven temperatures can vary, so start checking at 35 minutes rather than blindly trusting the timer.
- Glaze variations: Instead of honey, try a spicy sriracha drizzle or fresh herbs for a different flavor profile. The glaze should be slightly runny but not too sticky.
One thing I’ve learned: patience and gentle handling go a long way. Allowing it to rest a bit after baking helps everything set, making for cleaner slices. And if it doesn’t turn out perfect the first time — don’t worry! Every batch is a learning experience, and this recipe always feels like a warm hug regardless.
Storing and Reheating Tips
Leftovers? No problem. This corn casserole keeps well in the fridge for about 3 days. Just transfer it into an airtight container — I prefer glass because it’s easy to reheat and doesn’t absorb funky smells. To reheat, sprinkle a little extra cheese or butter on top, cover with foil, and warm in a 350°F (175°C) oven for 15-20 minutes until bubbly. You can also microwave individual slices — just be careful not to overdo it, or it might get a little rubbery. If you’re freezing leftovers, wrap tightly in plastic wrap and then foil; it’ll stay good for about a month. When ready to eat, let it thaw in the fridge overnight, then reheat gently in the oven. I’ve tested adding the glaze after reheating, which still gives it that glossy, inviting finish — delicious every time!
Frequently Asked Questions
Final Thoughts
This corn casserole has truly become a family staple in my house — it’s simple, comforting, and endlessly customizable. I love how it’s one of those dishes you can throw together quickly, yet it feels so special on the dinner table. The rich, cheesy flavor combined with the natural sweetness of corn makes every bite worth savoring. Whether it’s a holiday gathering or just a cozy weeknight dinner, this dish always brings smiles. Plus, I have a feeling once you try it, it’ll become a go-to for your family too. Don’t be shy about experimenting with flavors — maybe add some chops of cooked bacon, fresh herbs, or even a dash of hot sauce — because this base recipe is just waiting for your personal touch.
Classic Corn Casserole
Ingredients
Method
- Preheat oven to 350F.
- Spray a 9 x 13-inch baking dish with cooking spray.
- In a large bowl, combine all ingredients and mix with a spoon until fluffy.
- Pour mixture into the prepared baking dish.
- Bake for 55-60 minutes or until edges are golden.
- Let cool for a few minutes before cutting and serving.