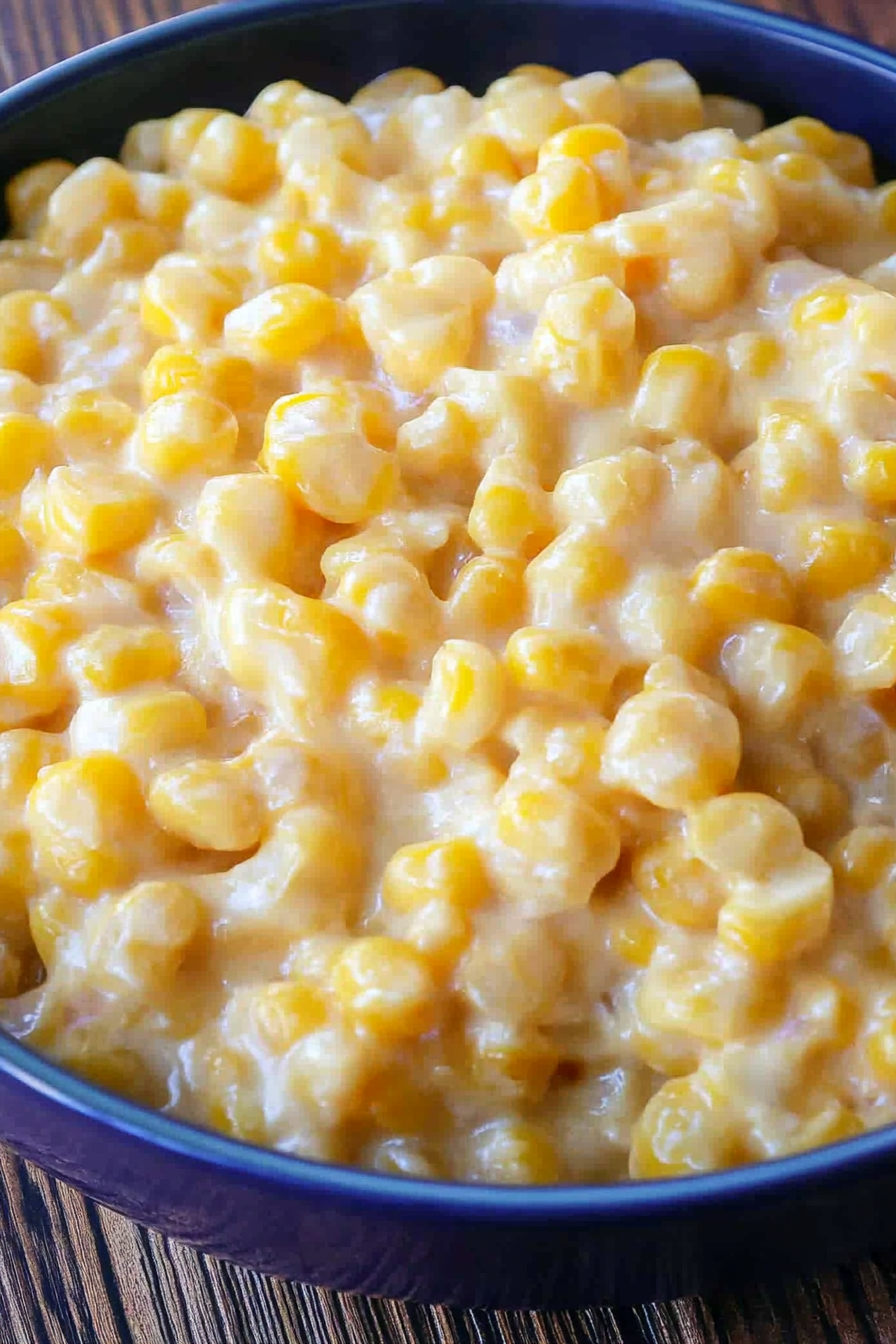
Easy Crockpot Creamed Corn Recipe
There’s something about cream corn that instantly takes me back to my childhood Sunday dinners—those warm, buttery smells wafting through the house, my mom stirring a pot of this magical, golden sauce. It’s one of those dishes that’s simple, comforting, and unbelievably versatile. I’ve probably made this recipe a hundred times, tweaking here and there, but each time it comes out creamy and bursting with flavor. My family always asks for seconds—and trust me, I’m more than happy to give it to them! It’s honestly the kind of side that makes everything else on the table feel just a little more special. Plus, it’s a lifesaver on busy nights when I don’t want to fuss over anything fancy. Just a handful of ingredients, a few minutes of stirring, and you’ve got a side dish that’s as comforting as a hug. Perfect for everything from holiday dinners to quick weeknight meals—this creamed corn is a true crowd-pleaser.
What is creamed corn?
Creamed corn is essentially the lovechild of sweet corn and creamy goodness. Think of it as a mellow, buttery corn pudding—silky, slightly sweet, with just enough richness to make each bite feel indulgent. The name “creamed” comes from the rich, milk-based sauce that envelops every kernel, transforming humble corn into something downright addictive. It’s a dish that’s been around forever, often served at family gatherings or holiday tables, especially here in the South where it’s practically a tradition. But honestly, it’s so easy to whip up at home that I don’t see any reason not to make it anytime you’re craving a cozy, flavorful side. Think of it as comfort food that’s quick enough to throw together on a weeknight but fancy enough to bring to the holiday table. It’s basically like a savory, slightly sweet, velvety pudding—with bits of tender corn nestled inside.
Why you’ll love this recipe?
What I love most about this creamed corn is how it manages to be both incredibly flavorful and ridiculously easy. The smell alone when it’s simmering is enough to make everyone in the house come running—think warm butter, sweet corn, and a hint of garlic mingling in the air. The best part? It’s budget-friendly, using pantry staples and a few fresh ingredients, yet tastes indulgent enough to impress. Plus, it’s super versatile—you can serve it as a side for roasted chicken, splash some crispy bacon on top to jazz it up, or even use it as a filling for tacos or baked potatoes. And, of course, it’s absolutely kid-approved! My kids ask for this all the time, especially during the holidays or when I want to surprise them with something special. I’ve tested this with different kinds of corn (fresh, frozen, even canned), and honestly, it always turns out creamy and delicious—although my personal favorite is fresh sweet corn when in season. What I love most about this dish is that it’s not just a side, but a whole mood in a bowl. Creamy, comforting, slightly sweet, and totally addictive.
How do I make creamed corn?
Quick Overview
This creamed corn recipe is about as simple as it gets. You’ll start by sautéing some butter and garlic, then stir in the corn and cream, letting everything simmer until thick and velvety. The trick is to use enough cream or milk to create that luscious sauce without it becoming too heavy, and to cook it just long enough so the flavors meld beautifully. It’s one of those dishes where the ingredients are minimal, but the flavor is out of this world. Perfect for when you want a side that’s both comforting and quick to prepare, with plenty of room for your own tweaks and personal touches.
Ingredients
For the main creamed corn: For the creamed corn: For the creamed corn: For the creamed corn: For the
– 4 cups fresh corn kernels (about 4 ears of corn or a big bag of frozen)
– 1 cup heavy cream or half-and-half
– 2-3 tablespoons unsalted butter
– 2 cloves garlic, minced
– Salt and pepper to taste
– Pinch of sugar (optional, adds a lovely sweetness)
– A squeeze of fresh lemon juice or a dash of hot sauce (for brightness and heat, if you like)
For Extra Flavor (Optional):
– Crumbled cooked bacon or pancetta
– Shredded cheese (cheddar, parmesan, or Gruyère work beautifully)
– Fresh herbs like parsley, chives, or thyme
Step-by-Step Instructions
Step 1: Preheat & Prep Pan
Set your oven to medium-low and grab a large skillet or saucepan. I always do this when I want that perfect creamy texture—preheating the pan helps everything cook evenly. Add the butter and let it melt gently, making sure it doesn’t brown too much. Toss in your minced garlic and cook for just about 30 seconds until fragrant—you’ll know because your kitchen will smell incredible. Keep your heat low so the garlic doesn’t burn; this dish is all about gentle simmering.
Step 2: Mix Dry Ingredients
Not much here, really—just measure out your corn kernels and set aside. If you’re using frozen corn, give it a quick rinse and pat dry. Fresh corn is best when it’s sweet and crisp; I always try to slice it right off the cob just before cooking because it tastes so much brighter that way.
Step 3: Mix Wet Ingredients
In a bowl, whisk together your cream (or half-and-half) with a pinch of salt and pepper, maybe a teaspoon of sugar if you want that extra hint of sweetness. When the garlic is fragrant, pour in the cream mixture and gently stir, letting it warm up without boiling. It should start to thicken slightly within a couple of minutes.
Step 4: Combine
Add in your corn kernels, stirring gently. The key here is not to overmix—just enough for everything to get coated nicely. If you notice the mixture isn’t thickening up after 5-7 minutes, turn up the heat slightly or let it simmer uncovered a bit more. Keep stirring occasionally so nothing sticks or burns on the bottom—it’s all about patience and gentle heat.
Step 5: Prepare Filling (Optional)
If you’re adding extras like cheese, bacon, or herbs, do it now. For cheese, stir it in and let it melt into the sauce for extra richness. For bacon or pancetta, sprinkle on top or stir in for a smoky kick. This is your chance to make it uniquely yours.
Step 6: Layer & Swirl
If you want a pretty marbled look, try layering a few spoonfuls of plain creamed corn with some with added cheese or herbs, then swirl gently with a toothpick or butter knife. My trick is to do this right in the pan before serving—looks beautiful and adds a little wow factor.
Step 7: Bake
Honestly, I don’t always bake this dish—sometimes I just serve it straight from the stove. But if you want a slightly crusty top, pop it into a preheated 375°F oven for about 10 minutes. Keep an eye on it so the top gets just a little golden, but it doesn’t dry out. The texture should be velvety and tender, with those bright, sweet cornbits shining through.
Step 8: Cool & Glaze
Allow it to cool for 5 minutes before serving—this helps the sauce set just a tad. If you like, drizzle a little fresh lemon juice or a splash of hot sauce on top for an extra zing right before serving. That little touch of acidity really balances the richness.
Step 9: Slice & Serve
This is one of those side dishes that’s perfect for scooping straight from the pan. If you made it in a casserole dish, use a sharp knife to cut into neat squares. Serve it hot, warm, or even at room temperature—that velvety, sweet corn flavor is glorious in any form.
What to Serve It With
Honestly, creamed corn pairs beautifully with just about everything, but I’ve got a few favorites I keep going back to. For breakfast, serve it alongside fluffy scrambled eggs and crispy bacon—trust me, the richness of the creamed corn makes a whole morning feel special. At brunch, I love spooning it on top of cheesy grits or baked sweet potatoes, drizzling with a little extra butter. It’s also fantastic on Thanksgiving or Christmas dinner tables as a side to roasted turkey or ham, adding that touch of luxe to the feast. If you’re craving a more casual vibe, spread it over baked potatoes or serve it as a dip with crusty bread—I’ve even done a little spoonful on top of grilled corn and veggies for a summer BBQ. My family loves pairing it with fried chicken or crispy salmon for a little balance of flavors. Honestly, once you know how easy and delicious this is, you’ll find every reason to whip up a batch—leftovers are great stirred into soups or used as a filling for tacos or even quesadillas. It’s comfort food that’s both satisfying and surprisingly versatile.
Top Tips for Perfecting Your Creamed Corn
Over the years, I’ve picked up a few tricks I swear by to make this dish even better. First, if you’re using fresh corn, always cook it just until tender—overcooking can make the kernels lose their bright, crisp bite, and nobody wants mushy corn! When blending the cream, try adding a splash of milk or even a tiny bit of cream cheese for that extra rich, velvety texture. I experimented by adding a little smoked paprika or cayenne pepper, which gave it a subtle smoky kick—highly recommended if you like a spicy twist. Don’t be tempted to skip the garlic—it really boosts the flavor and elevates the dish. And if you want it extra creamy, try blending a small portion of cooked corn with the cream before stirring everything together—this makes the sauce even silkier. As for baking, I like to position my dish on the middle rack to avoid over-browning and to keep it uniformly creamy. One mistake I made early on was adding too much sugar—trust me, a little goes a long way here, just enough to enhance the natural sweetness of the corn without turning it into dessert. Finally, experimenting with ingredient swaps, like swapping in coconut milk for a dairy-free version, can give you a new take on an old favorite. Just remember, patience is key—let it simmer slowly to build those layers of flavor. It’s honestly the kind of dish that rewards the time you put into it, even if it only takes minutes to prepare.
Storing and Reheating Tips
This creamed corn keeps surprisingly well, especially if you want to make it ahead. Once cooled, transfer leftovers to an airtight container and pop it into the fridge. It’s best enjoyed within 3-4 days, as the texture can change slightly with time—think more thick and velvety, which isn’t a bad thing! To reheat, simply warm it gently over low heat, stirring occasionally. If it looks a little thick, stir in a splash of milk or cream to loosen it up. For freezing, I recommend portioning it into freezer-safe containers or zip-top bags—just squeeze out excess air. It’ll stay fresh for up to two months. Defrost overnight in the fridge, then reheat gently, adding a splash more cream or milk if needed. A quick tip: if you’re serving it cold or at room temperature, give it a good stir and maybe warm it slightly just to refresh those flavors. For the glaze, I usually prefer adding it fresh just before serving to keep that shiny, luscious appearance—delaying it helps prevent sogginess or separation. Overall, this dish is surprisingly resilient and ready to enjoy days later, making it perfect for busy weeknights or batch cooking adventures!
Frequently Asked Questions
Final Thoughts
There’s something truly special about this creamed corn that keeps me coming back—maybe it’s the way it hits that perfect cozy spot, or how flexible it is to suit any mood or occasion. I’ve learned over years of testing that the best versions come from fresh, sweet corn and gentle heat—patience, folks! The creamy texture, combined with the burst of sweet corn, makes each bite addictive. Whether you’re serving it alongside roasted chicken, crumbled bacon, or just enjoying it on its own, it’s one of those dishes that feels like a warm hug on a chilly evening. I genuinely encourage you to give this a try—play around with the add-ins and make it your own. Honestly, the only mistake I’ve made is rushing through it or adding too much sugar; once I slowed down and took my time, it turned into a family favorite that disappears in minutes. Happy baking, and I can’t wait to hear how yours turns out! Drop a comment or share your twists—this dish is simple, comforting, and full of love, just like home cooking should be.
Creamed Corn with Bacon and Herbs
Ingredients
Method
- In a large skillet, cook bacon over medium heat until crispy. Remove and drain on paper towels. Crumble once cooled.
- In the same skillet, melt butter and sauté frozen corn for 5 minutes until heated through.
- Add heavy cream, sugar, salt, and pepper to the corn. Stir and simmer for 10 minutes.
- Stir in chopped parsley and thyme. Top with crumbled bacon before serving.