Easy Greek Yogurt Dip Recipe
There’s something about the smell of fresh herbs, tangy yogurt, and crisp cucumber that instantly transports me to lazy summer evenings in Greece, sitting at a tiny tavern with a cold glass of ouzo. But honestly, I don’t need to be on a plane to enjoy all those flavors—because I’ve got my own secret weapon in the kitchen: homemade tzatziki. This dip is my go-to for everything—whether I’m craving a quick snack, a side for grilled chicken, or even a little something to brighten up a veggie platter. I swear, once you learn how to make tzatziki yourself, you’ll never settle for store-bought again. It’s incredibly simple, super fresh, and tastes like it’s straight from a seaside taverna. Plus, I love how versatile it is—think of it as the Greek version of ranch, but way more interesting. Trust me on this one, your taste buds will thank you! I always do this when I want something cool, creamy, and packed with herbs. This one’s a lifesaver on busy nights when I want something easy but flavorful that everyone loves—my kids ask for this all the time, and honestly, I sneak a spoonful myself when no one’s looking. Let’s dive into how I make this magic happen!
What is Tzatziki?
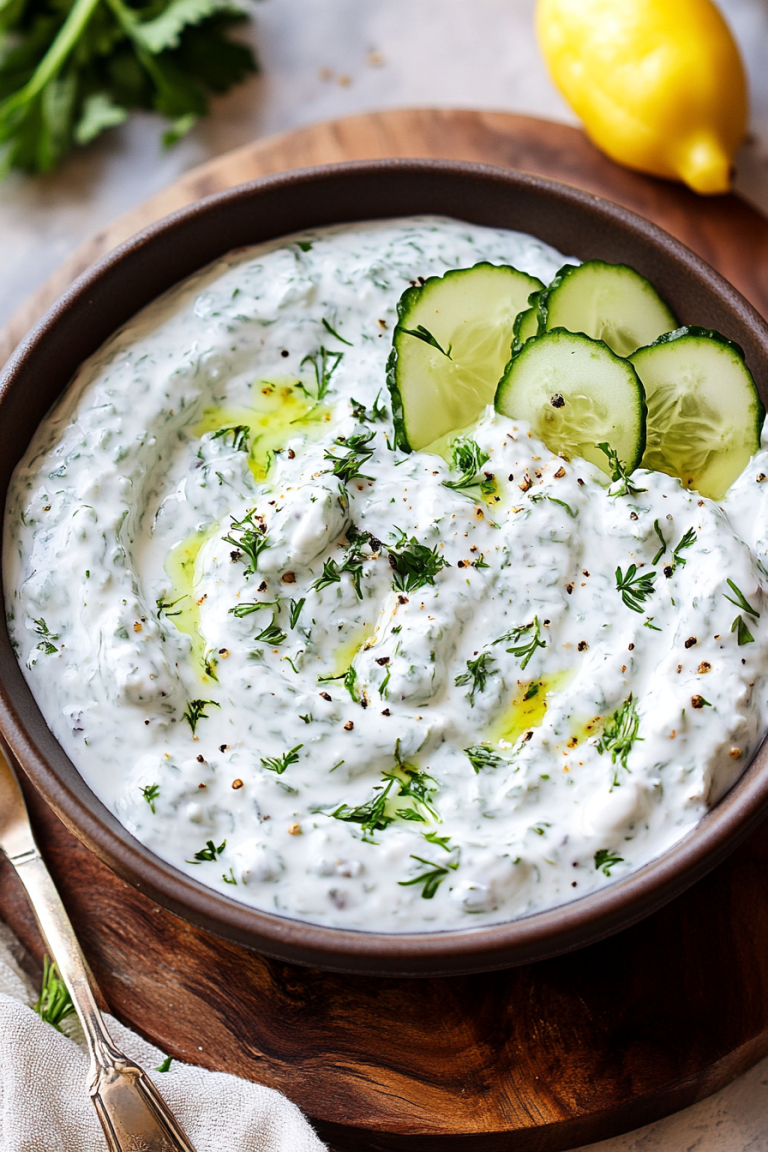
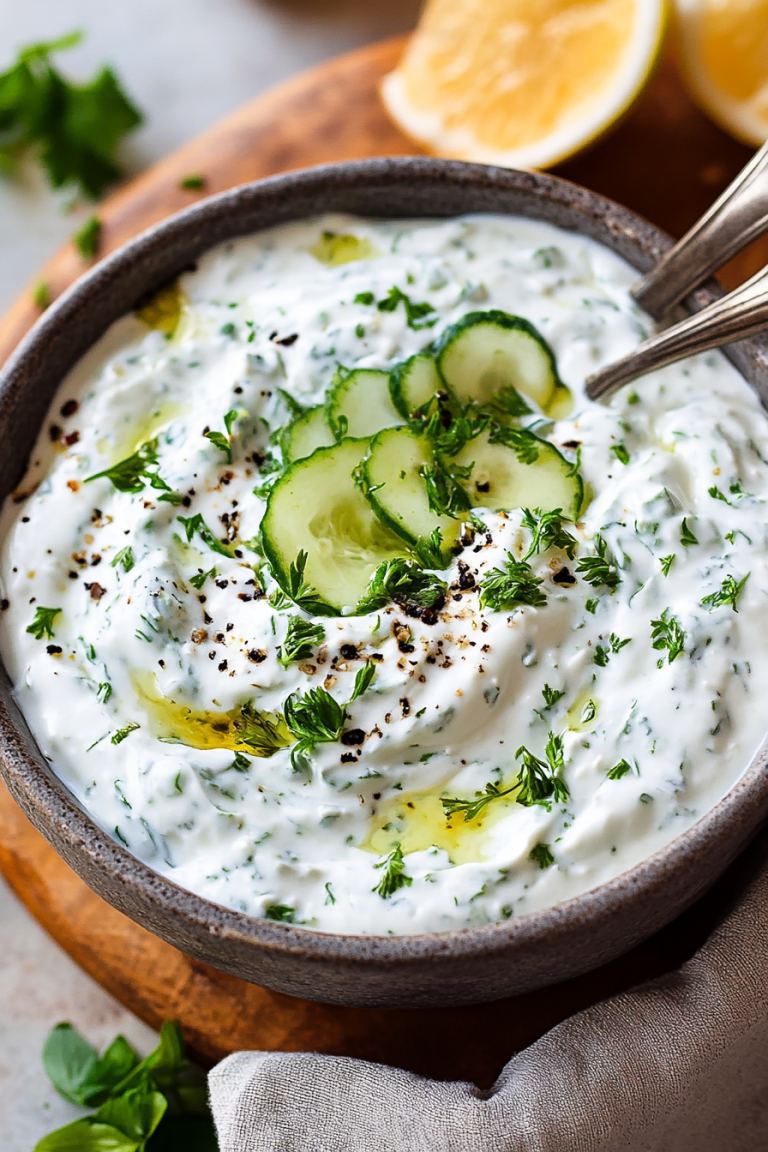
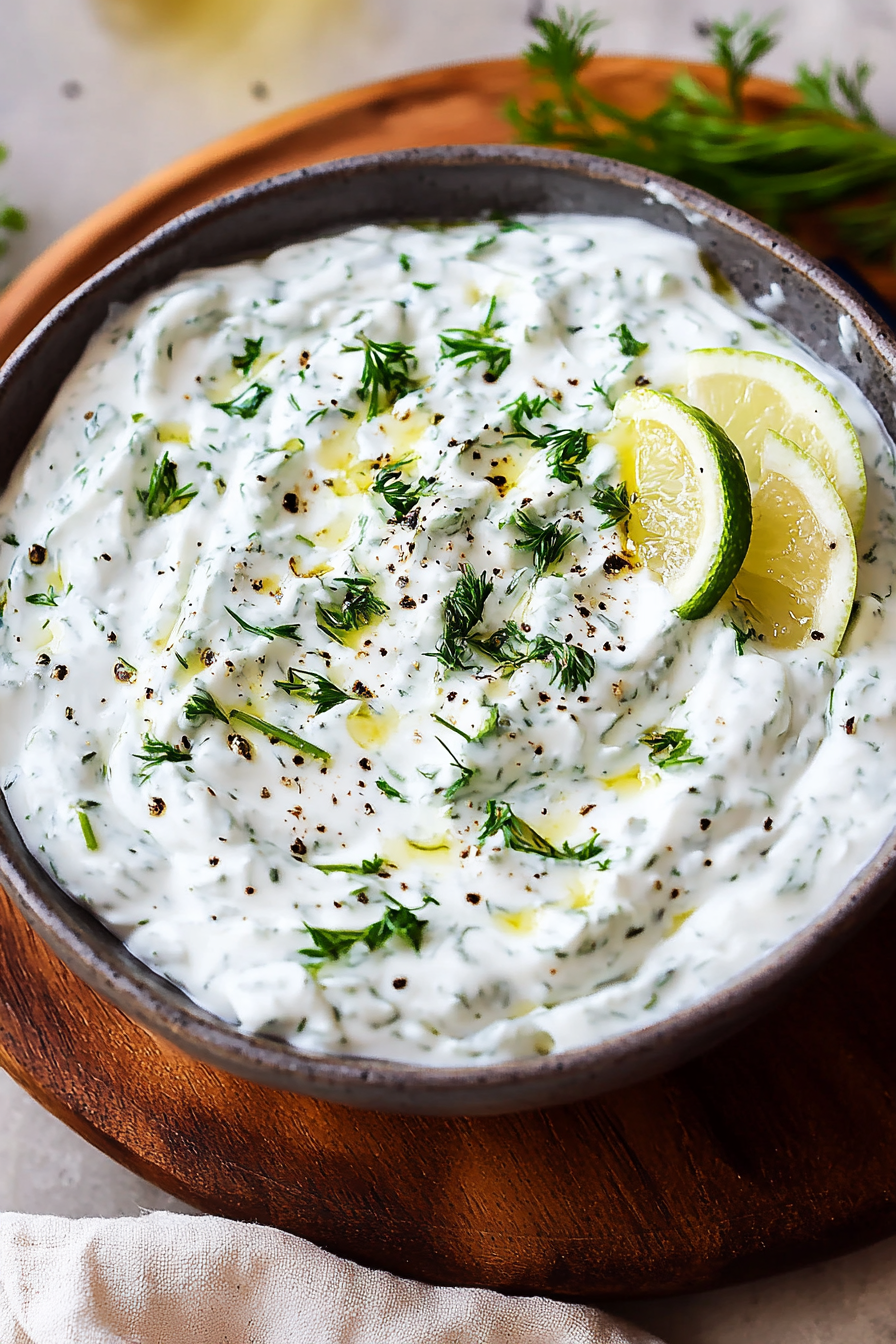
Tzatziki is essentially a Greek yogurt-based sauce, bursting with fresh herbs, zingy lemon, and crunchy cucumber. Think of it as the Mediterranean’s answer to a cool, creamy dip that’s perfect for every occasion. Its name comes from the Turkish word “cacık,” which means a chilled, herb-infused yogurt. The beauty of tzatziki is that it’s not only easy to pull together, but it’s also a total flavor bomb that adds brightness to grilled meats, acts as a dip with warm pita, or even makes salads sing. At its core, it’s a blend of thick Greek yogurt, fresh cucumbers, garlic, herbs like dill and mint, and a splash of lemon juice. My version is a little more relaxed—no fancy techniques, just bold, fresh flavors that make everyone come back for more. It’s essentially the sauce I crave after a long day, soothing and zesty all at once. Once you get the hang of it, you’ll find yourself sneaking spoonfuls straight from the bowl—no shame in that!
Why you’ll love this recipe?
Honestly, what I love most about this tzatziki is how it turns an ordinary snack into something special. The moment you mix it all up, the aroma hits you—notes of tangy yogurt, fragrant herbs, and that unmistakable cucumber crunch. It’s a flavor profile that’s light, refreshing, and somehow addictive. Plus, it’s crazy simple to make. I’ve tested this with different kinds of yogurt—full-fat, Greek style, even plant-based options—and honestly, it never fails to impress. Budget-wise, it’s hard to beat: the ingredients are pretty much pantry staples or fridge favorites. The best part? Versatility. Serve it alongside grilled chicken, lamb, falafel, or even roasted veggies. It’s perfect for a quick lunch, a summer barbecue, or a cozy night in. What I love most about this is that it’s almost impossible to mess up—just chop, stir, squeeze, and chill. And if you want to make it extra fancy, you can toss in a little paprika or a drizzle of honey for a twist. This tzatziki has become a household staple for us, and I know once you try it, you’ll be hooked too. It’s that perfect balance of tangy and fresh, creamy and crunchy, simple yet spectacular. Plus, my kids ask for seconds every time—I’d say that’s a gold rating!
How do I make tzatziki?
Quick Overview
This recipe is all about minimal fuss but maximum flavor. You start with thick Greek yogurt—my personal favorite is the one that’s strained and super creamy. Grate a crisp cucumber, squeeze out the excess moisture—don’t skip this step or your tzatziki ends up watery—and then stir in chopped herbs, garlic, lemon juice, and a splash of olive oil. Whisk everything together until well combined and chill for at least 30 minutes. That’s it! The longer it sits, the more the flavors meld and the fresher it tastes. It’s perfect to make ahead on busy mornings or the night before a gathering. If you’re rushing, just plan on a quick 15-minute chill, and you’re ready to serve. Trust me, this method keeps it simple but yields seriously impressive results—like a professional chef’s touch, but with no fancy equipment required. I always do this when I want something quick, cool, and satisfying—because, honestly, this tzatziki disappears in minutes at my house.
Ingredients
For the Main Batch:
– 2 cups Greek yogurt (full-fat or low-fat, but full-fat looks creamier)
– 1 large cucumber (English cucumbers are perfect for less seed waste)
– 3 cloves garlic (adjust to taste)
– 2 tablespoons fresh dill, chopped
– 2 tablespoons fresh mint, chopped (optional but adds a lovely freshness)
– 1 tablespoon lemon juice (freshly squeezed, always)
– 1 tablespoon olive oil
– Salt and pepper to taste
– A pinch of red pepper flakes (for a little heat if you like)
For Variations & Extras:
Feeling adventurous? Try adding a splash of white vinegar or a dash of smoked paprika. I’ve also tested adding chopped scallions or a bit of tzatziki-tuned Greek feta. Use what you love—this recipe is forgiving!
Step-by-Step Instructions
Step 1: Preheat & Prep Pan
No actual oven preheating here—just get your ingredients ready! Grab a clean bowl, your grater, and a fine mesh sieve or cheesecloth for draining. If your cucumber has thicker skin or a lot of seeds, peel or seed it first. I always do this for a smoother texture and fewer watery surprises. Have your garlic minced and herbs chopped; it’s easier to work with everything prepped.
Step 2: Mix Dry Ingredients
Skip this, but if you’re mixing herbs and spices, I like to do this early to let the flavors start melding. Easy peasy.
Step 3: Mix Wet Ingredients
In a separate small bowl, squeeze the lemon juice, whisk in the olive oil and garlic. This helps distribute those flavors evenly. Trust me, garlic evenly dispersed makes all the difference.
Step 4: Combine
In your main bowl, add the yogurt. Grate the cucumber directly into a clean cloth or paper towel, then squeeze out as much moisture as possible—this is the trick that keeps your tzatziki thick and creamy. Mix the cucumber into the yogurt, then fold in the herbs, garlic mixture, lemon juice, and season with salt and pepper. Give it a good stir, tasting and adjusting seasoning as needed. I’ve learned that patience is key—let it sit covered in the fridge for at least 30 minutes. The flavors really deepen during this rest.
Step 5: Prepare Filling
While the base chills, I sometimes toss in a little more herbs or a splash of vinegar for brightness. Again, it’s all about tasting and adjusting.
Step 6: Layer & Swirl
If you want a pretty presentation, I like to serve it in a shallow dish, swirling it with a spoon and maybe sprinkling a little extra dill or mint on top for that wow factor. This step is totally optional but makes it feel special.
Step 7: Bake
No baking needed here! Just chill in the fridge. I prefer at least 30 minutes but overnight if I have time—it only gets better with time.
Step 8: Cool & Glaze
Once chilled, serve directly from the fridge. If you’re adding a drizzle of olive oil or a sprinkle of herbs, do that right before serving for maximum freshness and visual appeal.
Step 9: Slice & Serve
Enjoy as a dip, topping, or side. I love serving it alongside grilled lamb or chicken skewers, but it also makes a killer veggie dip. I always keep a jar in the fridge—trust me, it’s a game changer.
What to Serve It With
Oh, the possibilities! For breakfast, I love spreading a dollop on toasted pita with a fried egg on top—think of it as a Mediterranean breakfast pizza. At brunch, serve it with fresh cut vegetables, warm flatbread, and a chilled glass of white wine or crisp sparkling water with lemon—so refreshing. It’s also an incredible side for grilled meats—lamb chops, chicken souvlaki, or even my dad’s famous spam kebabs (don’t judge, they’re delicious). As a dessert—wait, hear me out—spread a spoonful onto fresh strawberries or apple slices, and add a drizzle of honey. Need a quick snack? Just grab some pita chips or veggie sticks and dip away. My family totally adores tzatziki with roasted sweet potatoes—such a combo! It’s become a staple around here for casual dinners, summer barbecues, or even livening up leftovers. I love how flexible and forgiving it is—you just can’t go wrong. Plus, it’s so much fresher than store-bought, and I get to control all the ingredients. This dip has a special place in my heart—and my fridge!
Top Tips for Perfecting Your Tzatziki
Every time I pull off a batch of tzatziki, I learn a little more. Here are some of my go-to tips:
- Zucchini Prep: If you want your tzatziki extra thick, make sure to squeeze out all the excess moisture from the grated cucumber. I use a clean dish towel or cheesecloth—trust me, if you leave the water in, it dilutes the flavor and makes the dip watery.
- Mixing Advice: Don’t overmix once you’ve combined everything—it can make your tzatziki runny. Gently fold everything together for that perfect velvety texture.
- Swirl Customization: To get pretty swirls or layers, I like to spread the tzatziki in a shallow dish, then swirl the spoon in a circular motion. A little sprinkle of herbs on top makes it look festive and fresh.
- Ingredient Swaps: I’ve experimented with Greek feta crumbles, chopped olives, or even a splash of balsamic vinegar—I say, play around! Just keep the core ingredients, and you’ll be fine.
- Baking Tips: Since there’s no baking, focus on the fridge time. I often make this the night before; it’s a game-changer for flavor melding.
- Glaze Variations: For a different twist, try tossing in a pinch of smoked paprika or a drizzle of honey atop before serving. It adds a nice pop of flavor and makes it more complex.
Honestly, it took me a few tries to get the perfect consistency—trust me, don’t rush the draining part and taste as you go. Sometimes I add a little more lemon or herbs to brighten it up. The best part? You can tweak it endlessly until it’s just right for your palate. I’ve also tested using plant-based yogurt, and it works beautifully—just mind the thickness. This recipe is forgiving and adaptable, so don’t stress if you want to make it dairy-free or add your own flair. Every batch gets better as the flavors settle in, and soon, you’ll find your own perfect version. That’s what I love most—cooking is all about personal touch and little experiments!
Storing and Reheating Tips
Once you’ve made your tzatziki, how you store it makes a big difference. I usually transfer it into an airtight container and keep it in the fridge. It’s good for about 3 to 4 days—any longer, and the cucumbers might lose their crunch, and the flavors won’t be as bright. For best texture, I recommend giving it a gentle stir before serving. If you want to prep it ahead, make the base and add the herbs and lemon just before serving—that way, everything stays vibrant. Freezing isn’t ideal—it can get watery once thawed, but if you must, just make sure to thaw slowly in the fridge and give it a quick stir. Be aware that the texture might change slightly, but flavor-wise, it’s still delicious. As for the glaze or any toppings, add those just before serving—anything stored on top might get soggy or lose that fresh look. Trust me, the fresher day you serve it, the better it is.
Frequently Asked Questions
Final Thoughts
If you’ve never tried making tzatziki at home, I promise, once you do, you’ll never go back to store-bought jars. It’s so much fresher, more satisfying, and honestly, kind of addictive. I love how it can elevate everything from grilled meats to simple veggie snacks. Plus, it’s one of those recipes that makes you feel like a fancy chef without any of the fuss. It’s my little secret for turning an ordinary meal into something memorable. Every time I make this, it disappears in minutes—trust me on this. Once you get the hang of draining the cucumbers and balancing the herbs, it’s almost impossible to mess up. Perfect for lazy summer days, cozy nights, or whenever you just want to add a splash of sunshine to your plate. I can’t wait to hear how yours turns out—please share your tweaks and favorites! Happy baking, and here’s to many more delicious dips to come.
Homemade Tzatziki Sauce
Ingredients
Method
- Strain the yogurt using a metal strainer or a coffee filter for a few hours to remove as much liquid as possible. Set aside.
- Scoop seeds out of the cucumber with a small spoon. Place cucumber in a mini food processor or grate with a box cheese grater. Drain the liquid from the cucumber in a metal strainer and sprinkle with a little salt. Use the back of a spoon to help squeeze out any excess liquid.
- Combine strained cucumber, garlic, yogurt, salt, pepper, lemon juice, dill, and chives. Refrigerate for at least 1 hour before serving.
- Makes about 2 cups. Store in refrigerator for about a week.