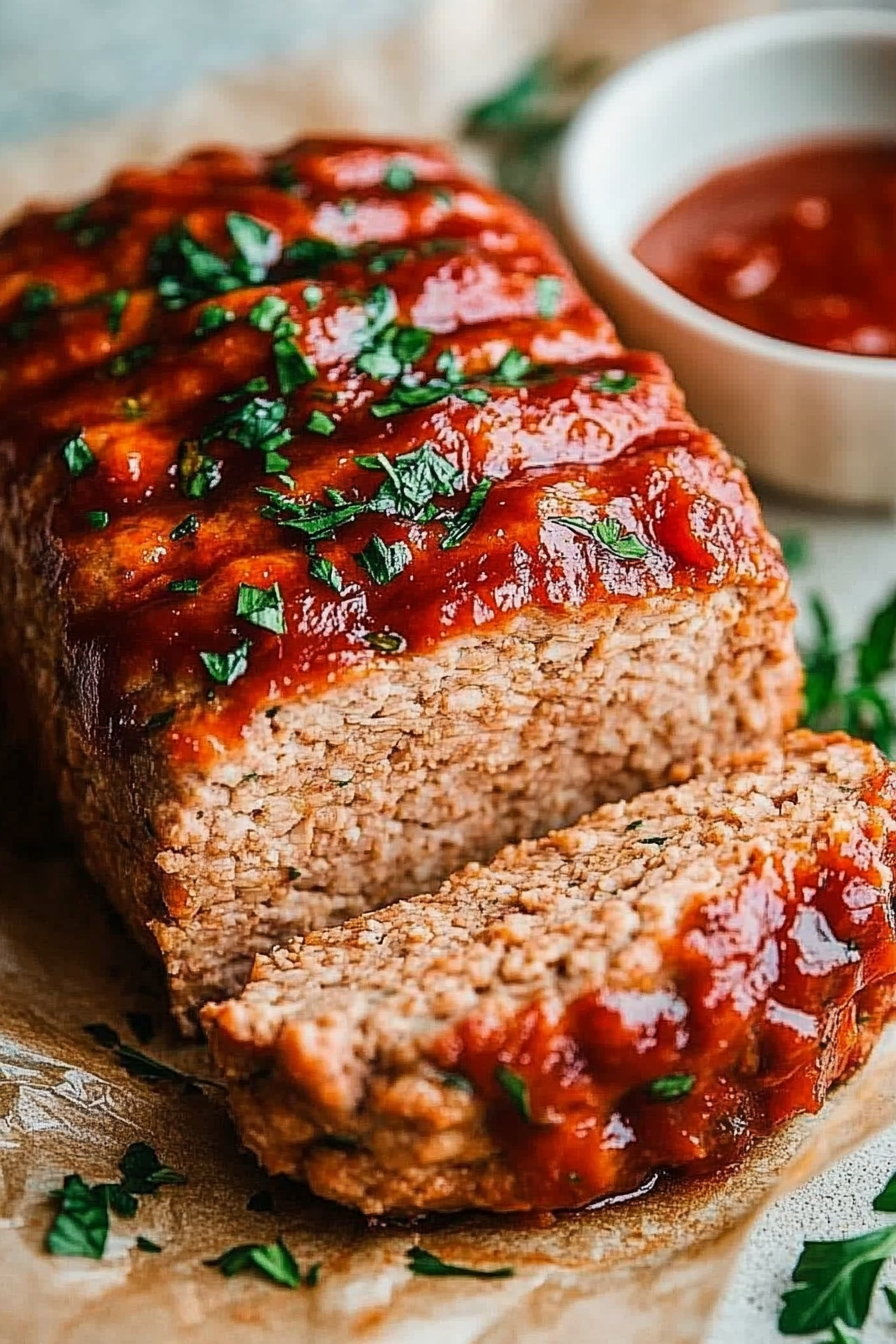
Easy Ground Turkey Meatloaf Recipe
If there’s one recipe that feels like a warm hug after a long day, it’s my go-to turkey meatloaf. Honestly, I’ve made it so many times that I’ve lost count—and each time, it’s greeted with hungry eyes and happy bellies. It’s one of those dishes that checks all the boxes: it’s flavorful, fuss-free, budget-friendly, and perfect for family dinners or even meal prep on busy weekends. I still remember the first time I tried making it—how the house filled with this incredible aroma that made everyone stop what they were doing. My kids ask for this all the time, especially when I toss in a little extra cheese or a dash of smoked paprika. It’s comfort food with a little sophistication, and the best part? It’s super versatile—you can tweak it to suit your taste or what’s in the fridge. Trust me on this one: once you get the hang of it, your kitchen will fill with happy chaos and delicious smells every time!
What is turkey meatloaf?
Think of turkey meatloaf as a hearty twist on the classic meatloaf, but made with lean turkey instead of beef or pork. It’s essentially a savory, loaf-shaped dish that’s packed with flavor, moisture, and a little secret ingredient or two to keep it from drying out (like a splash of milk or a beaten egg). The name “meatloaf” comes from the old-school way of baking ground meat mixed with breadcrumbs, spices, and veggies all together, then topped with a glaze. When you think of it, imagine a slightly healthier, lighter version that’s just as satisfying as the traditional—maybe even better. It’s perfect when you’re craving comfort food but want to keep it wholesome. This dish has been a family favorite for generations in my house, and honestly, I love how adaptable it is—sometimes I add crispy bacon on top, other times I sneak in shredded zucchini for extra moisture. It’s comfort food with a little modern twist, and I promise, once you try it, it’ll be a staple in your recipe collection too.
Why you’ll love this recipe?
What I love most about this turkey meatloaf is how incredibly forgiving it is. Even if you’re not a seasoned cook, you’ll find this straightforward and almost impossible to mess up. The flavor? Oh, it’s a game-changer. The tender, juicy bites of seasoned turkey paired with that slightly caramelized top—trust me, the smell alone will draw everyone to the kitchen. And because it’s made with turkey, it’s a lighter alternative to the usual beef version, making it a smart choice for a weeknight dinner or meal prep. Plus, it’s super budget-friendly; I often use whatever bread or breadcrumbs I have on hand, and the veggies are mostly pantry staples. The versatility is what makes it so appealing—turn up the heat with spicy peppers, go Mediterranean with herbs and feta, or keep it simple with just salt, pepper, and a little ketchup glaze. This dish is a blank canvas that’s begging to be personalized. What I love most about this is how my family always asks for seconds—even the picky eaters—and how the leftovers are just as delicious sliced cold for lunch!
How do I make turkey meatloaf?
Quick Overview
This turkey meatloaf comes together in just a few simple steps, starting with mixing your dry ingredients and wet ingredients separately before bringing everything together. It’s a one-loaf wonder that’s baked until golden and juicy, topped with a tangy glaze that adds just the right touch of sweetness and acidity. I love how adaptable it is—you can toss in your favorite herbs or even some chopped veggies. The secret to keeping it moist is not overmixing and ensuring you don’t skip the bread crumbs, which help hold everything together and give it that perfect texture. Once baked, you let it rest for a few minutes—this is key to slicing neat, beautiful squares. Served warm with a drizzle of glaze, it’s pure comfort on a plate, and leftovers heat up beautifully for days afterward.
Ingredients
For the Main Batter:
– 1 ½ pounds lean ground turkey (preferably organic or free-range if you can find it)—I like to use a blend that’s not too lean; a little bit of fat keeps it really juicy.
– 1 cup breadcrumbs (preferably homemade or panko for crunch)
– ½ cup milk (whole or almond, I tested with almond milk and it actually made it even creamier!)
– 1 large egg
– 1 small onion, finely chopped or grated
– 2 cloves garlic, minced
– 2 tablespoons Worcestershire sauce or soy sauce for depth
– 1 teaspoon dried thyme or Italian herbs
– Salt and black pepper to taste
For the Filling:
– 1 cup shredded cheese (cheddar, mozzarella, or whatever you prefer)
– ½ cup chopped fresh herbs like parsley or basil, optional
– For a little kick, add diced jalapeños or red pepper flakes
For the Glaze:
– ¼ cup ketchup or tomato sauce
– 1 tablespoon honey or brown sugar for sweetness
– 1 teaspoon vinegar (apple cider or rice vinegar)
– Optional: a dash of hot sauce or smoked paprika for flavor variations
Step-by-Step Instructions
Step 1: Preheat & Prep Pan
Set your oven to 375°F (190°C). Lightly grease a loaf pan or line it with parchment paper. I like doing this because nothing sticks, and cleanup is a breeze. Keep a baking sheet handy if you prefer freeform loaves. It makes for easier handling and browning.
Step 2: Mix Dry Ingredients
In a big bowl, combine the breadcrumbs, salt, pepper, and herbs. I always do this first because it helps everything disperse evenly in the batter later. Make sure your breadcrumbs are not stale—fresh or slightly toasted ones make a difference in texture.
Step 3: Mix Wet Ingredients
In a separate small bowl, beat your egg and then whisk in the milk, Worcestershire sauce, and garlic. Trust me, a well-mixed wet mixture ensures everything binds nicely. I usually do this right before combining to make sure the egg is fresh and incorporated thoroughly.
Step 4: Combine
Add the wet mixture to the dry ingredients and gently fold. Try not to overmix—overworking the meatloaf can make it dense. The goal is just to combine everything until mostly uniform, with some tiny lumps leftover—that’s what keeps it juicy!
Step 5: Prepare Filling
If you’re adding cheese or herbs, fold those into the mixture now. If you want a swirl of cheese throughout, sprinkle some inside and lightly fold to create streaks. It’s like making a loaf but with a surprise center of cheesy goodness!
Step 6: Layer & Swirl
Pour half of the batter into the loaf pan, then sprinkle your cheese or filling evenly over, then top with the remaining batter. For a marble effect, use a knife to gently swirl through the batter—this is where a little artistic flair comes in and makes each loaf a unique piece of comfort.
Step 7: Bake
Pop it into your preheated oven and bake for about 50-60 minutes. The top should be golden brown, and a thermometer inserted into the center should read 165°F (74°C). I usually check around the 55-minute mark because oven temperatures can vary. If it starts to brown too quickly, tent it with foil.
Step 8: Cool & Glaze
Let it rest for 10 minutes after baking—this makes it easier to slice cleanly. Then, brush on your glaze, which should be slightly thick but spreadable. I sometimes warm my glaze a bit, so it’s nice and glossy and easy to brush on.
Step 9: Slice & Serve
Slice with a sharp knife and plate it up. I like serving mine with a side of roasted veggies or a simple green salad. The glaze adds just enough sweetness to balance the savory flavors. Trust me, this turkey meatloaf disappears in minutes at my house!
What to Serve It With
For breakfast, it’s fantastic with a fried or poached egg on top, paired with a fresh cup of coffee. At brunch, try serving thick slices with a dollop of herbed Greek yogurt and a side of crusty bread. I also love making it into a hearty dinner with mashed potatoes and roasted carrots—kind of like a healthy, flavorful version of a roast dinner. Since this dish is so versatile, it even works for casual snacks—cold, sliced thin, stacked on a sandwich with some crunchy lettuce and pickles. It’s one of those recipes I’ve adapted over the years, adding or subtracting ingredients based on what’s in my fridge, and it always turns out delicious. Plus, leftovers are a lifesaver for busy mornings or late-night cravings, warm or cold.
Top Tips for Perfecting Your Turkey Meatloaf
After countless tests, here are some tricks I swear by to make your turkey meatloaf truly unbeatable:
Zucchini Prep: If you’re adding shredded zucchini like I sometimes do, make sure to squeeze out excess moisture. I learned this the hard way—wet zucchini can make the loaf watery and less cohesive. Grate it finely, toss with a pinch of salt, then squeeze tightly in a clean kitchen towel before mixing.
Mixing Advice: When combining ingredients, do it gently. Overmixing can lead to a dense, rubbery loaf. Think of it like folding in a delicate fabric—light and even. The batter should be just combined, with a few lumps remaining—that’s when you know it’s just right.
Swirl Customization: For a pretty presentation and extra flavor, try swirling in some pesto or a tomato sauce before baking. Use a toothpick or skewer to create beautiful streaks—your guests will think it’s fancy, but it’s super simple.
Ingredient Swaps: Out of cheese? No worries! Try chopped sun-dried tomatoes or sautéed mushrooms for an earthy twist. If you’re aiming for a lower salt version, use herbs and spices generously—it adds flavor without sodium.
Baking Tips: Can’t find the perfect oven temperature? If your loaf is browning too fast, tent it with foil and lower the temperature by 10-15°F. Check doneness with a digital probe thermometer; this is my secret to perfectly moist meatloaf every time. And never skip the resting period—slice too early, and all those juices run out, making it dry.
Glaze Variations: Feeling adventurous? Mix Sriracha into your glaze for a spicy kick or add a splash of balsamic vinegar for a tangy depth. The glaze is the finishing touch; don’t rush it—spread it evenly for that glossy, irresistible finish.
Storing and Reheating Tips
This dish keeps surprisingly well, and I’ve found that the leftovers often taste even better the next day. Wrap slices tightly in plastic wrap or store in an airtight container in the fridge—best eaten within 3-4 days. To reheat, I prefer the oven set at 350°F (175°C) for about 15 minutes, covered with foil to keep things moist. You can also microwave slices in short bursts, but I think the oven preserves that lovely glaze and crispy top better. If you’re planning to freeze, wrap slices well in foil and then in a freezer bag. They’ll keep for up to 3 months, and just defrost overnight in the fridge before reheating. A quick tip: if you add the glaze before storing, reheat in the oven and then brush on a fresh layer—it’s so much better than reheating with cooled-down glaze!
Frequently Asked Questions
Final Thoughts
This turkey meatloaf is more than just a weeknight meal; it’s a family tradition in the making. It’s comfort food that feels wholesome, yet indulgent enough to make you smile with every bite. The beauty of this dish is in its flexibility—adjust the herbs, cheese, or glaze to match your mood or what you have in the fridge. Honestly, I’ve tested countless variations, and each time, I’m reminded why this recipe sticks around. It’s gathered dust in old family cookbooks and evolved into my own kitchen staple. I hope you give it a try—I bet your family will ask for it again and again! Happy baking, and I can’t wait to hear how yours turns out. Share your stories, tweaks, and success pics—I love hearing your kitchen adventures!
Classic Turkey Meatloaf
Ingredients
Method
- Preheat oven to 350F.
- In a small bowl, combine 2 tbsp ketchup with Worcestershire sauce.
- Heat olive oil and sauté minced onion on low heat until translucent, about 3 to 5 minutes.
- In a medium bowl, mix ground turkey, sautéed onion, breadcrumbs, egg, 1/4 cup ketchup, salt, and marjoram until combined.
- Shape the mixture into a loaf and place in a baking pan. Spoon sauce on top.
- Bake uncovered for 55 minutes. Let sit for 5 minutes before slicing.