Easy Pan-Seared Chicken Breasts
There’s just something about a perfectly cooked chicken breast that feels like a warm hug, isn’t there? I remember as a kid, my mom always had this way of turning simple chicken into something so tender, so flavorful, it disappeared in minutes at our dinner table. Now, as a busy parent myself, I’ve come to realize that cooking juicy, flavorful stove-top chicken breasts is one of those lifesaver recipes I keep coming back to. No fancy equipment, no complicated marinades—just good old-fashioned technique and a dash of patience. I love how this method makes the chicken so tender and moist, unlike the dried-out versions I used to get from the microwave or overcooked in the oven. This is perfect when you’re craving something savory fast — it’s super adaptable, family-approved, and honestly, it smells so good while it’s cooking, your entire kitchen will be filled with that irresistible aroma. Trust me, once you master this, chicken will become your new go-to for salads, wraps, or just a simple protein boost on weeknights. Let’s dive into the secret behind cooking the best stove-top chicken breasts ever!
What is a stove top chicken breast?
Think of stove-top chicken breasts as your answer to quick, hearty, and healthful meals. It’s essentially chicken breasts cooked right on your stovetop—no oven or slow cooker required. The “stove-top” part means that you’re searing the meat first to develop a lovely golden crust and then gently cooking it through with heat, keeping the inside juicy and tender. The name is pretty straightforward, but what makes it special is how versatile and foolproof it is once you get the hang of a few key techniques. I like to consider this the adult version of “minimum effort, maximum flavor”—perfect for busy weeknights or lazy weekends when you want something satisfying without spending hours in the kitchen. The best part? It pairs well with just about anything—salads, grains, veggies, or even sliced and piled into tacos. Think of it as your blank canvas, ready to adapt to whatever flavor profile you’re craving. And trust me, once you try this method, you’ll see why I keep coming back!
Why you’ll love this recipe?
What I love most about stove-top chicken breasts is how reliably delicious they turn out, every single time. There’s a magic in that perfect sear—crispy, flavorful, yet inside stays impossibly tender. The smell alone brings everyone to the kitchen! This recipe is a total game changer because it’s honestly so simple: just a handful of pantry staples, some patience, and a little love. It’s budget-friendly, too—chicken breasts are an affordable protein, and you don’t need fancy ingredients to turn them into something special. Plus, the versatility is unmatched. Need a quick lunch? Slice this over a bed of greens or toss into a wrap. Want to impress guests? Serve slices with a homemade sauce and a side of roasted veggies. The flavors are neutral enough to take on spices or herbs easily—think lemon, garlic, paprika, or just salt and pepper. What I love most about this method is how forgiving it is—I’ve made adjustments along the way, and every time it’s perfect. It’s a staple I can count on when I’m short on time but still want a nutrient-rich, satisfying dinner. Plus, the kids ask for seconds—can’t beat that!
How do you cook a chicken breast on stove top?
Quick Overview
This method is all about simplicity and technique. You season your chicken breasts generously, sear them in a hot skillet until golden, then lower the heat and cook through until juicy inside. The key is to avoid overcooking, so I always use a meat thermometer — 165°F is the safe zone. The whole process takes about 15-20 minutes, making it perfect for a busy weeknight or even meal prep. I’ve tested this with different seasonings and found that the method remains consistent — just watch those heat levels, and don’t rush the searing part. The payoff? Chicken that’s not only moist but also has that gorgeous, restaurant-quality crust. Trust me on this one, once you get the hang of the searing and simmering dance, you’ll never want to cook chicken any other way.
Ingredients
For the main chicken: For the main chicken: For the main chicken: For the main chicken: For the main chicken: For the main chicken: For
• 4 boneless, skinless chicken breasts (pound them to even thickness for even cooking)
• 2 tablespoons olive oil or butter
• Salt and freshly ground black pepper to taste
• Optional spices: garlic powder, paprika, Italian herbs, or your favorite seasoning blend
For the Optional Flavor Boost:
• 2 cloves garlic, minced
• Fresh lemon juice or zest
• Fresh herbs like thyme or parsley
• Onion powder or smoked paprika for richer flavor
Step-by-Step Instructions
Step 1: Preheat & Prep Pan
Start by heating your skillet over medium-high heat for a few minutes until it’s nice and hot. I prefer cast iron or stainless steel for that perfect sear, but a non-stick works too. While it’s heating, pat your chicken breasts dry with paper towels—moisture is the enemy of a good sear. Season generously with salt, pepper, and any spices you like. This is where you build flavor from the start. Once the pan is hot, add your olive oil or butter and give it a moment to shimmer or melt. This is the magic moment—lay the chicken breasts into the pan carefully, ensuring they don’t touch each other. Hear that sizzle? Good. That’s surface contact starting to caramelize those beautiful browns.
Step 2: Mix Dry Ingredients
Honestly, I do this first—season the chicken with your dry spices. It keeps the flavor even and allows the salt to start working its magic. If I’m feeling fancy, I like to sprinkle on a little garlic powder and smoked paprika for that smoky hit. This step is quick but crucial; it’s the flavor foundation.
Step 3: Mix Wet Ingredients
While the chicken is searing, I prepare any wet flavor additions—like a squeeze of lemon or a drizzle of honey. Sometimes I brush on a little melted butter mixed with herbs for an extra layer of flavor. Keep these nearby so you can baste or add during cooking. Trust me, it makes all the difference.
Step 4: Combine
Once your chicken gets a nice golden crust—about 3-4 minutes per side—you’ll want to lower the heat to medium or medium-low. If it’s browning too quickly, reduce the heat sooner. This slow finish ensures the inside gets cooked without burning the outside. Use tongs to flip gently, and don’t overcrowd your pan—give each piece space.
Step 5: Prepare Filling
If you’re adding a flavor filling like garlic or herbs, do so now. I often toss minced garlic into the pan and let it soften for a minute, but be careful not to burn it. You can also add a splash of chicken broth or water, letting it steam gently to keep the chicken moist. I like to add a sprinkle of fresh herbs in the last minute of cooking for a burst of fresh flavor.
Step 6: Layer & Swirl
This is optional, but if you’re feeling fancy, you can swirl a teaspoon of honey or balsamic vinegar into the pan juices, then spoon that luscious glaze over the chicken. This little step makes all the difference in creating a rich, flavorful coating that clings to the meat.
Step 7: Bake or Finish on Stovetop
If your chicken breasts are thick, you might want to finish them in the oven at 375°F for about 10 minutes after searing, but I prefer to keep everything on the stovetop—just cover the pan and cook on low until the internal temp reaches 165°F. Using a meat thermometer is my best friend here. You’ll see the juices run clear, and the texture will be just right.
Step 8: Cool & Glaze
Remove the chicken from the pan and let it rest for about 5 minutes before slicing. This helps redistribute juices. Meanwhile, you can turn the heat back up briefly to reduce any pan juices into a sticky glaze—then pour that over the sliced chicken for extra flavor. If you like, finish with a sprinkle of chopped herbs or a squeeze of lemon for brightness.
Step 9: Slice & Serve
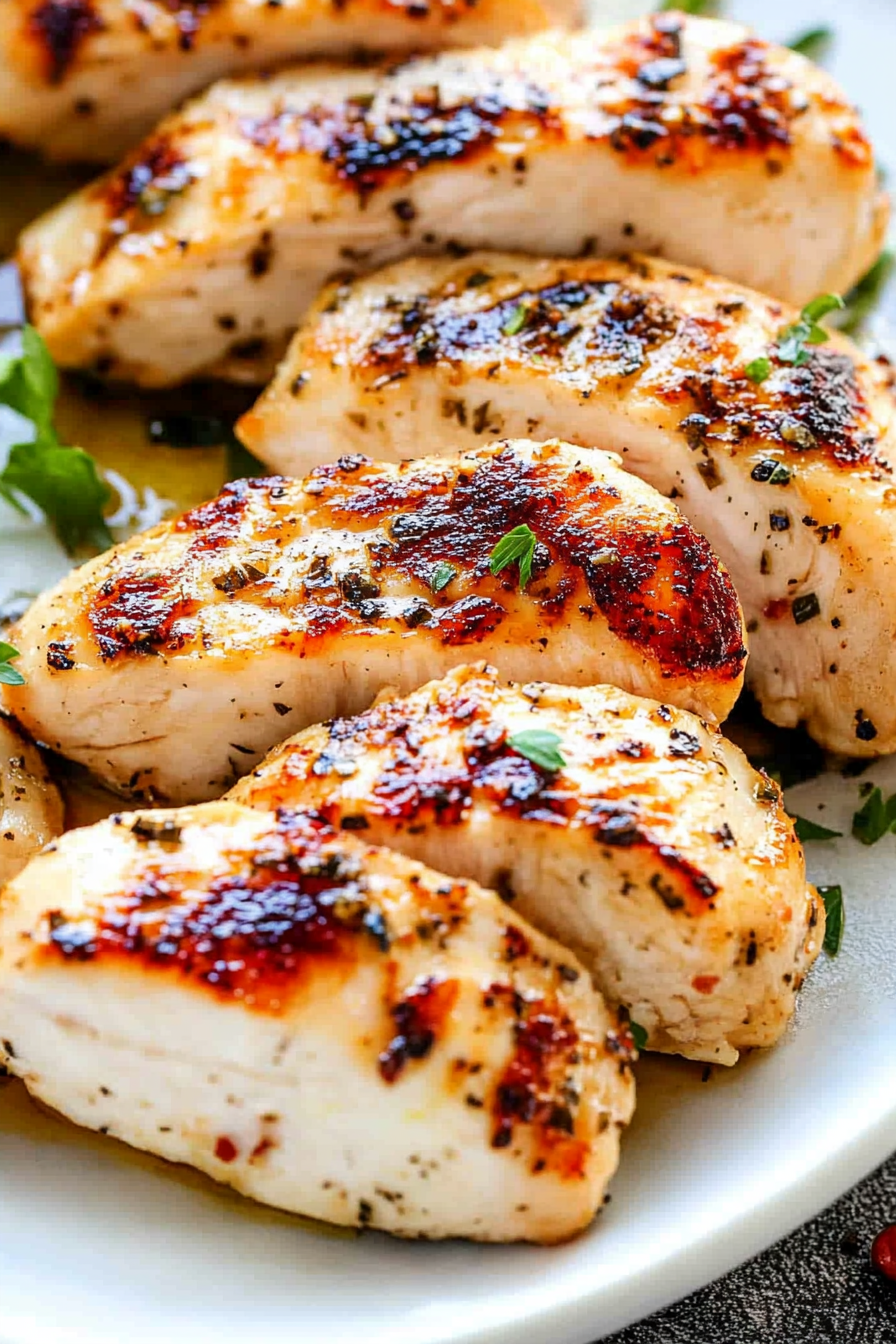
Use a sharp knife to slice against the grain for tender bites. Serve hot, alongside your favorite sides—roasted vegetables, creamy mashed potatoes, or even over a fresh salad. The slices should be juicy and beautifully browned, the perfect centerpiece for any meal.
What to Serve It With
My favorite part! This stove-top chicken breasts plays well with practically everything. For breakfast, I love slicing it thin and tossing it into a scrambled egg scramble or wrapping it in a warm flour tortilla—hello, protein-packed breakfast tacos! For brunch, serve it over a bed of quinoa salad with fresh herbs and lemon—bright and fresh. Need a quick dinner? Slice it thin and pile it on a hearty green salad with cherry tomatoes, cucumbers, and a tangy vinaigrette. Want to go all-out? Make chicken grain bowls with roasted sweet potatoes, sautéed greens, and a drizzle of tahini or yogurt sauce. It’s also fantastic sliced thin and layered into sandwiches or wraps—my kids actually ask for this all the time with a smear of pesto or mustard. And honestly, the savory aroma just about guarantees applause from everyone at the table.
Top Tips for Perfecting Your Stove-Top Chicken Breasts
Every time I make this, I learn just a little more. Here’s what I’ve discovered over years of trial and error:
- Zucchini Prep: I always salt and squeeze out excess water if I’m adding zucchini or other watery veggies into my wraps or salads—moisture is the enemy of crispness!
- Mixing Advice: Overmixing is a common mistake—keep your seasonings simple and sprinkle evenly. For extra flavor, I sometimes marinate the chicken briefly in olive oil with herbs, but only for about 20 minutes.
- Swirl Customization: Swirling in a flavored butter or balsamic vinegar during the last few minutes lifts the dish to a restaurant level. Play with your flavors!
- Ingredient Swaps: If you’re out of lemon, a splash of vinegar works wonders. Want smokiness? A pinch of smoked paprika or chipotle powder works great. I’ve even tested this with a dash of soy sauce for a salty umami boost, and it was a hit.
- Baking Tips: Keep the heat regulated—too high and you risk burning the outside, undercooked inside. Use a meat thermometer for best results. I learned this the hard way after drying out the first batch!
- Glaze Variations: A quick honey-mustard glaze or even a spoonful of pesto stirred into the pan juices makes for an irresistible finishing touch. Just don’t add the glaze until after resting or reheating—otherwise, it can become watery.
My personal trick? I’m always cautious with heat, and I let the chicken rest wrapped loosely in foil for a few minutes—it keeps those juices right where they should be. Plus, experimenting with different seasoning combos keeps it interesting—I aim for flavorful but simple every time.
Storing and Reheating Tips
This chicken keeps beautifully, which makes leftovers a true treasure. I usually store leftovers in airtight containers in the fridge, and they’re good for about 3-4 days. If I want to reheat, I prefer doing it gently in a skillet over low heat or in the microwave with a splash of broth or water to keep things moist. Freezing? Absolutely—slice or shred the chicken, pack it in freezer-safe containers, and it stays good for up to 3 months. When ready to eat, thaw overnight in the fridge, then reheat slowly on the stove or in a microwave. Just avoid overcooking it again—nobody wants rubbery chicken! I also like to keep the glaze separate so I can add it fresh when reheating for that just-made flavor. Trust me, even after freezing, this chicken remains juicy—sometimes better the next day after all those flavors have melded! Proper storage and reheating are key in making sure every bite feels as good as day one.
Frequently Asked Questions
Final Thoughts
There’s really nothing like a batch of perfectly cooked stove-top chicken breasts—moist, flavorful, and so quick to prepare. Once you get comfortable with this technique, you’ll find yourself reaching for it over and over again. It’s a blank canvas that loves a splash of lemon, a sprinkle of herbs, or a smoky spice mix. I’ve cooked this for everything from weeknight dinners to weekend gatherings, and each time it’s met with happy faces and clean plates. Plus, it’s so adaptable—you can turn it into salads, wraps, pasta, or serve it simply with roasted veggies. My biggest tip? Don’t skip resting the chicken after cooking—it makes all the difference in retaining those juicy bites. I hope you try this and love it as much as my family does. Happy cooking, friends! And I can’t wait to hear how yours turns out—feel free to drop your variations or tips in the comments below!

Simple Herb Roasted Chicken
Ingredients
Method
- Preheat your oven to 375F. Rub the chicken with olive oil, then season with thyme, rosemary, garlic powder, salt, and pepper.
- Place the chicken in a roasting pan and roast in the oven for 60 minutes, or until the internal temperature reaches 165F.
- Remove from oven and let rest for 10 minutes before carving.