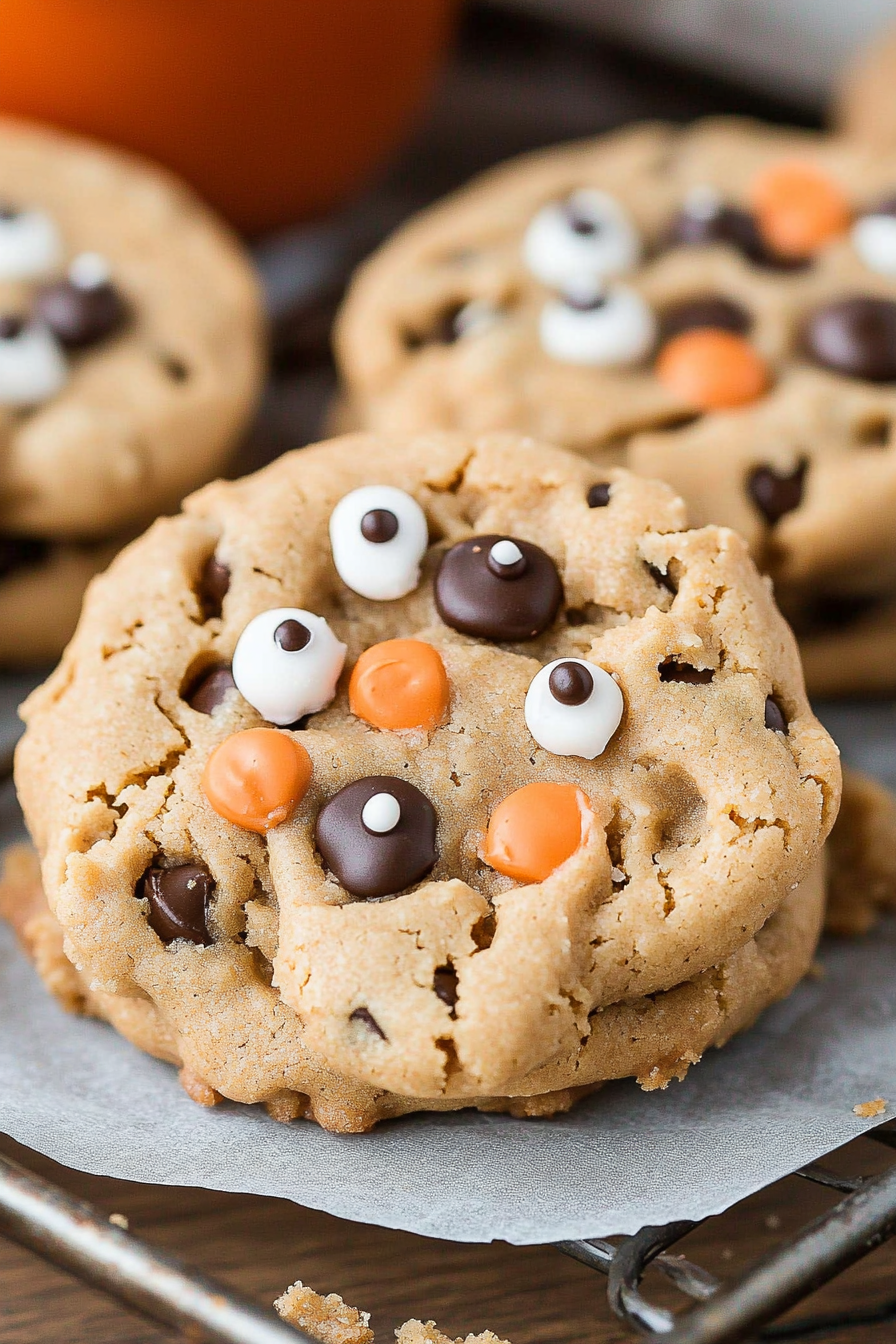
Easy Peanut Butter Cookie Monster Treats
If there’s one thing I can count on to bring a smile to everyone’s face, it’s my trusty batch of peanut butter cookies. I remember the first time I attempted these—I was maybe 12, sneaking a spoonful of peanut butter straight from the jar while my mom was baking and thinking, “This is the best smell in the world.” Fast forward to today, these cookies have become a staple in my kitchen. They’re fudgy, slightly salty, with that perfect peanutty punch. Honestly, they’re a lifesaver on busy nights when I need a quick hug in cookie form. Plus, my kids ask for these all the time—sometimes I swear I could hide vegetables in them and they’d never notice. From the first golden edge to that soft, chewy center, I’ve yet to meet anyone who doesn’t love a good peanut butter cookie. If you love that rich, nutty flavor that hits all the right notes, keep reading—I’ve got a recipe that’s become a family classic for a reason.
What is peanut butter cookies?
Think of peanut butter cookies as the lovechild of creamy, velvety peanut butter and warm, sweet cookie dough. They’re essentially a cookie made primarily of peanut butter, sugar, and a few simple ingredients—all coming together into this wonderfully gooey, slightly crisp treat. The name itself is pretty straightforward: they’re cookies *with* peanut butter. But what’s truly magic about them is how they melt in your mouth. The recipe has roots that go way back—I’ve read that peanut butter cookies became popular in the early 20th century, when peanut butter was just starting to make its debut as a household staple. Today, they’re a comforting standby for so many of us—perfect for sharing, for snacking, or just because you’re craving something sweet but don’t want to fuss with complicated baking. Think of it as a hug in cookie form, easy enough to whip up on a weeknight or impress friends with at a casual get-together.
Why you’ll love this recipe?
What I love most about these peanut butter cookies is how effortlessly delicious they are. Honestly, I’ve made countless batches, and I swear, they never fail me. The flavor? Out of this world. That rich peanut aroma alone can fill your whole kitchen and bring everyone rushing in from the backyard. And the best part? They’re downright simple. No fancy ingredients or fancy skills needed—just a handful of pantry staples and a mixer. Plus, they’re super budget-friendly; peanut butter is usually the priciest ingredient, but even then, it lasts for ages and makes dozens of cookies. I’ve experimented with healthier swaps and add-ins over the years—I’ve used honey instead of sugar, added a sprinkle of sea salt on top, or mixed in a few chocolate chips—and each variation turns out amazing. These cookies aren’t just a treat; they’re a versatile crowd-pleaser that can be tweaked to suit every mood or occasion. Whether you’re craving something sweet after dinner, a quick snack for the kids, or a lazy weekend bake, this recipe’s got your back.
What truly makes these cookies stand out is their nostalgic charm. They remind me of weekend afternoons baking with my grandma, the smell of warm peanut butter filling the house while we laughed and swapped stories. It’s funny how such a simple treat can evoke so many memories. My friends have told me they make my peanut butter cookies when they want to cheer up, or bring them as gifts—trust me, they always disappear faster than you’d expect! There’s something about that perfect balance of crunch and chewiness, combined with the rich peanut flavor, that keeps pulling me back. Once you make these a couple of times, you’ll see—they’re both a comfort and a celebration all in one bite.
How do I make peanut butter cookies?
Quick Overview
This recipe comes together in just about 30 minutes, start to finish. It’s a no-fuss process—you mix, scoop, shape, and bake. The secret to that irresistible texture is not overmixing your dough; instead, you want just enough to combine everything evenly. You’ll love how quick it is to get those cookies in the oven—then, it’s the waiting that’s hardest! Once you see the little criss-cross pattern on top (which I always do with a fork—so nostalgic!), you know they’re close to perfect, just slightly golden around the edges. These cookies stay tender inside but get a lovely, chewy exterior. Honestly, I always double the batch because they disappear faster than I can count—no joke.
Ingredients
[Organize ingredients by purpose with detailed explanations:]
For the Main Batter:
- 1 cup natural peanut butter (smooth or chunky, your call! For a richer flavor, I prefer creamy)
- 1 cup granulated sugar (white sugar keeps them classic, but I occasionally swap half for brown sugar for depth)
- 1 large egg (room temperature helps it blend better)
- 1 teaspoon vanilla extract (optional but adds a nice warmth)
For the Filling:
- Optional: mini chocolate chips or chopped peanuts for texture and flavor variation
For the Glaze:
- For a simple glaze, mix powdered sugar and a splash of milk or water, or just dust with powdered sugar for a pretty finish. Sometimes I top them with a drizzle of chocolate for extra indulgence—trust me on this one!
Step-by-Step Instructions
Step 1: Preheat & Prep Pan
Set your oven to 350°F (175°C). Line a baking sheet with parchment paper or a silicone baking mat—that way, no sticking, no fuss. You want your cookies to slide right off—trust me, clean-up is way easier, and you get perfectly round cookies every time.
Step 2: Mix Dry Ingredients
Since this recipe is so simple, the dry ingredients are basically just the sugar. But if you’re making variations with add-ins like chocolate chips, this is when you’d prepare them. I always use a whisk to lightly combine the sugar and any dry mix-ins—I’ve learned that evenly distributed bits mean every bite is just right.
Step 3: Mix Wet Ingredients
In a separate bowl, stir together the peanut butter, egg, and vanilla until smooth. Sometimes I microwave the peanut butter for 20 seconds to loosen it—makes mixing way easier and hands less sticky. You’re aiming for a uniform, slightly thick batter here.
Step 4: Combine
Pour the wet mixture into the dry and gently fold until just combined. No overmixing! Overworking the dough can yield cakier cookies, and I prefer them chewy and dense. The dough should be thick and slightly crumbly but hold together when rolled into balls.
Step 5: Prepare Filling
If you’re adding chocolate chips or nuts, fold those in now. For classic peanut butter cookies, I skip this step—though, honestly, a handful of mini chocolate chips mixed in the dough makes a huge difference!
Step 6: Layer & Swirl
Using a spoon or cookie scoop, form balls about 1 inch in diameter. Place them on your prepared baking sheet, then gently flatten with a fork, creating those iconic criss-cross lines. For a prettier swirl, I press down slightly more in the center—so they don’t puff up unevenly during baking.
Step 7: Bake
Pop them into your preheated oven and bake for 8-10 minutes. Keep an eye on the edges—they should look just a touch golden. If you like them softer, pull them out early. If you’re a crunchy cookie fan, give them those extra couple of minutes, but don’t overdo it—you want a chewy center, not a biscuit.
Step 8: Cool & Glaze
Once baked, transfer cookies to a wire rack and let them cool for about 5 minutes. If you want to add any glaze or toppings, do it now while they’re still warm—then let them cool completely. This helps toppings set and keeps your cookies neat.
Step 9: Slice & Serve
Because these cookies are soft and chewy, I use a gentle hand when stacking or storing. Serve them warm or at room temperature with a glass of cold milk or a steaming cup of coffee. Honestly, I think they’re best enjoyed slightly warm—soft, gooey, and fragrant.
What to Serve It With
These peanut butter cookies are versatile enough for any occasion. For breakfast? Pair them with a squeeze of fresh orange juice and a robust coffee—the salty-sweet combo wakes up your senses. At brunch, I love serving them alongside a cheese platter and fresh fruit—they’re playful yet satisfying. As a dessert, they’re fantastic fresh from the oven with a scoop of vanilla ice cream melting on top. But most of all, they’re perfect as a cozy snack during movie nights or when friends drop by unexpectedly. I often wrap a few in wax paper and tie them with twine—who doesn’t love a little homemade gift? My family’s tradition is to leave a few on the counter for the morning—they seem to disappear overnight, which I take as a good sign. No matter how you serve them, these cookies add a warm, inviting scent to any table and a smile to everyone’s face.
Top Tips for Perfecting Your Peanut Butter Cookies
Over the years, I’ve picked up a few tricks to make these cookies even better:
- Zucchini prep: Not relevant here! But if I want to sneak in some veggies into a variation, I squeeze out excess moisture and grate finely to avoid sogginess.
- Mixing advice: Gently fold ingredients—overmixing can make cookies tough.
- Swirl customization: Press forks into the dough in different directions or use different colored sugars for visual flair.
- Ingredient swaps: Almond butter or sunbutter works great if peanut allergies are a concern—just expect a slightly different flavor!
- Baking tips: Rotate your baking sheet halfway through to ensure even browning. If your oven runs hot, drop the temperature by 10-15°F.
- Glaze variations: For a quick chocolate glaze, melt some chocolate chips and drizzle after cooling—delicious and decadent.
I’ve learned that patience and gentle handling lead to the best cookies. Also, keeping the dough chilled for 30 minutes before baking can help cookies keep their shape better. Trust me, these little tweaks make a big difference!
Storing and Reheating Tips
To keep your peanut butter cookies at their best:
- Room temperature: Store in an airtight container for up to 3 days—still soft and chewy, perfect for snacking.
- Refrigerator storage: Keep in an airtight container for up to a week. They’ll stay fresh, but I recommend bringing them to room temp before serving for that just-baked feel.
- Freezer instructions: Wrap them tightly in plastic wrap and store for up to 3 months. To reheat, pop them in a low-temp oven or microwave for 10-15 seconds—instant soft cookies, anytime!
If you glazed your cookies, it’s best to add the topping just before serving, because the glaze might get soggy or sticky if stored too long. I usually do that right before I serve or give away extras as gifts.
Frequently Asked Questions
Final Thoughts
If you’re looking for a cookie that hits all the right spots—rich, nutty, sweet, and just a little salty—you’ve found it. These peanut butter cookies are a lifelong favorite of mine, built on simple ingredients but packed with personality. They remind me of childhood afternoons baking with my mom, and I love passing that warmth on to my family now. Whether you’re a seasoned baker or just starting out, this recipe is forgiving and adaptable, perfect for any occasion. I genuinely hope you give these a try and make them your own—maybe add a sprinkle of sea salt, a handful of chocolate chips, or even a swirl of jelly in the middle. Oh, and don’t forget a tall glass of milk or a steaming cup of coffee—they’re meant to be savored together. Happy baking! I’d love to hear how yours turn out, so leave a comment or share your tweaks. Enjoy every bite!

Peanut Butter Cookies with Chocolate Chips
Ingredients
Method
- Preheat oven to 350°F. Line baking sheets with parchment paper.
- Cream butter, peanut butter, and brown sugar until smooth. Mix in vanilla, egg, and milk. Add pudding mix and mix well. Stir in baking soda, flour, chocolate chips, and sprinkles.
- Scoop 2 tablespoon-sized balls onto prepared baking sheets. Flatten slightly with a fork, creating a criss-cross pattern. Optionally add extra chocolate chips or sprinkles on top.
- Bake for 10-12 minutes until edges are golden. Immediately press candy eyes onto warm cookies if using. Cool on wire racks before serving.