Easy Rose Spritz Cookies Delight
There’s just something magical about baking cookies that remind you of childhood, isn’t there? I remember tucked inside my grandma’s cozy kitchen, the aroma of vanilla and fresh butter filling the air as she meticulously piped these beautiful Rose Spritz Cookies. They’re a little piece of elegance on a tray, with their delicate rose shape and a subtle floral hint that makes them stand out from the usual cookie crowd. Honestly, I used to think cookies needed to be messy or gooey to be special — until I discovered these. They’re surprisingly simple to make, and trust me, once you try them, they’ll be a new family favorite. Whether it’s for a special occasion or just because you’re craving something fancy but quick, these cookies have a way of charming everyone at the table. Plus, they’re so pretty they practically sell themselves! I always do this when I want to impress guests or treat my kids to something a little more special — it’s a recipe I keep coming back to because it’s that good. And the best part? Kids ask for seconds every single time.
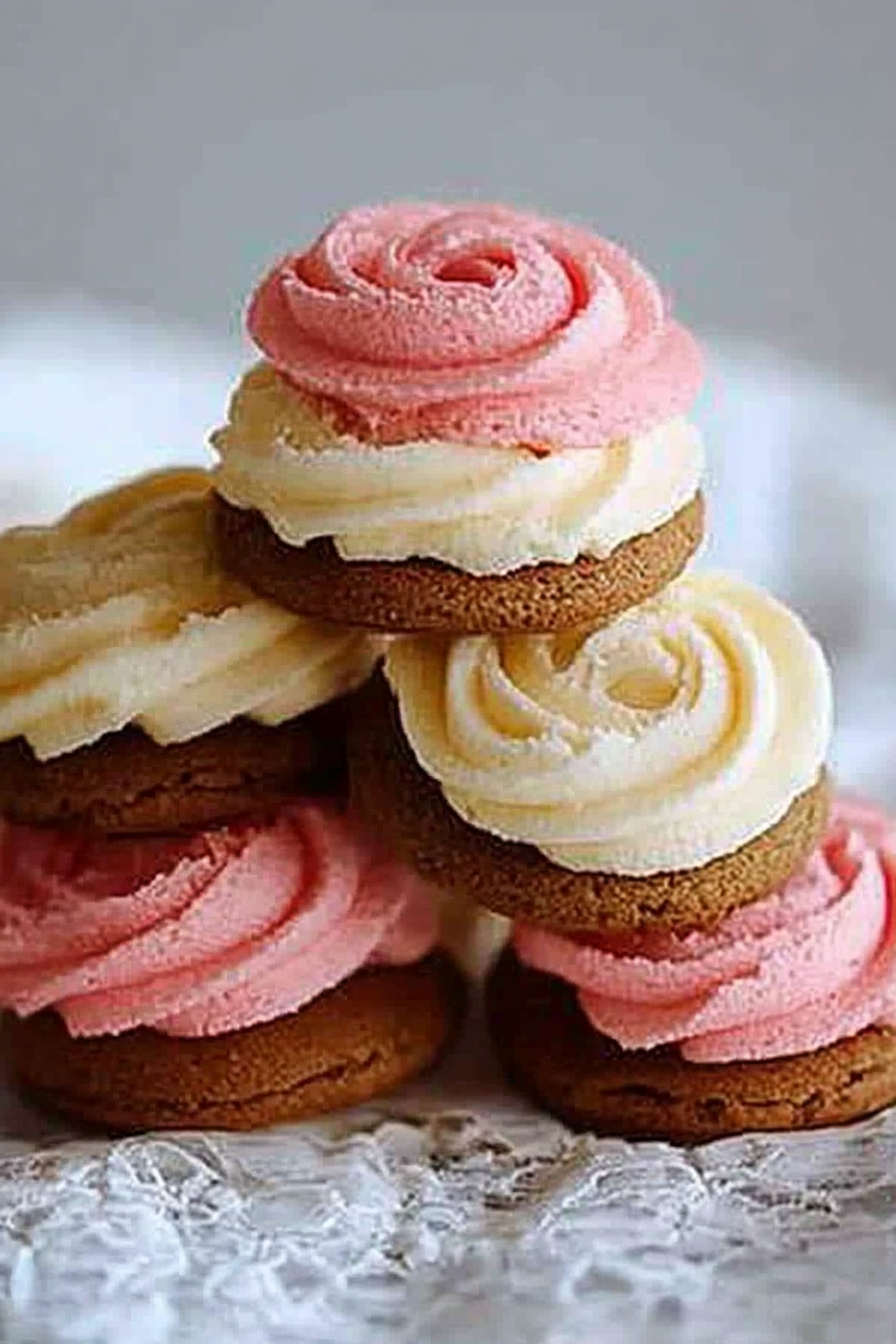
What is Rose Spritz Cookies?
Think of Rose Spritz Cookies as a sort of cross between a buttery, melt-in-your-mouth treat and a work of art. Named after their beautiful floral shape, these cookies are piped from a simple yeast-based dough through a star-shaped nozzle, creating a delightful, frilly petal effect — kind of like tiny rose blossoms. It’s essentially a European-inspired cookie, often associated with festive, romantic occasions, where their delicate appearance makes them feel extra special. The word “spritz” comes from the German “spritzen,” meaning “to spray or squirt,” which perfectly describes the piping method. What makes this cookie truly charming is how each little blossom is handcrafted, yet the dough itself is straightforward — butter, sugar, eggs, flour, and just a touch of flavor to bring it all together. They’re the perfect combination of elegance and ease, making them a cornerstone in my holiday baking lineup, or whenever I want a cookie that wows without taking hours to prepare.
Why you’ll love this recipe?
Oh, where do I even start? First off, the flavor — these cookies are buttery and slightly sweet with a whisper of vanilla and floral notes that just make your taste buds dance. The texture is light and tender, almost like a melt-in-your-mouth shortbread, but with that charming frilled shape that makes them look like tiny roses. What I love most about this recipe is how incredibly easy it is — you don’t need fancy ingredients or hours of prep. Just a handful of pantry staples, and you’re good to go. Plus, they’re budget-friendly; I usually have everything I need already in the kitchen. Another big win? Versatility. These cookies are so pretty they can be dressed up with colored glaze or left simple for a classy look. They’re perfect for everything from holiday cookie exchanges to afternoon tea with friends. And honestly, I’ve made these countless times, and they never fail to bring smiles and compliments. My kids ask for these all the time — they’re like little edible blooms, and everyone appreciates that little touch of elegance in a cookie. Plus, they store beautifully, so I can make a batch ahead of a party or gift them to neighbors and friends — everyone loves them.
How do I make Rose Spritz Cookies?
Quick Overview
This recipe is honestly one of the easiest ways to create something stunning. You start with a simple, rich butter-based dough, pipe it into pretty rose shapes, and bake until just golden. The magic is in the piping — I recommend a star-shaped tip for that perfect petal look — but don’t worry, it’s easier than it sounds. Once baked, you can enjoy them plain or dress them up with a light glaze or colored sugar. The whole process takes less than an hour, and the end result feels like you’ve just stepped out of a fancy bakery. Trust me on this — once you get the hang of piping, you’ll be hooked. Plus, how cute do they look arranged on a cake stand or tucked into a little gift box? These are the cookies I reach for when I want instant gratification with a touch of elegance.
Ingredients
For the Main Batter:
- 1 cup (2 sticks) unsalted butter, softened — I always use good-quality butter for that rich flavor
- 1/2 cup granulated sugar — keep it nice and simple
- 1 large egg — room temperature helps everything blend smoothly
- 1 teaspoon vanilla extract — pure vanilla for that warm, sweet aroma
- 2 1/2 cups all-purpose flour — I prefer unbleached flour for better flavor
- 1/4 teaspoon baking powder — just a pinch to help with rise (not too much)
For the Filling:
- Optional: fruit preserves or jam (raspberry or strawberry work beautifully) — I love to add a tiny dollop inside some of the cookies for a surprise center
For the Glaze:
- 1 cup powdered sugar
- 2-3 teaspoons milk or lemon juice — adjust for your desired thickness
- Optional: food coloring or vanilla extract for flavor
Step-by-Step Instructions
Step 1: Preheat & Prep Pan
Set your oven to 350°F (175°C). Line baking sheets with parchment paper or silicone mats — it’s easier to clean and helps the cookies slide off without a fuss. I like to keep my piping bag nearby with the star tip ready to go, so it’s all set once the dough is prepared.
Step 2: Mix Dry Ingredients
In a small bowl, whisk together the flour, baking powder, and a pinch of salt. This step ensures even distribution of dry ingredients, which is especially important for light, tender cookies. I always do this first — it keeps everything smooth later on.
Step 3: Mix Wet Ingredients
In a large mixing bowl, cream together softened butter and sugar until fluffy — about 2-3 minutes. Add the egg and vanilla, mixing well until everything’s combined. I’ve tested this with almond extract, and it’s surprisingly lovely if you want a hint of nuttiness.
Step 4: Combine
Gradually add the dry ingredients into the wet mixture, mixing on low speed or with a spatula just until combined. Be careful not to overmix — the dough should be soft but not sticky. If it feels too firm or crumbly, a splash of milk can help loosen it up.
Step 5: Prepare Filling
If you’re adding jam or preserves, scoop a small amount into a piping bag or zip-top bag with the corner snipped off. For a more classic look, you might pipe a little bit into the center of each cookie before baking, or leave them plain if you prefer minimalism.
Step 6: Layer & Swirl
Fill your piping bag fitted with a star tip with the dough. Pipe petal-shaped rosettes onto your prepared baking sheet, starting from the center and piping outward in a spiral. If you want to add a touch of color, sprinkle a tiny bit of colored sugar or edible glitter on top before baking for that extra magic.
Step 7: Bake
Bake in the preheated oven for about 12-15 minutes, or until the edges turn a very light golden. Keep an eye on them — they’re delicate and can burn quickly. I always check a couple of minutes early because oven temperatures can vary. Once baked, transfer the cookies to a cooling rack — delicate as they are, they’re easiest to handle after a few minutes’ rest.
Step 8: Cool & Glaze
Let the cookies cool completely before glazing, unless you like that glaze a little warm and gooey. Mix your powdered sugar with milk or lemon juice, adjusting until you reach a smooth, drizzleable consistency. Drizzle over the cooled cookies, or dip the tops for a neat finish. I sometimes add a few drops of food coloring for fun — pink or lavender makes them feel extra special.
Step 9: Slice & Serve
These cookies are best enjoyed at room temperature. Arrange them on a pretty platter and watch how quickly they disappear. I love stacking them in a tin or wrapping some in cellophane with a satin ribbon — they make a lovely gift, too. My family keeps telling me I should sell these — I swear, they’re that addictive.
What to Serve It With
This cookie pairs beautifully with a light cup of tea or coffee, especially in the afternoon. I like to serve them with a side of fresh berries for a touch of tartness that balances their sweet richness. They’re perfect for brunch platters, layered on a cake stand with other delicate treats like madeleines or macarons. Want to elevate the experience? A dollop of softly whipped cream alongside or a drizzle of warm honey turns these into a lovely dessert. On cozy days, I sometimes warm them slightly and serve with vanilla ice cream for an indulgent spin. My family loves these for holiday gatherings — arranged in a pretty circle with a little sprinkle of powdered sugar and edible gold dust. They look so fancy, yet they’re all about simple pleasures. Honestly, I’ve even tucked a few into lunchboxes because they’re so cute, kids think they’re fancy snacks from a bakery. Trust me, the versatility alone keeps me coming back to this recipe time after time.
Top Tips for Perfecting Your Rose Spritz Cookies
Over the years, I’ve learned a few tricks that make these cookies turn out picture-perfect every time. First, for the dough, I always make sure the butter is well softened but not melted — cold butter makes piping tricky. When it’s time to pipe, hold your bag at a steady angle and apply gentle, consistent pressure — no need to squeeze too hard, or the shape gets wonky. If your cookies spread too much, popping the baking sheet in the fridge for 10-15 minutes before baking helps them hold their shape. I’ve tested different pipette tips, and a star tip creates that charming, textured rose effect best. For the filling, I recommend using a thick jam or fruit preserve; runny filling can leak out in the oven, which isn’t cute. Want to switch things up? Try adding finely chopped pistachios or lavender petals into the dough for a unique twist. And don’t forget about the glaze — it’s the finishing touch! If your glaze seems too runny, add a little more powdered sugar; if it’s too thick, a splash more milk. After baking, I also like to brush a tiny bit of honey or melted butter on top while they’re still warm for a glossy finish and extra flavor boost. Trust me, these little tips are what elevate your cookies from good to utterly irresistible.
Making these cookies is a little bit of a dance — the piping, the timing, the finishing touches — but every step is worth it when you see those beautiful rose shapes coming out of the oven. The smell alone makes my kitchen feel like a holiday wonderland, and I promise your home will smell just as lovely. Plus, once you’ve done it a couple of times, it’s so quick and calming — the perfect way to unwind. I always keep a batch in the freezer just in case company drops by — they thaw in minutes and are still delicious. Honestly, I’ve given these as gifts, brought them to potlucks, and served them at family brunches — they never disappoint. And I know once you try making them, they’ll become a cherished part of your baking rotation, too.
Storing and Reheating Tips
These cookies are quite resilient when it comes to storage, which is a blessing. Once completely cooled, I like to store them in an airtight container — a glass or tin works beautifully. They stay fresh for about 4-5 days at room temperature, especially if the weather isn’t too humid. If you’re not planning to eat them right away, pop them into the fridge, where they can last up to a week. Just make sure they’re covered well so they don’t dry out or pick up fridge odors. For longer storage, the freezer is your friend. Wrap the cookies tightly in plastic wrap or place them in a freezer-safe container, and they’ll stay good for up to 3 months. Thaw at room temperature for a few minutes, and they’re just as delightful as day one. If you’ve glazed them, I recommend waiting until they’re fully thawed before adding the glaze — that way, you’ll avoid any unwanted melting or pooling. As for reheating, I prefer enjoying them at room temperature, but if you like them warm? Just pop them in a low oven (around 300°F) for 3-5 minutes — it’s perfect for that bakery-fresh feel. These cookies keep their charm long after baking, making them ideal for making ahead of time and sharing the love later.
Frequently Asked Questions
Final Thoughts
If you’re craving something that’s both beautifully delicate and incredibly satisfying, these Rose Spritz Cookies truly hit the spot. They’re a bit of a zen activity to pipe — I swear, it’s almost meditative — and the moment they come out of the oven, your whole house smells like a bakery filled with blossoms. Over the years, I’ve learned that the secret to the best ones is patience and a gentle hand when piping. These cookies remind me that sometimes, elegance doesn’t have to come with hours of fuss — just a good recipe, a piping bag, and a sprinkle of love. Trust me, your family and friends will be enchanted by their lovely appearance and tender bite. I hope you give this recipe a try — it’s a little classic that never fails to bring a smile. Happy baking!
Rose Spritz Cookies
Ingredients
Method
- Preheat oven to 400°F. In a stand mixer, combine 1 cup butter, sugar, egg, vanilla, and almond extract until creamy.
- Add flour, salt, and strawberry extract. Mix at low speed until well combined. Divide dough and tint with pink food coloring as desired.
- Fill a piping bag fitted with a star tip with dough. Pipe cookies onto baking sheets.
- Bake for 5 to 8 minutes until edges are slightly golden. Let cool.
- Prepare the marshmallow buttercream: Cream 2 sticks butter until fluffy. Mix in almond extract, then gradually add confectioners' sugar. Fold in marshmallow creme.
- Spread or pipe frosting onto cooled cookies. Decorate as desired.