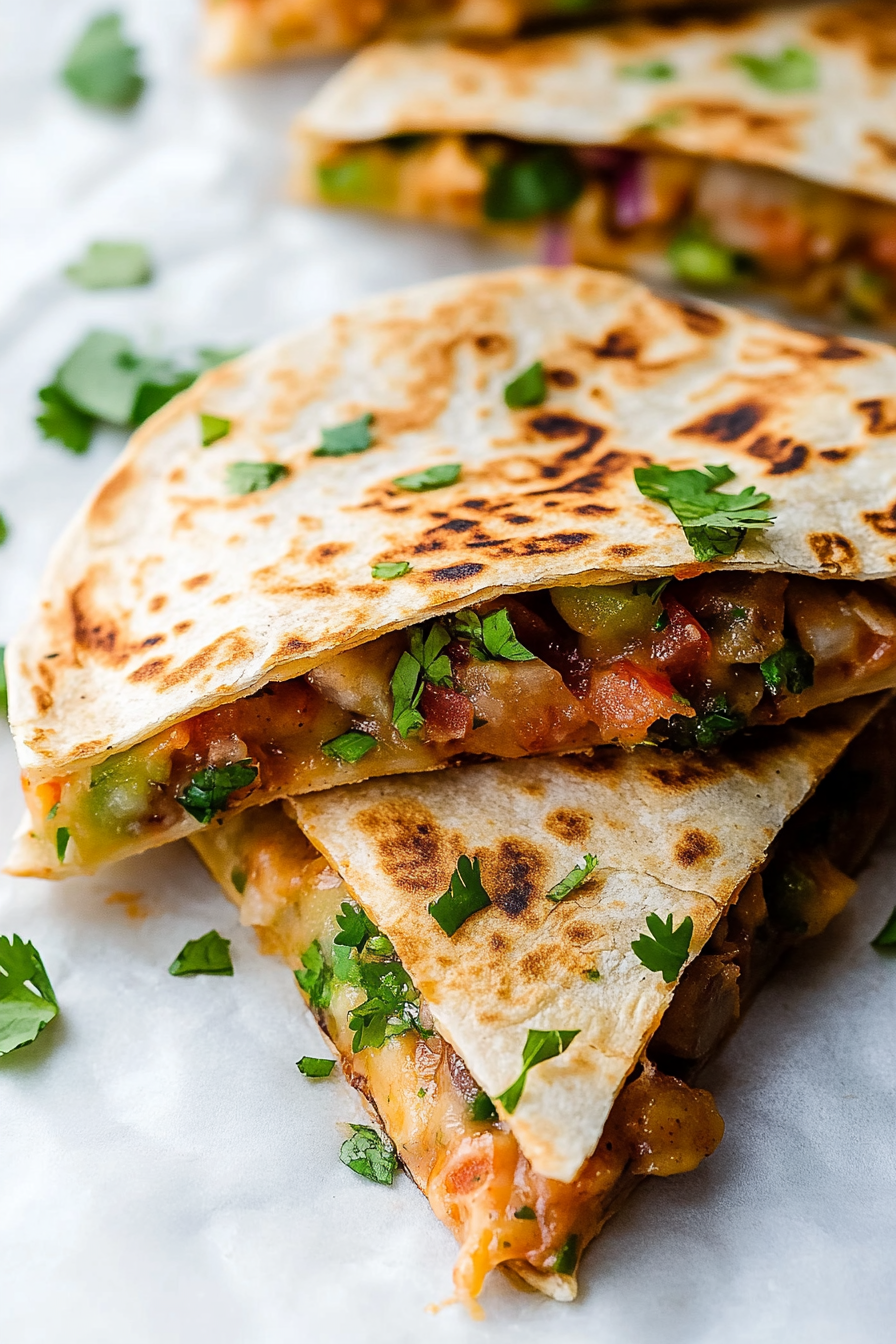
Easy Shrimp Quesadillas for a Quick Dinner
There’s just something about a good quesadilla that feels like a warm hug, right? I remember my childhood kitchen, the smell of melting cheese wafting through the air, and my mom flipping a crispy, gooey quesadilla onto a plate with a satisfied smile. It’s the kind of comfort food that’s so versatile—it can be a quick lunch, a snack, or even a fun dinner if you throw in some veggies or leftover chicken. I always do this when I want something satisfying but easy—plus, my kids love ‘em, and honestly, they disappear in minutes at my house. The best part? You can toss them together in about ten minutes, and they taste like a fancy restaurant dish. Trust me on this—once you master the art of making perfect quesadillas, you’ll find yourself craving these cheesy marvels nonstop. Plus, they’re way better than takeout because you customize everything just how you like it. Ready to get cheesy? Let’s dive in!
What is a quesadilla?
Think of quesadillas as a cozy, cheesy grilled sandwich wrapped in a tortilla. The word comes from the Spanish “queso,” meaning cheese, so naturally, cheese is the star here. It’s essentially a folded or layered flour tortilla filled with melted cheese and often a mix of savory ingredients like meats, veggies, or beans. The magic happens when you crisp up the outside until golden brown, creating that irresistible crunch, while the inside stays melty and gooey. Originally from Mexico, quesadillas have become a global comfort food, loved for their simplicity and endless versatility. Whether you prefer them loaded with spicy salsa, chunks of grilled chicken, or just plain cheesy goodness, they’re a go-to for quick, satisfying bites. Think of it as a tortilla pizza or a melted cheese pocket—delicious, fun, and totally customizable for whatever you’re craving that day.
Why you’ll love this recipe?
What I love most about making quesadillas at home is how effortless yet totally satisfying they are. The flavor profile is unbeatable—the crispy shell combined with melted, cheesy goodness is pure comfort. Plus, you get to play chef and decide exactly what fillings go inside—so it’s truly personalized. This recipe is a lifesaver on busy nights because it comes together in under 15 minutes, yet feels like a special treat. And let’s not forget how budget-friendly it is—using simple ingredients like tortillas, cheese, and whatever leftovers you have in the fridge. I’ve tested this with so many variations, from classic cheese to spicy jalapeño and even sautéed mushrooms, and honestly, they’re all fantastic. The best part? It’s a perfect dish for picky eaters and kids—my kids actually ask for these all the time, and I don’t mind because I know exactly what’s in them. They’re crispy, gooey, flavorful, and so customizable—it’s my go-to when I want a quick, satisfying meal or snack.
How do I make quesadillas?
Quick Overview
This recipe is all about layering cheese and fillings inside a tortilla, then crisping it up until golden brown. The process is super simple: assemble your fillings, cook on a hot skillet, flip, and serve. What makes this method special is how quickly everything comes together—no complicated steps or fancy tools needed. Just good quality tortillas, cheese, and whatever extras you love. The secret is in the crispiness—getting that perfect golden exterior makes all the difference. Once you master this basic technique, you’ll see how endlessly adaptable this dish is. It’s perfect for busy nights, unexpected guests, or lazy weekends where you just want to relax while something delicious cooks in a pan.
Ingredients
For the Main Filling:
– 2 large flour tortillas (soft, fresh, and flexible)
– 1 to 1 ½ cups shredded cheese (cheddar, Monterey Jack, or a blend—they all melt beautifully)
– Optional: cooked chicken, ham, sautéed peppers, onions, or black beans
For the Filling:
– A handful of chopped herbs (cilantro or parsley for freshness)
– Diced jalapeños or pickled veggies for some heat
– Sliced avocado or guacamole for serving
For the Glaze:
– A little melted butter or olive oil for extra crunch
– Optional: a sprinkle of chili powder or paprika for color and flavor
Step-by-Step Instructions
Step 1: Preheat & Prep Pan
First, grab a large skillet or griddle and heat it over medium heat. I like to give it a quick wipe with a little olive oil or butter—I promise, it makes everything crispier and prevents sticking. Keep your fillings ready so you can assemble quickly once the pan hits the right temperature—about 350°F if you have a stove thermometer, but honestly, just medium heat works fine. The goal is a hot pan that sears the tortilla perfectly.
Step 2: Mix Dry Ingredients
If you’re adding any dry seasonings or herbs, sprinkle them into your cheese or fillings now. I usually keep it simple but adding a pinch of chili powder or cumin gives an extra flavor boost. Mix your cheese with any extras you want to include—trust me, shredded cheese is the glue that holds everything together, so don’t skimp here.
Step 3: Mix Wet Ingredients
Most fillings don’t need much wet, but if you’re adding ingredients like cooked chicken or veggies, just make sure everything’s chopped small and ready to go. I never do this when I’m in a rush—frozen cooked chicken works fine if you thaw it first, and sautéed peppers should be soft and flavorful but not soggy.
Step 4: Combine
Lay one tortilla flat on a plate or cutting board, sprinkle cheese evenly, then layer your fillings on half of it. Fold it over or top with a second tortilla if you prefer a double-layered quesadilla. If you’re making a single, just assemble and press gently to keep everything compact. Be careful not to overfill—too much cheese or fillings can make flipping tricky.
Step 5: Prepare Filling
If you’re using cooked chicken, beans, or veggies, arrange them evenly inside. A little goes a long way—better to keep it simple. I love mixing in a few herbs or spicy jalapeños to balance the richness of the cheese. For me, the best quesadillas have a little crunch from the fillings so I try not to make it too soggy.
Step 6: Layer & Swirl
Place your prepared quesadilla in the hot skillet. Let it cook for about 3-4 minutes until the bottom is golden and crispy, then carefully flip with a spatula. I like to use a large plate or another pan to flip these—takes a bit of practice, but it’s worth it. Keep the heat steady so the cheese melts nicely without burning the outside.
Step 7: Bake
Once flipped, cook for another 3-4 minutes until the second side is just as golden. If you want crispier edges, turn up the heat slightly for the last minute. You’ll know it’s done when the cheese is melted and you see a beautiful, crisp crust on both sides. Don’t rush this step—patience makes all the difference, trust me. If your cheese isn’t melting, cover the skillet for a minute or so to help it along.
Step 8: Cool & Glaze
Remove from the pan and let it sit for a minute or two—this helps everything set and prevents ooey gooey messiness when you slice. For an extra touch, I often brush the top with melted butter or olive oil and sprinkle a little chili powder or herbs for flavor and color. The smell alone gets everyone coming to the kitchen!
Step 9: Slice & Serve
Use a sharp knife or pizza cutter to slice into wedges. I always cut on a slight angle to reveal that cheesy gooey goodness inside. Serve hot, maybe with a side of salsa, sour cream, or a quick side salad. You can also reheat leftovers in the skillet—just keep the heat moderate so it crisps up again without burning. My kids ask for seconds always, and I happily oblige because they’re just that good.
What to Serve It With
Quesadillas are a blank canvas—they’re perfect on their own, but I love pairing them with fresh toppings and sides. For breakfast, I toss a few scrambled eggs on the side, or serve with a hot cup of coffee and some fruit. On weekends, I like to make a big platter with guacamole, pico de gallo, and a sprinkle of cilantro—makes everything feel a little more special. For dinner, a simple side of Mexican rice or a crisp green salad balances the richness. And honestly, they’re so good as leftovers, just reheated in the pan until crispy again. My family’s favorite? Quesadillas served with a cool dollop of sour cream and a squeeze of lime—bright, fresh, and oh-so-delicious. I’ve learned over years of making this that you can add just about anything inside—think cooked corn, sautéed spinach, or even leftover roast veggies—and it’s bound to turn out tasty. Whatever your family’s favorite fillings are, take this as a starting point and make it your own!
Top Tips for Perfecting Your Quesadillas
Before you flip that quesadilla for the first time, here are some bird’s-eye tips I swear by:
- Zucchini Prep: I usually grate zucchini and squeeze out excess moisture with a clean towel. This way, it won’t make your quesadilla soggy. Trust me, moisture is the enemy here.
- Mixing Advice: Don’t overmix the cheese and fillings—think of it as stacking, not kneading. Keep the layers loose so everything melts smoothly and heats evenly.
- Swirl Customization: For visual appeal, experiment with swirling cheese and fillings. Use a toothpick or fork to create pretty marbled patterns that look as good as they taste.
- Ingredient Swaps: Dairy-free? No problem. Melted vegan cheese or even mashed avocado can be a nice alternative. I’ve tried everything, and honestly, each brings a unique flavor.
- Baking Tips: If you need more crunch, flip your quesadilla more than once, or even pop it under the broiler for a minute for extra crispness. Just keep a close eye—it burns easily!
- Glaze Variations: Instead of butter, I sometimes brush the quesadilla with a spicy chili oil or sprinkle sesame seeds on top for a different twist. Play around—this is your kitchen!
Over the years, I’ve learned that the little tricks make all the difference—like not overstuffing or cooking on the right temperature. The key is patience and a good non-stick pan. Oh, and don’t be afraid to get creative with fillings. This is one of those recipes where improvisation can lead to your new favorite twist.
Storing and Reheating Tips
If you have leftovers (which, honestly, rarely happens in my house), here’s how to keep them fresh and tasty:
- Room Temperature: These are best eaten fresh. If you do store them, keep in an airtight container for up to 2 hours—beyond that, the crust may get soggy.
- Refrigerator Storage: Wrap the cooled quesadilla tightly in foil or store in an airtight container. They’re good for up to 3 days, but I find the texture is best with fresh or within a day or two.
- Freezer Instructions: Wrap individual slices in plastic wrap, then foil, and freeze for up to 2 months. To reheat, bake in a 350°F oven until warmed through and crispy again—about 10 minutes. You can also reheat in a skillet over medium heat, covered, to revive that crispness.
- Glaze Timing: If you love that extra butter or spice glaze, add it just before serving or after reheating to keep that fresh, crispy bite.
Honestly, these hold up pretty well, but nothing beats the just-made magic. When rewarming, I prefer skillet reheats—they revive the crunch and melt the cheese perfectly. The key is low and slow—don’t rush it, or you’ll end up soggy again.
Frequently Asked Questions
Final Thoughts
If you’ve never tried making quesadillas at home, I promise, once you get the hang of it, they become your weekly staple. There’s just nothing quite like that perfect crispy exterior with the stretchy, cheesy inside. Over the years, I’ve made countless versions—some with spicy chorizo, others with roasted veggies—and honestly, they all turn out amazing. What makes this recipe so special is the way it’s almost foolproof and endlessly customizable. Whether you’re making these for a quick dinner, a party snack, or a lazy weekend brunch, they never fail to satisfy. Plus, I love how kids and adults alike can get involved—everyone loves to build their own, after all! So go ahead, get those tortillas out, throw in your favorite fillings, and start flipping. Happy baking! I can’t wait to hear how yours turn out, so be sure to leave a comment or share your favorite variations. Enjoy every cheesy, crispy bite!
Cheese Quesadilla
Ingredients
Method
- Place a tortilla on a skillet over medium heat. Sprinkle half of the cheese evenly over one half of the tortilla.
- Fold the tortilla in half and cook for about 2-3 minutes until golden brown. Flip and cook the other side for another 2-3 minutes until cheese is melted.
- Remove from skillet, cut into wedges, and serve warm.