Easy Vanilla Syrup Recipe for Drinks & Baking
If you’ve ever wandered into a coffee shop and taken a sip of that smooth, fragrant vanilla syrup swirling into your latte, you know how transformative a simple touch can be. Honestly, I used to buy those bottles at the store and spend a small fortune on tiny, overly sweet bottles that never quite tasted like the real deal. Then I realized, I could make my own vanilla syrup right at home, and let me tell you—game changer! Not only is it ridiculously easy and cost-effective, but it’s also infused with that warm, comforting vanilla aroma that makes my kitchen smell like my favorite bakery. Plus, it’s become my secret weapon for whipping up quick desserts or jazzing up plain oatmeal or iced tea when I want something special. My kids ask for this all the time—they love how it makes everything taste just a little bit more indulgent. The best part? This vanilla syrup comes together in a matter of minutes, no special equipment needed. It’s perfect when you’re craving something sweet at 10pm but don’t want to bake a whole cake or open a fancy pastry store. Trust me, once you try this homemade vanilla syrup, you’ll never want store-bought again. Let’s get cozy in the kitchen and whip up a batch together!
What is vanilla syrup?
Think of vanilla syrup as liquid gold for anyone who loves coffee, tea, or sweet treats. It’s essentially a concentrated blend of sugar, water, and vanilla bean or vanilla extract, simmered until the sugar dissolves into a smooth, fragrant syrup. The name “vanilla syrup” is pretty descriptive—it’s a syrup flavored with the warm, mellow notes of vanilla that can elevate just about anything. Its origins are humble; originally, it was a simple way to sweeten and add flavor to beverages and desserts without fussing with vanilla pods every single time. These days, vanilla syrup is a staple in cafés and homes alike, transforming an ordinary cup of coffee into something cozy and indulgent. What I love about it is how versatile it is—drizzle it over pancakes, mix it into yogurt, or even use it as a sweetener for cocktails. It’s basically a little bottle of happiness you keep in the fridge, ready to turn everyday snacks into special moments. Plus, made from scratch, it’s free from all those weird additives you find in store-bought versions. It’s like giving your drinks and desserts a warm, homemade hug.
Why you’ll love this recipe?
What I love most about this homemade vanilla syrup is how it instantly elevates everything, from my morning coffee to late-night ice cream sundaes. The flavor is so much richer and more natural than the bottled stuff, which can often taste artificial or oversweetened. Plus, once you taste how easy it is to make, you’ll wonder why you ever bought it in a store to start with. The process takes under 10 minutes, and the ingredients are simple—just sugar, water, and vanilla—yet the flavor punch is incredible. And here’s a little secret: you can tweak it to suit your taste buds. Want it more vanilla-forward? Just add a splash of vanilla extract at the end. Prefer it a tad less sweet? Reduce the sugar slightly. I’ve tested this with different types of sugar—raw, coconut, even honey—and every version turned out fantastic. Budget-wise, it’s a huge saver over buying specialty syrups at the café or grocery store. Versatility is another reason I keep this in my fridge. Drizzle it over waffles, toss it into milk for a vanilla-flavored shake, or dip strawberries in it. Honestly, I’ve made this countless times, and it never fails to make me smile. It’s one of those little homemade touches that always feel special—like I’ve taken a simple everyday moment and made it just a bit more luxurious. My kids ask for this all the time, especially when they’re craving a quick sweet fix without waiting for the dessert table to load up. Trust me on this one—once you keep a jar of homemade vanilla syrup around, it become your kitchen’s best-kept secret.
How do I make vanilla syrup?
Quick Overview
Making vanilla syrup at home is so straightforward, it’s almost hard to believe. The whole process involves boiling water and sugar together until they form a glossy syrup, then adding vanilla for that irresistible aroma. I love how customizable it is—whether you prefer it thick and syrupy or light and pourable, you can tweak the simmering time and vanilla amount. This isn’t one of those recipes that demand you stand over the stove for ages; it’s really a quick fuse project. Once it’s cooled a bit, you pour it into a jar or bottle, and you’re set to add a touch of sweetness and elegance to anything. Plus, it keeps in the fridge for weeks—if it lasts that long! The best part? You can make a small batch just to test it out or whip up a generous jar for your whole family, depending on how often you use it. I always do this when I want that warm vanilla scent in my kitchen or need a DIY gift for friends—it’s a lifesaver on busy nights or when I want to indulge a little without any fuss.
Ingredients
For Vanilla Syrup: For the Vanilla Syrup: For the Vanilla Syrup: For the Vanilla Syrup: For the Vanilla Sy
- 1 cup granulated sugar (white, raw, or coconut sugar work well)
- 1 cup water
- 1-2 tablespoons pure vanilla extract or 1 vanilla bean, split and scraped
Optional Extras:
- A splash of bourbon or rum for depth
- A pinch of salt to enhance the vanilla flavor
- Honey or agave syrup as alternative sweeteners
Note:
If you’re using a vanilla bean, make sure to scrape out the seeds and steep the pod alongside the sugar and water as it heats. Once done, you can remove the pod before bottling for a clean look. Vanilla extract, on the other hand, gives a cleaner, more uniform flavor—perfect for quick prep.
Step-by-Step Instructions
Step 1: Preheat & Prep Pan
Place a small saucepan over medium heat. Add the water and sugar, stirring gently to help the sugar dissolve evenly. You want the mixture to come to a gentle simmer—no need to boil vigorously, just enough to melt everything smoothly. If you’re using a vanilla bean, now’s the time to add it along with the seeds to infuse. Keep an eye on it to prevent burning or boiling over. This step takes about 3-5 minutes—trust me, you’ll smell that sweet vanilla aroma filling your kitchen!
Step 2: Mix Dry Ingredients
Since we’re just using sugar and water, this step’s pretty simple—make sure the sugar is fully dissolved before moving on. If you notice any granules clinging to the sides of the pan, whisk them in gently. For a clearer syrup, you can strain out the vanilla pod and any impurities after simmering, but I often leave the pod in for extra flavor if I want a richer, more intense vanilla hit.
Step 3: Mix Wet Ingredients
If you’re adding vanilla extract, stir it in once the syrup has cooled just a bit (around warm, but not boiling) so the vanilla’s aroma stays lively. This is also when I like to add a splash of good quality vanilla extract—trust me, it makes all the difference in depth. The mixture should be fragrant and glossy—think of that perfect bubblegum pink hue of a classic vanilla milkshake.
Step 4: Combine
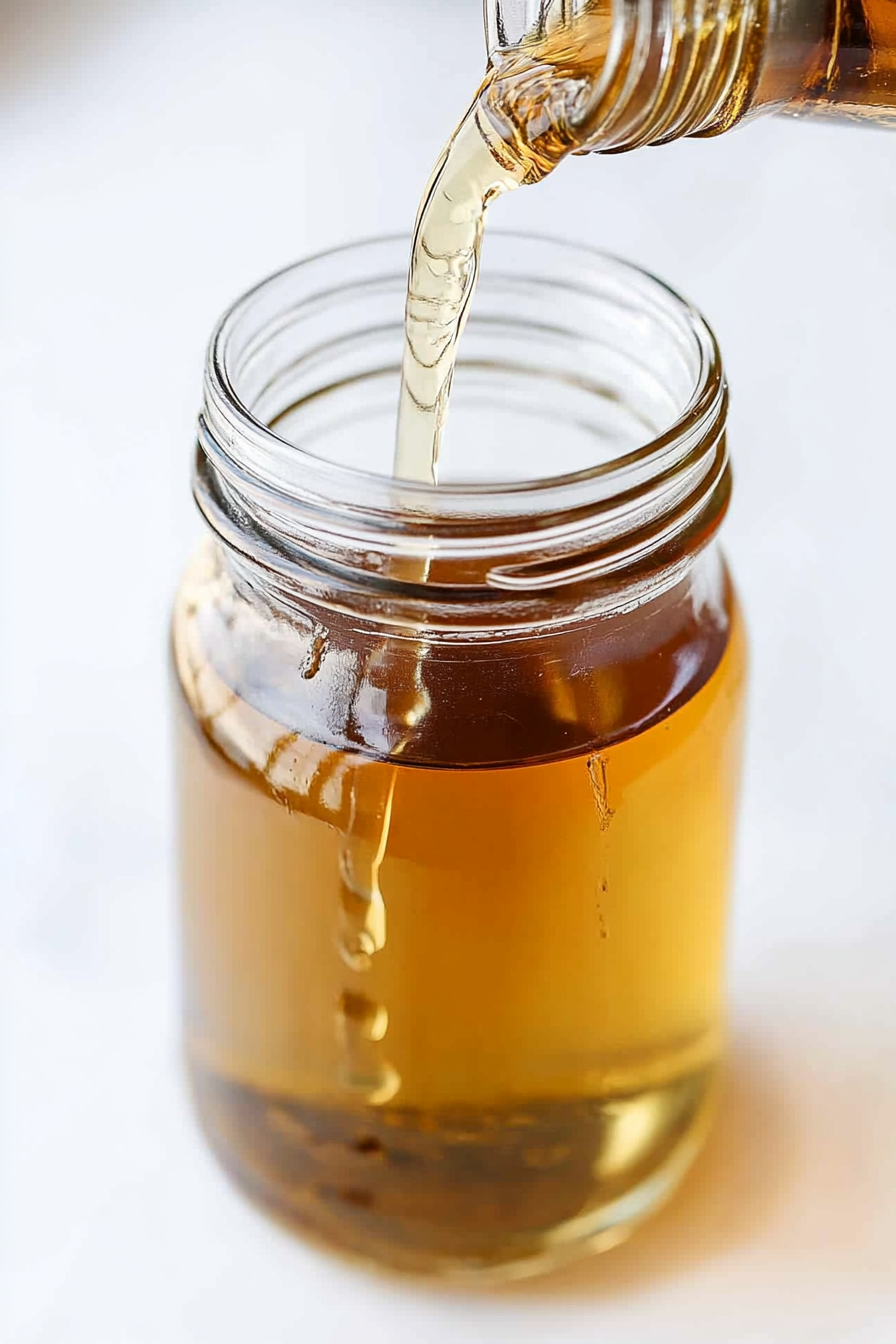
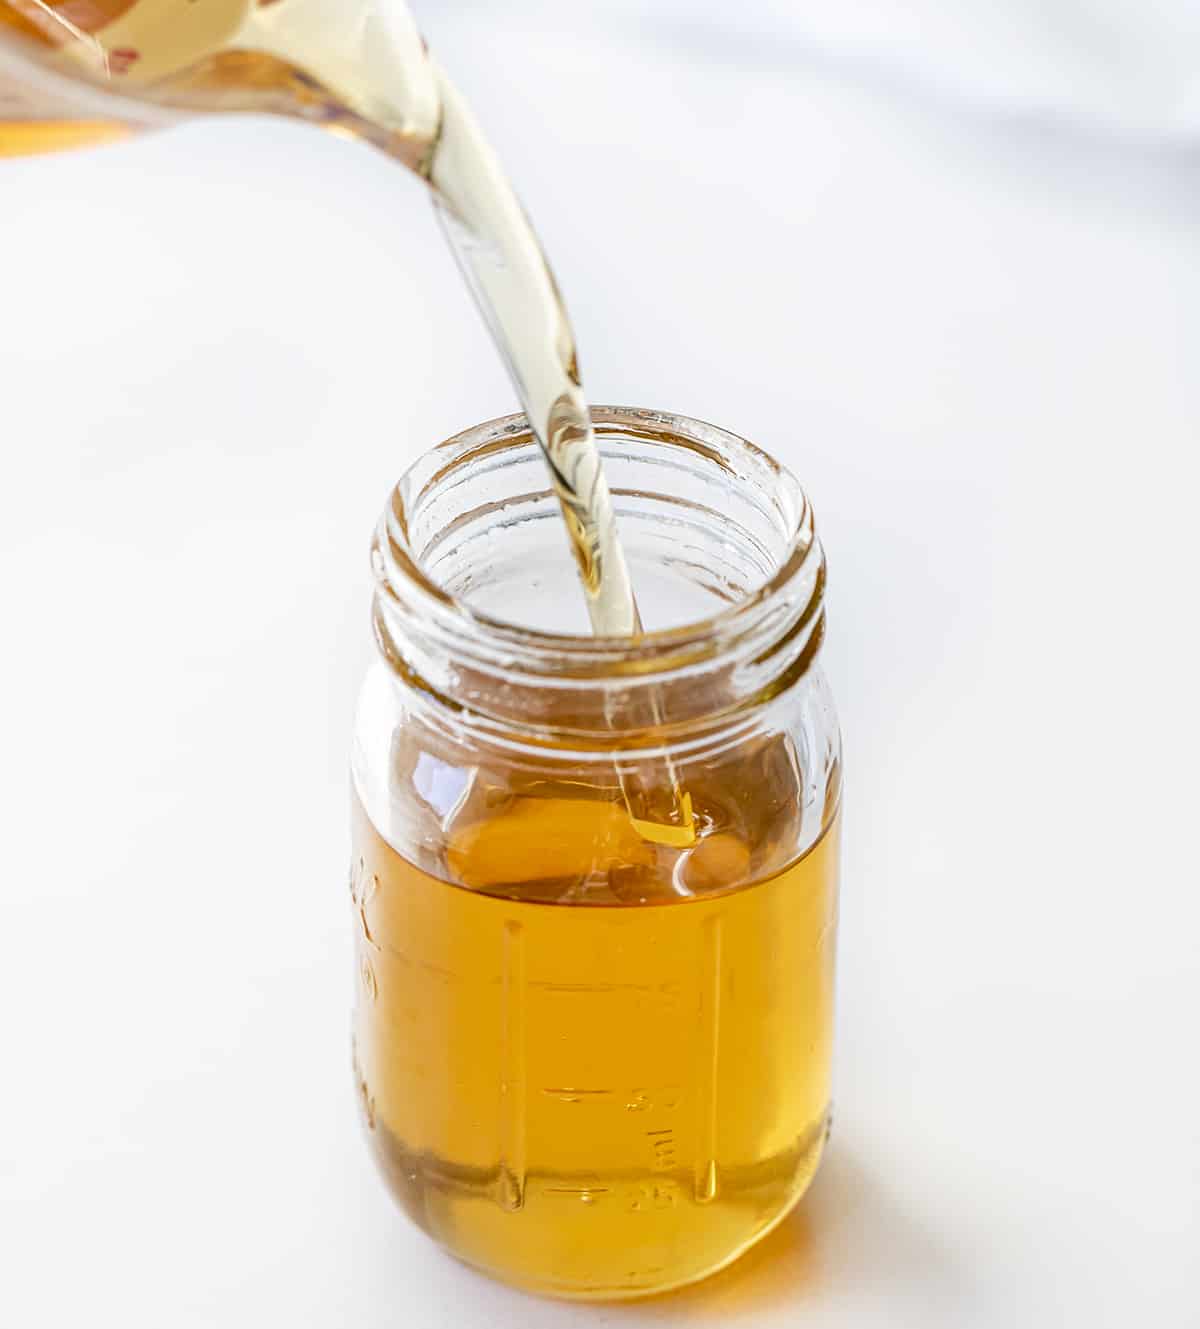
Pour your syrup into a jar or bottle while it’s still warm but not hot. Let it cool completely at room temperature, then seal it up and pop it in the fridge. The syrup thickens slightly as it cools, giving you that lovely, pourable consistency. Don’t worry if it’s a little runny—it’ll thicken with time and can be warmed slightly to loosen it again if needed.
Step 5: Prepare Filling
If you’re feeling fancy, you can add things like a cinnamon stick, cardamom pods, or even a dash of almond flavor for a unique twist. But honestly, the pure vanilla version is enough to make any dessert feel extra special. Store any extras in a clean jar, and they’ll last for a few weeks—sometimes even longer if kept tightly sealed and refrigerated.
Step 6: Layer & Swirl
If you’re making something like a swirl cake or layered pudding, you can use this syrup to add vanilla accents. Swirling it into batter before baking adds that gorgeous vanilla streaks, or drizzle over a freshly baked muffin for that authentic bakery feel. I love to do quick layered drinks—just a splash of vanilla syrup on the bottom, then fill with milk or coffee, and you get this beautiful, fragrant drink every time.
Step 7: Bake & Finish
For smoothies or baked goods requiring a little vanilla kick, this syrup works wonders. You can also brush it onto cakes or cookies right after baking for a shiny, sweet coating. Keep in mind, if you’re baking a cake or muffins with the syrup inside, reduce the sugar slightly in your batter to balance the sweetness.
Step 8: Cool & Glaze
When it’s cooled, you can add a little more vanilla extract if you want a punch of flavor or heat the syrup gently to loosen it before pouring over desserts. For a shiny finish, brush it onto your baked goods once they’re entirely cool. The syrup acts as a natural glaze, sealing in moisture and enhancing flavor with every bite.
Step 9: Slice & Serve
Use a sharp knife to cut into cakes or swirls—warm slices tend to be messier, so give it a few minutes to set. The syrup adds a delicate sweetness and a wonderful vanilla fragrance that your family and friends will love. I love serving it with a dollop of cream or fresh berries for an easy summer dessert, but it’s just as good simply drizzled over ice cream or stirred into a glass of cold milk.
What to Serve It With
This vanilla syrup is like a little magic wand for your kitchen—it makes everything taste just a touch more special. For breakfast, drizzle it over fluffy pancakes or waffles, topping with whipped cream and strawberries. It’s also fantastic in my homemade vanilla latte—trust me, the smell alone will lift your spirits first thing in the morning. In brunch settings, parfaits layered with yogurt, granola, and fresh fruit get a big boost from a drizzle of vanilla syrup. It’s such a simple way to elevate a humble parfait into something pretty fancy. And when you’re craving something sweet after dinner, a splash over vanilla ice cream or pudding turns an everyday treat into something reminiscent of a fancy cafe. For just cozy, casual snacking, I love dipping cookies or churros in this syrup—my kids get a real kick out of it. Honestly, I keep a jar in the fridge at all times because I reach for it constantly, whether I’m making a Sunday brunch or quick after-school snacks. Plus, it’s a lovely homemade gift—just pop it in a pretty bottle with a ribbon and give it to friends who love baking or coffee. Honestly, once you’ve tasted how simple and delicious this is, you’ll be hooked!
Top Tips for Perfecting Your Vanilla Syrup
From years of experimenting in my kitchen, I’ve learned a few tricks that will make your vanilla syrup truly shine. First, always use high-quality vanilla—whether extract or beans—because the flavor really depends on it. If you’re using vanilla beans, soak them in warm syrup after simmering to extract every bit of that fragrant vanilla. Next, stir the mixture gently but often as it heats to prevent burning or sticking to the bottom. If you want a clearer syrup without vanilla bean bits, strain out the pod and any sediment before bottling. Plus, don’t over-boil—once it thickens and coats a spoon, it’s done. A quick tip: if your syrup seems too thick after cooling, warm it slightly before pouring or add a little hot water to loosen it—perfect for drizzling. I’ve tested swapping sugar for honey or agave, and while it changes the flavor slightly, it still works beautifully—just keep in mind these alternatives might give a slightly different consistency. For baked goods, I like to brush the syrup onto warm cakes for that shiny finish. I’ve also learned that a pinch of salt enhances the vanilla aroma—trust me on this little tweak! Once you get the hang of it, you can create your own signature vanilla syrup with infused flavors or natural extracts—as long as you keep the basic proportions in mind, the sky’s the limit. My biggest lesson? Keep that jar handy—it disappears faster than you think, especially in my house!
Storing and Reheating Tips
This syrup keeps surprisingly well, making it a great staple to prepare ahead of time. Store it in a clean airtight jar or bottle in the fridge, and it’ll last for up to 3 weeks—sometimes longer if you’re diligent about clean spooning or pouring. For best results, refrigerate immediately after cooling; the chilled syrup will thicken slightly, which is perfect for drizzling over hot oatmeal or ice cream. Want it more pourable? Just warm it up gently on the stove or microwave for a few seconds, stirring until it loosens. If you’re planning to make a bigger batch, consider freezing some in ice cube trays—then pop out small amounts when needed, which is especially handy for cocktails or baking. When you’re ready to glaze or drizzle, warm the syrup slightly so it flows smoothly. Just avoid reheating too aggressively—high heat can change vanilla’s flavor or cause caramelization. I’ve found that adding a small splash of vanilla extract just before using it makes the flavor pop again. When it comes to freshness, trust your senses—if it smells off or shows any signs of mold, toss it out. But honestly, with good storage, this vanilla syrup stays a long time, and getting it back to perfect consistency is simple. Making your own syrup means you control the quality and flavor—both of which matter, especially in recipes that rely heavily on vanilla’s warm embrace.
Frequently Asked Questions
>
Final Thoughts
There’s just something so comforting about a homemade vanilla syrup—it’s like capturing a little bit of bakery magic in a jar you keep right in your fridge. Whether you’re slathering it on pancakes, stirring it into morning coffee, or drizzling it over a scoop of vanilla ice cream, this syrup adds that warm, sweet aroma that makes everything taste just a tiny bit more special. It’s incredible how such a simple ingredient list can transform everyday treats into something truly indulgent. Plus, once you get the hang of making it, you’ll find endless ways to customize and experiment—think with different vanilla types, adding a splash of liqueur, or infusing spices. I always keep this on hand because my family loves the cozy aroma, and I love how easy it is. It’s also a wonderful gift—just pour into a pretty bottle, tie a ribbon, and you’ve got a thoughtful, homemade treat. I hope you enjoy making this as much as I do—trust me, once you do, you’ll be reaching for this vanilla syrup almost every day. Happy baking, pouring, and indulging! I can’t wait to hear how yours turns out—share your stories or variations below!
Vanilla Simple Syrup
Ingredients
Method
- To a medium saucepan over medium-high heat, add water and sugar.
- Bring to a boil and stir until all sugar has dissolved (about 2-3 minutes).
- Remove from heat and add vanilla extract. Stir to combine.
- Allow the syrup to cool. Then, transfer to an airtight container and refrigerate. This makes about 1.5 cups of vanilla syrup.