Fast Microwave Brownies How Easy Is That
Honestly, I’ve lost track of how many times I’ve whipped up these microwave brownies just when I really needed a quick chocolate fix. There’s something about that warm, gooey, just-baked smell that instantly makes the day better — and the best part? It’s ready in literally minutes. I remember the first time I made these late one night when I was craving something sweet but didn’t want to turn on my oven. My kids actually asked if I’d ordered takeout because the smell was so incredible! Believe me, this isn’t your average mug brownie; it’s rich, fudgy, and so easy that even my most distracted mornings can’t mess it up. If you love soft, chocolatey treats but don’t always have time to bake a whole batch, this recipe is a total game-changer. And trust me, once you try this, it’ll become your go-to for those occasional midnight cravings or quick dessert emergencies. It’s honestly my little secret weapon for instant happiness. So, let’s get to it, shall we? Your new favorite chocolate obsession awaits!
What is microwave brownies?
Think of microwave brownies as that perfect little chocolate fix you can make in a mug or small dish, all in just a few minutes. It’s essentially a tiny, personal-sized brownie — think of it as a fast, indulgent version of the classic oven-baked treat. The name’s pretty straightforward: “microwave brownies” are simply brownies that you cook quickly in your microwave rather than in a traditional oven. The concept is fantastic because it’s so adaptable; you can whip one up when you’re short on time or just feeling lazy but still want a decadent chocolate experience. The batter is usually rich with cocoa, butter, sugar, and flour, which all come together effortlessly in under five minutes. What I love most about these brownies is the texture — they’re fudgy on the inside with just a hint of crisp on top, like a bakery-style treat. Think of this as your secret weapon for those spontaneous chocolate cravings or when you’re entertaining and need that last-minute dessert fix with minimal fuss.
Why you’ll love this recipe?
What makes these microwave brownies so irresistible? Well, for starters, they’re incredibly delicious — dense, fudgy, with that deep chocolate flavor we all crave. But beyond their taste, what I love most about this recipe is how simple and quick it is. I mean, honestly, I’ve made these countless times on hectic weeknights or when I just don’t feel like baking but still want something sweet and comforting. You don’t need fancy ingredients or special equipment; a few pantry staples turned into pure magic. Plus, this recipe is so versatile. Want to swap out the sugar for a natural sweetener? Go for it. Prefer to add nuts or chocolate chips? Absolutely. My kids ask for this all the time, especially when friends are over, because it’s that crowd-pleaser that you can make in the time it takes to scroll through your social feed. And let’s be honest — the smell alone, drifting from the microwave, has everyone in the house rushing to the kitchen. What I love most about this is how it turns a busy moment into a cozy, decadent treat with zero stress or clean-up.
How do you make microwave brownies?
Quick Overview
This recipe is as straightforward as it gets. You mix up a handful of simple ingredients into a batter, pour it into a microwave-safe dish or mug, swirl in your favorite fillings if you like, and microwave for about 1 to 2 minutes. That’s it! The magic lies in how fast and fuss-free it is, making it perfect for those moments when you need a chocolate fix STAT. What makes this method special is the ability to customize in so many ways, plus the fact that it’s virtually impossible to overbake — so you’re guaranteed that perfect fudgy consistency every single time. Trust me, once you master this quick technique, you’ll be reaching for your mug almost every weeknight!
Ingredients
For the Main Batter:
- 2 tablespoons unsalted butter or coconut oil, melted — I love using butter for that rich flavor, but coconut oil gives it a nice subtle coconut undertone
- 2 tablespoons granulated sugar — white or brown, depending on your preference
- 1 teaspoon vanilla extract — a splash makes all the difference
- 2 tablespoons all-purpose flour — I’ve tested this with almond flour, but the texture is slightly different
- 2 tablespoons unsweetened cocoa powder — Dutch-processed for a smoother flavor
- 1/4 teaspoon baking powder — optional, for a tiny bit of rise
- A pinch of salt — to enhance the chocolate flavor
For the Filling:
- Extra chocolate chips, nuts, or caramel bits — whatever your heart desires! I often toss in a few chocolate chips for extra gooeyness
For the Glaze (Optional):
- 2 tablespoons powdered sugar mixed with a teaspoon of milk or cream — for a quick drizzle or dusting
- Or a simple dusting of cocoa powder for that added chocolate boost
Step-by-Step Instructions
Step 1: Preheat & Prep Pan
No oven preheat needed! Just grab a microwave-safe mug or small dish, and give it a quick grease with butter or non-stick spray. This prevents sticking — especially if you plan to turn your brownie out onto a plate.
Step 2: Mix Dry Ingredients
In a small bowl, whisk together the flour, cocoa powder, baking powder, and salt. Doing this first ensures the dry ingredients are evenly distributed, so your brownie is perfectly flavored and textured.
Step 3: Mix Wet Ingredients
In a separate small bowl or directly in your mug, melt the butter (if not already melted), then stir in the sugar and vanilla until well combined. Make sure the butter isn’t too hot — you don’t want to cook the sugar prematurely!
Step 4: Combine
Add the dry ingredients into the wet mixture gradually, mixing gently until you get a smooth batter. Avoid overmixing; just stir until everything is combined and there are no streaks of flour.
Step 5: Prepare Filling
If you’re adding extras, sprinkle some chocolate chips or nuts on top of the batter or gently fold them in. For a surprise center, consider adding a spoonful of caramel or Nutella before swirling!
Step 6: Layer & Swirl
For a marbled effect, add a dollop of filling on top and use a chopstick or skewer to swirl it through the batter. This creates a beautiful look and a mix of flavors in every bite.
Step 7: Bake
Microwave on high for 1 to 2 minutes. Keep an eye on it — it should look set around the edges but still slightly gooey in the middle. Every microwave is different, so start with 1 minute and add more time in 10-second bursts if needed.
Step 8: Cool & Glaze
Allow the brownie to sit for a minute or two — it will be incredibly hot right out of the microwave. If using a glaze, drizzle it on while the brownie is still warm for best adhesion.
Step 9: Slice & Serve
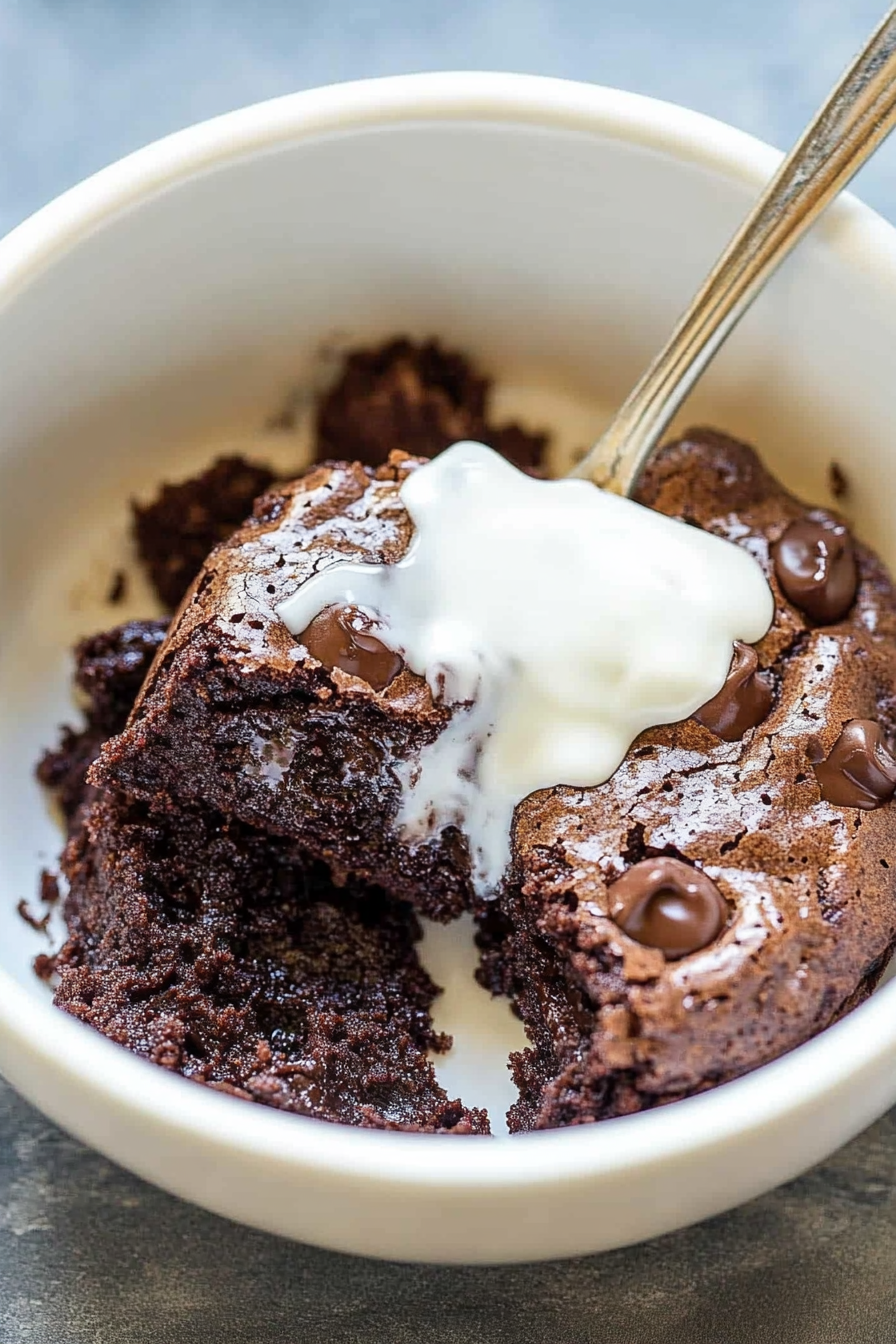
Enjoy straight from the mug or carefully invert onto a plate for a more elegant presentation. I love serving mine with a scoop of vanilla ice cream or a dollop of whipped cream on top. A sprinkle of powdered sugar never hurts either!
What to Serve It With
This microwave brownie is perfect for a solo treat or for sharing. For breakfast or brunch, serve with a hot cup of coffee or espresso — the rich chocolate combined with a strong brew is divine. My family loves it as a quick dessert after dinner, especially when we’re craving something sweet but don’t want the fuss of oven-baking. It pairs beautifully with a glass of cold milk or a cup of tea. If you’re feeling fancy, fold in some crushed peppermint candies or swirl in peanut butter for a fun twist. During cozy movie nights, I’ll top mine with some chopped nuts and a drizzle of caramel sauce. Honestly, once you get the hang of this, you’ll be experimenting endlessly — and I guarantee everyone will be asking for seconds!
Top Tips for Perfecting Your Microwave Brownies
Over the years, I’ve picked up quite a few tricks to make this recipe even better. First, when preparing your ingredients, make sure your butter isn’t super hot or cold — just melted and slightly cooled for the best batter. When mixing the dry ingredients, sift them if you want an ultra-smooth texture, but I’ve found good whisking works just fine. The swirl technique really adds a professional look; try to make circular motions with your skewer for a marbled effect that’s also delicious. Substituting ingredients is easy—oat flour works in a pinch, but it turns the brownie a little denser; I recommend a mix of half oat, half all-purpose if you’re experimenting. Also, don’t overcook! Microwaves vary, so keep that first run short, then add seconds as needed. As for toppings, I love sprinkling sea salt flakes on top before microwaving — it enhances the chocolate flavor like a fancy truffle. I’ve learned that slightly underbaking yields that perfectly gooey center, which is exactly how I like my brownies. Trust me, the first few tries might be a bit of a mess, but once you nail the timing, you’re set for lifelong microwave brownie bliss.
Storing and Reheating Tips
If you’re lucky enough to have leftovers (which I rarely do!), storing is simple. Keep your leftover brownies in an airtight container at room temperature for a day or two — just make sure they’re covered so they don’t dry out. If it’s more than 24 hours, pop them in the refrigerator for about 3-4 days; you can reheat in the microwave for 10-15 seconds, just enough to bring back that warm gooey texture. Want to freeze? Wrap individual brownies tightly in plastic wrap and place in a freezer bag. They’ll last about 2-3 months. When you want to enjoy again, microwave for about 20-30 seconds straight from the freezer, or let it thaw in the fridge first. I recommend adding a fresh drizzle of glaze or a sprinkle of sea salt after reheating to keep that bakery-quality vibe alive. The smell alone during reheating will make everyone in the house come running — I swear, it’s that good.
Frequently Asked Questions
Final Thoughts
If there’s one recipe to keep in your back pocket for those spontaneous chocolate cravings, it’s definitely this microwave brownie. It’s so deceptively delicious, it’s like having a tiny bakery at your fingertips — all in under five minutes! Every time I make these, I’m reminded that sometimes, simple ingredients combined with a little microwave magic can bring instant comfort. Plus, the fact that you can customize — add nuts, swirl in caramel, sprinkle sea salt — makes this recipe a total keeper. Whether you’re solo and looking for a moment of bliss or entertaining friends and want a quick sweet fix, this is the answer. Once you get the timing down, I swear, you’ll be making these all the time. Dive in, enjoy every fudgy bite, and don’t forget to share your favorite variations in the comments. Happy baking — or should I say, happy quick chocolate happiness!
Microwave Fudge Brownies
Ingredients
Method
- In a small microwave-safe bowl, combine sugar, cocoa powder, water, oil, brown sugar, vanilla, and salt. Whisk until smooth.
- Add flour to the mixture and stir until just combined, avoiding overmixing.
- Stir in chocolate chips.
- Cook in the microwave on high for 1 minute or until set in the center. Check at 45 seconds and adjust time as needed.
- Serve immediately, optionally with ice cream or whipped toppings.