Fudgy Brownie Puppy Chow Recipe
There’s nothing quite like the smell of warm brownies wafting through the house—am I right? But sometimes, you want that chocolatey goodness without all the fuss of baking a big batch. That’s where brownie puppy chow comes in—think of it as the secret, ultra-decadent snack you didn’t know you needed. I always do this when I’m craving something sweet but don’t want to wait around for a full-on dessert. And honestly, my kids ask for this all the time—it’s become a regular treat at our house. It’s basically made from crushed-up brownies mixed with cereal and coated in a luscious chocolate glaze. Yes, it’s sweet, it’s crunchy, and it’s almost embarrassingly easy to make. I’ve tested this with different kinds of chocolate—dark, semi-sweet, even a touch of white chocolate—and trust me, each variation is a winner. This one’s a lifesaver on busy nights, a hit at parties, and a guaranteed crowd-pleaser that disappears in minutes at my house. Imagine a snack that’s like a brownie’s sparkly secret—scrumptious, a little messy, and totally addictive. Ready to dive in? Let’s get baking!
What is a brownie puppy chow?
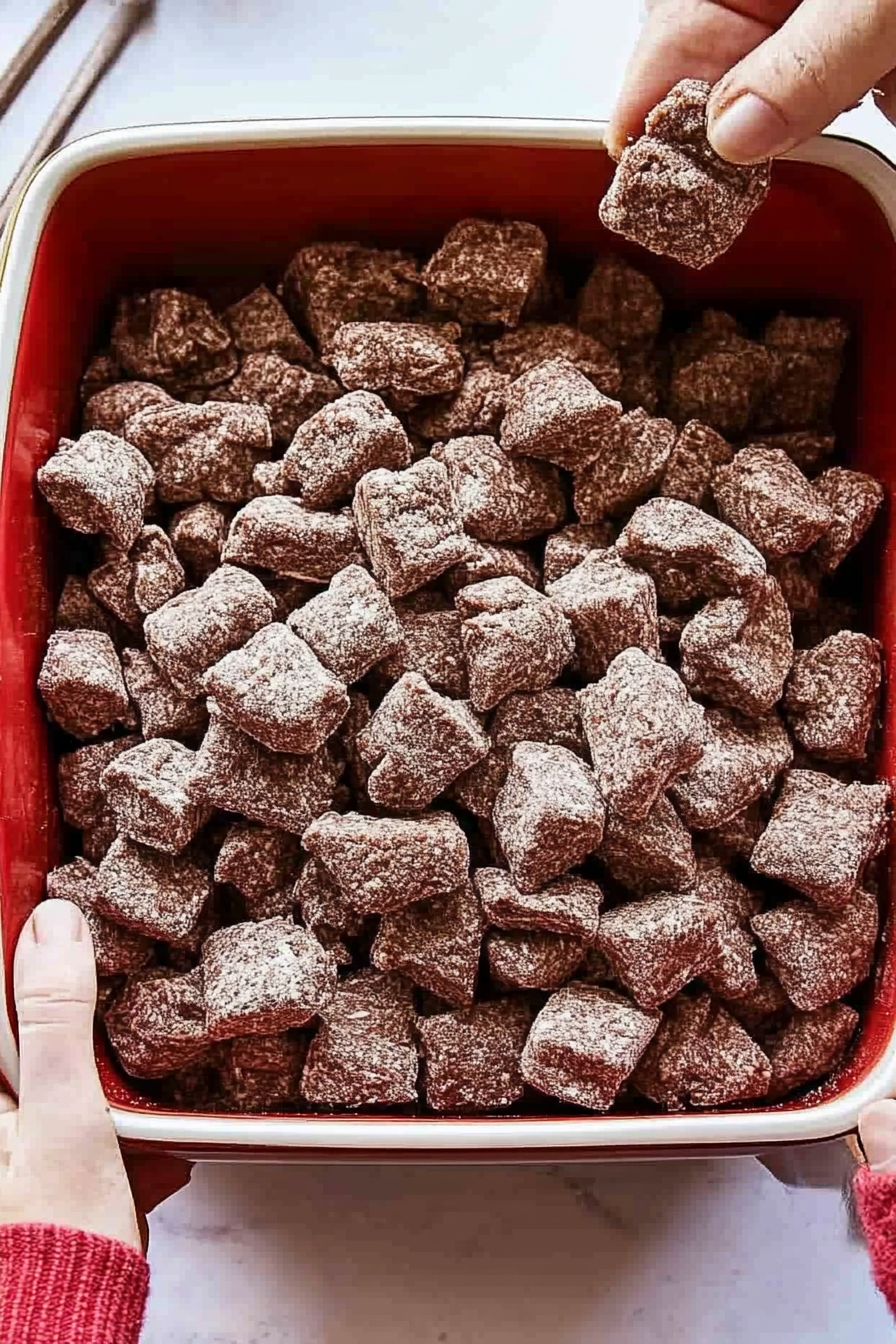
Brownie puppy chow is essentially a playful twist on the classic puppy chow, but instead of using cookie or cereal alone, it features cozy, chocolate-infused brownie crumbs. Think of it as *brownie crumbles*—but in a snack form that’s perfect for movie nights, school lunches, or just when you need a sweet little pick-me-up. The name comes from the way you toss the crushed brownie bits with cereal—like a delicious, chocolatey snowball—and coat it all in a glossy glaze. It’s **sweet**, it’s **crunchy**, and it’s totally customizable. The foundation is usually crushed brownies or brownie mix, combined with a crispy cereal—most often Chex or Rice Krispies—and then coated with a rich chocolate glaze that makes it all sticky and chewy in the best way. The beauty of brownie puppy chow is how infinitely adaptable it is; you can add a sprinkle of sea salt, some chopped nuts, or even a dash of peppermint extract for a festive kick. It’s kind of like a childhood candy but elevated, with more depth of flavor and that irresistible brownie aroma. Think of it as your new favorite, messy-movie snack that’s as indulgent as it sounds.
Why you’ll love this recipe?
What I love most about brownie puppy chow is how ridiculously simple it is to whip up—no oven required! That means you can make it even if all your kitchen tools are limited or if you’re just craving something quick and satisfying. The smell alone when I make this— that warm, chocolatey aroma—brings everyone running to the kitchen, and it’s honestly the ultimate comfort food. Plus, since it’s mostly pantry staples—cereal, chocolate, maybe some butter—it’s gentle on the wallet, too. I’ve found that this recipe is super versatile; I’ve swapped in different kinds of cereals, added some chopped pretzels or mini marshmallows for texture, and it’s always a hit. That crunch, paired with the rich, fudge-like coating, makes every bite feel like a mini celebration. And let’s be honest: this is one of those recipes I always turn to when I want a no-fuss dessert that doesn’t compromise on decadence. Perfect for a quick gift, party treat, or just a dessert that feels special but is totally fail-proof. It’s so good, I honestly can’t keep it enough around—my kids ask for this constantly, and I don’t blame them. Trust me on this one—once you try it, you’ll be hooked.
How do I make a Brownie Puppy Chow?
Quick Overview
This recipe is about mixing crushed brownie pieces with cereal and then coating everything in a silky chocolate glaze—simple, straightforward, and oh-so-delicious. I love how the brownie bits add an extra depth of chocolate flavor, making this treat richer than typical puppy chow. The process involves blending the ingredients carefully, so everything stays intact but gets coated evenly. In about 30 minutes, you’ve got a batch of irresistible, messy snack happiness that’s perfect for sharing or keeping all to yourself. Like most good recipes, it’s flexible, forgiving, and a total crowd-pleaser. The best part? No baking needed—just melt, mix, layer, and go! That means whenever I want a quick chocolate fix, I pull out the ingredients, and within a half-hour, I’ve got a bowlful of sweet, crunchy goodness ready to devour.
Ingredients
For the Main Batter:
– 2 cups of crushed brownies (freshly baked or store-bought brownie bits)
– 4 cups of breakfast cereal (Chex or Rice Krispies work beautifully)
– 1/2 cup unsalted butter
– 1 cup semi-sweet chocolate chips
– 1/2 cup sweetened condensed milk (or heavy cream for a less sweet version)
– 1 teaspoon vanilla extract
For the Filling:
– Optional: chopped nuts, mini marshmallows, or sprinkles for extra fun
For the Glaze:
– 1 cup semi-sweet chocolate chips
– 2 tablespoons butter or coconut oil
– 1 teaspoon vanilla extract
– Optional: a pinch of salt or a drizzle of caramel for extra flavor
Step-by-Step Instructions
Step 1: Preheat & Prep Pan
While you won’t need an oven for the actual assembly, I like to line my big baking sheet or shallow dish with parchment paper for easy cleanup. If you’re crushing brownies yourself, just make sure they’re broken into small, bite-sized crumbs. If you’re using store-bought, crumble them up with your hands or a fork; honesty, I’ve done this with leftover birthday cake brownies, and it works just fine!
Step 2: Mix Dry Ingredients
In a large mixing bowl, toss together your cereal and brownie crumbs. I like to keep some larger chunks in the brownie bits—they add texture and surprise in every bite. Mix gently to distribute evenly. This combination is already promising a flavor bomb, so no need to fuss over perfect uniformity.
Step 3: Mix Wet Ingredients
In a small saucepan over low heat, melt the butter and chocolate chips together. I always do this slowly—stirring constantly—to keep everything smooth and shiny. Once melted, stir in the condensed milk and vanilla; you want a glossy, fudge-like mixture that’s pourable but still thick enough to coat. Trust me, this little step makes all the difference in that rich, chocolaty coating.
Step 4: Combine
Pour the warm glaze over the cereal-brownie mixture and gently fold everything together. Be careful not to overmix—just enough to coat everything evenly. This is when I get a little messy, but hey, that’s part of the charm. The chocolate will start to set a bit as it cools, so work quickly enough to get it all coated without it sticking to the bowl.
Step 5: Prepare Filling
If you want an extra punch of flavor or texture, sprinkle in some chopped nuts or mini marshmallows before layer layering. You can also leave it plain and let the glaze do all the work. Whatever you choose, this is the fun part to customize based on your mood or what’s in your pantry.
Step 6: Layer & Swirl
Spread half of this mixture onto your prepared pan. If you’re feeling artistic, sprinkle some of the extras on top and then layer the remaining mixture over it. Use a spatula to gently swirl or create patterns—trust me, it makes this treat look just as tempting as it tastes.
Step 7: Bake
Here’s a little confession: I usually skip the baking with this one! But if you prefer a firmer, brownie-like texture, you can chill it in the fridge for an hour or two, or even put it in a low-temperature oven (around 200°F/95°C) for 10-15 minutes. But honestly, I love it soft and chewy without baking. Just let it set up in the fridge for a bit to firm if needed.
Step 8: Cool & Glaze
Once cooled (or set in the fridge), melt your additional chocolate chips and butter for the glaze, stirring until smooth. Pour it over the top, spreading evenly with a spatula or spoon. Let it sit until the glaze firms up—this doesn’t take long, especially if you’re in a hurry!
Step 9: Slice & Serve
When ready, slice into squares or irregular chunks—no need to be precise here. I like to serve it at room temperature so the glaze is soft and glossy. This is perfect for sharing at parties or sneaking a little piece after the kids go to bed. Trust me, once you make this, it’s hard to go back to plain old cereal treats.
What to Serve It With
Brownie puppy chow is a versatile snack that plays well with just about anything. For breakfast, I love serving it alongside a strong coffee or a cold glass of milk—the crunchy cereal texture balances out the rich sweetness. It’s also a fabulous brunch addition when you want something indulgent but easy to whip up while chatting with friends. When serving as a dessert, I like to fancy it up with a drizzle of caramel or a sprinkle of sea salt—adds a little contrast that keeps everyone coming back for more. And let’s not forget when I’m craving a cozy snack; a bowl of this with a cup of tea or hot cocoa is pure comfort. It’s so adaptable that sometimes I stash some in my kids’ lunch boxes or keep a jar in the pantry for unexpected visitors. Honestly, this treat is a little miracle—crunchy on the outside, fudgy and intense on the inside, and always, always a crowd favorite. I’ve even hidden a little for myself at times—don’t tell my family!
Top Tips for Perfecting Your Brownie Puppy Chow
After making this countless times, I’ve learned a few tricks to make it even better. First, when crushing brownies, avoid making super fine crumbs; a few larger chunks add delightful bites of fudgy goodness. If your glaze feels too thick, add a tiny splash of milk—everything should pour smoothly but still cling to the cereal. On the flip side, if it’s too runny, just let it cool a bit or add a sprinkle more chocolate chips. I’ve tried swapping out ingredients, like using coconut oil instead of butter, which gives it a faint tropical note—delicious! As for the swirl patterns, I like to drag a toothpick through my layered mixture for a marbled look—it’s surprisingly easy and looks pretty when served. Baking at a lower temp rather than overbaking keeps everything moist and fudgy. Oh, and a pinch of flaky sea salt on top right before serving elevates the whole thing. Trust me, these little tweaks have turned this from a good snack into an irresistible showstopper. It’s all about balancing texture, flavor, and presentation, and I promise—once you get the hang of it, you’ll keep coming back for more.
Storing and Reheating Tips
This cheesy, chocolatey goodness keeps surprisingly well. If I’m not devouring it all at once—which rarely happens—it’s amazing stored in an airtight container. At room temperature, I keep it covered for up to 2 days; beyond that, it starts to lose a little crunch and the glaze gets a tad softer. In the fridge, it stays fresh for about a week if stored in a sealed container—perfect for making ahead for parties. Just a quick tip: when you’re ready to serve leftover puppy chow from the fridge, give it a quick stir to redistribute the glaze—sometimes it firms up in fridge, but don’t worry, the microwave comes to the rescue. Reheating a handful in short bursts or letting it come back to room temp helps bring back some of that fudgy, gooey delight. If you’re freezing a batch—just double-wrap it to prevent freezer burn—and thaw at room temperature before serving. I’ve even frozen in portions for those days when only instant chocolate happiness will do. The secret is to keep it covered and away from moisture—this treat is fragile, but oh so worth it.
Frequently Asked Questions
Final Thoughts
Honestly, brownie puppy chow has become one of those recipes I keep coming back to, whether it’s for a quick snack, a party favor, or just because I need that chocolate fix. It’s cozy, nostalgic, and surprisingly versatile—perfect for transforming ordinary cereal into something extraordinary. Every time I make it, I think about all the happy faces around my table—kids, friends, neighbors—delighted at how simple ingredients transform into a treat that feels indulgent but is honestly pretty straightforward. My advice? Don’t overthink it! Trust your instincts, sprinkle in your favorite add-ins, and enjoy the process. Once you’ve made this, I bet you’ll have a whole new favorite snack that’s just as good for sharing as it is for sneaking bites straight from the bowl. Happy baking—and more importantly, happy snacking! I can’t wait to hear how yours turns out, so be sure to share your tweaks and photos—this recipe’s a keeper for sure!
Brownie Puppy Chow
Ingredients
Method
- Melt chocolate chips and peanut butter in the microwave in a small bowl. Melt in 30-second increments, stirring between.
- After melted, stir in the vanilla.
- In a large bowl, pour the cereal. Then pour the chocolate mixture over top. With a spatula, stir well, making sure every piece is coated.
- Pour the cereal into a large plastic sealable bag and then sprinkle the dry brownie mix over top. Close bag and shake until well coated.
- Place mixture on a sheet pan and allow to set.