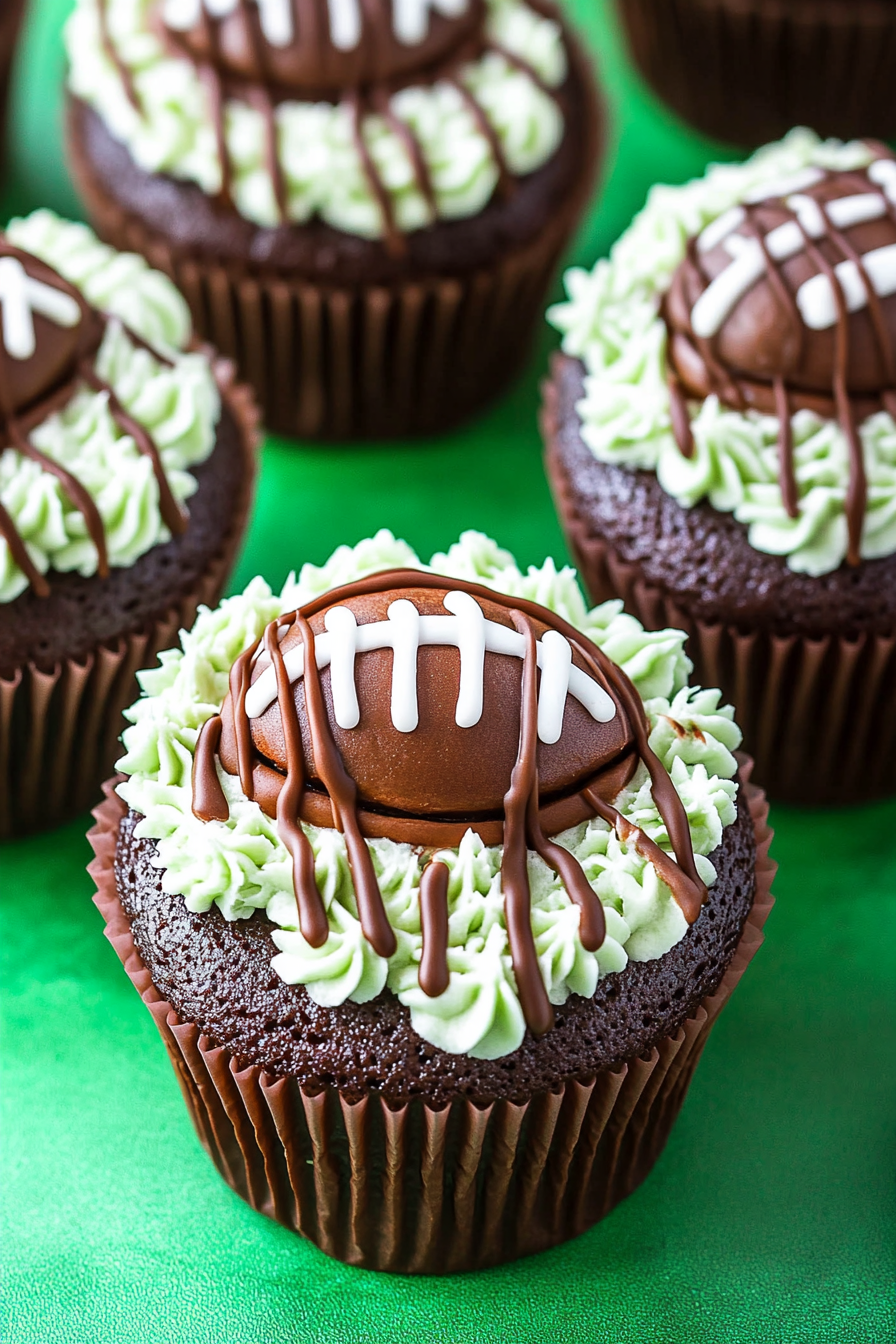
Game Day Cupcakes How to Score Big
If there’s one thing I can’t resist during football season, it’s the joy of whipping up something fun and festive for game days. And let me tell you, these football cupcakes are a game-chopper — a little sweet, a lot adorable, and so easy to make, they might just become your new favorite party treat. I still remember the first time I made them for my son’s youth league chili cookout; I was a little worried they’d turn out too complicated, but these cupcakes came together smoothly — and best of all, everyone loved them! My kids ask for these on their birthdays, and they disappear in minutes at my house. I promise, they’re perfect for the big game or any casual gathering because the aroma alone brings everyone to the kitchen, and the fun design always earns the wow factor. Whether you’re a football fanatic or just love themed treats, these football cupcakes will definitely score major points with your friends and family. Let’s dive into how to make these adorable and tasty treats that are sure to make your next party a hit!
What is a football cupcake?
Think of football cupcakes as a fun twist on classic cupcakes, dressed up to look like tiny footballs. It’s essentially a mini dessert that combines the best of both worlds: the cozy comfort of a homemade cupcake with the playful appeal of a themed decoration. The name’s pretty straightforward — they’re cupcakes shaped and decorated to resemble footballs, perfect for game days, tailgating, or just because. The base is a soft, moist vanilla or chocolate cupcake, topped with flavorful frosting, and finished off with a clever, football-inspired design using frosting and edible accents. This is one of those recipes that feels fancy but is surprisingly simple to pull off. I always do this when I want something visually impressive but don’t want to spend hours in the kitchen — and trust me, the kids love helping make the “football stitches” with piping bags! It’s a little tradition at our house now, and the smiles they bring to everyone’s faces are totally worth the effort.
Why do you love these guys?
There are so many reasons why these football cupcakes will become your go-to game day treat. For starters, the flavor? Absolutely delicious — a fluffy, melt-in-your-mouth vanilla or chocolate cake that pairs perfectly with buttercream or cream cheese frosting, depending on your mood. What I love most about this is how simple it is to adapt to different tastes or dietary needs. Plus, they’re budget-friendly — no fancy ingredients required! Most of the items are staples in my pantry, which makes whipping these up feel almost effortless. And then there’s the fun factor. Watching the kids decorate them with the little stitched details—so adorable!—is a cherished part of the process. These cupcakes are versatile, too. I’ve decorated them for Super Bowl parties, kids’ birthday events, or even as a fun treat for a football-themed family movie night. They’re always a hit, especially when I make extra so everyone can grab seconds. Honestly, once you try them, I bet you’ll be asked to make these over and over again. They’re just that good and that fun to assemble.
How do you make a football cupcake?
Quick Overview
Alright, here’s the scoop without all the fuss: start by baking your favorite cupcake batter — I recommend vanilla or chocolate because they’re classic and go well with any frosting. While they cool, whip up some buttercream or cream cheese frosting flavored to your fancy. Once the cupcakes are cooled, use a piping bag fitted with a round tip to frost each one smoothly. To make the football stitches, use a contrasting color frosting and pipe small, evenly spaced lines across the surface — like tiny laces. Then, with a toothpick or a skewer, gently drag down the center of each stitch to create the laces’ indentation. To finish, you can add little white fondant patches on each end if you want an extra realistic look — but honestly, the piping alone is enough to wow! These cupcakes are best enjoyed within a day or two but can be stored in an airtight container — just add the decorative stitching right before serving for that crisp, fresh look.
Ingredients
For the Main Batter:
– 1 1/2 cups all-purpose flour (I always opt for unbleached for a little extra flavor)
– 1 cup sugar
– 1/2 cup unsalted butter, softened
– 2 large eggs
– 1/2 cup milk (I tested with almond milk and it actually made it even creamier!)
– 1 teaspoon vanilla extract
– 1 1/2 teaspoons baking powder
– 1/4 teaspoon salt
For the Filling:
– Optional: a spoonful of jam or frosting for filling if you want a surprise center (trust me, this isn’t necessary but fun if you love a surprise inside!)
For the Glaze & Decorations:
– 2 cups powdered sugar
– 2-3 tablespoons milk or water
– 1 teaspoon vanilla or almond extract
– Food coloring (I love using brown for the football body and white for the stitches)
– Optional: white fondant for small patches
– Piping bags with round tips (small sizes — #1 or #2)
Step-by-Step Instructions
Step 1: Preheat & Prep Pan
Set your oven to 350°F (175°C). Line a cupcake pan with paper liners — I always use beige or light brown to match the football theme, but any color works. Give the liners a quick spritz with non-stick spray if you want them ultra-easy to remove later. This little trick helps prevent any sticking, especially if you’re baking in a glass pan or if your cupcake papers are on the thinner side.
Step 2: Mix Dry Ingredients
In a medium bowl, whisk together the flour, baking powder, and salt. Doing this ensures everything is evenly distributed and helps your cupcakes bake rise nicely—no lumps or dense spots! I always do this step first so it’s ready when I mix the wet ingredients.
Step 3: Mix Wet Ingredients
In a large bowl, beat the softened butter and sugar until light and fluffy — I usually do this for about 3 minutes with a hand mixer. Then, add the eggs one at a time, mixing well after each addition. Stir in vanilla, and slowly pour in your milk, mixing gently until smooth. The batter should be silky but not runny; if it’s too thick, a splash more milk does the trick.
Step 4: Combine
Gradually add the dry ingredients into the wet, mixing on low for just a minute or two — don’t overmix or your cupcakes might turn out dense. Stop as soon as it’s just combined. You want them soft, not tough. I’ve learned this the hard way from overmixing, so now I just stop early and fold the last bits in gently with a spatula.
Step 5: Prepare Filling (Optional)
If you’re feeling fancy, dollop a teaspoon of jam or frosting into the center of each cupcake after filling with batter — this adds a fun surprise. I prefer simple today, so I skip this step, but it’s fun for special occasions. Just pop the filling right before baking and lightly press down which helps it stay centered.
Step 6: Layer & Swirl
Once baked and cooled, it’s frosting time! Using your piping bag filled with your chosen frosting, pipe a smooth, generous mound on top. To create the football laces, fill another piping bag fitted with a small round tip with contrasting frosting (white, usually). Carefully pipe tiny horizontal lines across the top—about 4 to 6 depending on cupcake size. Use a toothpick to gently press down the middle of each line to mimic the stitches of a real football. This part’s super satisfying—nothing like seeing that tiny lacing come to life.
Step 7: Bake
Pop the cupcakes into your preheated oven for about 18-20 minutes or until a toothpick inserted in the center comes out clean. Ovens vary, so start checking at around 17 minutes to prevent overbaking. Once done, remove from oven and let them cool completely on a wire rack. You’ll want them totally cool before decorating or the frosting will melt away!
Step 8: Cool & Glaze
Cooling is key here! Wait at least 30 minutes to make sure they’re room temperature. Then, mix your glaze ingredients — powdered sugar, milk, and vanilla — until smooth. Adjust thickness by adding more powdered sugar if it’s too runny or a splash more milk if it’s too thick. Drizzle it over the cupcakes, or dip the tops for a little extra shine. For an authentic football look, I leave the stitching white, but you can get creative with colors or add edible glitter for extra sparkle.
Step 9: Slice & Serve
When it’s time to serve, I recommend keeping these cupcakes out at room temperature for the best flavor and texture. Use a sharp knife to cut through the caramelized frosting for a clean, even slice. Plate them on a football-themed platter, sprinkle with edible confetti, or just serve as-is — everyone will love seeing that mini football on top. These definitely look best when fresh, but if you need to keep them longer, store in an airtight container at room temp for a day or refrigerate for up to three days. Just remember to add extra frosting on the stitches if they start to soften or fade after a day or two!
What to Serve It With
Now, these football cupcakes are the star of the show, but pairing them properly just makes the whole experience better. For a casual game day, serve alongside crunchy potato chips, spicy pretzels, or a fresh veggie platter. Want to turn it into a more refined affair? Serve them on a platter with a side of vanilla ice cream or whipped cream — like miniature football field desserts! I love placing a few bowls of assorted toppings nearby — crushed cookies, chocolate chips, or sprinkles — so guests can customize their cupcakes. For breakfast or brunch on game day, pair with strong coffee or a mimosa. These cupcakes also work beautifully as part of a dessert table at birthday parties or family reunions. Just keep a stack nearby because they tend to disappear fast. Honestly, I’ve never hosted a football party without these, and I promise, they add a layer of fun and sweetness that everyone remembers. They’re a talking point, a visual hit, and absolutely delicious—what more could you ask for?
Top Tips for Perfecting Your Football Cupcakes
If you’ve ever battled with cupcakes that sink in the middle or frosting that melts away, don’t worry — I’ve been there. Here are my go-to tips from years of trial and error:
- Zucchini Prep: I don’t actually use zucchini, but I do recommend making sure your cupcakes aren’t too moist or greasy, especially if you’re substituting ingredients. Always measure accurately — baking is a science, after all!
- Mixing Advice: do not overmix your batter once the flour is added. Overmixing leads to dense cupcakes; I learned this the hard way. Use a gentle folding technique after the initial mixing for best fluffiness.
- Swirl Customization: When piping the stitches, keep your frosting slightly firm but still pipeable — too soft, and they’ll drip or spread. Using a steady hand and a small, round tip makes the pattern neat and tidy.
- Ingredient Swaps: For a dairy-free version, coconut milk and vegan butter work well, though I’d recommend halving the sugar to prevent sweetness overload. For flavor variations, add cocoa powder to make chocolate cupcakes — just reduce the flour slightly to account for the added dry ingredient.
- Baking Tips: Always start checking a minute or two early — ovens really vary. Position your racks in the middle of the oven for even heat distribution.
- Glaze Variations: For a shiny, harder finish, add a bit of corn syrup or invert sugar. Or, for a festive touch, mix in a few drops of food coloring or flavor extracts like peppermint or almond before glazing.
Over years of baking these, I’ve learned that patience and attention to detail really pay off. Whether it’s getting the frosting just right or piping those tiny stitches smoothly, don’t rush. The results are so worth it — trust me on this one!
Storing and Reheating Tips
This is a tricky one — cupcakes are best enjoyed fresh, but life happens. Here’s how I store and keep them tasting great, no matter when I need them:
- Room Temperature: In an airtight container, they stay fresh for up to two days. Just be sure to keep them out of direct sunlight and heat, or the frosting might soften too much.
- Refrigerator Storage: If you need to make them in advance, store in an airtight container and refrigerate for up to 3 days. To avoid a soggy frosting, add extra decorative stitches just before serving.
- Freezer Instructions: Wrap each cupcake tightly in plastic wrap, then place in a zip-top bag or airtight container. Freeze for up to 3 months. To serve, thaw at room temperature for about an hour, and re-glaze if the frosting looks dull or soft.
- Glaze Timing: For best presentation, add the glaze right before serving — it adds a glossy finish and sharpens those stitches. If you freeze the cupcakes, add the glaze after they’re completely thawed to keep that fresh bakery look.
In my experience, these little tricks keep cupcakes delicious and beautiful from the oven to the table. I’ve tested different storage methods, and patience with proper covering makes a big difference. Few things beat biting into a perfectly moist cupcake with shiny, smooth frosting and crisp, tidy stitches. Just remember: the fresher, the better, so plan accordingly!
Frequently Asked Questions
Final Thoughts
There’s just something about the look and taste of these football cupcakes that makes every occasion feel a little more special — whether it’s game day, a birthday, or just a fun day hanging out with friends. The best part? They’re surprisingly easy to make, even if you’re new to decorating. Honestly, once you see how adorable they turn out, you might find yourself sneaking an extra stitch or two just because it’s fun. I’ve made countless batches, and each time I find a new way to customize the colors or add a little flair. These cupcakes aren’t just a dessert — they’re a conversation starter, a way to bring everyone together, and a little piece of homemade happiness. So grab your piping bag, gather some friends or family, and get ready to score big with these delightful football cupcakes. I can’t wait to hear how yours turn out, so don’t forget to leave a comment below or share photos of your masterpiece. Happy baking! — and may the best team (or at least the best cupcakes) win!
Football Cupcakes
Ingredients
Method
- Preheat oven to 300°F and prepare a cupcake pan with liners. Mix dry ingredients, then add wet ingredients, and bake for 18-23 minutes.
- Prepare vanilla buttercream by beating butter, then gradually adding powdered sugar, vanilla, and cream to achieve desired consistency.
- Divide buttercream into portions for green and chocolate, coloring the green with gel icing.
- Frost cupcakes with chocolate buttercream for the football, and green buttercream for the grass. Pipe laces with white buttercream.