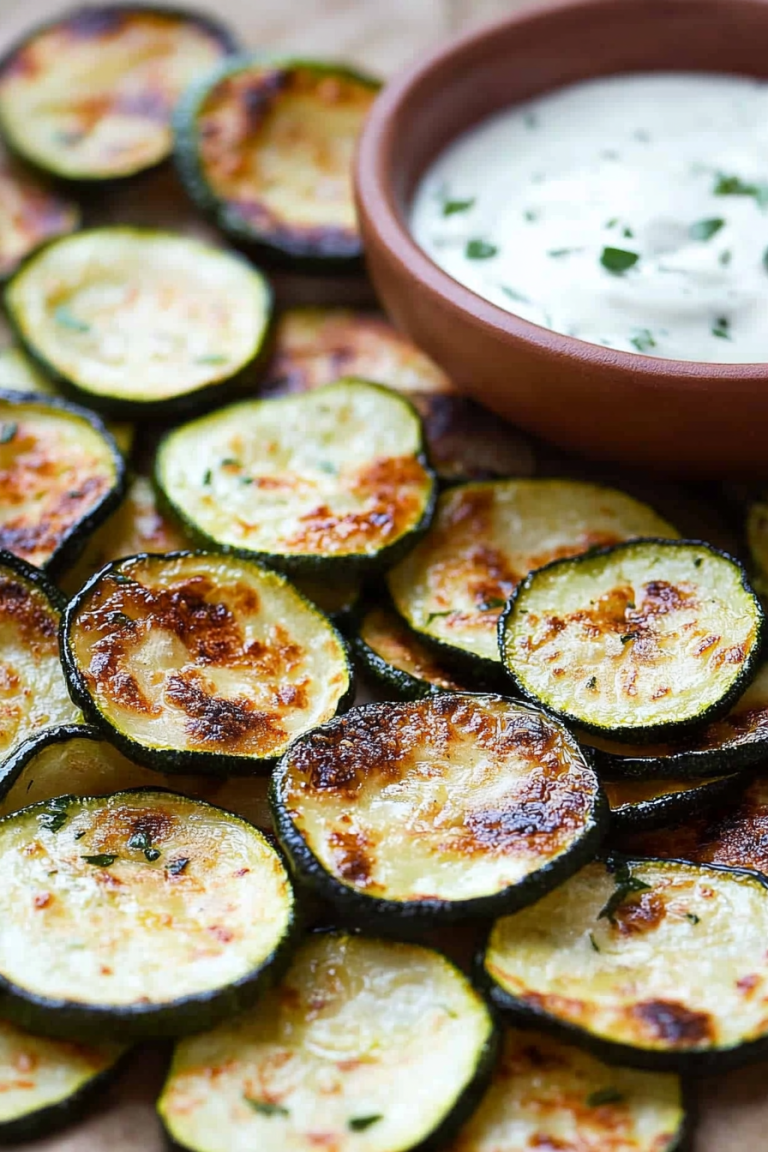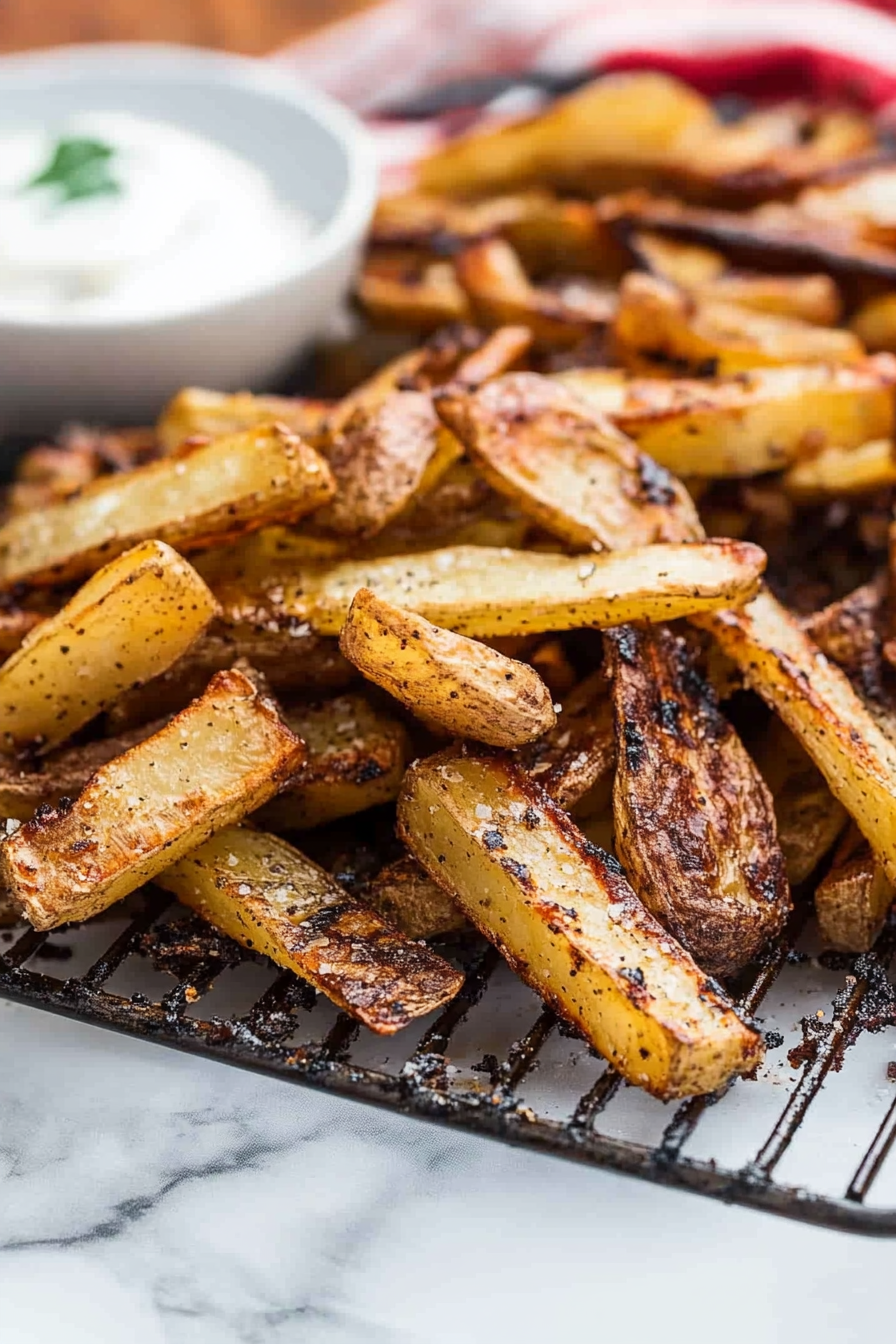
Grilled Potato Chips How to Make Them
There’s honestly nothing quite like the smell of backyard grilling on a warm summer evening—except maybe the aroma of crispy, golden grilled potato chips wafting through the air. I remember the first time I tried making these myself; it was a lazy Sunday afternoon, and I was craving something crunchy and savory, but I didn’t feel like going to the store. Instead, I grabbed a few potatoes, some olive oil, and a sprinkle of salt, and I’ve been hooked ever since. These grilled potato chips aren’t just a game-changer at barbecues—they’re a revelation on their own. Plus, they’re surprisingly easy to whip up, and once you get the hang of it, they disappear in minutes at my house. I love how they have that smoky char from the grill, yet they stay tender inside—kind of like the perfect homemade version of a bag of chips, but way more crave-worthy. Trust me on this one; once you try these, you’ll never go back to fried chips again! Let’s dive into how to make these crispy wonders—you’ll be glad you did.
What is a grilled potato chip?
Think of grilled potato chips as a fusion between classic potato chips and that irresistible smoky flavor you love from grilled snacks. They’re essentially thin slices of potato, lightly coated in oil and seasonings, then grilled to perfection. The name’s pretty straightforward—they’re crispy, chip-sized pieces of potato that get that beautiful grill char on each side. It’s like turning your favorite snack into a summer-loving, outdoor-dining superstar. What I love most about these is their versatility—they can be a snack, a side dish, or even a topping for salads and bowls. The best part? No deep frying involved, so they’re a lot healthier than their bagged counterparts and so much more flavorful. Plus, they’re perfect for those backyard parties or cozy evenings when you’re craving something crunchy without the fuss of oven-baking or frying. Think of them as a cross between a homemade potato chip and a grilled delight—simple, satisfying, and totally addictive.
Why you’ll love this recipe?
What I love most about these grilled potato chips is how easy they are to whip up. Seriously, you only need a handful of ingredients, and within minutes, you’ve got a batch of warm, crispy chips that taste like summer in your mouth. No fancy equipment required—just a sharp knife, a bit of patience, and your trusty grill. Plus, they’re budget-friendly; potatoes are always affordable, and a splash of oil and seasoning cost next to nothing. These chips are pretty versatile, too—they pair perfectly with everything from burgers and hot dogs to dips like sour cream or spicy salsa. My kids ask for these all the time, especially when I tell them they’re “grilled,” which makes them feel a bit fancy even on a casual weeknight. They’re also a healthier alternative to fried snacks—baked or grilled, they’re lighter but just as addictive. What truly sets them apart is the smoky flavor you get from the grill—that’s honestly what makes all the difference. Trust me on this: once you’ve tasted these, they’ll become a regular feature at your cookouts. Plus, they’re a big hit with friends when you want to impress without spending hours in the kitchen. Just one bite, and you’ll see what I mean!
How do I make grilled potato chips?
Quick Overview
If I had to sum it up, making grilled potato chips is as simple as slicing potatoes thinly, tossing them in a little oil and seasonings, and grilling until crispy. I like to keep the slices super thin—about 1/16 inch—so they crisp up nicely and cook fast. You don’t need to pre-cook or parboil; just straight onto the grill. The key is to watch them closely; they burn quickly, but with a little practice, you’ll master the perfect, golden chips with smoky edges. The trick is flipping them halfway through and removing them once they turn a beautiful amber color. That’s when you’ll get that satisfying crunch and flavor. And honestly, you can flavor these in endless ways—paprika, garlic powder, even a sprinkle of Parmesan once they’re off the grill. The entire process takes about 20 minutes from start to finish, making it perfect for spontaneous snack attacks or last-minute side dishes.
Ingredients
For the Main Chips:
– 3 large potatoes (Russet or Yukon Gold are great choices)
– 2-3 tablespoons olive oil or vegetable oil
– Salt, to taste
– Optional seasonings: smoked paprika, garlic powder, black pepper, cayenne for heat
For the Optional Flavor Boost:
– Grated Parmesan or pecorino
– Fresh herbs like rosemary or thyme
For the Glaze (if you want to add a finishing touch):
– Honey or balsamic glaze (a little drizzle adds a lovely sweet-savory note)
– A squeeze of lemon juice for brightness
Step-by-Step Instructions
Step 1: Preheat & Prep Pan
First off, get your grill heated to medium-high—around 375-400°F (190-200°C). While it’s warming up, wash your potatoes well. No need to peel unless you prefer them skinless; I like to keep the skin on for extra flavor and texture. Use a mandoline or a sharp knife to slice the potatoes as thin as possible—this part’s crucial for crispy chips. Lay the slices in a bowl of cold water for about 5 minutes to remove excess starch, which helps them crisp up better. Drain and pat dry with a clean towel or paper towels. A dry surface is key to getting that beautiful grill caramelization.
Step 2: Mix Dry Ingredients
In a small bowl, mix your seasonings—salt, paprika, garlic powder, whatever strikes your fancy. This blend will be sprinkled over the potatoes before grilling, so think about the flavor profile you want—spicy, smoky, or simple salty.
Step 3: Mix Wet Ingredients
In a larger bowl, toss the potato slices with the oil—just enough to lightly coat each piece. I find that a tablespoon or two does the trick. This helps them grill evenly and gets that nice crispy texture. Add in your seasoning mix and toss again, ensuring every slice gets a flavorful coat.
Step 4: Combine
Now, carefully lay the slices in a single layer on a grill basket or directly on the grill grates. If you’re worried about them falling through, a grill basket or a piece of foil with holes works beautifully. Keep your slices flat—overlapping is okay, but don’t crowd them, or they’ll steam instead of crisp up. Flip them every couple of minutes, watching closely to prevent burning.
Step 5: Prepare Filling (Optional)
If you want to take these up a notch, sprinkle a little grated Parmesan or fresh herbs over the chips during the last minute of grilling. For an extra punch, a tiny bit of cayenne will add heat without overpowering.
Step 6: Layer & Swirl
As you flip the slices, you can gently toss them in a small bowl with additional seasonings or oil if needed. Aim for even coverage—think of it as creating a little mosaic of flavors and textures. I love swirling them in different seasonings on the grill for a layered, complex flavor.
Step 7: Bake / Grill
They’ll take about 8-12 minutes depending on thickness and grill temperature. Keep a keen eye—they can go from perfect to burnt in seconds. When they turn a deep amber and feel crisp when you lift one with tongs, they’re ready. Don’t forget to rotate the grill tray or grates if you’re using one to ensure even cooking.
Step 8: Cool & Glaze
Transfer the chips to a wire rack or a plate lined with paper towels once off the grill—this lets any remaining steam escape and keeps them crispy. If you’re brushing them with glaze or adding a drizzle of honey, do it while they’re still warm so the flavors meld beautifully. A light brushing with balsamic or honey adds a lovely glossy finish and complex taste.
Step 9: Slice & Serve
Once cooled enough to handle, serve these chips in a big bowl, maybe with a sprinkle of extra sea salt or herbs. They’re best enjoyed the same day, but if you store them in an airtight container, they’ll retain their crispness for a few hours. Just beware—they’re so addictive, they usually don’t last long!
What to Serve It With
These grilled chips are basically the Swiss Army knife of snacks—they go with everything. For a summer barbecue, serve them alongside burgers or grilled chicken, with dips like hummus, guacamole, or a spicy salsa. They make a fantastic appetizer for casual gatherings—think cheese platters or a selection of pickles. I love serving a big bowl on movie nights too, especially when paired with a cold beer or homemade lemonade. When I’ve made them for brunch, I like to sprinkle some fresh herbs or a bit of crumbled feta on top—they look beautiful and taste even better. And for a sweet twist, a drizzle of honey or balsamic glaze makes an awesome finishing touch. Honestly, my family asks for these every time I fire up the grill—they’re kind of our summer secret weapon for satisfying crunchy cravings, and I always end up making extra because they’re just that good.
Top Tips for Perfecting Your Grilled Potato Chips
This recipe might seem straightforward, but a few little tips make all the difference. First, slice your potatoes uniformly—using a mandoline is a game-changer for even cooking and crispness. I’ve learned that removing excess moisture is crucial, so soaking the slices in cold water and then thoroughly drying them helps avoid sogginess. When tossing the slices with oil and seasonings, do it gently—overcrowding or overmixing can cause uneven coats. Trust me, I’ve over-oiled many batches, only to have them be greasy rather than crispy. For that perfect smokiness, don’t skip the preheating step and keep a close eye as they grill; they burn quickly! If you want to experiment with flavor, try using smoked paprika for a truly BBQ taste or a pinch of cumin for earthy warmth. I’ve also tested swapping out regular oil for coconut or avocado oil—both work beautifully and add their own subtle flavor. For a different look, sprinkle some chopped chives or scallions right after grilling. The key to success is patience and attention—these chips reward you with a flavor that’s worth every minute of the effort.
Storing and Reheating Tips
Leftover grilled potato chips? They actually stay pretty good if stored properly. Once cooled completely, place them in an airtight container or resealable bag. They’ll stay crispy at room temperature for about a day, but I find they’re best enjoyed within 4-6 hours for that fresh crunch—any longer, and they tend to soften. If you want to keep them longer, pop them into the fridge—just be aware that they might lose a little crispness, but a quick reheat on the grill or under the broiler for a minute or two can restore their crunch. Freezing isn’t really ideal because they tend to get soggy upon thawing, but if you must, pack them in a well-sealed bag, and reheat directly from frozen. As for the glaze, if you’ve brushed the chips with honey or balsamic, it’s best to add those just before serving—applying glaze too early might make them sticky or soggy. Overall: store in a dry place, reheat if needed, and enjoy the next day, knowing they’re still better than anything you’d find in a bag!
Frequently Asked Questions
Final Thoughts
If you haven’t tried grilling your potato chips yet, I honestly think you’re missing out on one of the best snacks ever. There’s something about that smoky flavor and the crackle of crispy edges that just can’t be beat. From casual backyard barbecues to quick weeknight cravings, these chips are my go-to for a surprisingly simple, flavor-packed treat. The best part? Once you master the basic technique, you can get creative with seasonings, toppings, and even different root vegetables. My family loves when I bring out the grill for these—they disappear faster than anything else I cook! So, give these a shot—you’ll love how easy and addictive they are. And hey, be sure to leave a comment or share your own variations; I’d love to hear how yours turn out. Happy grilling, and enjoy every crunchy, smoky bite!
Grilled Potato Chips with Herb Dip
Ingredients
Method
- Preheat the grill to medium-high heat. Wash and slice the potatoes thinly into rounds approximately 1/8 inch thick.
- In a small bowl, mix olive oil, kosher salt, black pepper, and paprika. Toss the potato slices in the mixture until evenly coated.
- Arrange the coated potato slices on the grill grates in a single layer. Grill for about 3-4 minutes per side until golden brown and crispy.
- Remove the grilled potato chips from the grill and let cool slightly before serving. Serve with your choice of herb dip.